Vimar R14541 Handleiding
Vimar
Niet gecategoriseerd
R14541
Bekijk gratis de handleiding van Vimar R14541 (6 pagina’s), behorend tot de categorie Niet gecategoriseerd. Deze gids werd als nuttig beoordeeld door 32 mensen en kreeg gemiddeld 4.6 sterren uit 16.5 reviews. Heb je een vraag over Vimar R14541 of wil je andere gebruikers van dit product iets vragen? Stel een vraag
Pagina 1/6

Viale Vicenza, 14
36063 Marostica VI - Italy
www.vimar.com
49400478A0 03 1804
Eikon
20541
Arké
19541
Idea
16981
Plana
14541
Apparecchio di comando a tre pulsanti basculanti, da comple-
tare con tasti intercambiabili 1 o 2 moduli - 3 moduli.
Dispositivo da utilizzare come tre pulsanti singoli oppure uno singolo e uno doppio
a seconda del tasto considerato; il pulsante può essere premuto sia nella parte
superiore che nella parte inferiore.
CARATTERISTICHE.
• Tensione nominale di alimentazione: BUS 29 V
• Assorbimento: 16 mA
• Tasto: 1 doppio e 1 singolo oppure 3 singoli
• Morsetti: bus TP
• Funzioni realizzabili:
- interruttore ON/OFF
- comando per regolatore
- comando per tapparelle
- attivazione di 2 scenari.
• Compatibile con:
- centrali By-me 8 moduli incasso e parete ver. 2.0 e successive
- centrali By-me 2 moduli ver. 2.0 e successive
CONFIGURAZIONE.
PER LE OPERAZIONI DI INSTALLAZIONE E CONFIGURAZIONE, VEDERE IL
MANUALE ISTRUZIONI DEL SISTEMA By-me ALLEGATO ALLA CENTRALE
DI CONTROLLO.
L’operazione di configurazione deve essere effettuata con il dispositivo privo di
tasto per poter premere il pulsante di configurazione.
Il dispositivo può essere utilizzato come tre pulsanti singoli oppure un pulsante
doppio e uno singolo.
• Blocchi funzionali: 3, ogni blocco funzionale può appartenere al massimo a 4
gruppi.
•
Selezione del blocco funzionale (configurazione): durante la creazione dei gruppi,
quando la centrale richiede di premere il pulsante dei dispositivi:
- premere il pulsante di configurazione;
- se il dispositivo deve essere configurato come tre pulsanti singoli premere, entro
3
s, il pulsante destro per selezionare il blocco funzionale destro, il pulsante
centrale per selezionare il blocco funzionale al centro e il pulsante sinistro per
selezionare il blocco funzionale sinistro;
-
se il dispositivo deve essere configurato come un pulsante doppio e uno singolo,
si effettua:
• la configurazione del blocco funzionale sinistro nel caso in cui si desideri ottenere
un pulsante da due moduli nella parte sinistra del dispostivo (tasto sinistro + tasto
centrale) e poi si configura il blocco funzionale destro (tasto destro);
•
la configurazione del blocco funzionale centrale nel caso in cui si desideri ottenere
un pulsante da due moduli nella parte destra del dispostivo (tasto centrale + tasto-
destro) e quindi si configura il blocco funzionale sinistro (tasto sinistro).
- il led rosso si accende e la centrale configura il blocco funzionale; al termine
dell’operazione il led rosso si spegne.
PARAMETRI.
• Per ogni blocco funzionale è possibile impostare la modalità di funzionamento:
- pulsante ON/OFF;
- pulsante controllo regolatore;
- pulsante controllo tapparelle;
- comando scenario.
• Funzionamento come pulsante controllo regolatore:
- premendo il tasto nella parte superiore per meno di 0,5 s il carico si accende
regolato al punto memorizzato;
- premendo il tasto nella parte superiore per più di 0,5 s la luminosità aumenta fino
al rilascio;
- premendo il tasto nella parte inferiore per più di 0,5 s la luminosità decresce fino
al rilascio;
- premendo il tasto nella parte inferiore per meno di 0,5 s il carico si spegne.
• Funzionamento come pulsante per controllo tapparelle:
- premendo il tasto nella parte superiore per più di 0,5 s la tapparella si apre com-
pletamente; l’arresto avviene ad apertura completata oppure per pressione breve
(sia nella parte superiore che nella parte inferiore);
- premendo il tasto nella parte inferiore per più di 0,5 s la tapparella si chiude com-
pletamente; l’arresto avviene a chiusura completata oppure per pressione breve
(sia nella parte superiore che nella parte inferiore).
- utilizzare esclusivamente tapparelle con finecorsa incorporato.
• Parametri led:
- led disabilitato;
- led con funzionamento normale (acceso se l’attuatore associato è in ON);
- led con funzionamento invertito;
- led sempre acceso per individuazione al buio;
- led centrale con funzionamento normale (tasto doppio);
- led centrale con funzionamento invertito (tasto doppio);
- led centrale sempre acceso per individuazione al buio (tasto doppio).
Nel caso il blocco funzionale appartenga a più di un gruppo, i parametri “led con
funzionamento normale” e “led con funzionamento invertito” non sono disponibili.
In questi casi il comando è confermato da un cambio di stato del led per 3 s.
Nel caso si utilizzi un tasto doppio, è necessario settare il comportamento del led
centrale per renderne visibile lo stato. In questo caso configurare il pulsante sini-
stro se il tasto doppio si trova nella parte sinistra del dispositivo oppure il pulsante
centrale se il tasto doppio si trova nella parte destra.
• Parametri di default:
- i tasti sono impostati come pulsanti ON/OFF e led in funzionamento normale.
REGOLE DI INSTALLAZIONE.
L’installazione deve essere effettuata da personale qualificato con l’osservanza
delle disposizioni regolanti l’installazione del materiale elettrico in vigore nel paese
dove i prodotti sono installati.
CONFORMITÀ NORMATIVA.
Direttiva EMC
Norma EN 50428.
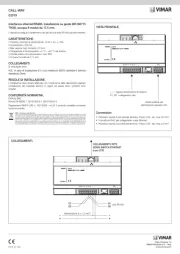
B
A
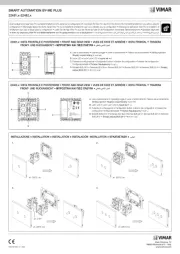
VISTA FRONTALE E POSTERIORE.
Legenda:
A: Pulsante di configurazione
B: Led
C: Morsetti bus TP
C
RAEE - Informazione agli utilizzatori
Il simbolo del cassonetto barrato riportato sull’apparecchiatura o sulla sua confezione
indica che il prodotto alla fine della propria vita utile deve essere raccolto separatamente
dagli altri rifiuti. L’utente dovrà, pertanto, conferire l’apparecchiatura giunta a fine vita agli
idonei centri comunali di raccolta differenziata dei rifiuti elettrotecnici ed elettronici. In al-
ternativa alla gestione autonoma, è possibile consegnare gratuitamente l’apparecchiatura
che si desidera smaltire al distributore, al momento dell’acquisto di una nuova apparec-
chiatura di tipo equivalente. Presso i distributori di prodotti elettronici con superficie di
vendita di almeno 400 m
2 è inoltre possibile consegnare gratuitamente, senza obbligo
di acquisto, i prodotti elettronici da smaltire con dimensioni inferiori a 25 cm. L’adeguata
raccolta differenziata per l’avvio successivo dell’apparecchiatura dismessa al riciclaggio,
al trattamento e allo smaltimento ambientalmente compatibile contribuisce ad evitare
possibili effetti negativi sull’ambiente e sulla salute e favorisce il reimpiego e/o riciclo dei
materiali di cui è composta l’apparecchiatura.

Viale Vicenza, 14
36063 Marostica VI - Italy
www.vimar.com
49400478A0 03 1804
Eikon
20541
Arké
19541
Idea
16981
Plana
14541
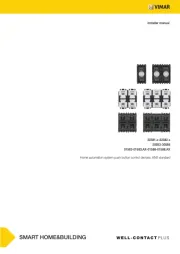
Three rocker push buttons, to complete with 1 or 2-module
buttons - 3 modules.
Device to be used as three single buttons or one single and one double, depend-
ing on the button.
CHARACTERISTICS.
• Rated supply voltage: BUS 29 V
• Input: 16 mA
• Button: 1 double, 1 single or 3 single ones.
• Terminals: TP BUS
• Possible functions:
- ON/OFF switch
- dimmer control
- roller shutter control
- activation of 2 scenarios.
• Consist with:
- By-me flush and surface mounting control units, rel.2.0 and next
- By-me 2-module control units, rel. 2.0 and next
CONFIGURATION.
FOR THE OPERATIONS OF INSTALLATION AND CONFIGURATION, SEE THE
By-me SYSTEM INSTRUCTIONS MANUAL ATTACHED TO THE CONTROL UNIT.
Configuration must be done with the device without the button to be able to
press the central configuration button.
The device can be used as three single buttons or one double push-button and
a single one.
• Functional blocks: 3, each functional block can belong to at most 4 groups.
• Selecting the functional block (configuration): during group creation, when the
control unit requires pressing the device button:
- press the configuration button;
- if the device must be configured as three single push-buttons, within 3 s, press
the right-hand button to select the right functional unit, the middle button to
select the middle functional unit or the left-hand button to select the left func-
tional unit; the red LED illuminates.
If none of the three buttons is pressed within approximately 3 s the red LED will
light up; in this case the selected functional unit is the third one, the one related
to the actuator.
- if the device must be configured used as a double and a single push-button,
proceed as follows:
• configure the left functional unit in the case in which you want a push-button
with two modules on the left of the device (left button + middle button) and then
configure the right functional unit (right button);
• configure the middle functional unit in the case in which you want a push-but-
ton with two modules on the right of the device (middle button + right button)
and then configure the left functional unit (left button).
- the red LED will come on and the control unit will configure the functional block;
at the end of the operation the red LED will go out.
PARAMETERS.
• For each functional block it is possible to set the operating mode:
- ON/OFF button;
- dimmer control button;
- roller shutter control button;
- scenario control.
• Operation as a dimmer control button:
- pressing the key at the top for less than 0.5 s lights up the load with the dim-
ming at the saved point;
- pressing the key at the top for more than 0.5 s increases brightness until it is
released;
- pressing the key at the bottom for more than 0.5 s decreases brightness until it
is released;
- pressing the key at the bottom for less than 0.5 s switches off the load.
• Operation as a roller shutter control button:
- pressing the key at the top for more than 0.5 s opens the shutter completely; it
stops when fully open or when briefly pressing the key (either at the top or bottom);
- pressing the key at the bottom for more than 0.5 s closes the shutter com-
pletely; it stops when fully closed or when briefly pressing the key (either at the
top or bottom);
- use only roller shutters with a built-in limit switch.
• LED parameters:
- LED off;
- LED with normal operation (on if the associated actuator is ON);
- LED with reverse operation;
- LED always on for location in the dark;
- central LED with normal operation (Double button);
- central LED with reverse operation (Double button);
- central LED always on for location in the dark (Double button).
If the functional block belongs to more than one group, the “LED with normal
operation” and “LED with reverse operation” parameters are not available. In
these cases the control is confirmed by a LED status change for 3 s.
If a double key is used, it is necessary to set the central LED behaviour to make
the status visible. In this case, configure the left button if the double button is
on the left of the device or the middle button if the double button is on the right.
• Default parameters: the buttons are set as ON/OFF push-buttons (step step) and
LED in normal operation.
INSTALLATION RULES.
Installation should be carried out by qualified personnel in compliance with the
current regulations regarding the installation of electrical equipment in the country
where the products are installed.
CONFORMITY.
EMC directive
Standard EN 50428.
Caption:
A: Configuration button
B: LED
C: Terminals TP BUS
B
A
FRONT AND BACK VIEW.
C
WEEE - Information for users
If the crossed-out bin symbol appears on the equipment or packaging, this means the
product must not be included with other general waste at the end of its working life. The
user must take the worn product to a sorted waste center, or return it to the retailer when
purchasing a new one. Products for disposal can be consigned free of charge (without
any new purchase obligation) to retailers with a sales area of at least 400 m
2, if they
measure less than 25 cm. An efficient sorted waste collection for the environmentally
friendly disposal of the used device, or its subsequent recycling, helps avoid the potential
negative effects on the environment and people’s health, and encourages the re-use and/
or recycling of the construction materials.

Viale Vicenza, 14
36063 Marostica VI - Italy
www.vimar.com
49400478A0 03 1804
Eikon
20541
Arké
19541
Idea
16981
Plana
14541
Tres poussoirs basculants à compléter avec touches inter-
changeables 1 ou 2 modules - 3 modules.
Dispositif à utiliser en tant que 3 boutons simples ou un simple et un double selon
le bouton considéré.
CARACTÉRISTIQUES.
• Tension nominale d’alimentation : BUS 29 V
• Absorption : 16 mA
• Touche : 1 double, 1 simple ou 3 simples
• Bornes : bus TP
• Fonctions réalisables :
- interrupteur ON/OFF
- commande pour régulateur
- commande pour stores
- activation de 2 situations.
• Compatible avec:
- centrales By-me 8 modules d’encastrement et pour pose en saillie, vers.
2.0 et suivantes.
- centrales By-me 2 modules, vers. 2.0 et suivantes.
CONFIGURATION.
POUR LES OPÉRATIONS D’INSTALLATION ET DE CONFIGURATION, VOIR LE
MANUEL D’INSTRUCTIONS DU SYSTÈME By-me ANNEXÉ À LA CENTRALE.
L’opération de configuration doit être effectuée avec le dispositif exempt de
touche pour pouvoir appuyer sur le bouton central de configuration.
Le dispositif peut être utilisé en tant que 3 boutons simples ou un bouton double
et un simple.
• Blocs fonctionnels : 3, chaque bloc peut appartenir au maximum à 4 groupes.
• Sélection du bloc fonctionnel (configuration) : pendant la création des groupes,
lorsque la centrale demande d’appuyer sur le bouton des dispositifs:
- appuyer sur le bouton de configuration ;
- si le dispositif doit être configuré comme 3 boutons simples appuyer dans les 3
sec. le boutondroite pour sélectionner le bloc fonctions droit, le bouton central
pour sélectionner le bloc fonctions central et le bouton gauche pour sélection-
ner le bloc fonctions gauche; la led rouge s’allume.
Si aucune des 3touches n’est appuyée dans les 3 s environ, la led rouge s’al-
lume ; dans ce cas, le bloc fonctionnel sélectionné est le troisième, celui relatif
à l’actionneur.
-
si le dispositif doit être configuré comme un bouton double et un simple, on effectue :
• la configuration du bloc fonctions gauche pour obtenir un bouton 2 modules à
gauche du dispositif (touche gauche + touche centrale) et on configure le bloc
fonctions droit (touche droite);
• la configuration du bloc fonctions central pour obtenir un bouton 2 modules à
droite du dispositif (touche centrale + touche droite) et pour configurer le bloc
fonctions gauche (touche gauche).
- la led rouge s’allume et la centrale configure le bloc fonctionnel ; à la fin de
l’opération, la led rouge s’éteint.
PARAMÈTRES.
•
Pour chaque bloc fonctionnel, il est possible d’introduire le mode de fonctionnement:
- bouton ON/OFF ;
- bouton contrôle variateur ;
- bouton contrôle stores ;
- commande scénario.
• Fonctionnement comme bouton contrôle variateur :
- en appuyant sur la touche dans la partie supérieure pendant moins de 0,5 s, la
charge s’allume réglée au point mémorisé ;
- en appuyant sur la touche dans la partie supérieure pendant plus de 0,5 s, la
luminosité augmente jusqu’au relâchement ;
- en appuyant sur la touche dans la partie inférieure pendant plus de 0,5 s, la
luminosité diminue jusqu’au relâchement ;
- en appuyant sur la touche dans la partie inférieure pendant moins de 0,5 s, la
charge s’éteint.
• Fonctionnement comme bouton pour contrôle stores :
- en appuyant sur la touche dans la partie supérieure pendant plus de 0,5 s, le
store s’ouvre complètement ; l’arrêt a lieu à ouverture complétée ou bien par
pression brève (tant dans la partie supérieure que dans la partie inférieure) ;
- en appuyant sur la touche dans la partie inférieure pendant plus de 0,5 s, le store
se ferme complètement ; l’arrêt a lieu à fermeture complétée ou bien par pres-
sion brève (tant dans la partie supérieure que dans la partie inférieure) ;
- utiliser exclusivement des stores avec fin de course incorporé.
• Paramètres led :
- led invalidée ;
- led avec fonctionnement normal (allumée si l’actionneur associé est sur ON) ;
- led avec fonctionnement inversé ;
- led toujours allumée pour individualisation dans le noir ;
- led centrale avec fonctionnement normal (Touche double);
- led centrale avec fonctionnement inversé (Touche double);
- led centrale toujours allumée pour individualisation dans le noir.
Lorsque le bloc fonctionnel appartient à plus d’un groupe, les paramètres “led
avec fonctionnement normal” et “led avec fonctionnement inversé” ne sont pas
disponibles. Dans ces cas, la commande est confirmée par un changement
d’état de la led pendant 3 s.
Si l’on utilise une touche double, il est nécessaire de définir le comportement de
la led centrale pour en rendre l’état visible. Dans ce cas configurer le bouton gau-
che si la touche double se trouve dans la partie gauche du dispositif ou le bouton
central si la touche double se trouve dans la partie droite.
• Paramètres par défaut: les touches sont configurées comme boutons ON/OFF (par
pas) et led en fonctionnement normal.
RÈGLES D’INSTALLATION.
L’installation doit être confiée à des personnel qualifiés et exécutée conformément
aux dispositions qui régissent l’installation du matériel électrique en vigueur dans le
pays concerné.
CONFORMITÉ AUX NORMES.
Directive EMC
Norme EN 50428.
B
A
C
VUE FRONTALE ARRIÈRE. ET
Légende:
A: Bouton de configuration
B: LED
C: Bornes bus TP
DEEE - Informations pour les utilisateurs
Le symbole du caisson barré, là où il est reporté sur l’appareil ou l’emballage, indique
que le produit en fin de vie doit être collecté séparément des autres déchets. Au terme
de la durée de vie du produit, l’utilisateur devra se charger de le remettre à un centre de
collecte séparée ou bien au revendeur lors de l’achat d’un nouveau produit. Il est possible
de remettre gratuitement, sans obligation d’achat, les produits à éliminer de dimensions
inférieures à 25 cm aux revendeurs dont la surface de vente est d’au moins 400 m
2. La
collecte séparée appropriée pour l’envoi successif de l’appareil en fin de vie au recyclage,
au traitement et à l’élimination dans le respect de l’environnement contribue à éviter les
effets négatifs sur l’environnement et sur la santé et favorise le réemploi et/ou le recyclage
des matériaux dont l’appareil est composé.
Product specificaties
| Merk: | Vimar |
| Categorie: | Niet gecategoriseerd |
| Model: | R14541 |
Heb je hulp nodig?
Als je hulp nodig hebt met Vimar R14541 stel dan hieronder een vraag en andere gebruikers zullen je antwoorden
Handleiding Niet gecategoriseerd Vimar
2 September 2025
26 Augustus 2025
26 Augustus 2025
26 Augustus 2025
14 Augustus 2025
5 Juli 2025
5 Juli 2025
5 Juli 2025

5 Juli 2025
24 Mei 2025
Handleiding Niet gecategoriseerd
- DBX
- Fulltone
- FORS
- Vileda
- Harman Kardon
- Crunch
- Vaillant
- Debel
- Swisson
- CRB Cleaning Systems
- Kernau
- Sencor
- Amaran
- Capkold
- Sloan
Nieuwste handleidingen voor Niet gecategoriseerd

14 September 2025

14 September 2025

13 September 2025

13 September 2025

13 September 2025

13 September 2025

13 September 2025

13 September 2025

13 September 2025

13 September 2025