Ursus Trotter UT-KERAMIK TOP Handleiding
Ursus Trotter
Strijkijzer
UT-KERAMIK TOP
Bekijk gratis de handleiding van Ursus Trotter UT-KERAMIK TOP (3 pagina’s), behorend tot de categorie Strijkijzer. Deze gids werd als nuttig beoordeeld door 50 mensen en kreeg gemiddeld 4.5 sterren uit 25.5 reviews. Heb je een vraag over Ursus Trotter UT-KERAMIK TOP of wil je andere gebruikers van dit product iets vragen? Stel een vraag
Pagina 1/3

CORDLESS
DRILL
DRIVER
12V Lithium Ion
ORIGINAL INSTRUCTIONS
CDL-1200U
WHAT’S IN THE BOX
Cordless Drill Driver
MAINTENANCE
DESCRIPTION OF SYMBOLS
TROUBLESHOOTING
WARNING! Wear ear protectors when impact drilling Exposure to noise
can cause hearing loss.
Use auxiliary handle(s), if supplied with the tool. Loss of control can cause
personal injury.
Hold power tool by insulated gripping surfaces, when performing an operation
where the cutting accessory may contact hidden wiring or its own cord. Cutting
accessory contacting a “live” wire may make exposed metal parts of the power tool
“live” and could give the operator an electric shock.
Before drilling into walls, ceilings etc, ensure that there are no concealed power
cables or pipes in the cavity.
WARNING! Some dust created by power sanding, sawing, grinding,
drilling and other construction activities contain chemicals known to cause
cancer, birth defects or other reproductive harm. Some examples of these
chemicals are:
• Lead from lead-based paints
• Crystalline silica from bricks and cement and other masonry products
• Arsenic and chromium from chemically treated timber
Your risk from exposure to these chemicals varies, depending on how often you
do this type of work. To reduce your exposure to these chemicals: work in a well
ventilated area and work with approved safety equipment, such as dust masks that
are specially designed to lter out microscopic particles.
1. When not in use, the drill should be stored in a dry, frost free
location, keep out of children’s reach.
2. Keep ventilation slots of the drill clean at all times and prevent
anything from entering.
3. If the housing of the drill requires cleaning, do not use solvents.
Use of a cloth only is recommended.
4. Blow out the ventilation slots with compressed air periodically .
Note: Ozito Industries will not be responsible for any damage or
injuries caused by repair of the drill by an unauthorised person or by
mishandling.
SPARE PARTS
ozito-diy.co.uk
DRILL DRIVER SAFETY WARNINGS
GENERAL POWER TOOL SAFETY WARNINGS
ELECTRICAL SAFETY
BATTERY AND CHARGER SAFETY WARNINGS
THIS MANUAL CONTAINS IMPORTANT SAFETY AND OPERATING INSTRUCTIONS FOR YOUR
BATTERY CHARGER.
1. Before using the charger read all instructions and cautionary markings on the charger, battery
pack and the product using the battery pack.
2. This charger is not intended for any uses other than charging rechargeable batteries. Any other
use may result in risk of re, electric shock or electrocution.
3. Do not place any object on top of the charger or place the charger on a soft surface that may
result in excessive internal heat. Place the charger in a position away from any heat source.
4. To reduce risk of damage to the electric plug and cord, pull by the plug rather than the cord when
disconnecting the charger.
5. Make sure the cord is located so that it will not be stepped on, tripped over, or otherwise sub-
jected to damage or stress.
6. An extension cord should not be used unless absolutely necessary. Use of an improper extension
cord could result in the risk of re, electric shock or electrocution.
7. Do not operate the charger if it has received a sharp blow, been dropped or otherwise damaged
in any way. Have it checked by an electrician or power tool repairer.
8. Do not disassemble charger. Take it to an electrician or power tool repairer when service or
repair is required. Incorrect reassembly may result in a risk of electric shock, electrocution or re.
9. To reduce risk of electric shock, unplug the charger from the outlet before attempting any clean-
ing. Removing the battery pack will not reduce this risk.
10. Never attempt to connect 2 chargers together.
11. DO NOT store or use the tool and battery pack in locations where the temperature may reach or
exceed 40ºC (such as inside sheds or metal buildings in summer).
12. The charger is designed to operate on standard household electrical power (240 volts). Do not
attempt to use it on any other voltage!
13. The battery pack is not fully charged out of the carton. First read the safety instructions and then
follow the charging notes and procedures.
14. The longest life and best performance can be obtained if the battery pack is charged when the
air temperature is between 18 - 24ºC. Do not charge the battery pack in an air temperature
below 10ºC or above 40ºC. This is important and will prevent damage to the battery pack.
15. Do not incinerate the battery pack even if it is seriously damaged or is completely worn out. The
battery can explode in a re.
16. Never attempt to open the battery pack for any reason. If the plastic housing of the battery pack
breaks or cracks, immediately discontinue use and do not recharge.
17. During charging, the battery must be placed in a well ventilated area.
LED lights do not illuminate when charging
Check the charging adaptor is securely plugged into the wall out let.
Check the battery is rmly connected to the charging cradle.
Check that the charging jack is securely connected to the charging cradle.
Variable speed trigger is locked
Ensure that the forward / reverse lever is in the correct position; pressed
left for forwards direction, pressed right for backwards direction. If it is in
between the two settings the variable speed trigger will be locked.
The drill is stripping the screw head
Ensure you are not applying to much force to the screw. Hold the drill
more lightly against the screw and lower the torque setting.
Drill has cut out during use
It is likely that the battery’s thermal voltage protection has been activated.
This can happen when the drill has been used for extended periods or
worked hard with large drill bits or accessories.
Place the battery on the charging cradle for 2-3 hours. It will need this
time to cool down and for the protection circuits to be reset.
Sparking visible through the housing air vents
A small amount of sparking may be visible through the housing vents.
This is normal and does not indicate a problem.
Charging Adaptor
SPECIFICATIONS
Voltage: 12V
Chuck Size: 10mm Keyless
No Load Speed: 0-700/min
Torque Setting: 17
Max. Torque: 12Nm
Battery: 1.5Ah Li-ion
Charge Time: 3-5 Hours
Weight: 0.94 kg
WARNING! When using mains-powered tools, basic safety precautions, including the
following, should always be followed to reduce risk of re, electric shock, personal injury and
material damage.
Read the whole manual carefully and make sure you know how to switch the tool off in an emergency, before
operating the tool.
Save these instructions and other documents supplied with this tool for future reference.
The manufacturer cannot accept any liability for damage or accidents which arise due to a failure to follow these
instructions and the safety information.
Before you connect the charger to the mains supply make sure that the data on the rating plate are identical to
the mains data.
This tools charger is double insulated therefore no earth wire is required.
The power supply for this product should be protected by a residual current device (rated at 30mA or less). A
residual current device reduces the risk of electric shock.
If the supply cord is damaged, it must be replaced by the manufacturer, its service agent or similarly qualied
persons in order to avoid a hazard.
Note: Double insulation does not take the place of normal safety precautions when operating this tool. The
insulation system is for added protection against injury resulting from a possible electrical insulation failure
within the tool.
Using an Extension Lead
Always use an approved extension lead suitable for the power input of this tool. Before use, inspect the
extension lead for signs of damage, wear and ageing. Replace the extension lead if damaged or defective.
When using an extension lead on a reel, always unwind the lead completely. Use of an extension lead not
suitable for the power input of the tool or which is damaged or defective may result in a risk of re and electric
shock.
This appliance is not intended for use by young or inrm persons
unless supervised by a responsible person to ensure that they can use the
appliance safely. Young children should be supervised to ensure that they do not
play with the appliance.
WARNING! Read all safety warnings and all instructions. Failure to follow the warnings and
instructions may result in electric shock, re and/or serious injury.
Save all warnings and instructions for future reference. The term “power tool” in the
warnings refers to your mains-operated (corded) power tool or battery-operated (cordless) power tool.
1. Work area safety
a. Keep work area clean and well lit. Cluttered or dark areas invite accidents.
b. Do not operate power tools in explosive atmospheres, such as in the presence of ammable
liquids, gases or dust. Power tools create sparks which may ignite the dust or fumes.
c. Keep children and bystanders away while operating a power tool. Distractions can cause you to lose
control.
2. Electrical safety
a. Power tool plugs must match the outlet. Never modify the plug in any way.
Do not use any adapter plugs with earthed (grounded) power tools. Unmodied plugs and matching
outlets will reduce risk of electric shock.
b. Avoid body contact with earthed or grounded surfaces, such as pipes, radiators, ranges and
refrigerators. There is an increased risk of electric shock if your body is earthed or grounded.
c. Do not expose power tools to rain or wet conditions. Water entering a power tool will increase the
risk of electric shock.
d. Do not abuse the cord. Never use the cord for carrying, pulling or unplugging the power tool.
Keep cord away from heat, oil, sharp edges or moving parts. Damaged or entangled cords increase
the risk of electric shock.
e. When operating a power tool outdoors, use an extension cord suitable for outdoor use. Use of a
cord suitable for outdoor use reduces the risk of electric shock.
f. If operating a power tool in a damp location is unavoidable, use a residual current device (RCD)
protected supply. Use of an RCD reduces the risk of electric shock.
3. Personal safety
a. Stay alert, watch what you are doing and use common sense when operating a power tool. Do
not use a power tool while you are tired or under the inuence of drugs, alcohol or medication. A
moment of inattention while operating power tools may result in serious personal injury.
b. Use personal protective equipment. Always wear eye protection. Protective equipment such as dust
mask, non-skid safety shoes, hard hat, or hearing protection used for appropriate conditions will reduce
personal injuries.
c. Prevent unintentional starting. Ensure the switch is in the off-position before connecting to power
source and/or battery pack, picking up or carrying the tool. Carrying power tools with your nger on
the switch or energising power tools that have the switch on invites accidents.
d. Remove any adjusting key or wrench before turning the power tool on. A wrench or a key left
attached to a rotating part of the power tool may result in personal injury.
e. Do not overreach. Keep proper footing and balance at all times. This enables better control of the
power tool in unexpected situations.
f. Dress properly. Do not wear loose clothing or jewellery. Keep your hair, clothing and gloves away
from moving parts. Loose clothes, jewellery or long hair can be caught in moving parts.
g. If devices are provided for the connection of dust extraction and collection facilities, ensure these
are connected and properly used. Use of dust collection can reduce dust-related hazards.
4. Power tool use and care
a. Do not force the power tool. Use the correct power tool for your application. The correct power tool
will do the job better and safer at the rate for which it was designed.
b. Do not use the power tool if the switch does not turn it on and off. Any power tool that cannot be
controlled with the switch is dangerous and must be repaired.
c. Disconnect the plug from the power source and/or the battery pack from the power tool before
making any adjustments, changing accessories, or storing power tools. Such preventive safety
measures reduce the risk of starting the power tool accidentally.
d. Store idle power tools out of the reach of children and do not allow persons unfamiliar with the
power tool or these instructions to operate the power tool. Power tools are dangerous in the hands
of untrained users.
e. Maintain power tools. Check for misalignment or binding of moving parts, breakage of parts and
any other condition that may affect the power tool’s operation. If damaged, have the power tool
repaired before use. Many accidents are caused by poorly maintained power tools.
f. Keep cutting tools sharp and clean. Properly maintained cutting tools with sharp cutting edges are less
likely to bind and are easier to control.
g. Use the power tool, accessories and tool bits etc. in accordance with these instructions, taking
into account the working conditions and the work to be performed. Use of the power tool for
operations different from those intended could result in a hazardous situation.
5. Battery tool use and care
a. Recharge only with the charger specied by the manufacturer. A charger that is suitable for one
type of battery pack may create a risk of re when used with another battery pack.
b. Use power tools only with specically designated battery packs. Use of any other battery packs may
create a risk of injury and re.
c. When battery pack is not in use, keep it away from other metal objects, like paper clips, coins,
keys, nails, screws or other small metal objects, that can make a connection from one terminal to
another. Shorting the battery terminals together may cause burns or a re.
d. Under abusive conditions, liquid may be ejected from the battery; avoid contact. If contact
accidentally occurs, ush with water. If liquid contacts eyes, additionally seek medical help. Liquid
ejected from the battery may cause irritation or burns.
6. Service
a. Have your power tool serviced by a qualied repair person using only identical replacement parts.
This will ensure that the safety of the power tool is maintained.
WARRANTY
OZITO UK Unit 9 Stadium Court, Wirral International Business Park, Plantation Road, Bromborough, Wirral, CH62 3QG 0716
All of our products undergo strict quality checks to ensure that they reach
you in perfect condition. In the unlikely event that your device develops a
fault, please contact our service department at the address shown on this
guarantee card. You can also contact us by telephone using the customer
service number shown. Please note the following terms under which
guarantee claims can be made:
1. These warranty terms regulate additional warranty services, which the
manufacturer mentioned below promises to buyers of its new products
in addition to their statutory guarantee claims are not affected by this
guarantee. Our guarantee is free of charge to you.
2. The warranty services only covers defects due to material or
manufacturing faults on a product which you have bought from the
manufacturer mentioned below are limited to either the rectication of said
defects on the product or the replacement of the product, whichever we
prefer.
Please note that our devices are not designed for use in commercial, trade
or professional applications. A guarantee contract will not be created if the
device has been used by commercial, trade or industrial business or has
been exposed to similar stresses during the guarantee period.
3. The following are not covered by our guarantee:
- Damage to the device caused by a failure to follow the assembly
instructions or due to incorrect installation, a failure to follow the operating
instructions (for example connecting it to an incorrect mains voltage or
current type) or a failure to follow the maintenance and safety instructions
or by exposing the device to abnormal environmental conditions or by lack
of care and maintenance.
- Damage to the device caused by abuse or incorrect use (for example
overloading the device or the use or unapproved tools or accessories),
ingress of foreign bodies into the device (such as sand, stones or dust,
transport damage), the use of force or damage caused by external forces
(for example by dropping it).
- Damage to the device or parts of the device caused by normal or natural
wear or tear or by normal use of the device.
4. Your Product is guaranteed for a period of 36 months from the original
date of purchase and is intended for DIY (Do It Yourself) use only. Lithium
Ion batteries and chargers are covered by a 12 month warranty. Warranty
excludes consumable parts. Guarantee claims should be submitted
before the end of the guarantee period within two weeks of the defect
being noticed. No guarantee claims will be accepted after the end of the
guarantee period. The original guarantee period remains applicable to the
device even if repairs are carried out or parts are replaced. In such cases,
the work performed or parts tted will not result in an extension of the
guarantee period, and no new guarantee will become active for the work
performed or parts tted. This also applies if an on-site service is used.
IN ORDER TO MAKE A CLAIM UNDER THIS WARRANTY YOU MUST
RETURN THE PRODUCT TO THE PLACE OF PURCHASE WITH YOUR
REGISTER RECEIPT.
Please refer to the restrictions of this warranty concerning wearing parts,
consumables and missing parts as set out in the service information in
these operating instructions.
CUSTOMER SERVICE HELPLINE
GB: 0151 294 4488
IRL: 1850 882711
Ozito-diy.co.uk
Warning Read instruction manual
ø Diameter
mA Milliamperes
Recycle battery Do not put in the rubbish
Polarity
Do not incinerate Do not get battery wet
Thermal cut-out protection
Double insulated
/min Revolutions or
reciprocation per minute
Ah Amp hour
Indoor use only
Lithium Ion battery Do not use or store battery in
temperatures exceeding 50ºC
IPM Impacts per minute Nm Newton Meters
no No load speed
V Volts Hz Hertz
ac/~ Alternating current W Watts
Direct current
dc/
Spare parts can be ordered from the Special Orders Desk
at your local Bunnings Warehouse or Homebase store.
For further information, or any parts visit
www.ozito-diy.co.uk or contact Ozito Customer Service:
Great Britain: 0151 294 4488
Ireland: 1850 882711
E-mail: enquires@ozito-diy.co.uk

ONLINE MANUAL
Scan this QR Code with your
mobile device to take you to
the online manual.
5.
HELPFUL TIPS
When drilling hard, smooth surfaces, use a centre punch to mark
the desired hole location. This measure will prevent the drill bit from
slipping off centre as you start the hole.
When drilling metals, use light oil on the drill bit to keep it from
overheating. The oil will prolong the life of the bit and increase drilling
action.
3 Drill into the material until the surface reaches the start of the tape..
1 Measure along the drill bit to
indicate the desired depth
2 Wrap a small piece of masking
tape tightly around the drill bit.
Torque Settings
Drilling to a Preset Depth
2 If the clutch ratchets and
makes a clicking sound before
screw is ush, increase the
collar setting and continue
tightening.
Torque settings can alter the depth to which you can drive into a
surface. To determine the torque setting required to drive a screw
perfectly ush to the work surface, follow the below steps.
A simple way of achieving a hole at a desired depth is to use masking
tape.
1 Set the torque
collar to lowest
setting and tighten
the rst screw.
3 Repeat until you
reach the correct
setting/ screw
depth. Use this
setting for the
remaining screws.
4. DRILLING
Before starting to drill, perform a few simple checks.
3 Secure the material to be drilled in a vice or clamp to stop it turning
whilst drilling.
6 Move the drill bit into the workpiece.
1 Depress and release the
variable speed trigger to
ensure it is not locked on.
4 Hold the drill rmly and place
the bit at the point to be drilled.
2 Check the forward/reverse
lever is on desired setting.
5 Depress the variable speed
trigger to start the drill.
FWD
REV
Note: Do not force the drill or apply side pressure to elongate
the hole. Let the drill do all the work.
FWD
REV
3. CONTROLS
Forward/ Reverse Lever
Adjusting Torque
Variable Speed Trigger
1 For forward rotation, push the fwd/rev lever towards the left side of
the drill. For reverse rotation push fwd/rev lever to the right.
The indicator lights will illuminate to show direction of rotation
1 To start drilling squeeze the
variable speed trigger.
When drilling in forward rotation,
front arrow will illuminate.
2 To stop drilling release the
trigger.
When drilling in reverse direction,
back arrow will illuminate.
Note: The more the variable speed trigger is depressed, the faster the
drill bit will rotate.
Turn torque ring to the
desired setting. Refer to
Helpful Tips for determining
desired setting.
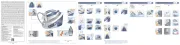
2. KEYLESS CHUCK
Installing a Drill Bit
Removing a Drill Bit
4 Tighten the chuck by turning
clockwise.
3 Insert the drill bit,
making sure it
is centred in the
chuck.
CAUTION: TO REDUCE THE RISK OF INJURY WE
RECOMMEND THE USE OF GLOVES WHEN HANDLING
DRILL BITS.
WARNING: ENSURE THE TOOL IS TURNED OFF AND
DISCONNECTED FROM THE POWER SUPPLY BEFORE
PERFORMING ANY OF THE FOLLOWING OPERATIONS.
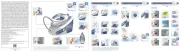
KNOW YOUR PRODUCT SETUP & PREPARATION
CDL-1200U
1. BATTERY
1 Keyless Chuck
2 Torque Adjustment Collar
3 LED Light
4 Variable Speed Trigger
5 Forward/ Reverse Lever
6 Charging Socket
7 Sure Grip Handle
8 Battery Indicator
CORDLESS DRILL DRIVER
OPERATION
9 Charging Adaptor 10 Charging Jack
ACCESSORIES
9 10
1 2 3 4 5 6 7 8
WARNING! THE POWER SUPPLY FOR THIS CHARGER
SHOULD BE PROTECTED BY A RESIDUAL CURRENT
DEVICE (RATED AT 30MA OR LESS). A RESIDUAL CURRENT
DEVICE REDUCES THE RISK OF ELECTRIC SHOCK.
Charging
1 Plug charging jack into the
charging socket on the drill.
2 The light will illuminate red
when properly connected and
charging.
3 The light will turn green when
the battery reaches full charge.
NOTE: It will take 4-5 charging cycles before the battery reaches
optimum charge and run time.
NOTE: The light will illuminate red
when the battery has a low level
of charge remaining.
1. Hold the back sleeve of
the chuck with one hand.
2. With the other hand, turn
the rst chuck sleeve anti-
clockwise.
5. Ensure the bit is rmly in
place.
1. Hold the back sleeve while
turning the front sleeve
clockwise to open chuck.
2. Remove the drill bit.
Product specificaties
| Merk: | Ursus Trotter |
| Categorie: | Strijkijzer |
| Model: | UT-KERAMIK TOP |
Heb je hulp nodig?
Als je hulp nodig hebt met Ursus Trotter UT-KERAMIK TOP stel dan hieronder een vraag en andere gebruikers zullen je antwoorden
Handleiding Strijkijzer Ursus Trotter

2 Juni 2023
Handleiding Strijkijzer
- Polti
- Fagor
- Siemens
- Electrolux
- Termozeta
- Nedis
- Lelit
- Oster
- Coline
- Maxim
- Steamfast
- Schneider
- Leifheit
- Alpina
- Jura
Nieuwste handleidingen voor Strijkijzer

5 Augustus 2025

5 Augustus 2025

5 Augustus 2025

5 Augustus 2025

5 Augustus 2025

5 Augustus 2025
5 Augustus 2025
4 Augustus 2025

4 Augustus 2025

4 Augustus 2025