Thermaltake Pacific V-RTX 3070 Plus Handleiding
Thermaltake
Hardwarekoeling
Pacific V-RTX 3070 Plus
Bekijk gratis de handleiding van Thermaltake Pacific V-RTX 3070 Plus (2 pagina’s), behorend tot de categorie Hardwarekoeling. Deze gids werd als nuttig beoordeeld door 26 mensen en kreeg gemiddeld 5.0 sterren uit 13.5 reviews. Heb je een vraag over Thermaltake Pacific V-RTX 3070 Plus of wil je andere gebruikers van dit product iets vragen? Stel een vraag
Pagina 1/2

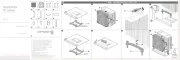
VGA Water Block
Pacific V-RTX 3070 Plus
Q
100
80
80
45 45
910
90
30
unit : m m
A B
C
C
D
E E F
A
B
C C
D
E
F
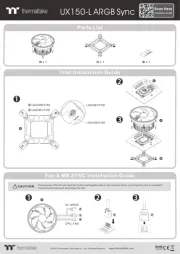
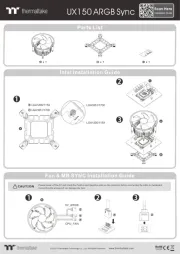
A x 1 B x 1
2
Remov e the p ower c onn ecto r
(Care ful ly det ach t he ori gin al stock cooler)
Remove the screws circled on the diagram. All heat sink assembly screws should be removed.
When installing the water block, carefully position the water block with the preinstalled standoffs on the graphics card.
Remove the screws circled on the diagram.
All heat sink assembly screws should be removed.
Cut the thermal pads to the dimensions listed and place them on the spots shown on the diagram.
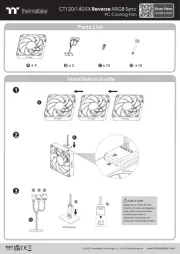
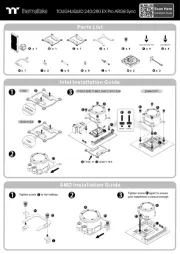
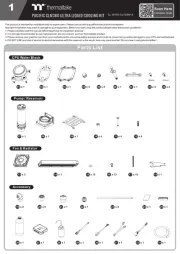
Parts List
7
Apply thermal compound
Clean the original thermal compoun d off the GPU die
Finish
1
65
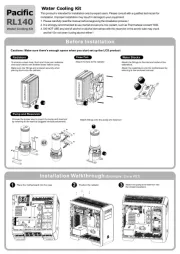
This product is intended for installation only by expert users. Please consult with a qualified technician for installation. Improper installation may result in damage to your equipment.
Before you start using this product please follow these basic guidelines:
1. Please carefully read through the instruction manual before beginning the installation process.
2. Please remove your graphics card from your motherboard to insure the safest process and in order to prevent any possible damages to your CPU and motherboard.
3. It is strongly recommended to use market proven pre-mix coolant, such as Thermaltake Coolant 1000.
4
3
8
C D E F H x 10 x 2 x4 x 6 x 2 I Q x 1 x 8
G x 2
I
E
C
D
G
F
BC

VGA Water Block
Pacific V-RTX 3070 Plus
Parts List
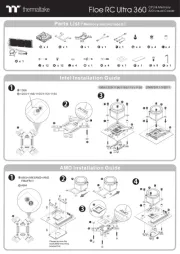
Installation Guide
9
11
12
13 14
10
J
N
Conne ct th e Wat erb lock o nto t he controller.
J
A
N
123
45
Set the DIP switch on the back side of the controller to assign the
number of the controller
J
NO .1
ON
1234
NO .3
ON
1234
NO .2
ON
1234
NO .4
ON
1234
NO .9
ON
1234
NO .1 1
ON
1234
NO .1 0
ON
1234
NO .1 2
ON
1234
NO .5
ON
1234
NO .7
ON
1234
NO .6
ON
1234
NO .8
ON
1234
NO .1 3
ON
1234
NO .1 5
ON
1234
NO .1 4
ON
1234
NO .1 6
ON
1234
K
K
Connect the controller cable onto the mainboard (USB 2.0 9 pin)
and controller.
If you want to connect two or mo re connectors, you can use the bridge
cable to connect the controllers.
M M
Connect the p ower cable to the 4pin Molex connecter and controller.
L L
J K L M Px 1 x 1 x 1 x 1 x 1N Ox 1 x 1
Controller Power Cable VelcroController Cable Bridge Cable LED Y - Cable MB SYNC Cable
Connect the L ED Y-Cable onto the waterblock.
ON
1 2 3 4
© 2021 Thermaltake Technology Co., Ltd. All Rights Reserved. www.thermaltake.com
Product specificaties
| Merk: | Thermaltake |
| Categorie: | Hardwarekoeling |
| Model: | Pacific V-RTX 3070 Plus |
| Kleur van het product: | Grijs |
| Gewicht: | 1600 g |
| Breedte: | 159.4 mm |
| Diepte: | 268 mm |
| Hoogte: | 29.2 mm |
| Soort: | Waterblok |
| Netvoeding: | 6.5 W |
| Materiaal: | Acrylic,Cooper |
| Aantal per verpakking: | 1 stuk(s) |
| Compatibele producten: | ASUS ROG RTX 3070 |
| Verlichtings-led: | Ja |
| Geschikte locatie: | Videokaart |
| Compatibele processors: | Niet ondersteund |
| Ventilator diameter: | Nee mm |
| Supported processor sockets: | Niet ondersteund |
| Startspanning: | 5 V |
Heb je hulp nodig?
Als je hulp nodig hebt met Thermaltake Pacific V-RTX 3070 Plus stel dan hieronder een vraag en andere gebruikers zullen je antwoorden
Handleiding Hardwarekoeling Thermaltake
15 Juli 2025
15 Juli 2025
3 Juni 2025


14 Mei 2025
14 Mei 2025

14 Mei 2025
14 Mei 2025
Handleiding Hardwarekoeling
- Gamdias
- SilverStone
- In Win
- Middle Atlantic
- Noctua
- Cooler Master
- MSI
- Crestron
- Mars Gaming
- Sogo
- Krux
- NOX
- Scythe
- FSP
- Valkyrie
Nieuwste handleidingen voor Hardwarekoeling

30 Juli 2025

29 Juli 2025

29 Juli 2025
29 Juli 2025

26 Juli 2025
25 Juli 2025
25 Juli 2025
15 Juli 2025
15 Juli 2025