StarTech.com M2E1BRU31C Handleiding


Lees hieronder de 📖 handleiding in het Nederlandse voor StarTech.com M2E1BRU31C (2 pagina's) in de categorie Externe harde schijf. Deze handleiding was nuttig voor 28 personen en werd door 2 gebruikers gemiddeld met 4.5 sterren beoordeeld

Pagina 1/2
Quick-Start Guide
To view manuals, FAQs, videos, drivers, downloads, technical drawings, and more, visit www.startech.com/support.
Manual Revision: December 18, 2019 6:37 PM
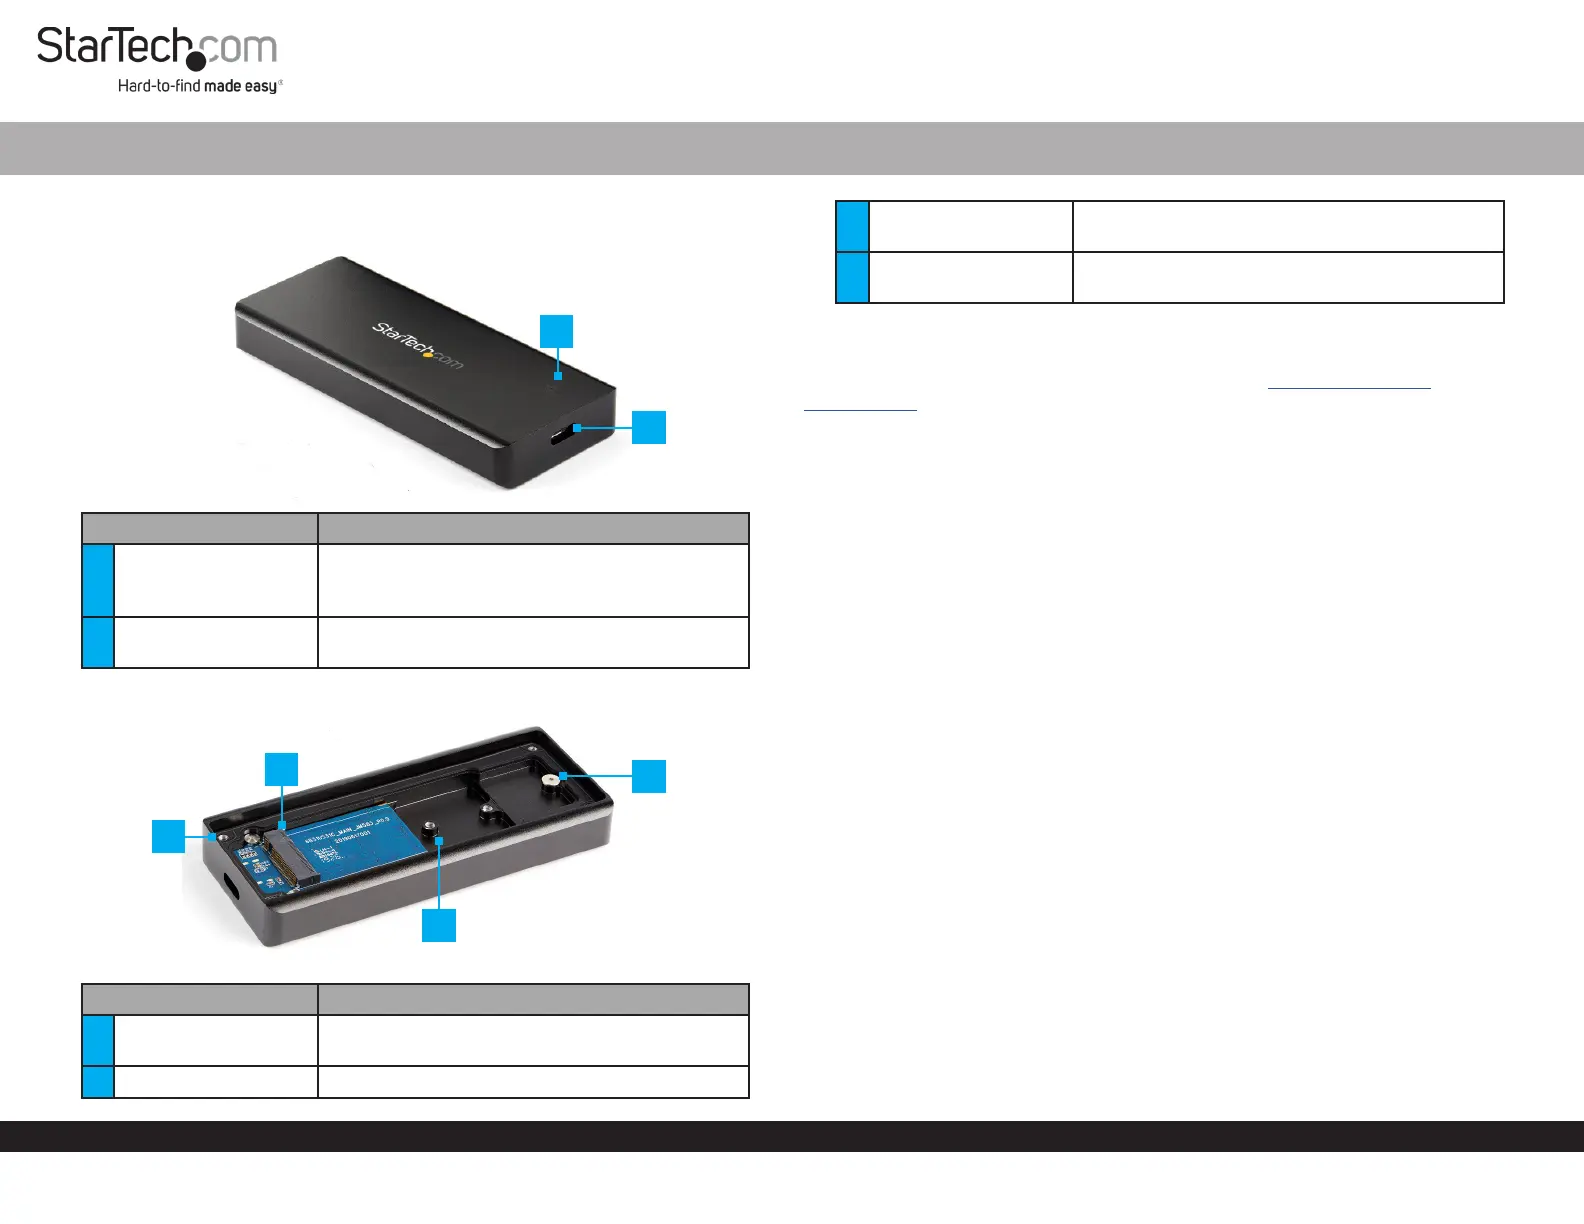
Product Diagram (M2E1BRU31C)
Exterior
Component Function
1Power LED
Indicates that the is receiving Solid: Enclosure
power.
Indicates that the activity.Flashing: Drive
2USB-C Port Used to connect the to the Enclosure Host
Computer.
Interior
Component Function
3Drive-Bay Screws x 4 Used to secure the in the Drive Bay Cover
Enclosure.
4Drive Connector Used to connect the to the .Drive Enclosure
USB 3.2 Gen 2 Type C IP67 Rugged NVMe Enclosure
5Adjustable Drive
Length Holes Used to accommodate dierent drive lengths.
6Drive-Mount Screw/
Nut Used to secure the to the .Drive Enclosure
Requirements
For the latest requirements and full manual, please visit www.startech.com/
M2E1BRU31C
Installation
Warning! Drives should be handled carefully, especially when they’re transported. If
you’re not careful with your drives, you may lose data as a result.
Installing an 80 mm Drive
1. Using the (included), remove the (x 4) from Torx Screwdriver Drive-Cover Screws
the bottom of the and remove the .Enclosure Cover Plate
2. Place the next to the and align the screw groove on the with Drive Drive Tray Drive
the on the .Adjustable Drive Length Holes Drive Tray
3. Use the and to remove the from the Torx Screwdriver Drive-Mount Screw
Enclosure.
4. Gently slide the connector on the (on a 30-degree angle) into the Drive Drive
Connector Enclosure on the .
Note: The connector on your drive is keyed so that it only ts one way.
5. Lightly push the down into position on the circuit board.Drive
6. Insert the through the screw groove on the and into the Drive-Mount Screw Drive
Drive-Mount Screw Hole Enclosureon the .
7. Using the tighten the , being careful not to Torx Screwdriver Drive-Mount Screw
over-tighten.
8. Place the back onto the bottom on the . Make sure that the Cover Plate Enclosure
Cover Plate Enculosure is properly aligned with the top of the creating a tight seal
and that nothing is obstructing the , in order to provide a water and Cover Plate
dust resistance seal.
9. Insert the back into the four corner on the bottom of the Drive-Cover Screws
Enclosure.
6
4
5
3
1
2
FCC Compliance Statement
This equipment has been tested and found to comply with the limits for a Class B digital device, pursuant to part 15 of the FCC
Rules. These limits are designed to provide reasonable protection against harmful interference in a residential installation.
This equipment generates, uses and can radiate radio frequency energy and, if not installed and used in accordance with the
instructions, may cause harmful interference to radio communications. However, there is no guarantee that interference will not
occur in a particular installation. If this equipment does cause harmful interference to radio or television reception, which can be
determined by turning the equipment o and on, the user is encouraged to try to correct the interference by one or more of the
following measures:
Reorient or relocate the receiving antenna.
Increase the separation between the equipment and receiver.
Connect the equipment into an outlet on a circuit dierent from that to which the receiver is connected.
Consult the dealer or an experienced radio/TV technician for help
This device complies with part 15 of the FCC Rules. Operation is subject to the following two conditions:
(1) This device may not cause harmful interference, and (2) this device must accept any interference received, including
interference that may cause undesired operation. Changes or modications not expressly approved by StarTech.com could void
the user’s authority to operate the equipment.
Industry Canada Statement
This Class B digital apparatus complies with Canadian ICES-003.
Cet appareil numérique de la classe [B] est conforme à la norme NMB-003 du Canada.
CAN ICES-3 (B)/NMB-3(B)
This device complies with Industry Canada licence-exempt RSS standard(s). Operation is subject to the following two conditions:
(1) This device may not cause interference, and (2) This device must accept any interference, including interference that may
cause undesired operation of the device.
Le présent appareil est conforme aux CNR d’Industrie Canada applicables aux appareils radio exempts de licence. L’exploitation
est autorisée aux deux conditions suivantes:
(1) l’appareil ne doit pas produire de brouillage, et (2) l’utilisateur de l’appareil doit accepter tout brouillage radioélectrique subi,
même si le brouillage est susceptible d’en compromettre le fonctionnement.
Use of Trademarks, Registered Trademarks, and other Protected Names and Symbols
This manual may make reference to trademarks, registered trademarks, and other protected names and/or symbols of third-
party companies not related in any way to StarTech.com. Where they occur these references are for illustrative purposes only
and do not represent an endorsement of a product or service by StarTech.com, or an endorsement of the product(s) to which
this manual applies by the third-party company in question. StarTech.com hereby acknowledges that all trademarks, registered
trademarks, service marks, and other protected names and/or symbols contained in this manual and related documents are the
property of their respective holders.
Warranty Information
This product is backed by a two-year warranty.
For further information on product warranty terms and conditions, please refer to .www.startech.com/warranty
Limitation of Liability
In no event shall the liability of StarTech.com Ltd. and StarTech.com USA LLP (or their ocers, directors, employees or agents)
for any damages (whether direct or indirect, special, punitive, incidental, consequential, or otherwise), loss of prots, loss of
business, or any pecuniary loss, arising out of or related to the use of the product exceed the actual price paid for the product.
Some states do not allow the exclusion or limitation of incidental or consequential damages. If such laws apply, the limitations
or exclusions contained in this statement may not apply to you.
Safety Measures
If product has an exposed circuit board, do not touch the product under power.
Mesures de sécuri
Si l’un des circuits imprimés du produit est visible, ne pas touchez le produit lorsqu’il est sous tension.
安全対策
• 製品に露出した状態の回路基盤が含まれる場合、電源が入っている状態で製品に触らないでください
Misure di sicurezza
Se il prodotto ha un circuito stampato visibile, non toccare il prodotto quando è acceso.
Säkerhetsåtgärder
Rör aldrig vid enheter med oskyddade kretskort när strömmen är påslagen.
FR: fr.startech.com
DE: de.startech.com
ES: es.startech.com
NL: nl.startech.com
IT: it.startech.com
JP: jp.startech.com
StarTech.com Ltd.
45 Artisans Cres
London, Ontario
N5V 5E9
Canada
StarTech.com Ltd.
Unit B, Pinnacle 15
Gowerton Rd,
Brackmills
Northampton
NN4 7BW
United Kingdom
StarTech.com LLP
2500 Creekside
Parkwy
Lockbourne, Ohio
43137
U.S.A.
9. Use the to tighten the .Torx Screwdriver Drive-Tray Screws
10. Remove the backing from the and position them overtop of Adhesive Strips
the (two secrews per ) on the bottom of the Drive-Cover Screws Adhesive Strip
Enclosure Drive-Cover Screws, sealing the .
Connecting a Drive to a Computer
When the is connected to the the OS will automatically Enclosure Host Computer
install the necessary software.
Note: The does not require an external power supply, as it receives enough Enclosure
power through the USB port that it is connected to. However, not all USB ports may be
able to provide enough power to power the .Enclosure
Connect a to the on the and to a USB port on USB-C Cable USB-C Port Enclosure
the .Host Computer
Disconnecting a Drive
Warning! If you remove the drive before you receive the notication that it’s safe to
do so, you could experience lost or corrupted data.
If the OS is Windows, complete the following steps:Host Computer’s
1. On the tray, click the icon.Notication Safely Remove Hardware and Eject Media
2. Click the storage device that you want to remove.
3. When the message appears indicating that , it’s safe to remove the device
disconnect the drive.
If the OS is macOS, complete the following steps:Host Computer’s
1. Close any windows that list the contents of the drive.
2. On your desktop, click and drag the icon onto the icon on USB Storage Trash Can
your desktop.
3. Wait 5 seconds, then disconnect the drive.
10. Use the to tighten the .Torx Screwdriver Drive-Tray Screws
11. Remove the backing from the and position them overtop of Adhesive Strips
the (two secrews per ) on the bottom of the Drive-Cover Screws Adhesive Strip
Enclosure Drive-Cover Screws, sealing the .
Installing a 42 mm or 60 mm Drive
1. Using the (included), remove the (x 4) from Torx Screwdriver Drive-Cover Screws
the bottom of the and remove the .Enclosure Cover Plate
2. Place the next to the and align the screw groove on the with Drive Drive Tray Drive
the on the .Adjustable Drive Length Holes Drive Tray
3. Insert the into the correct (60 or 42) Stando Adjustable Drive Length Hole
according to the length of the .Drive
4. Gently slide the connector on the (on a 30-degree angle) into the Drive Drive
Connector Enclosure on the .
Note: The connector on your drive is keyed so that it only ts one way.
5. Lightly push the down into position on the circuit board.Drive
6. Insert the through the screw groove on the and into the Drive-Mount Screw Drive
Stando.
7. Place the back onto the bottom on the . Make sure that the Cover Plate Enclosure
Cover Plate Enculosure is properly aligned with the top of the creating a tight seal
and that nothing is obstructing the , in order to provide a water and dust Cover Plate
resistance seal.
8. Insert the back into the four corner on the bottom of the Drive-Cover Screws
Enclosure.


Product specificaties

Merk: StarTech.com
Categorie: Externe harde schijf
Model: M2E1BRU31C
Kleur van het product: Zwart
Gewicht: 164 g
Breedte: 105 mm
Diepte: 45 mm
Hoogte: 14 mm
Snoerlengte: 0.05 m
Gewicht verpakking: 256 g
Breedte verpakking: 144 mm
Diepte verpakking: 175 mm
Hoogte verpakking: 32 mm
Internationale veiligheidscode (IP): IP67
LED-indicatoren: Activiteit
Type stroombron: USB
Meegeleverde kabels: USB Type-C
Certificering: CE, FCC, REACH
USB-versie: 3.2 Gen 2 (3.1 Gen 2)
Materiaal: Aluminium
Duurzaamheidscertificaten: CE, RoHS
Temperatuur bij opslag: -20 - 50 °C
USB-aansluiting: Ja
Snelle installatiehandleiding: Ja
Mean time between failures (MTBF): 50000 uur
Opslag schijfgrootte: M.2 "
Ondersteunde opslagstationinterfaces: PCI Express 3.0
Chipset: JMicron - JMS583
(Buitenste) hoofdverpakking hoogte: 390 mm
(Buitenste) hoofdverpakking breedte: 360 mm
(Buitenste) hoofdverpakking lengte: 410 mm
Hoeveelheid per (buitenste) hoofdverpakking: 40 stuk(s)
Overdrachtssnelheid: 10 Gbit/s
Aantal storage drives ondersteund: 1
Bedrijfstemperatuur (T-T): 5 - 35 °C
Relatieve vochtigheid in bedrijf (V-V): 20 - 80 procent
Type product: SDD-behuizing
Code geharmoniseerd systeem (HS): 84733080
UASP-ondersteuning: Ja
Inclusief schroevendraaier: Ja

Heb je hulp nodig?

Als je hulp nodig hebt met StarTech.com M2E1BRU31C stel dan hieronder een vraag en andere gebruikers zullen je antwoorden


Handleiding Externe harde schijf StarTech.com

Handleiding Externe harde schijf

Nieuwste handleidingen voor Externe harde schijf