SSV Works X3-DM3 Handleiding
SSV Works
Niet gecategoriseerd
X3-DM3
Bekijk gratis de handleiding van SSV Works X3-DM3 (4 pagina’s), behorend tot de categorie Niet gecategoriseerd. Deze gids werd als nuttig beoordeeld door 39 mensen en kreeg gemiddeld 3.7 sterren uit 20 reviews. Heb je een vraag over SSV Works X3-DM3 of wil je andere gebruikers van dit product iets vragen? Stel een vraag
Pagina 1/4

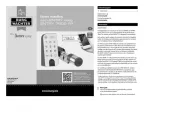
X3-DM3
Can-Am Commander X3
Dash Kit for MRB3
SSV WORKS, 201 N. Rice Ave Unit A, Oxnard, CA 93030
www.SSVworks.com | Phone: 818-991-1778 | Fax: 866-293-6751
!
Please read and understand these
instructions completely before
installation to avoid possible injury, or
damage to the accessory or vehicle.
WARRANTY INFORMATION:
All SSV Works enclosures are covered by a limited lifetime warranty against defects in
material or workmanship. All SSV Works Electronics are covered by a limited 1 year warranty
against defects in material or workmanship. All SSV Works Speakers are covered by a
limited 1 year warranty against defects in material or workmanship. Labor for replacement of
defective components is not covered. Contact SSV Works for further warranty information.
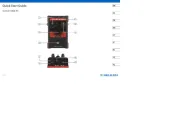
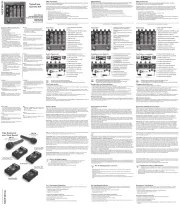
1. X3-DM3 Base Plate
2. X3-DM3 Top Panel
3. #7 x 1.25 Kit Screws x4
TOOLS NEEDED FOR INSTALLATION PARTS LIST
PARTS LIST IMAGES
4. M3 x 20mm Screws x2
5. M3 Washers x 2
6. M3 Hex Nuts x 2
2. X3-DM3 Top Panel
1. X3-DM3 Base Plate
- #2 Phillips Screw Driver
- 1/8” drill bit
- 1/2” drill bit
- Drill
INSTALLATION NOTES
For instrucitons regarding the MRB3 black box, refer to the MRB3 manual.
5. M3 Washers x 2
4. M3 x 20mm Screws x2 6. M3 Hex Nuts x 2
3. #7 x 1.25 Kit Screws x4

X3-DM3
A
D
C C C
B
E
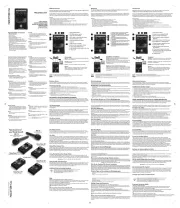
A. Remove the factory rocker switches.
D. Place the base plate back on the dash lining up the outside
screw holes to the dimples on the dash. Using (2) #7 Screws and
a philips screw driver secure the base to the dash. Make sure the
screws are driving into the dash dimples for best results.
Line up base plate Drill pilot hole Drill 1/2” hole
C. Rest the X3-DM3 base plate on the dash. Line up the two outside screw holes with the dimples of the dash. Do not screw the kit in yet.
While holding the base plate down to the dash, use the center hole on the base plate to drill your 1/8” pilot hole.
Remove the base plate and open the pilot hole up using a 1/2” drill bit.
B. Locate the two dimples at the top of the dash. These dimples
are actual screw bosses on the underside of the dash.
E. Fasten the MRB3 Remote to the dash kit using (2) M3 screws.

X3-DM3
F
G
H
F
G
© 2017 SSV Works, Oxnard, CA 93030 X3-DM3 Rev. A 3-8-17
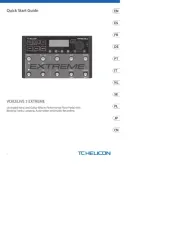
F. Now that the MRB3 remote is mounted to the dash kit route the din cable through the base plate so that it drops into the dash.
Pull the din cable all the way through until the X3-DM3 Top Panel rests on the Base Plate.
G. Using (2) #7 screws, secure the top of the Top Panel to the Base Plate.
H. Refer to the MRB3 manual for wiring instructions.
Product specificaties
| Merk: | SSV Works |
| Categorie: | Niet gecategoriseerd |
| Model: | X3-DM3 |
Heb je hulp nodig?
Als je hulp nodig hebt met SSV Works X3-DM3 stel dan hieronder een vraag en andere gebruikers zullen je antwoorden
Handleiding Niet gecategoriseerd SSV Works

12 November 2024

16 Augustus 2023

16 Augustus 2023

16 Augustus 2023

16 Augustus 2023

16 Augustus 2023

16 Augustus 2023

16 Augustus 2023

16 Augustus 2023

16 Augustus 2023
Handleiding Niet gecategoriseerd
- AV:link
- Saro
- Snoes
- Challenge
- Trevi
- Kress
- Active Era
- Pancontrol
- Arris
- Dnt
- Wasp
- Savage Bros.
- Imarflex
- Iseki
- Rikon
Nieuwste handleidingen voor Niet gecategoriseerd
2 Augustus 2025

2 Augustus 2025
2 Augustus 2025

2 Augustus 2025
2 Augustus 2025
2 Augustus 2025

2 Augustus 2025
2 Augustus 2025
2 Augustus 2025

2 Augustus 2025