SSV Works WP3-RZOA Handleiding
SSV Works
Niet gecategoriseerd
WP3-RZOA
Bekijk gratis de handleiding van SSV Works WP3-RZOA (4 pagina’s), behorend tot de categorie Niet gecategoriseerd. Deze gids werd als nuttig beoordeeld door 18 mensen en kreeg gemiddeld 3.9 sterren uit 9.5 reviews. Heb je een vraag over SSV Works WP3-RZOA of wil je andere gebruikers van dit product iets vragen? Stel een vraag
Pagina 1/4

WP3-RZOA
2 Seat RZR 570, 800, 900
2 Speaker Overhead
SSV WORKS, 201 N. Rice Ave Unit A, Oxnard, CA 93030
www.SSVworks.com | Phone: 818-991-1778 | Fax: 866-293-6751
!
Please read and understand these
instructions completely before
installation to avoid possible injury, or
damage to the accessory or vehicle.
WARRANTY INFORMATION:
All SSV Works enclosures are covered by a limited lifetime warranty against defects in
material or workmanship. All SSV Works Electronics are covered by a limited 1 year
warranty against defects in material or workmanship. All SSV Works Speakers are
covered by a limited 1 year warranty against defects in material or workmanship. Labor
for replacement of defective components is not covered. Contact SSV Works for further
warranty information.
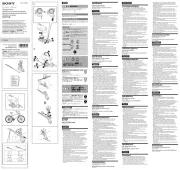
1. WP3-RZOA x 1
2. M6 x 1.0 Screws x 8
3. M6 Washers x 8
4. Mounting Brackets x 2
TOOLS NEEDED FOR INSTALLATION
INSTALLATION NOTES
PARTS LIST
PARTS LIST IMAGES
5. Fuse Holder with Fuse
6. Crimp on ring terminal
7. Zip Ties
To make wiring easier, locate the battery in the vehicle before beginning the installation. The use of a thread locker is recommended on all
screws to prevent loosening due to vibration.
2. M6 x 1.0 Screws x 8 3. M6 Washers x 8
5. Fuse Holder with Fuse
4. Mounting Brackets x 2
9. Crimp on ring terminal 10. Zip ties
1. WP3-RZOA
- Wire Crimpers
- Wire Strippers
- 13mm Wrench for Battery
Terminal
- #3 Phillips Screwdriver

A. With one person on either side of the vehicle place the WP3-
RZOA into location from the underside of the cage
C. Once the enclosure is in position, press the bracket toward
the center of the vehicle and tighten the brackets using the #3
screwdriver. NOTE: After all brackets are tightened, it may be
necessary to go back and re-adjust the brackets to ensure the
enclosure is properly secured.
B. While holding the enclosure securely in place, loosely install the 2
brackets using the screws provided.
WP3-RZOA
A
C
B
D. Using the zip ties provided, route the Power/Ground loom to the battery location
away from any moving parts or sharp metal. NOTE: The 4 pin short cable is for
additional speakers (WP3-RZOA+2) and the 4 pin long cable is for adding an SSV
Works Powered Subwoofer (Part# WP-RZS10)
D D
A. Cut the power/ground cable to length; be sure to
leave enough wire at the battery location to wire to
the battery, strip back approximately 4 inches of the
black tubing to expose the red/black wires inside.
Strip back 1/4”-1/2” of wire to make your
connections.
B. Crimp the supplied
fuse holder onto the
end of the RED wire
and attach to the
battery “+” terminal.
C. Crimp the supplied
ring terminal to
the BLACK wire
and attach to the
battery “-” terminal.
WIRING INSTRUCTIONS
A
B C
© 2018 SSV Works, Oxnard, CA 93030 WP3-RZOA Rev. A 2-21-18

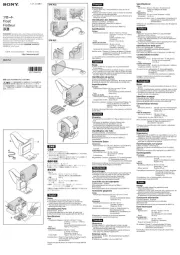
User Gu
Bl
Corporate: SSV WORKS, 201 N. Rice Ave Unit A, Oxnard, CA 93030
Web: www.SSVworks.com | Phone: 818-991-1778 | Fax: 866-293-6751
The Bluetooth® word mark and logos are registered trademarks owned by Bluetooth SIG,Inc. and any use of such
marks by SSV Works is under license. © 2018 SSV Works, Oxnard, CA 93030 MRB3 Rev. C 11/16/18
Do not attempt to disassemble or repair the MRB3
technical assistance or repair information. Changes
authorized by SSV Works will void the warranty.
SSV Works recommends disconnecting
beginning any installation.
SAFETY INFORMATION
!
RADIO FUNCTIONS
CONNECTING AN EXTERNAL AUDIO DEVICE (OPTIONAL)
BLUETOOTH AUDIO STREAMING
WARRANTY INFORMATION:
All SSV Works enclosures are covered by a limited lifetime warranty against defects in material or workmanship. All
SSV Works Electronics are covered by a limited 1 year warranty against defects in material or workmanship. Labor for
replacement of defective components is not covered. All SSV Works Speakers are covered by a limited 1 year warranty
against defects in material or workmanship. Contact SSV Works for further warranty information.
Selecting FM/AM Band: Press until the FM or AM band shows on the display. MODE
Automatic Station Search: Press or to start automatic station search. The search
stops when a station is found.
Manual Station Search: Press and hold or until M - SEEK. Press the or
briey to change the frequency until the desired frequency is set. Change to Automatic
search (A - SEEK) mode after a station is found.
- Press until AUX shows on the display.MODE
Add 3.5mm AUX-in
and USB Charging with
SSV Works 3PUSB35A
(sold separately)
1. Open the Bluetooth setup program on the mobile device and activate the Bluetooth feature
2. The device will show up as “SSV”. Select this device and enter passkey: OOOO
3. After successfully pairing, a Bluetooth logo will appear on the phone menu screen and
show “CONNECT” “BT MUSIC” on the device LCD display.
Stop Playback: Press briey to pause music. Press button again to continue playback.
Skip Track: Press or to play previous/next song.
Line in
Product specificaties
| Merk: | SSV Works |
| Categorie: | Niet gecategoriseerd |
| Model: | WP3-RZOA |
Heb je hulp nodig?
Als je hulp nodig hebt met SSV Works WP3-RZOA stel dan hieronder een vraag en andere gebruikers zullen je antwoorden
Handleiding Niet gecategoriseerd SSV Works

12 November 2024

16 Augustus 2023

16 Augustus 2023

16 Augustus 2023

16 Augustus 2023

16 Augustus 2023

16 Augustus 2023

16 Augustus 2023

16 Augustus 2023

16 Augustus 2023
Handleiding Niet gecategoriseerd
- Meireles
- Casaria
- KWS KitchenWare Station
- Maul
- Bulgin
- Noveen
- Control4
- Bora
- Jungle Gym
- XP-PEN
- Tefal
- Velux
- Pasquini
- Telestar
- Vox
Nieuwste handleidingen voor Niet gecategoriseerd
16 September 2025

16 September 2025

16 September 2025
16 September 2025

16 September 2025
16 September 2025

16 September 2025

16 September 2025
16 September 2025
16 September 2025