SilverStone ES02-USB Handleiding
SilverStone Afstandsbediening ES02-USB
Bekijk gratis de handleiding van SilverStone ES02-USB (38 pagina’s), behorend tot de categorie Afstandsbediening. Deze gids werd als nuttig beoordeeld door 79 mensen en kreeg gemiddeld 5.0 sterren uit 4 reviews. Heb je een vraag over SilverStone ES02-USB of wil je andere gebruikers van dit product iets vragen? Stel een vraag
Pagina 1/38
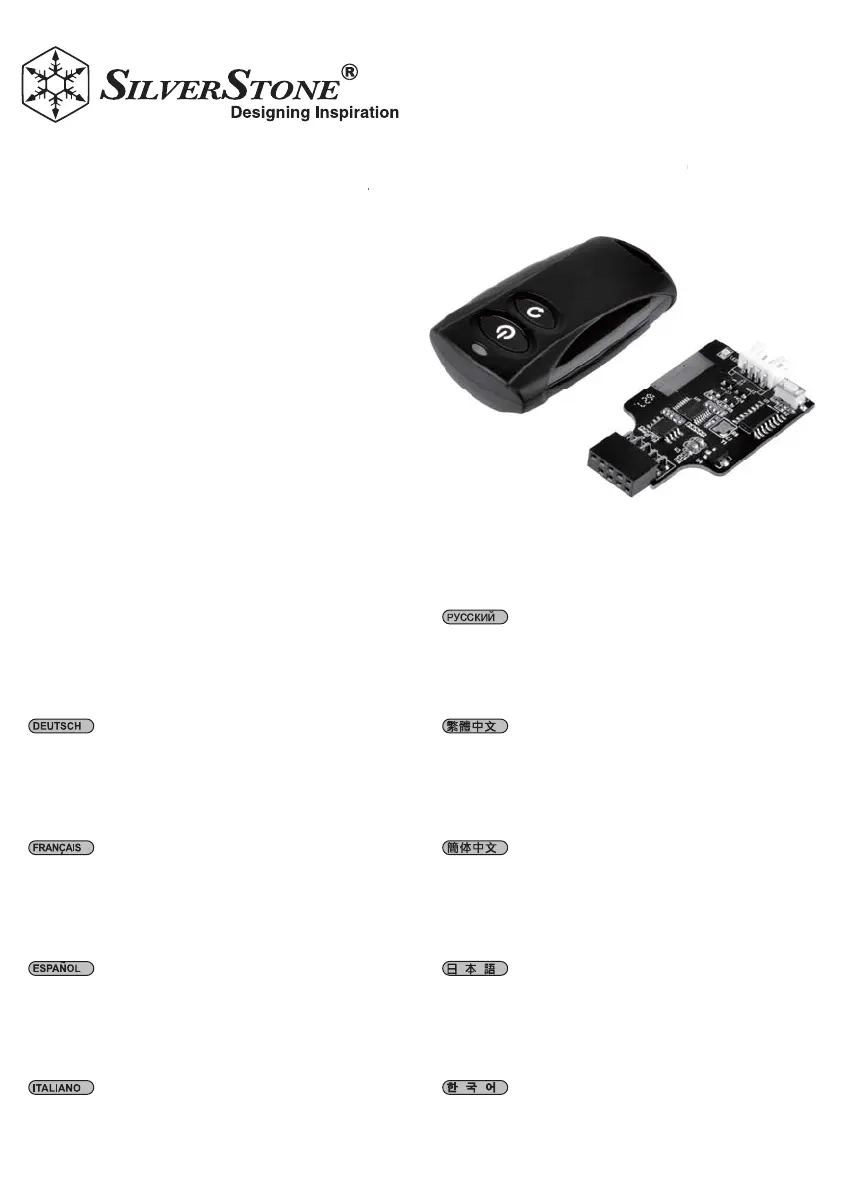
ES02-USB
2.4GHz
wireless computer power and
reset remote switch
Control your computer from anywhere in the room using 2.4GHz RF remote
2.4GHz receiver utilizing universal USB 9 pin male connector
Works as far away as twenty meter
Includes power / reset switch Y cable
Includes left and right angled USB adapters
ess computer power
a
n
d
t
r
e
m
o
t
e
swit
c
h
r
oom using
2
.4GHz RF remote
a
le connec
tor
To install ES02 properly, please follow the steps listed below:
Turn off your computer and unplug the power cord and all
cables
Remove your computer’s case cover
Unplug the power cable and reset cable from motherboard
Bitte befolgen Sie zur sachgemäßen Installation der ES02 die nachstehend
aufgelisteten Schritte:
Fahren Sie den Computer herunter und ziehen Sie Netzstecker und alle
anderen Kabel
Entfernen Sie die Gehäuseabdeckung des Computers
Trennen Sie Strom- und Reset-Kabel vom Motherboard
Pour installer l'ES02 correctement, veuillez suivre les étapes indiquées
ci-dessous:
Mettez votre ordinateur hors tension et débranchez son cordon
d'alimentation et tous ses cables
Retirez le couvercle du boîtier de votre ordinateur
Débranchez le câble d'alimentation et de redémarrage de la carte mère
Para instalar el ES02 de forma apropiada, por favor siga los pasos
enumerados a continuación:
Apague su ordenador y desconecte el cable de potencia y todos los
cables
Retire la cubierta de la carcasa de su ordenador
Desconecte el cable de potencia y el cable de reseteo de su placa base
Attenersi alle istruzioni che seguono per installare in modo appropriato
la scheda ES02:
Spegnere il computer e scollegare il cavo di alimentazione e tutti i cavi.
Rimuovere la copertura del case del computer
Scollegare il cavo di alimentazione e di ripristino dalla scheda madre
Дляправильнойустановкикарты ES02 следуйтеописаннымниже
действиям:
Выключитекомпьютер, отключитекабельпитанияивсе прочиекабели
Снимитекрышкукорпусакомпьютера
Отсоединитекабельпитанияикабельсбросаотсистемнойплаты
在安裝ES02之前,請先遵守下列步驟:
請先關閉您的電腦電源,拔掉電源線與相關線材
打開您的機殼側蓋
拔掉主機板上的電源線與其他線材
在安装ES02之前,请先遵守下列步骤:
请先关闭您的计算机电源,拔掉电源线与相关线材
打开您的机箱侧盖
拔掉主板上的电源线与其他线材
ES02を正しくインストールするには、下記のステップに従ってください:
コンピューターの電源をオフにし、電源コードその他ケーブルを全て外
します
コンピューターのケースのカバーを外します
マザーボードから電源ケーブルおよびリセットケーブルを外します
ES02를 제대로 설치하려면, 아래에 나열된 단계를 따르십시오:
컴퓨터를 끄고 전원 코드와 모든 케이블을 분리합니다
컴퓨터의 케이스 커버를 제거합니다
메인보드에서 전원 케이블과 초기화 케이블을 분리합니다
www.silverstonetek.com
Product specificaties
| Merk: | SilverStone |
| Categorie: | Afstandsbediening |
| Model: | ES02-USB |
| Kleur van het product: | Zwart |
| Ingebouwd display: | Nee |
| Gewicht: | 30 g |
| Breedte: | 30 mm |
| Diepte: | 60 mm |
| Hoogte: | 10 mm |
| Frequentieband: | 2.4 GHz |
| Interface: | RF Draadloos |
| Temperatuur bij opslag: | -40 - 70 °C |
| Maximumbereik: | 20 m |
| Luchtvochtigheid bij opslag: | 5 - 90 procent |
| Bedrijfstemperatuur, bereik: | 32 - 104 °F |
| Input type: | Drukknopen |
| juiste gebruik afstandsbediening: | PC |
| Bedrijfstemperatuur (T-T): | 0 - 40 °C |
| Relatieve vochtigheid in bedrijf (V-V): | 10 - 90 procent |
| Type batterij: | CR2032 |
| Code geharmoniseerd systeem (HS): | 85299097 |
| Number of devices supported: | 1 |
| Temperatuurbereik voor opslag (T-T): | -40 - 158 °F |
Heb je hulp nodig?
Als je hulp nodig hebt met SilverStone ES02-USB stel dan hieronder een vraag en andere gebruikers zullen je antwoorden
Handleiding Afstandsbediening SilverStone

18 Februari 2024
18 Februari 2024
Handleiding Afstandsbediening
Nieuwste handleidingen voor Afstandsbediening
7 Juni 2026
4 Mei 2026
24 Maart 2026
23 Maart 2026
16 Maart 2026
13 Maart 2026
12 Maart 2026
9 Maart 2026
7 Maart 2026
3 Maart 2026