Robert Abbey Z2418 Handleiding
Bekijk gratis de handleiding van Robert Abbey Z2418 (1 pagina’s), behorend tot de categorie Niet gecategoriseerd. Deze gids werd als nuttig beoordeeld door 2 mensen en kreeg gemiddeld 4.6 sterren uit 3 reviews. Heb je een vraag over Robert Abbey Z2418 of wil je andere gebruikers van dit product iets vragen? Stel een vraag
Pagina 1/1
CORD COVER ASSEMBLY INSTRUCTIONS:
1. Remove mounting plate (A) from backplate (C) by removing screws (D).
2. Determine desired location for light xture on wall. Hold mounting plate (A) in a
level position against the wall. Using a pencil, mark the location of the mounting
holes in mounting plate (A) onto the wall.
3. Drill small holes at marked locations on the wall. Holes should be sized so wall
anchors (R), provided, t snugly inside the opening. Insert wall anchors into drilled
holes.
DIRECT WIRE ASSEMBLY INSTRUCTIONS:
1. SHUT OFF MAIN ELECTRICAL SUPPLY FROM THE MAIN FUSE BOX/CIRCUIT
BREAKER. IT IS RECOMMENDED THAT A LICENSED ELECTRICIAN INSTALL THIS
FIXTURE.
2. Remove mounting plate (A) from backplate (C) by removing screws (D).
3. Cut three prong plug (H) from the end of the electrical cord.
4. Remove cord covers (F) and (G) from the electrical cord. From the back side of backplate (C),
pull the electrical cord up through hole in the bottom of backplate.
5. Cut the cord to the desired length for making an electrical connection. At least six inches of wire
will be needed to make proper electrical connection.
6. Thread plug (E) into hole at the bottom of backplate (C).
7. Carefully pull the wiring from wall outlet box. Thread wires through the center hole in
mounting plate (A).
8. Ax mounting plate (A) to wall outlet box with mounting screws (B) provided.
2418
IMPORTANT SAFETY INSTRUCTIONS:
* These instructions are provided for your safety. It’s important that all safety
instructions are read before beginning installation of xture.
* We STRONGLY recommend installation by a licensed electrician.
* Turn o power at switch before replacing bulbs, making sure xture has had
sucient time to cool down.
* Do not connect the electricity until lamp is fully assembled.
* This xture is UL rated for dry locations.
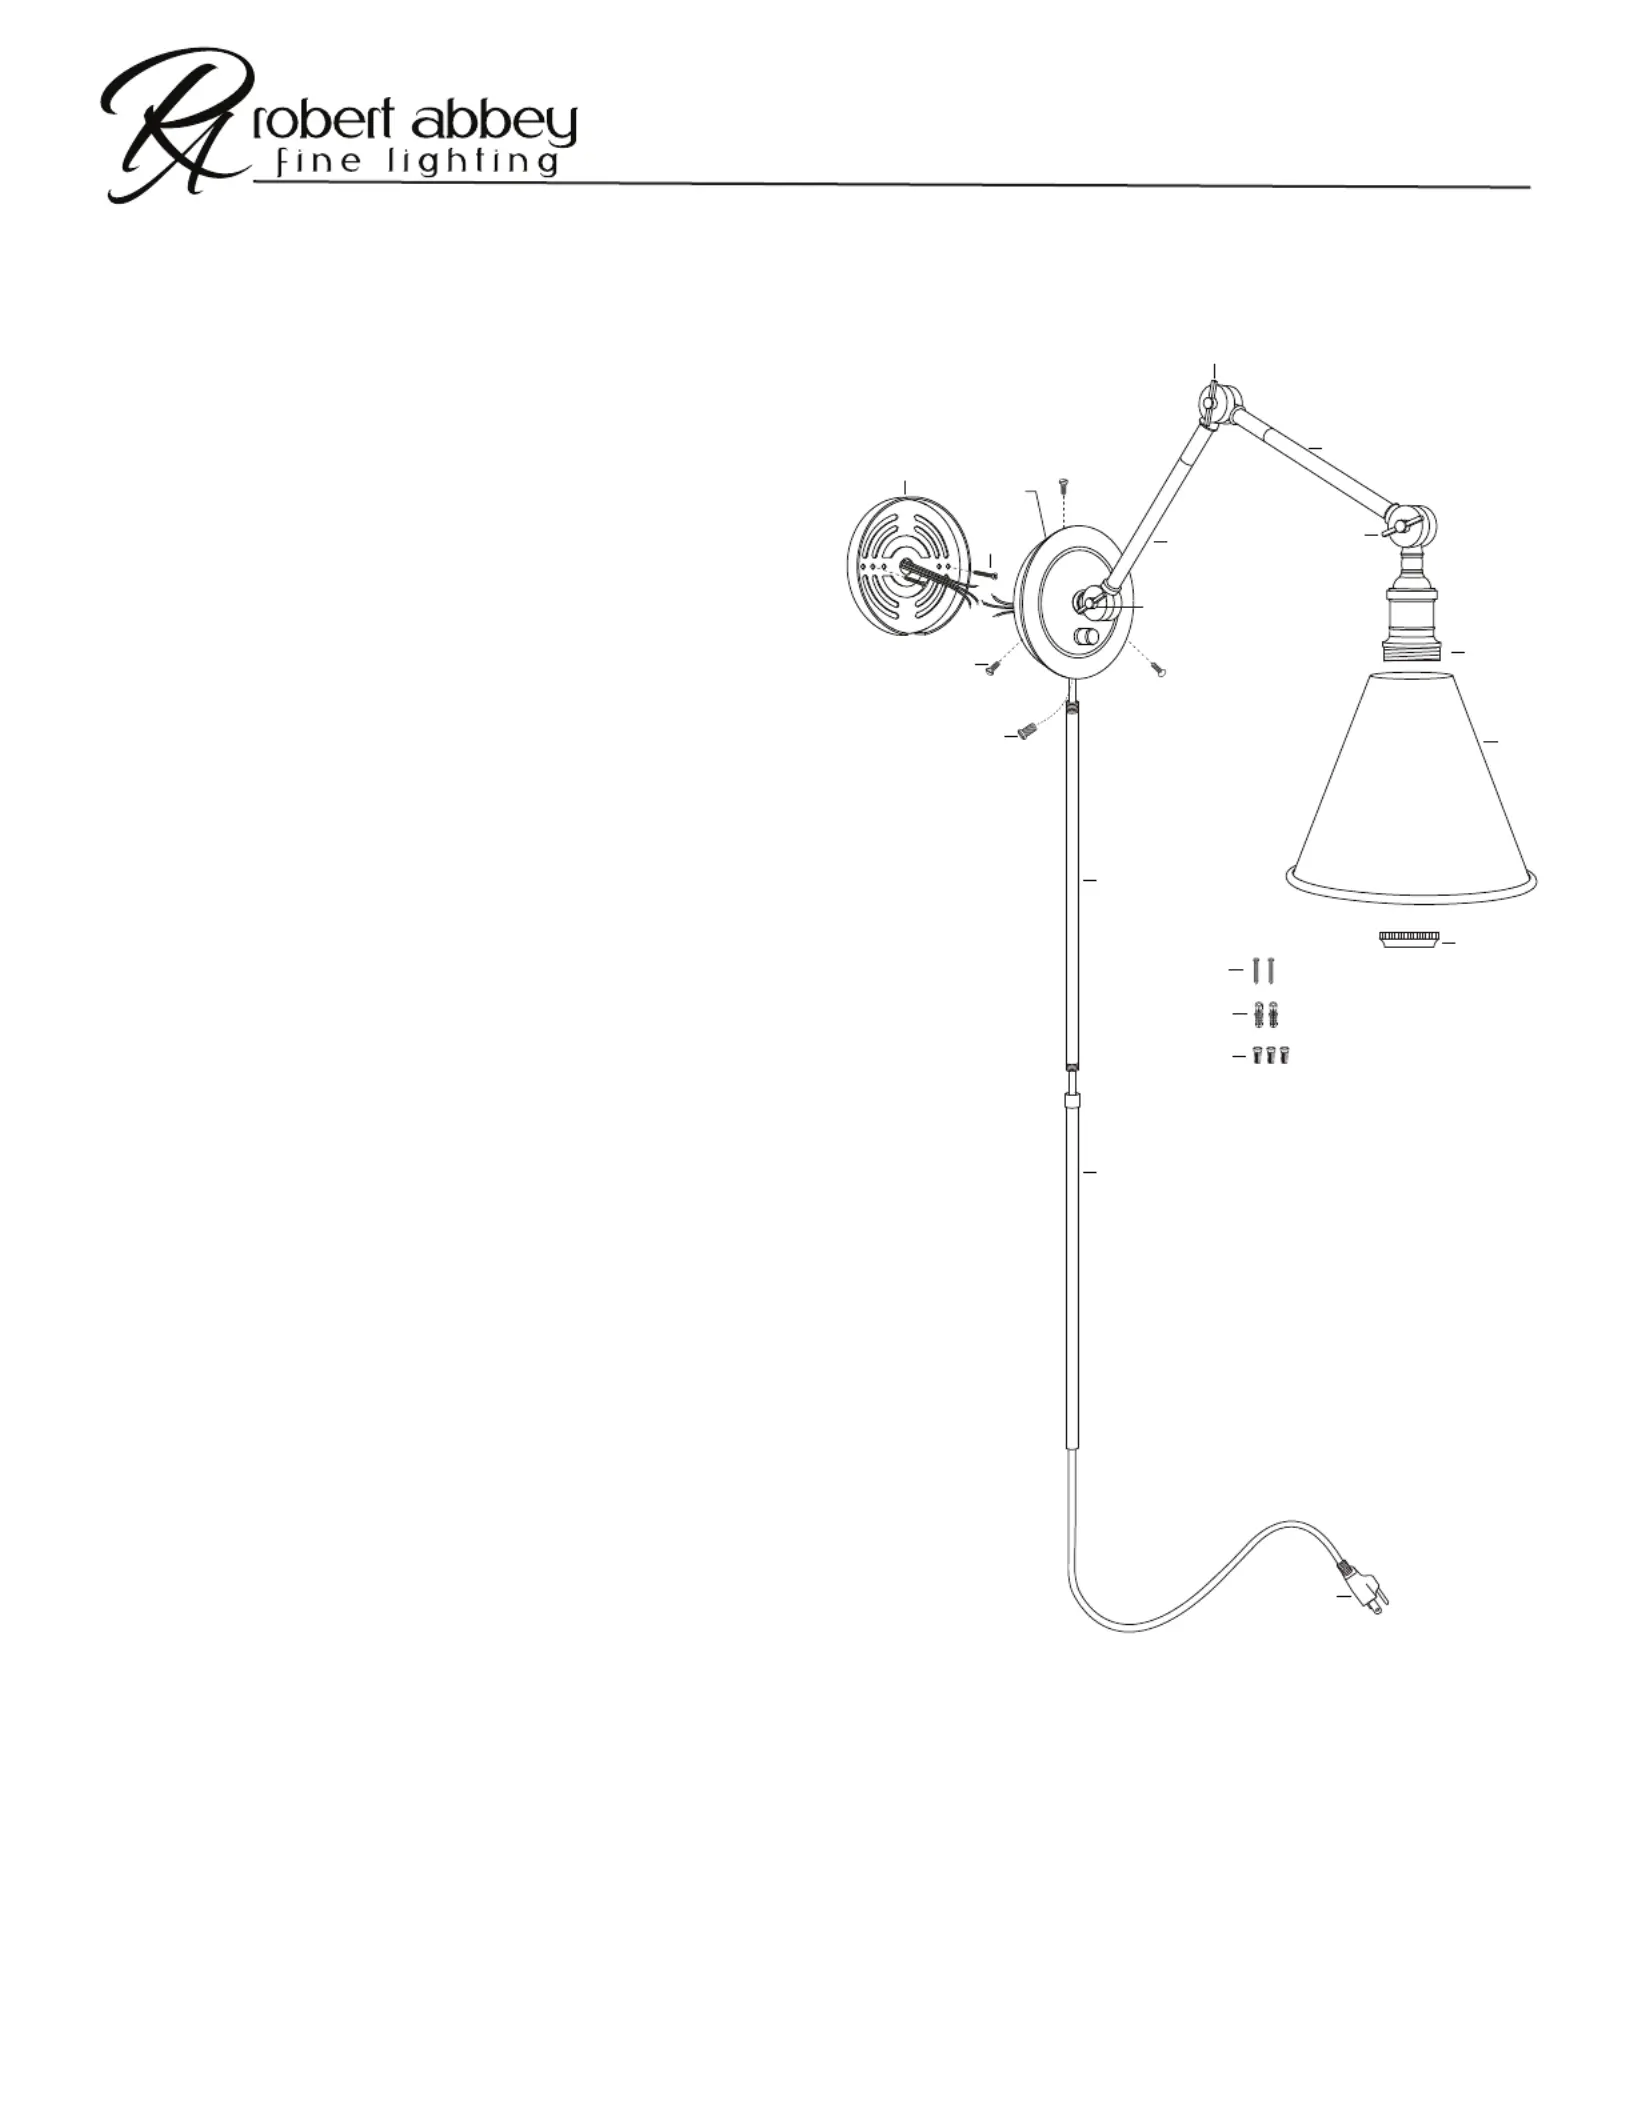
ASSEMBLY INSTRUCTIONS FOR YOUR
ALLOY WALL SCONCE
* To clean, use a soft dry cloth. Do not use any chemical or abrasive cleaners. *
9. Lift xture to mounting plate and make proper electrical connections described in steps 10-12. A LICENSED ELECTRICIAN IS RECOMMENDED.
10. Connect ground (green or silver in color) wire from xture to ground wire in the outlet box. Fasten wires together with wire nut (S) and tightly wrap
the connection with electrical tape.
11. Attach hot wire from xture (black in color or smooth side of wire) to hot wire from outlet box. Fasten wires together with wire nut (S) and tightly
wrap connection with electrical tape.
12. Attach neutral wire from xture (white in color or ribbed side of wire) to neutral wire from outlet box. Fasten wires together with wire nut (S) and
tightly wrap connection with electrical tape.
13. Carefully push wire connections back into wall outlet box. Slide backplate (C) over mounting plate (A).
14. Thread screws (D) into holes at the top and sides of backplate (C) to secure the xture to the mounting surface.
15. Follow steps 7-10 from cord cover assembly instructions above.
16. Control power to the xture by using the switch located on backplate (C).
(A)
(B)
(C)
(D)
(E)
(F)
(G)
(H)
(I)
(J)
(K)
(L)
(M)
(N)
(O)
(P)
(Q)
(R)
(S)
4. Ax mounting plate (A) to the wall by threading mounting screws (Q) through holes in
mounting plate (A) and into wall anchors (R).
5. Slide backplate (C) over mounting plate (A). Thread screws (D) back into holes at the top and
sides of backplate (C) to secure xture to the mounting surface.
6. Thread cord cover (F) into the bottom of the backplate (C). Thread cord cover (G) onto cord
cover (F).
7. Remove ange (P) from socket (N).
8. Place shade (O) onto socket (N). Thread ange (P) back onto the socket to secure the shade to
the xture.
9. Insert one 60W MAX. Type A, medium base bulb into socket (N).
10. To adjust lamp into the desired position, loosen turnknob (M) and move arm (L) into desired
position. Repeat step using turnknob (I) to adjust arm (J) and turnknob (K) to adjust shade
(O). Note: Adjust the lamp into the desired position before turning it on. When making any
adjustments to the position of the lamp, turn the lamp o and allow the shade to cool if
necessary as the shade can get very hot.
11. Insert three prong plug (H) into wall outlet.
12. Control power to the xture by using the switch located on backplate (C).
Product specificaties
| Merk: | Robert Abbey |
| Categorie: | Niet gecategoriseerd |
| Model: | Z2418 |
Heb je hulp nodig?
Als je hulp nodig hebt met Robert Abbey Z2418 stel dan hieronder een vraag en andere gebruikers zullen je antwoorden
Handleiding Niet gecategoriseerd Robert Abbey

1 April 2026
1 April 2026
31 Maart 2026
31 Maart 2026
31 Maart 2026
31 Maart 2026
30 Maart 2026
30 Maart 2026
30 Maart 2026
30 Maart 2026
Handleiding Niet gecategoriseerd
Nieuwste handleidingen voor Niet gecategoriseerd
1 April 2026
1 April 2026
1 April 2026
1 April 2026
1 April 2026
1 April 2026
1 April 2026
1 April 2026
1 April 2026
1 April 2026