Robert Abbey Roderick W1350 Handleiding
Robert Abbey Niet gecategoriseerd Roderick W1350
Bekijk gratis de handleiding van Robert Abbey Roderick W1350 (1 pagina’s), behorend tot de categorie Niet gecategoriseerd. Deze gids werd als nuttig beoordeeld door 12 mensen en kreeg gemiddeld 4.6 sterren uit 6 reviews. Heb je een vraag over Robert Abbey Roderick W1350 of wil je andere gebruikers van dit product iets vragen? Stel een vraag
Pagina 1/1
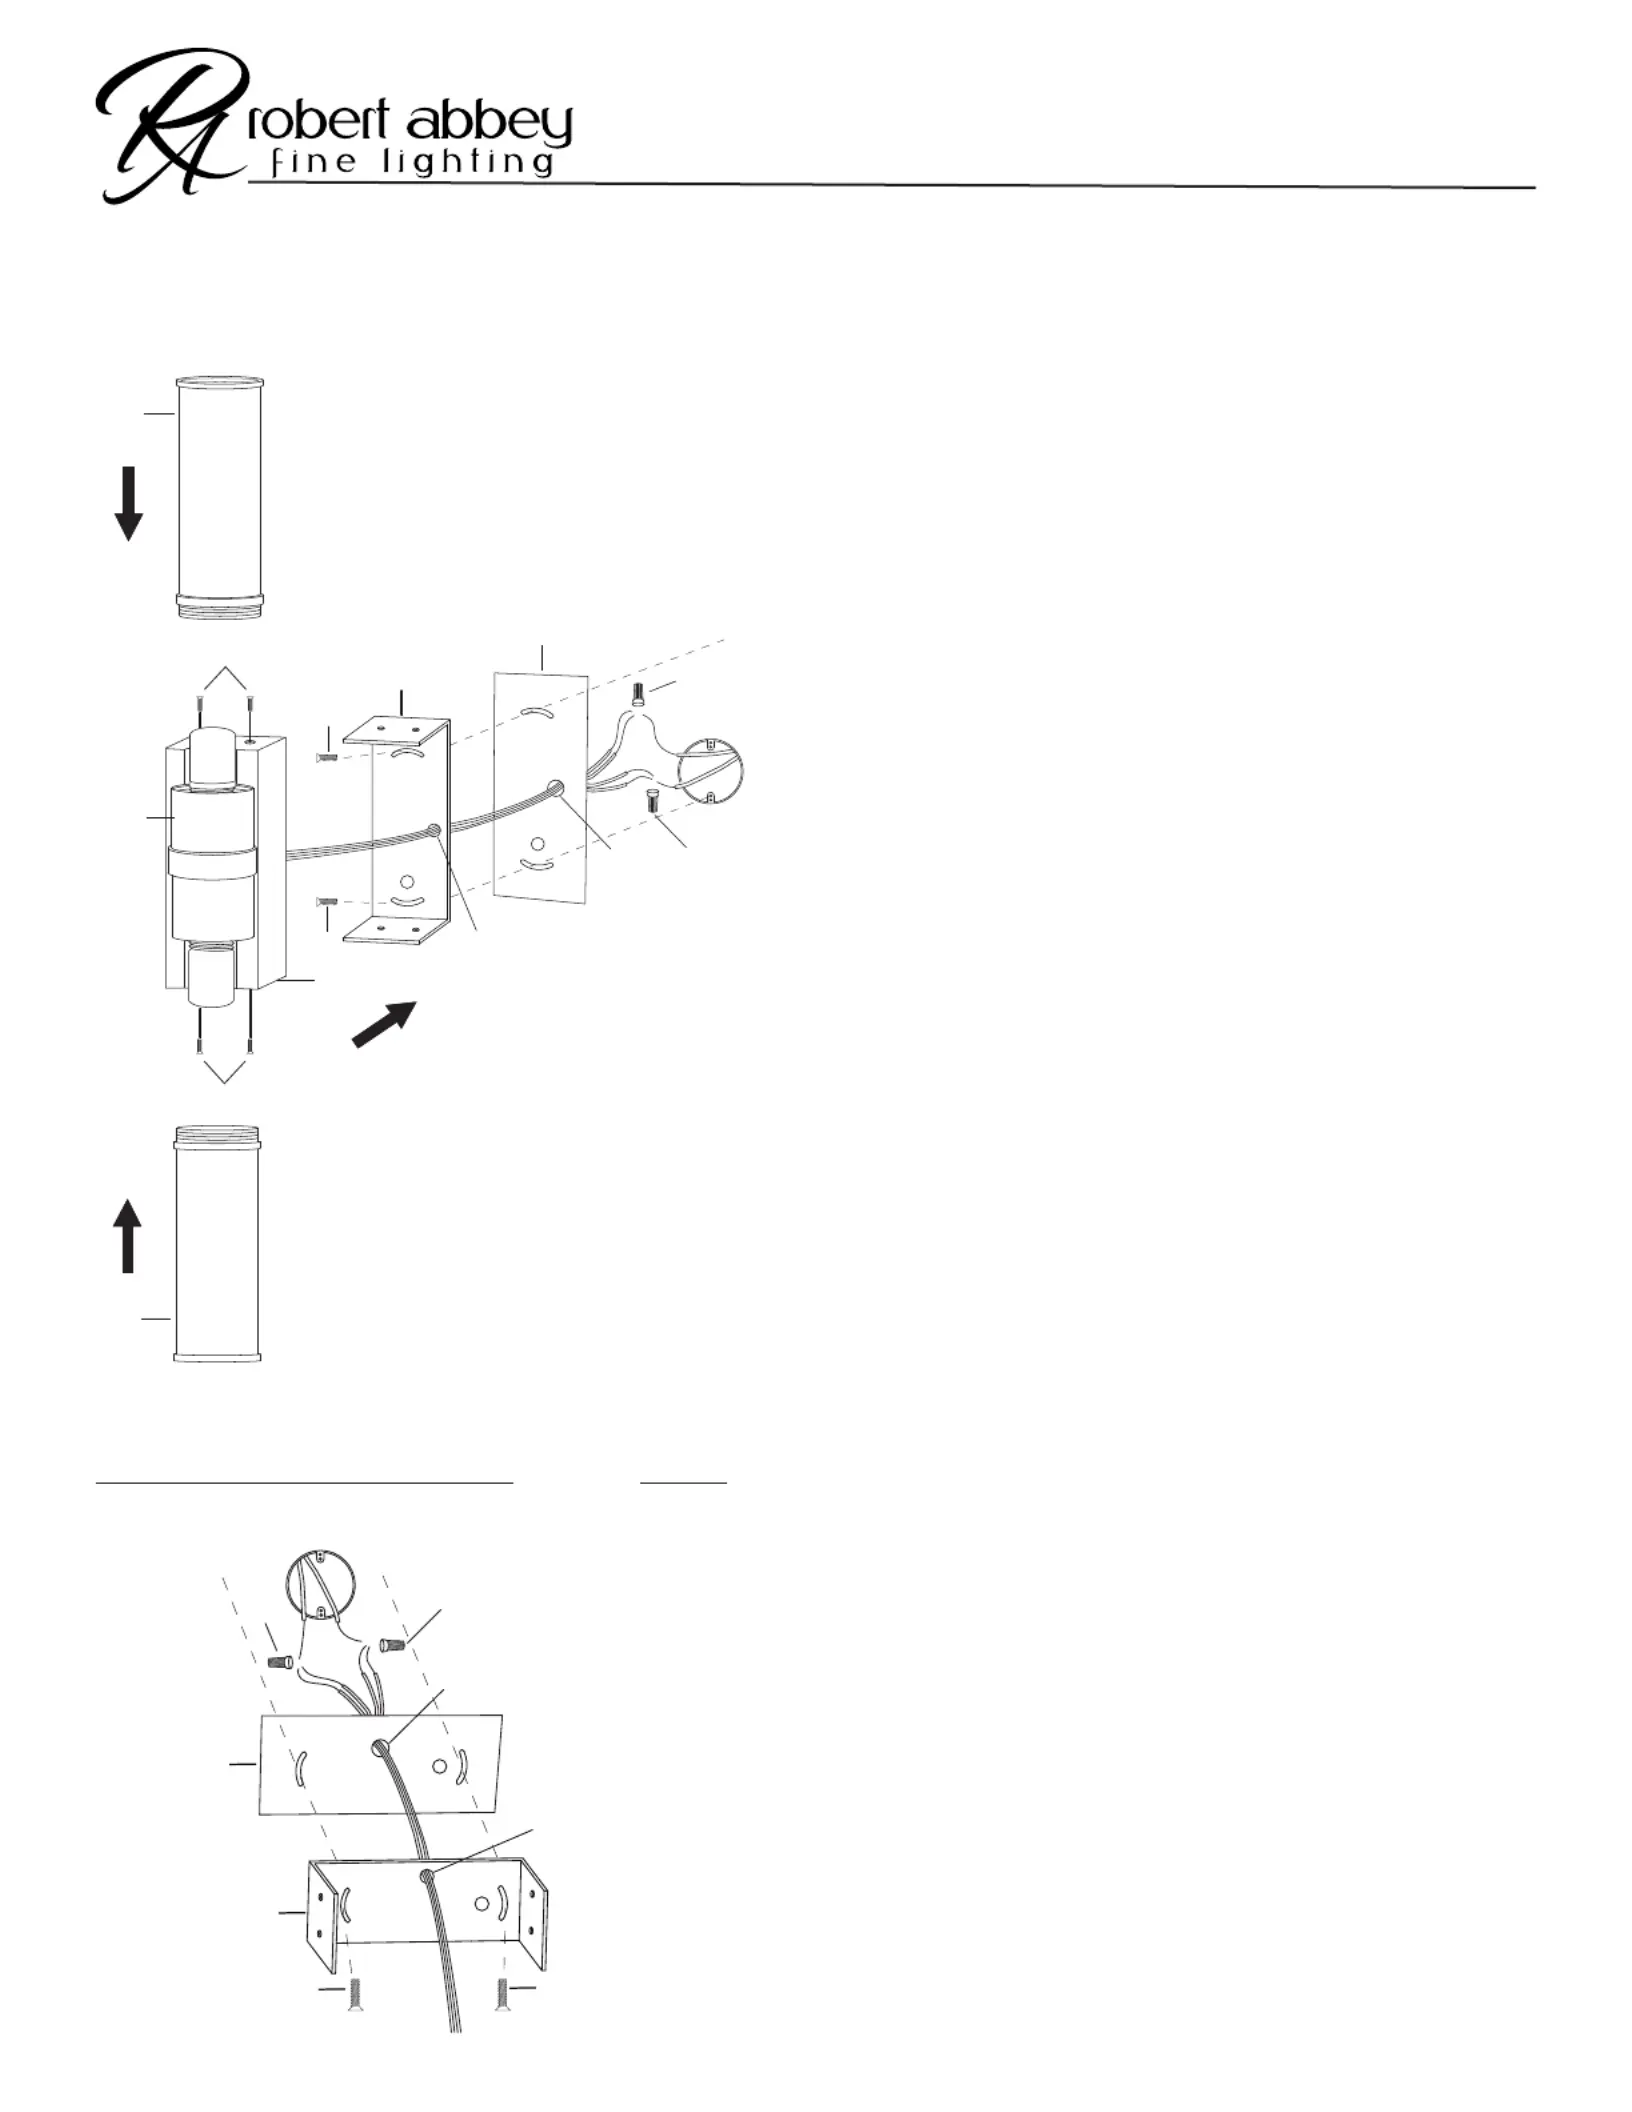
RODERICK LED DOUBLE SCONCE
ASSEMBLY INSTRUCTIONS FOR YOUR
1315
(A)
(C)
(C)
(B)
(D)
(J)
(E)
(I)
"J BOX"
(F)
(G)
(H)
(A)
(H)
FIG. A
VERTICAL
MOUNT
(K)
SHUT OFF MAIN ELECTRICAL SUPPLY FROM THE MAIN FUSE BOX /
CIRCUIT BREAKER.
1. Remove all parts carefully from the box.
2. Remove glass shades (A) by unscrewing from threaded socket cover (B).
3. Remove backplate screws (C) from backplate (D).
4. Carefully position adapter plate (G) behind mounting plate (F) and guide
wires from xture through hole (J) located on mounting plate (F) and hole (K)
located on adapter plate (G).
5. Make proper electrical connection with wiring exiting through hole (K) of
adapter plate (G).
6. Connect ground wire (green) from the xture to the ground wire in outlet box.
Connect the black wires from the xture (or smooth side of the wire) to the
black wire in the outlet box using wire nuts (H). Connect the white wires from
the xture (or rough side of the wire) to the white wire in the outlet box using
wire nuts (H).
7. Afx mounting plate (F) and adapter plate (G) to “J BOX” by inserting
mounting plate screw (I) into slotted hole on bottom of mounting plate (F) and
slotted hole on bottom of adapter plate (G). Thread screw (I) into bottom hole
of “J BOX.”
8. After mounting plate and adapter plate are moved into desired position, insert
mounting plate screw (E) into slotted hole in top of mounting plate (F) and
slotted hole in top of adapter plate (G) and thread screw (E) into drywall
above “J BOX”. Make sure to use threaded plastic sleeve (included) with
mounting plate screw (E) when attaching xture to drywall.
9. Align holes in top and bottom of backplate (D) with screw holes in top and
bottom of mounting plate (F).
10. Place backplate (D) over mounting plate (F). Thread backplate screws (C)
into backplate (D) to secure xture to mounting plate (F).
11. Align threaded section of glass shades (A) with threaded openings of socket
cover (B). Thread glass shades (A) onto threaded socket cover (B) until tight.
FIG. B
HORIZONTAL
MOUNT
(J)
(E) (I)
"J BOX"
(F)
(G)
(H)
(K)
(H)
VERTICAL MOUNTING
HORIZONTAL MOUNTING
1. Follow steps 1 -3 listed above.
2. Carefully position adapter plate (G) behind mounting plate (F) and guide
wires from xture through hole (M) located in the middle of mounting plate
(F) and hole (K) located in the middle of adapter plate (G).
3. Follow steps 5 - 6 listed above.
4. Position mounting plate (F) and adapter plate (G) horizontally over “J
BOX”. Afx mounting plate (F) and adapter plate (G) to drywall on right and
left side of “J BOX” by inserting mounting plate screws (E) and (I) into
slotted holes on right and left side of mounting plate (F) and adapter plate (G).
Make sure to use threaded plastic sleeve (included) with mounting plate
screws (E), and (I) when attaching xture to drywall.
5. Follow steps 9 - 11 listed above.
DIMMER WARNING:
If any special control devices are used with this xture, follow the instructions
carefully to assure compliance with N.E.C. requirements. If there are any
questions, contact a qualied electrical contractor.
NOTE: This lamp comes with two non-replaceable solid state LEDs installed.
Product specificaties
| Merk: | Robert Abbey |
| Categorie: | Niet gecategoriseerd |
| Model: | Roderick W1350 |
Heb je hulp nodig?
Als je hulp nodig hebt met Robert Abbey Roderick W1350 stel dan hieronder een vraag en andere gebruikers zullen je antwoorden
Handleiding Niet gecategoriseerd Robert Abbey

1 April 2026
1 April 2026
31 Maart 2026
31 Maart 2026
31 Maart 2026
31 Maart 2026
30 Maart 2026
30 Maart 2026
30 Maart 2026
30 Maart 2026
Handleiding Niet gecategoriseerd
Nieuwste handleidingen voor Niet gecategoriseerd
1 April 2026
1 April 2026
1 April 2026
1 April 2026
1 April 2026
1 April 2026
1 April 2026
1 April 2026
1 April 2026
1 April 2026