QualGear QG-SB-002-BLK Handleiding
QualGear
luidsprekersteun
QG-SB-002-BLK
Bekijk gratis de handleiding van QualGear QG-SB-002-BLK (4 pagina’s), behorend tot de categorie luidsprekersteun. Deze gids werd als nuttig beoordeeld door 13 mensen en kreeg gemiddeld 4.7 sterren uit 7 reviews. Heb je een vraag over QualGear QG-SB-002-BLK of wil je andere gebruikers van dit product iets vragen? Stel een vraag
Pagina 1/4

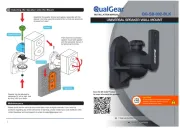
Installing the Speaker onto the Mount
4
7
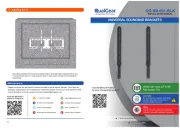
QG-SB-002-BLK
UNIVERSAL SPEAKER WALL MOUNT
Do not exceed the maximum rated weight
specied. Otherwise, serious injury or
property damage may occur.
.5kg
(7 7 bs)
3.5kg
(7.7lbs)
Vers on August
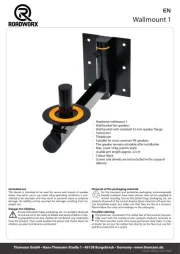
Speaker
Assemble the speaker bracket and speaker assembly with the
speaker mount by using the knob and at nut that was previously
removed from step 1.
Then insert the assembled
speaker mount with speaker
onto the wall plate. Secure it
by tightening the screw.
Speaker can be adjusted by
swiveling±70° left or right, and
by tilting ±20°up or down.
Speaker Bracket
Speaker Mount
Wall Plate
Scan the QR Code™ below
for more info about this product:
Version August 2020

Please read the entire installation manual before you start installation and assembly.
1
NOTE
W NGARNI
This uct was d to be st d on the f g l struct n ly:prod designe in alle ollowin wal con io on
WALL CONST CTION DWARE REQUIREDRU HAR
W n tud Inc edoode S lud
W n B m Inc d oode ea lude
S d crete Inc d oli Con lude
Ot r ntact Q if d Profess alhe Co ual ie ion
Do not begin to install your QualGear product
until you have read and understood all the
instructions and warnings contained in this
installation manual. If you have any questions
regarding the instructions, for US customers
please contact QualGear customer support
via email at support@qualgear.com. For
all international customers, please contact
your local distributor.
T s hi produ houlct s d only be t d by ins alle
s e of omeon good mechanica ap ude hal tit , s
experience with basi buildinc g cons ruc iont t ,
and f y ull unders andt s t e hes ins ruc ionst t .
T s hi product wa de ignes s d to be in allest d
and ut d y as s cif d in t s ilize onl pe ie hi manual.
I r mprope in alla iost t n of t s ct hi produ may c se au
damage or s s eriou injury. Q G r is t ual ea no
liable for e th improper use or in alla iost t n of its
products.
Make sure t t the t g ha suppor in sur acf e
will sa elf y support the combine load d of the
equipment an ald
l a d ttache hardwar ane d
c ts.omponen
A ys lwa use an assis ant t or mechanical
li inft g equipment to sa el lif y ft an posi iod t n the
equipment.
Tighten screws rmly, but do not over tighten.
Over tightening can damage the items, greatly
reducing their holding power.
ALL QUAL R ts GEA produc ar in endee t d for
indoor us onle y and an ou dooy t r use s the void
limi warranted ty.
ALL QUAL R ts GEA produc ar designee d
and t ted for es re iden ias t l use onl any d any
commercial use v s the ted oid limi warranty.
For warranty information, please visit
http://www.qualgear.com/warranty.php.
If g to mountin woode studn s, make sur thae t
moun int g sc s rew ar an horee c d into th cene ter
of the st s. Use of an t e stud ud edge- o-edg finder
is highl recommendedy .
Never ex eec d the m maximu ra weighted t
speci ief d in t s .hi manual
All bol ants d sc s rew must be used at the
designated points in the ins alla io ins ruct t n t tions
to preven propert ty damage and per ona/or s l
injury.
DO NOT ins alt l nea air r condi ione ent r v ts or
where t e is her ex siv duces e st or s ke.mo
W n he drilling holes in the wall, it is v y er
impor ant t to take c e of ar ele ri cablesct cal ,
water, or s ga pipes in the wall.
2
IMPORTANT! Please read the entire installation manual and check that all parts are
included before you start installation and assembly.
Part and Hardware Package
ST4.2x24mm
Lag Bolt (x4)
6x29mm Concrete
Anchor (x4)
M5x12 Screw (x4)
Disassembling the Speaker Wall Mount
1
Loosen and remove the screw in order
to separate the wall plate from the
speaker wall mount.
Loosen and remove the knob and the
at nut in order to separate the speaker
bracket from the speaker mount.
QG-S B-0 02- BLK
Marking Template (x1)
W-A W-B W-C
Wall Plate
Flat Nut
Knob

Installing the Speaker Bracket
2
Screw the speaker bracket onto the speaker.
3a
Using an edge-to-edge stud nder, nd the
edges of the stud.
1
Using a level, mark the centerline of the stud.
2
Stud Finder
Mounting to a Wooden Stud Wall
3
4
NOTE
For concrete nt g, mou in
s tep 3b.ee S
Using a Phillips screwdriver, mount the wall plate and fasten with the provided screws (W-A).
Wall Plate
ø 2.4mm
(ø 3/ ")32
3
5
Using the marking template, mark two holes for
drilling on the centerline of the stud.
QG-SB-002-B LK
SK IP TO STEP 4
NOTE
Do NOT use power drill and do NOT over tighten the lag bolts.
Using a power drill and 3/32" drill bit, drill pilot
holes of 3/32" (2.4mm) diameter and at least
1" (25 mm) depth.
4
mm25mm
(1")
(1")
Speaker Bracket
Speaker
W-A
W-C
Product specificaties
| Merk: | QualGear |
| Categorie: | luidsprekersteun |
| Model: | QG-SB-002-BLK |
Heb je hulp nodig?
Als je hulp nodig hebt met QualGear QG-SB-002-BLK stel dan hieronder een vraag en andere gebruikers zullen je antwoorden
Handleiding luidsprekersteun QualGear
16 Juni 2025
16 Juni 2025
Handleiding luidsprekersteun
- Newstar
- Vogels
- B-tech
- KEF
- Tannoy
- Xtech
- Focal
- Flexson
- Perlegear
- Norstone
- Axis
- Velleman
- Nedis
- HQ
- Monacor
Nieuwste handleidingen voor luidsprekersteun
5 Augustus 2025
4 Augustus 2025
4 Augustus 2025

4 Augustus 2025

2 Augustus 2025

29 Juli 2025
29 Juli 2025

29 Juli 2025

28 Juli 2025
28 Juli 2025