OmniMount AB2 HTS Handleiding
OmniMount luidsprekersteun AB2 HTS
Bekijk gratis de handleiding van OmniMount AB2 HTS (2 pagina’s), behorend tot de categorie luidsprekersteun. Deze gids werd als nuttig beoordeeld door 40 mensen en kreeg gemiddeld 4.8 sterren uit 9 reviews. Heb je een vraag over OmniMount AB2 HTS of wil je andere gebruikers van dit product iets vragen? Stel een vraag
Pagina 1/2
�
�
�
Ceiling
Wall
Wall
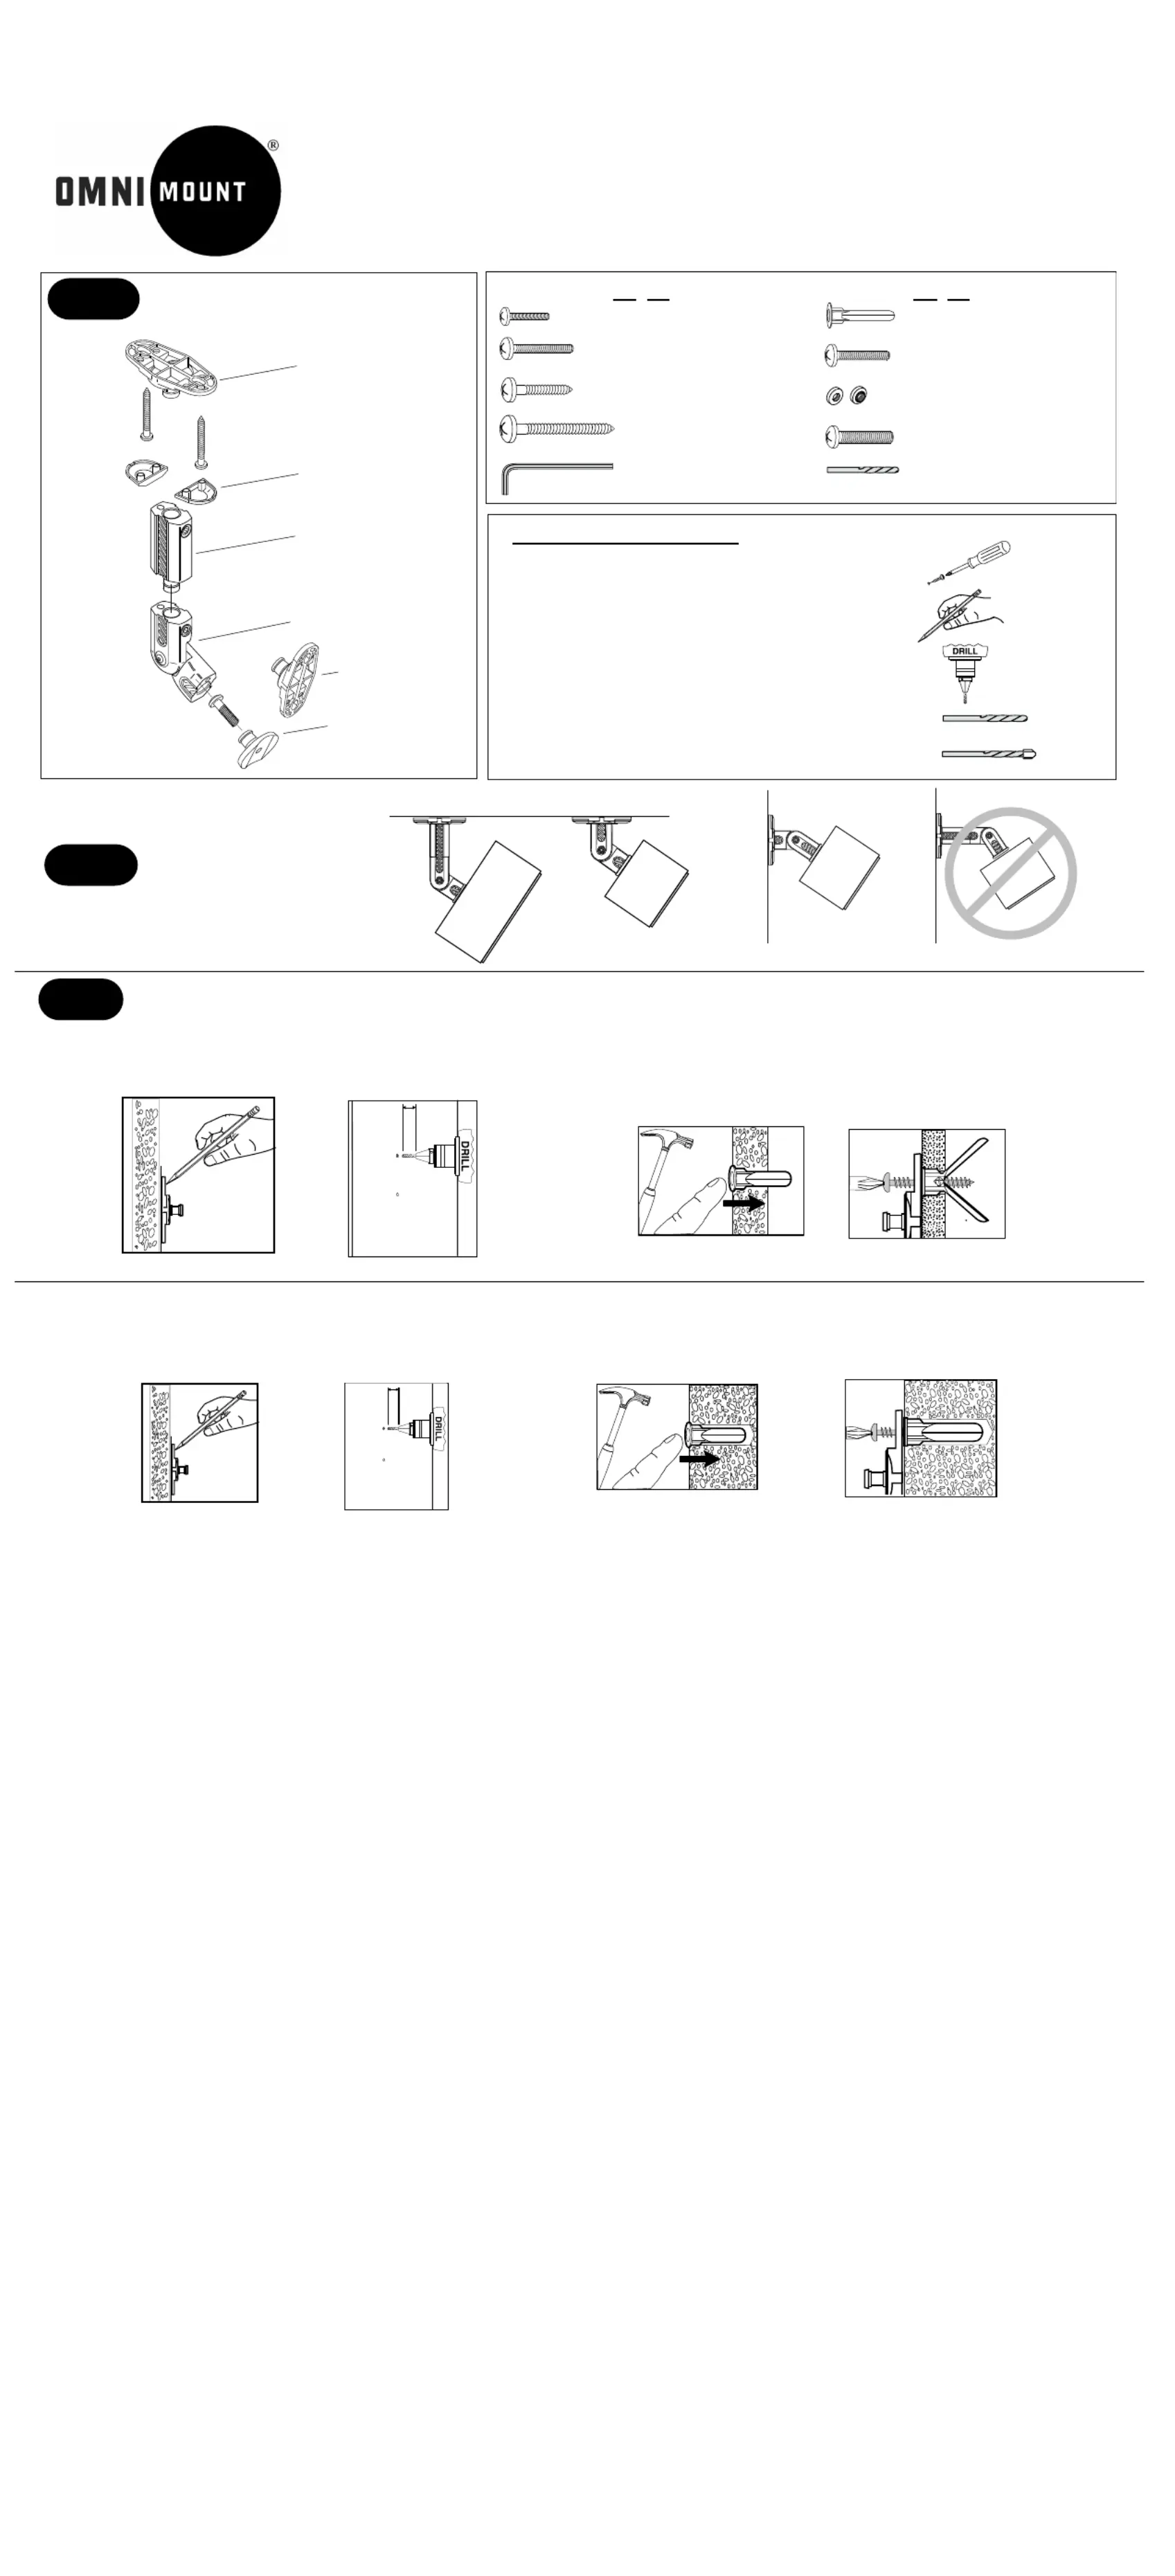
Step 1 Identify parts
Additional installation tools
Phillips Head Screw Driver
Pencil
Electric Drill
Drill Bits: 1/8'' drill bit for drywall
5/16'' masonry bit for cement wall applications
Step 3 Installation of the wall plate
Mounting to drywall.
1. Use the wall plate as a template and mark the screw hole locations onto the surface using a pencil.
2. Drill into the drywall with a 1/4'' drill bit. Insert the anchors into the hole as shown in fig. 3.
3. Secure with the #12 x 1-3/4'' screws, see fig. 4.
Mounting to solid concrete or cinder block.
1. Drill into the surface with a 3/16'' masonry drill bit 1-3/4" deep and insert the anchors into the holes as shown in Fig. 3
2. Secure wall plate with the #12 x 1-3/4" , see fig. 4.
1/8”
5/16''mason bit
�
�
These fasteners and tools are provided
3/32''
�
Step 2
Decide on location
�
Extension
Adjusting knuckle
Speaker plate
Mounting plate (1)
Screw covers
Mounting plate (2)
g. 3
g. 3
(1) (5) M4 X 12mm Phillips
pan head machine screw
(1) (5) M5 X 12mm Phillips pan
head machine screw
(2) (10) #12 X 3/4" Phillips pan
head self-tapping screw
(2) (10) #12 X 1-3/4'' Phillips pan
head self-tapping screw
(1) (5) 5/32'' Hex key
(2) (10) Plastic anchor
(1) (5) 8-32 X 5/8'' Phillips pan
head machine screw
(1) (5) Circular nut (PEM)
8-32 thread
(1) (5) 1/4-20 X 1" Phillips pan
head machine screw
(1) (2) 3/32'' Drill bit
g. 4
g. 4
�
�
�
AB2/AB2 HTS INSTALLATION INSTRUCTIONS
�
1 3/4"
�
1 3/4"
�
�
�
AB2 HTSAB2 HTS
Knurled side
Product specificaties
| Merk: | OmniMount |
| Categorie: | luidsprekersteun |
| Model: | AB2 HTS |
| Kleur van het product: | Zwart |
| Type verpakking: | Master Carton |
| Maximale gewichtscapaciteit: | 3.6 kg |
| Draaihoek: | 360 ° |
| Brutogewicht buitenverpakking: | 4.7 kg |
| Hoogte (cm): | 21.6 cm |
| Lengte (cm): | 49.5 cm |
| Breedte (cm): | 15.2 cm |
| Aantal producten inbegrepen: | 5 stuk(s) |
Heb je hulp nodig?
Als je hulp nodig hebt met OmniMount AB2 HTS stel dan hieronder een vraag en andere gebruikers zullen je antwoorden
Handleiding luidsprekersteun OmniMount

6 November 2025
5 Augustus 2025
4 Augustus 2025
7 Juli 2025
7 Juli 2025
12 Mei 2025
12 Mei 2025
11 Mei 2025
11 Mei 2025
11 Mei 2025
Handleiding luidsprekersteun
Nieuwste handleidingen voor luidsprekersteun
13 Juli 2026
7 Juli 2026
6 Juli 2026
13 Mei 2026
12 Mei 2026
11 Mei 2026
11 Mei 2026
5 Mei 2026
3 Mei 2026
2 Mei 2026