Pixel R60c Handleiding
Bekijk gratis de handleiding van Pixel R60c (2 pagina’s), behorend tot de categorie Lamp. Deze gids werd als nuttig beoordeeld door 18 mensen en kreeg gemiddeld 4.2 sterren uit 2 reviews. Heb je een vraag over Pixel R60c of wil je andere gebruikers van dit product iets vragen? Stel een vraag
Pagina 1/2
R
R
R
RR6
6
6
660
0
0
00c 环
c 环
c 环
c 环c 环形
形
形
形形灯
灯
灯
灯灯说
说
说
说说明
明
明
明明书
书
书
书书
一
一
一
一一、
、
、
、、承
承
承
承承蒙
蒙
蒙
蒙蒙您
您
您
您您惠
惠
惠
惠惠顾
顾
顾
顾顾
为正确使用本产品,请先仔细阅读此说明书,并熟悉其操作步骤。注意保存此说明书,以备参考。
6
6
6
66.
.
.
. . U
U
U
UUS
S
S
SSB
B
B
BB-
-
-
--Q
Q
Q
QQC
C
C
CC3
3
3
33.
.
.
..0
0
0
00接
接
接
接接口
口
口
口口,
,
,
,,支
支
支
支支持
持
持
持持手
手
手
手手机
机
机
机机充
充
充
充充电
电
电
电电以
以
以
以以及
及
及
及及其
其
其
其其它
它
它
它它设
设
设
设设备
备
备
备备充
充
充
充充电
电
电
电电。
。
。
。。
制 造 商: 东莞市宝易电子科技有限公司
地 址: 东莞市大朗镇金朗南路255号
网 址: http://www.pixelhk.com
电话: 400-8084899
执行标准: Q/PSKJ 004-2016
Made in china
二
二
二
二二、
、
、
、、产
产
产
产产品
品
品
品品参
参
参
参参数
数
数
数数
型 号
R60c
光 源
显色性 CRIRa: >97
显色性 TLCIQa: >99
角度
120 度
色温
3000K~5800K
@0.5米
4900Lux
工作电流
4A
亮度参数
电气参数
工作电压
DC 14-18V
功率恒功率瓦(3000K=瓦 5800K=60瓦)6060
控制系统
遥控无线频率
2.4GHz
无线频道
无线群组5个 (A.B.C.D.E)
控制距离
50米
亮度调节
显示
LCD 2.寸1
外 观
尺寸
材料
塑胶+铝合金
散热方式
铝合金加自然对流
净重量
0~100% 和0%1%.25%.50%.75%.100%
48 个(1~48)
三
三
三
三三、
、
、
、、操
操
操
操操作
作
作
作作面
面
面
面面板
板
板
板板名
名
名
名名称
称
称
称称
外径48.5cm (外径19英寸)
1.1KG
1
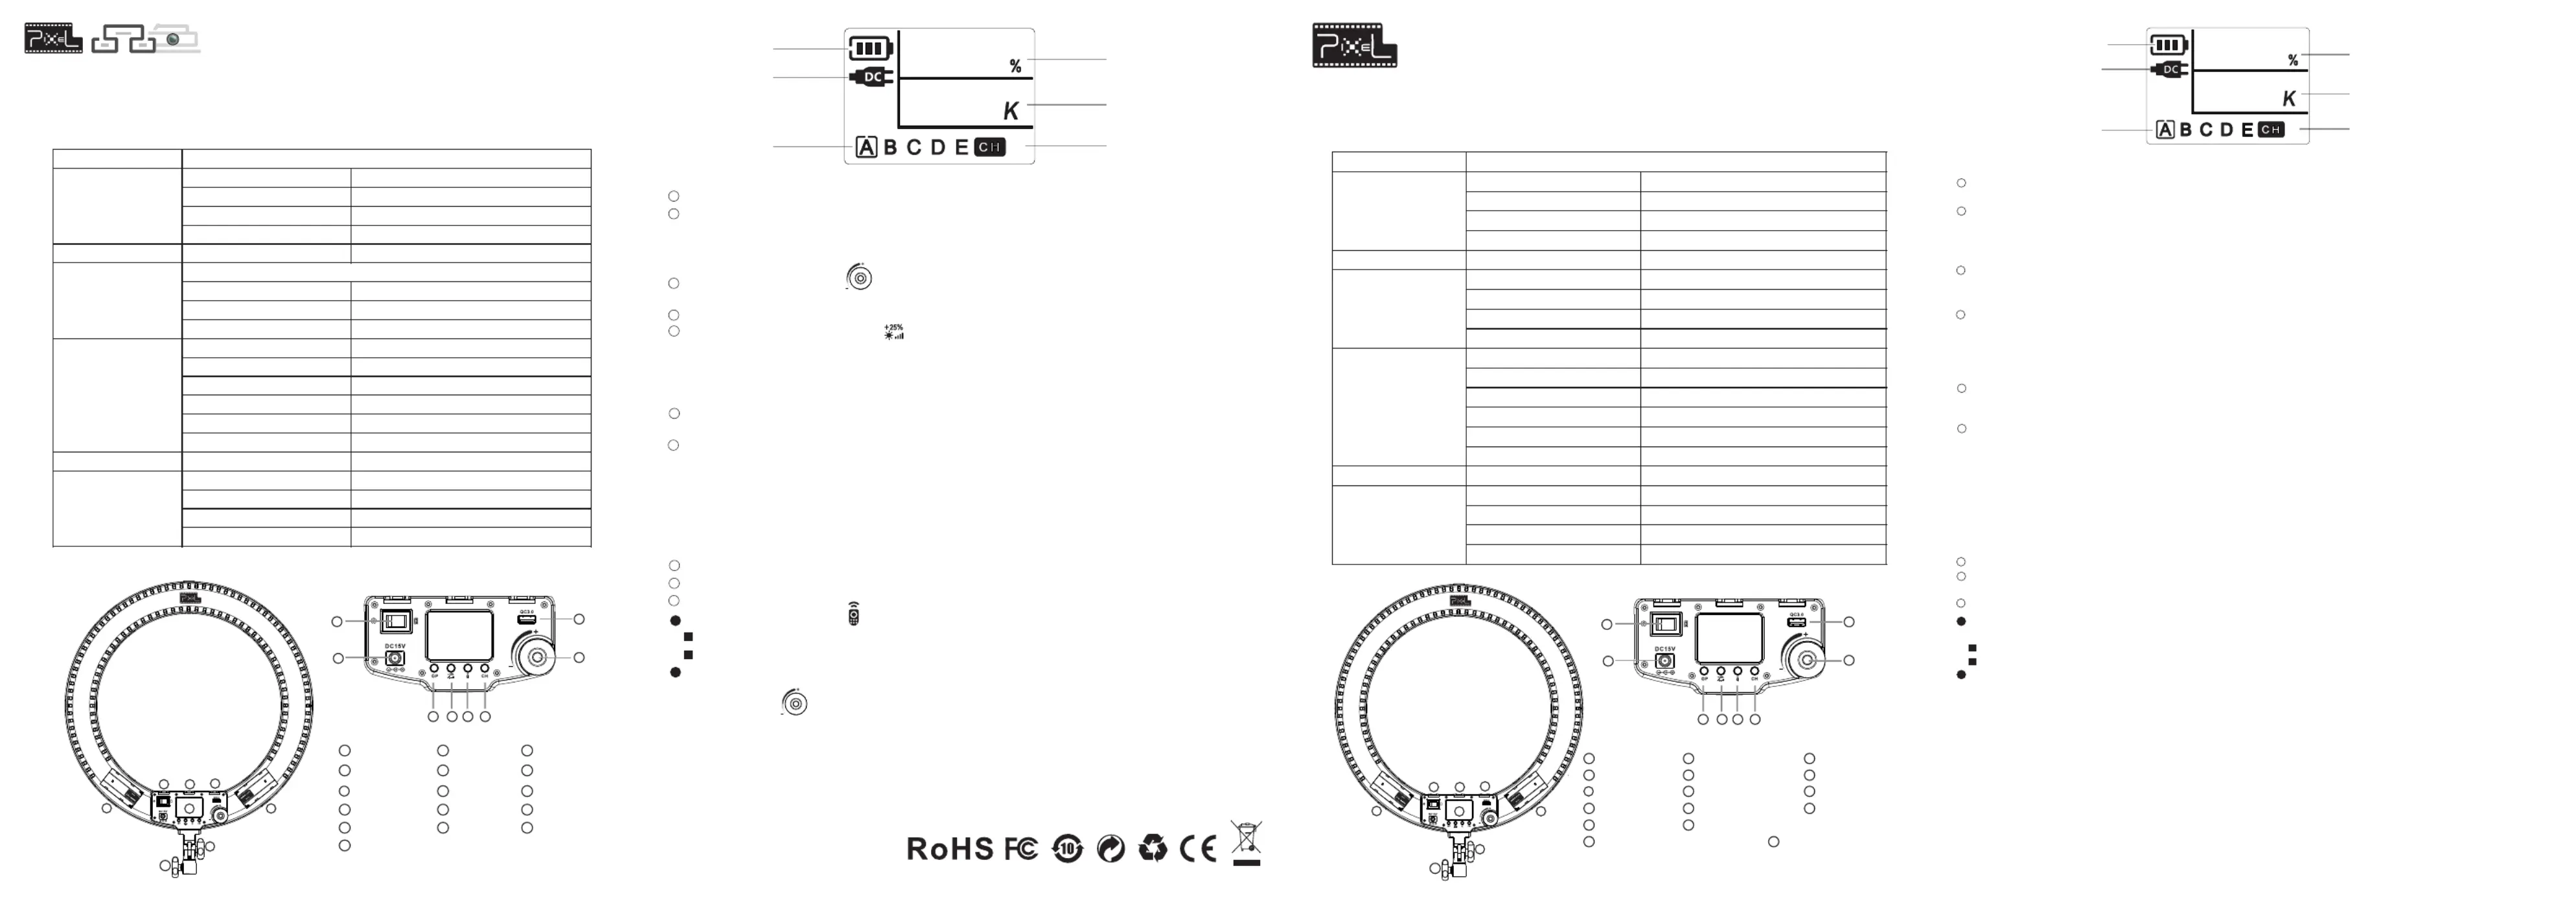
冷靴座
2
液晶显示屏
3
冷靴座
4
冷靴座
5
锂电池仓
6
8
USB-QC3.0
9
适配器接口
10
调节亮度/色温/切换开关
11
组别切换
12
频道设置
电源转换开关
13
亮度快速调整
14
遥控模式
15
紧固灯架旋钮
16
紧固旋钮
亮量百分比
色温显示
适配器供电
频道显示
组别显示
电池型号
NF-550570.750.770.950.960.970 两个.
锂电池仓
7
9
11
10
12
14
16
接 口
USBQC3.0-
DC 5V3A9V2A12V15A//.
7
13
5
2
4
6
8
DC7
.4V
BM:1518
For NP-F550/F570/F750/F770/
F960/970 battery
DC7.4V
BM:1518
For NP-F550/F570/F750/F770/
F960/970 battery
5800
1
1
1
11
1
1
1
110
0
0
000
0
0
00
13
15
电池供电
1
1
1
11. 打
. 打
. 打
. 打. 打开
开
开
开开灯
灯
灯
灯灯光:
光:
光:
光:光:
电池供电: 请在锂电池安装口上安装2节索尼NP-F系列电池,按下电池标识侧开关,即可打开环形灯。
1
适配器供电:请把电源适配器的DC头插入适配器接口,再把适配器的电源线插入电源插座并且连接110V60HZ或
240V50Hz交流电,按下环形灯电源转换开关,即可打开环形灯。
2
注: 打开电源开关后,按最后保存的参数进入工作状态,显示屏显示灯当前的工作参数。
2
2
2
22. 调
. 调
. 调
. 调. 调节
节
节
节节亮
亮
亮
亮亮度/双
度/双
度/双
度/双度/双色
色
色
色色温
温
温
温温切
切
切
切切换:
换:
换:
换:换:
1
开机状态下旋转亮度微调旋钮[]此时对环形灯功率进行调整,显示屏会显示当时的功率,可调节的范围为
0%~100%当显示0%时为关闭灯。
3
开机状态下按一下亮度快速调整按钮[]在0%1%25% 50%75%100% 六个亮度档位循环调整。当显示0%
时为关闭灯。
按下频道设置按钮[]显示屏上的CH频道会闪烁,再旋转频道调节旋钮可以调节CH01-CH48循环调整,调到
需要的频道后再按一下频道设置按钮[]或等4秒后自动确认为当前频道。
注: 第一次调整会让灯从原始的功率提高到相近的档位。
注: 调节任何一台灯的功率都会同步到相同频道相同组别的灯。
3
3
3
33. 频
. 频
. 频
. 频. 频道
道
道
道道组
组
组
组组别
别
别
别别的
的
的
的的设
设
设
设设置:
置:
置:
置:置:
按一下组别切换[]进入下一组,共分A、B、C、D、E、可以循环切换,显示屏上会显示出当前组别。
在切换组别时摄影灯会调出不同组别的最后一次数据作为当前值并调整亮度。
1
2
CH
GP
1)1-48本型号的灯可以设置联控频道,不同频道的灯调节不会相互干扰。
2).E.本型号的灯可以设置为A B.C.D.组别。每个组别可以同时有若干只灯。
3)对同一组别的灯进行无线联控时,需要设置为同一频道。
注:调节任何一台灯的功率都会同步到相同频道相同组别的灯。
4
4
4
44. 无
. 无
. 无
. 无. 无线
线
线
线线联
联
联
联联控:
控:
控:
控:控:
首先保证主控灯和受控灯处于同一频道。
同一组别的亮度调整,只要调整同一组别的任何一台灯,同频同组的其他影视灯将会跟随调整灯同步调整。
不同组别的亮度调整。
1
2
3
进入遥控模式: 按下遥控模式[ ]显示屏上的当前受控组别标识会闪烁。
按组别切换[]可以切换当前受控组别并显示对应组别的当前设置。
G
G
G
GGP
P
P
PP
在组别标识闪烁时可以调整对应闪烁组别的灯光亮度,主控灯设置不受影响。
再次按下遥控模式或4秒不调整会自动退出遥控模式。
7
7
7
77. 关
. 关
. 关
. 关. 关掉
掉
掉
掉掉灯
灯
灯
灯灯光
光
光
光光时
时
时
时时会
会
会
会会自
自
自
自自动
动
动
动动保
保
保
保保存
存
存
存存当
当
当
当当前
前
前
前前的
的
的
的的参
参
参
参参数
数
数
数数设
设
设
设设置
置
置
置置,
,
,
,,以
以
以
以以便
便
便
便便再
再
再
再再次
次
次
次次使
使
使
使使用
用
用
用用时
时
时
时时快
快
快
快快速
速
速
速速恢
恢
恢
恢恢复
复
复
复复上
上
上
上上次
次
次
次次的
的
的
的的拍
拍
拍
拍拍摄
摄
摄
摄摄场
场
场
场场景
景
景
景景灯
灯
灯
灯灯光
光
光
光光。
。
。
。。
CH
GP
2
按一下旋钮中间的切换键,即可进入双色温调整模式,再 微调旋钮对色温进行调整范围为:3000K~5800K。
长按旋钮中间键[ ]进入特效模式,再短按旋钮中间键可进行闪电1/闪电2/屏幕模式/SOS四种特效
切换,再次长按旋钮中间键退出特效模式。
5
5
5
55. 特
. 特
. 特
. 特. 特效
效
效
效效模
模
模
模模式:
式:
式:
式:式:
PL-2348-01V01
Instruction Manual
Overview
P
P
P
PPr
r
r
rro
o
o
ood
d
d
ddu
u
u
uuc
c
c
cct I
t I
t I
t It In
n
n
nnt
t
t
ttr
r
r
rro
o
o
ood
d
d
ddu
u
u
uuc
c
c
cct
t
t
tti
i
i
iio
o
o
oon
n
n
nn
Before using this product, please carefully read the instruction manual. This manual can help you better
understand how to use the product and make you easily handle the operation method.
Model
R60c
Light Source
CRI
Ra: >97
TLCIQa: >99
Angle
120 °
Color Temperature
3000K~5800K
0.5 meter4900Lux
Working current4A
Brightness parameters
Electric parameters
Operating voltageDC 14-18V
Power
Constant power 60W (3000K=60W 5800K=60W)
Control system
Remote radio frequency
2.4GHz
Wireless channel
Wireless group
5 groups
Control distance
50M
Brightness adjustment
Display
LCD 2.1in
Appearance
Size
MaterialAluminum alloy + plastic
Heat-dissipating mehthodAluminum alloy plus natural convection
Net Weight
0~100% and 1%.25%.50%.75%.100%
48 CH
1.1KG
Outer Diameter:19"/48.5cm
Battery model
NF-550570750770950960970 ﹑﹑﹑﹑﹑﹑
Interface
USBQC3.0-
DC 5V3A9V2A12V15A//.
1
23
4
5
6
8
9
10
11
12
13
14
15
16
7
9
11
10
12
14
16
7
13
5
2
4
6
8
DC7
.4V
BM:1518
For NP-F550/F570/F750/F770/
F960/970 battery
DC7
.
4V
BM:1518
For NP-F550/F570/F750/F770/
F960/970 battery
13
15
N
N
N
NNa
a
a
aam
m
m
mme o
e o
e o
e oe of P
f P
f P
f Pf Pa
a
a
aar
r
r
rrt
t
t
tts
s
s
ss
Cold Shoe
LCD Display
Cold Shoe
Cold Shoe
Lithium Battery clipLithium Battery clip
Lock Knob
Angle Adjustable Knob
Power Switch
Adapter Socket
Group Setting
Brightness Quick Adjust
Remote Control
Channel Setting
USB-QC3.0
Bright and Color Adjust Switch
O
O
O
OOp
p
p
ppe
e
e
eer
r
r
rra
a
a
aat
t
t
tte I
e I
e I
e Ie In
n
n
nns
s
s
sst
t
t
ttr
r
r
rru
u
u
uuc
c
c
cct
t
t
tti
i
i
iio
o
o
oon
n
n
nn
1
1
1
11.
.
.
..Tu
Tu
Tu
TuTur
r
r
rrn O
n O
n O
n On On
n
n
nn:
:
:
::
Note: After turned on the power, the light will work as the last settings. The monitor display the current parameters.
2
2
2
22.
.
.
..B
B
B
BBr
r
r
rri
i
i
iig
g
g
ggh
h
h
hht
t
t
ttn
n
n
nne
e
e
ees
s
s
sss
s
s
ss/C
/C
/C
/C/Co
o
o
ool
l
l
llo
o
o
oor t
r t
r t
r tr te
e
e
eem
m
m
mmp
p
p
ppe
e
e
eer
r
r
rra
a
a
aat
t
t
ttu
u
u
uur
r
r
rre
e
e
e e A
A
A
AAd
d
d
ddj
j
j
jju
u
u
uus
s
s
sst
t
t
ttm
m
m
mme
e
e
een
n
n
nnt D
t D
t D
t Dt Di
i
i
iia
a
a
aal
l
l
ll:
:
:
::
Adapter Supply: Please connect the adapter socket with DC adapter, then plug the adaptor cable to the power
socket and connect it with 110v60Hz or 220V50Hz, press the power switch toturn on the ring light.
Note: Adjusting one of the LED light power will automatically sync to other lights which are under the same
channel and group.
3
3
3
33.
.
.
..C
C
C
CCh
h
h
hha
a
a
aan
n
n
nnn
n
n
nne
e
e
eel a
l a
l a
l al an
n
n
nnd G
d G
d G
d Gd Gr
r
r
rro
o
o
ooup S
up S
up S
up Sup Se
e
e
eet
t
t
ttt
t
t
tti
i
i
iin
n
n
nng
g
g
gg:
:
:
::
1)The light can be set between 1 to 48 channel. And no interference between lights in different channels.
2)The light can be set between A. B. C. D. E . group, each group can have a lot of lights.
3)You need to set the same channel when you want wireless control all the lights under same group.
4
4
4
44. W
. W
. W
. W. Wi
i
i
iir
r
r
rre
e
e
eel
l
l
lle
e
e
ees
s
s
sss C
s C
s C
s Cs Co
o
o
oon
n
n
nnt
t
t
ttro
ro
ro
rorol
l
l
ll:
:
:
::
Make sure the master and slave light are in the same channel.
Brightness adjust in the different group
Enter to Remote Control mode: Press the Remote Control button, the current controlled group icon on the
display will flash.
Press Group Setting button to switch to the group you want to adjust.
Press Remote Control button again or wait 4 seconds to exit the remote control mode.
Press the Brightness Quick Adjust button to cyclically adjust the brightness between 0%, 1%,25%,50%,75%,
100%. The first adjustment will increase the power of the light from the current power to the closest power.
The CH icon will flash on display after the press the Channel Setting Button. Then rotate the adjust switch
to change the channel between CH01 to CH48, press the Channel Setting button or wait 4 seconds to
confirm the channel.
The group can be changed by pressing the Group Setting Button (A, B, C, D, E 5 groups in total). And the
display will show the existing group. When switched to a different group, the LED lights will be reset based
on the new group.
Note: Adjusting one of the light will automatically sync to the other lights which are under the same channel
and group.
Adjusting the brightness of the same group of lights, you only need to adjust any one light of the group. The
other lights in the same group and channel will be adjusted automatically.
7
7
7
77Tu
Tu
Tu
TuTur
r
r
rrn o
n o
n o
n on of
f
f
fff t
f t
f t
f tf th
h
h
hhe l
e l
e l
e le li
i
i
iig
g
g
ggh
h
h
hht p
t p
t p
t pt pow
ow
ow
owowe
e
e
eer, t
r, t
r, t
r, tr, th
h
h
hhe c
e c
e c
e ce cu
u
u
uur
r
r
rrr
r
r
rre
e
e
een
n
n
nnt p
t p
t p
t pt pa
a
a
aar
r
r
rra
a
a
aam
m
m
mme
e
e
eet
t
t
tte
e
e
eer
r
r
rrs a
s a
s a
s as ar
r
r
rre a
e a
e a
e ae au
u
u
uut
t
t
tto
o
o
oom
m
m
mma
a
a
aat
t
t
tti
i
i
iic
c
c
cca
a
a
aal
l
l
lll
l
l
lly s
y s
y s
y sy sa
a
a
aave
ve
ve
veved
d
d
dd.
.
.
..
.
.
.
..
2
1
2
1
2
1
2
3
Rotate the Dial to adjust the ring light's brightness, LCD display will show the current brightness level at the
same time, which can be adjusted from 0% to 100%. Press the middle of the adjustment dial and rotate the
dial to change the color temperature between 3000K - 5800K.
15V
You can adjust the brightness when the controlled group icon flashes.
Color Temperature Display
Power adapter socket
Group DisplayChannel Display
Bright Display
Battery display
Battery Supply: Please install battery on the lithium battery clip. Press the Power Switch button to the battery
icon to turn on the LED light (Note: Only support SONY NP-F series battery, battery not included)
1
6
6
6
66.
.
.
..E
E
E
EEq
q
q
qqu
u
u
uui
i
i
iip
p
p
ppp
p
p
ppe
e
e
eed w
d w
d w
d wd wi
i
i
iit
t
t
tth U
h U
h U
h Uh USB Q
SB Q
SB Q
SB QSB QC
C
C
CC3
3
3
33.
.
.
..0 p
0 p
0 p
0 p0 po
o
o
oor
r
r
rrt s
t s
t s
t st su
u
u
uui
i
i
iit
t
t
tta
a
a
aab
b
b
bbl
l
l
lle f
e f
e f
e fe fo
o
o
oor c
r c
r c
r cr ch
h
h
hha
a
a
aar
r
r
rrg
g
g
ggi
i
i
iin
n
n
nng s
g s
g s
g sg sm
m
m
mma
a
a
aar
r
r
rrt
t
t
ttp
p
p
pph
h
h
hho
o
o
oon
n
n
nne
e
e
ees a
s a
s a
s as an
n
n
nnd ot
d ot
d ot
d otd oth
h
h
hhe
e
e
eer d
r d
r d
r dr de
e
e
eev
v
v
vvi
i
i
iic
c
c
cce
e
e
ees
s
s
ss.
.
.
. .
5
5
5
558
8
8
880
0
0
000
0
0
00
1
1
1
11
1
1
1
110
0
0
000
0
0
00
5
5
5
55.
.
.
..S
S
S
SSc
c
c
cce
e
e
een
n
n
nne M
e M
e M
e Me Mo
o
o
ood
d
d
dde
e
e
ee:
:
:
::
Long press the middle button of the knob to enter the special mode, then short press the button to switch
the four effect modes amonglightning1/ lightning 2/ screen mode /SOS.Long press the middle button
again to exit the special mode.
Thank you for choosing Pixel Enterprise Limited product and reading this user manual. If there are any
other questions, please consult the local dealer or email us to Support@pixelhk.com
Product specificaties
| Merk: | Pixel |
| Categorie: | Lamp |
| Model: | R60c |
Heb je hulp nodig?
Als je hulp nodig hebt met Pixel R60c stel dan hieronder een vraag en andere gebruikers zullen je antwoorden
Handleiding Lamp Pixel

16 November 2024
16 November 2024
16 November 2024
27 Mei 2023
Handleiding Lamp
Nieuwste handleidingen voor Lamp
22 April 2026
22 April 2026
21 April 2026
21 April 2026
21 April 2026
21 April 2026
21 April 2026
20 April 2026
20 April 2026
20 April 2026