Panzeri Cross Handleiding
Panzeri
Verlichting
Cross
Bekijk gratis de handleiding van Panzeri Cross (2 pagina’s), behorend tot de categorie Verlichting. Deze gids werd als nuttig beoordeeld door 80 mensen en kreeg gemiddeld 4.2 sterren uit 40.5 reviews. Heb je een vraag over Panzeri Cross of wil je andere gebruikers van dit product iets vragen? Stel een vraag
Pagina 1/2

www.panzeri.i panz ri@panz ri.it e e t
A0 .030. 1 A0 .060 149__ 010 49__ .010
CROSS
FIG.1
IS IO ’IT ZRU NI D NSTALLAZIONE ED USO
ATTENZIONE: LEGGERE E CONSERVARE LE PRESENTI
IST ZIONI RU
Solo il rispetto scrupoloso delle indicazioni qui contenute in sede di
montaggio e di uso garantiscono la sicurezza.
L’installazione e tutte le operazioni di manutenzione non ordinarie
dovranno essere effettuate solo da personale qualificato.
Disinserire l’apparecchio dall rea te di al ntazione ogni qual volta ime
si agisce sullo stesso.
Panzeri Carlo srl non si ritiene responsabile di eventuali danni a persone
e/o cose derivati dalla errata installazione, cattivo uso o da modifiche non
da essa apportate ai prodotti.
ARTI OLIC
A049__.030.0101 LED 220-240V
A049__.060 LED 220-240V
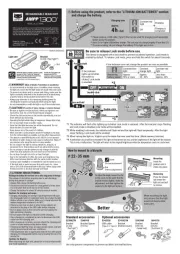
ESTRAZIONE FASCIA
- Per togliere la fascia (O) estrarre la linguetta (B) facendo leva verso il
se lla fr cia .1nso de ec . (FIG )
- Estrarre la linguetta (A)
- Rimuovere il vetro svitando le due viti laterali
SCHE GGMA MONTA IO AMPADA L
-Fissare a muro la montatura (1)
-Collegare i cavi di rete al morsetto (2) dopo averli isolati con le calze di
ve dota e. tro in zion
-Fissare il vetro (3) stringendo le due viti laterali usando l’apposita
chiave
Pe ttu dei do ut al taz one car evitare o r re vetri v i la d ail i termi
NON STRING TRO O LE VITI ERE PP
POSIZIONAMEN FASCIA IN ME O TO TALL
DIMMING SET DIP SWITCH N° 5
DALI
PUSH
-
ON
- Inserire la linguetta A nell'aggancio (C).
- Flettere la fascia verso l'esterno ( N DELLA FRE IA) in modo SE SO CC
che la lingue a (B) possa inserirsi nell'aggancio (D) (FIG.2) tt .
Si raccomanda di pulire l’apparecchio usando solo uno straccio
morbido.
In so di spo ca rco pe iste e midirlo ed eventualmente usare sapone rs nt inu
neutro.
NON USARE ol o valco e/ sol enti.
Negli apparecchi con sorgente a LED le sorgenti stesse non sono in
alcun modo sostituibili. In caso di danneggiamento deve essere
sostit tutta t ficazi uita l’elet ri one.
Pr t conforme a e e di sicure a e a e d ive r ee vig i. odo to ll norm zz ll irett eu op ent
Marc o unico di certificazi EAC (EurAsian rtification). hi one Ce
L’ par io non può re smaltito nei r fiuti dom ici ai i de a ap ecch esse no mali ri est sens ll
d iva rop 02/ CE in m a di r i el ci (w el cal d irett eu ea 20 96/ ateri appa ecch ettri aste ectri an
ele r ic equipm t – W E) Que a iva efini le rme r la r colta e ct on en EE . st dirett d sce no pe ac
il ri li li il rri ri ll cicl gio gag de apparecchi ism d essi va de su to tut te to o de ’Uni one
Eu ea. Pe one sposrop r la restituzi di un di itivo di s si prega di serv si i smes o, ir de
siste di stitu ione raccolt messi dis osi ione nei sinmi re z e a a p z goli esi di utili o. pa zz
A B
o
1
2
3
2 FIG.
C D
A B
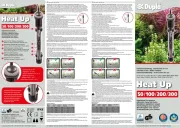
A049__.030.0101
A049__.060.0101
Collegamento
A049__.030.0102
A049__.060.0102
Collegamento DALI
A049__.030.0102
A049__.060.0102
Collegamento PUSH DIM
NL
INPUT
220-240 V
NL
INPUT
220-240 V
DALI NL
INPUT
220-240 V

www.panzeri.itpanzeri@panzeri.it
OPERATION AND USE INSTRUCTIONS
ATTENTION: PLEASE READ AND SAVE THESE INSTRUCTIONS
The safety of this fitting is only guaranteed if the instructions are
followed carefully.
Installation and all non-routine maintenance must be carried out only by
qualified personal.
Disconnect main voltage before taking any action on the fitting.
Panzeri Carlo Srl is not responsible for any damage to persons and/or
property resulting from improper installation, misuse, or unauthorized
modifications made to their products.
EXTRACTION OF SUPPORT
-To remove the support (O), pull up tab (B), levering in the direction of the arrow.
(Fig.1)
-Pull out the tab (A)
-Remove the glass by unscrewing the two lateral screws
ASSEMBLY
- Fix fitting (1) to the wall
- Connect power lines to terminal block (2) after isolating them by using the
supplied insulation tubes
- Fix the glass (3) tightening the two side screws using the supplied key
Due to GLASS expansion when switched on DO NOT OVER TIGHTEN THE
HOLDING SCREWS
POSITIONING THE METAL SUPPORT
-Insert tab A into dock (C)
-Bend the metal support outwards (THE DIRECTION OF THE ARROW) so that tab
(B) can be inserted intodock (D). Fig.2
MAINTENANCE
Only clean the product using a soft cloth. To remove persistent marks use only a
damp cloth and neutral soap
DON’T USE alcohol and/or solvent
Fixtures with led: the led cannot be partially replaced. If damaged all the power
supply must be replaced.
Product complying with safety rules and EU directives
Unique brand of EAC certification (EurAsian Certification).
The device may not be disposed of with household rubbish. This appliances is labelled in
accordance with European Directive 2002/96/EG concerning used electrical and electronic
appliances (waste electrical and electronic equipment – WEEE). The guideline determines the
framework for the return and recycling of used appliances as applicable throughout the EU. To
return your used device, please use the return and collection systems available to you.
MONTAGE- UND GEBRAUCHSANLEITUNG
ACHTUNG: BITTE LESEN UND BEWAHREN SIE DIESE
ANLEITUNGEN
Um die Sicherheit der Leuchte zu gewährleisten, beachten Sie bitte
unbedingt diese Anleitung.
Die Installation und alle Nicht-Routine-Wartungsarbeiten dürfen nur
durch Fachpersonal durchgeführt werden.
Vor jeglichen Arbeiten ist die Stromversorgung abzustellen.
Panzeri Carlo srl ist für eventuelle Personen- und/oder Sachschäden, die
sich aus einer falschen Installation, einem unsachgemäßen Gebrauch
und durch unbefugte Änderungen am Produkt ergeben, nicht
verantwortlich.
ENTFERNEN DER BLENDE
- Zum Entfernen der Blende die Lasche (B) durch Hebelwirkung in Pfeilrichtung
herausziehen. (ABB.1)
- Die Lasche (A) herausziehen.
- Die beiden seitlichen Schrauben lösen und das Glas abnehmen.
MONTAGEANLEITUNG
- Die Halterung (1) an der Wand befestigen.
- Das Netzkabel durch die beiliegende Glasfaserhülse (2) ziehen und mit der
Lüsterklemme verbinden.
- Das Glas (3) durch Anziehen der beiden seitlichen Schrauben mit dem
beiliegenden Schüssel befestigen.
Um das durch die Wärmeausdehnung bedingte Zerbrechen des Glases zu
vermeiden, DIE GLASHALTESCHRAUBEN NICHT ZU FEST ANZIEHEN.
ANBRINGEN DER METALLBLENDE
- Die Lasche A in die Halterung (C) einschieben.
- Die Blende nach außen ziehen (IN PFEILRICHTUNG), damit die Lasche (B) in der
Halterung (D) einrasten kann. (ABB. 2)
REINIGUNG
Reinigung nur mit einem weichen Tuch vornehmen. Bei stärkerer Verschmutzung
ein feuchtes Tuch und neutrale Seife verwenden. Alkohol oder Auf keinen Fall
andere Lösungsmittel benutzen.
Bei den Geräten mit LED sind die Quellen auf keine Weise ersetzbar. Bei
Schadensnahme muss die gesamte Elektrifizierung ersetzt werden.
Das Produkt entspricht den gültigen Sicherheitsvorschriften und EU-Richtlinien
Eineges Markeszeugnis EAC (EurAsian Certification).
Das Gerät darf nicht mit dem Siedlungsabfall (Hausmüll) entsorgt werden. Dieses Gerät ist
entsprechend der europäischen Richtlinie 2002/96/EG über Elektro- und Elektronik-Altgeräte (waste
electrical and electronic equipment – WEEE) gekennzeichnet. Die Richtlinie gibt den Rahmen für
eine EU-weit gültige Rücknahme und Verwertung der Altgeräte vor. Für die Rückgabe Ihres
Altgeräts nutzen Sie bitte die Ihnen zur Verfügung stehenden Rückgabe- und Sammelsysteme
INSTRUCTIONS D'INSTALLATION ET UTILISATION
ATTENTION: S'IL VOUS PLAIT LIRE ET CONSERVER CES
INSTRUCTIONS
Seulement le respect scrupuleux des conseils ici contenus au moment
de l'installation et de l'utilisation est une garantie de sécurité.
L'installation et les opérations de maintenance non-routine doivent être
effectuées uniquement par du personnel qualifié.
Débrancher l'appareil du réseau d'alimentation avant de procéder
à toute opération.
Panzeri Carlo srl n’est pas responsable de tout dommage aux
personnes ou choses resultant d’une mauvaise installation, mauvaise
utilisation, ou de modifications aux produits apportés par les autres.
EXTRACTION DE LA BANDE
-Pour enlever la bande extraire la languette (B) en faisant pression dans le sens de
la flèche (FIG.1)
-Extraire la languette (A)
-Enlever la vitre en dévissant les deux vis latérales
Montage de la lampe
-Fixer au mur la monture (1)
-Connecter les cables de réseau à la borne (2) après les avoir isolés avec les
tuyaux isolants en verre fournis.
-Fixer la vitre (3) en serrant les deux vis latérales en utilisant la clef fournie.
Pour éviter la rupture des vitres à cause de la dilatation thermique
NE PAS SERRER TROP LES VIS
POSITIONNEMENT DE LA BANDE EN MÉTAL
-Inserer la languette A au crochet (C)
-Flèchir la bande vers l’extérieur (SENS DE LA FLÈCHE) pour que la languette (B)
puisse s’insérer dans le crochet (D). (FIG.2)
Entretien
On conseille de nettoyer l'appareil seulement avec un chiffon souple.Pour enlever
les taches persistantes utiliser un chiffon humide avec du savon neutre. Ne pas
utiliser d'alcool ni de solvants.
Dans les appareils avec source à LED les sources mêmes ne sont pas
remplaçables. En cas d'endommagement il faut substituer toute l'électrification.
Produit conforme aux règles de sucurité et aux règlements de l’union européenne
Marque unique de conformité EAC (EurAsian Certification).
L'appareil ne peut pas être jeté dans le flux normal des déchets municipaux selon la Directive
Européenne 2002/96/CE sur les Déchets des Equipements Electriques et
Electroniques(DEEE)(Waste Electrical and Electronic Equipment-WEEE).Cette directive définit les
normes de collecte et le récyclage des appareils usagés sur tout le territoire de l'Union Européenne.
Pour la restitution d'un appareil usagé, il faut se servir des systèmes de restitution et de collecte
offerts dans chaque pays d'utilisation.
Product specificaties
| Merk: | Panzeri |
| Categorie: | Verlichting |
| Model: | Cross |
| Kleur van het product: | Goud |
| Breedte: | 600 mm |
| Diepte: | 90 mm |
| Hoogte: | 115 mm |
| Materiaal behuizing: | Metaal |
| Aantal lampen: | 1 gloeilamp(en) |
| Type lamp: | LED |
| Vermogen lamp: | 40 W |
| Internationale veiligheidscode (IP): | IP20 |
| Montagewijze: | Opbouw |
| Type stroombron: | AC |
| Aantal per verpakking: | 1 stuk(s) |
| Lichtstroom: | 4680 lm |
| Geschikt voor gebruik binnen: | Ja |
| Dimmer: | Ja |
| Kleurtemperatuur (max): | 3000 K |
| Geschikte locatie: | Gang |
| AC-ingangsspanning: | 220 - 240 V |
| Diffuus licht: | Ja |
Heb je hulp nodig?
Als je hulp nodig hebt met Panzeri Cross stel dan hieronder een vraag en andere gebruikers zullen je antwoorden
Handleiding Verlichting Panzeri

11 Februari 2024
Handleiding Verlichting
- Klein Tools
- Olight
- GLP
- AFX
- Luxli
- Ardes
- Cotech
- Gembird
- DCW
- Megatron
- Eutrac
- Heitronic
- Ion
- Canarm
- Hazet
Nieuwste handleidingen voor Verlichting

5 Augustus 2025

5 Augustus 2025
5 Augustus 2025
5 Augustus 2025
5 Augustus 2025
5 Augustus 2025
5 Augustus 2025
5 Augustus 2025
5 Augustus 2025
5 Augustus 2025