Panasonic ER-1511 Handleiding
Panasonic
Niet gecategoriseerd
ER-1511
Bekijk gratis de handleiding van Panasonic ER-1511 (104 pagina’s), behorend tot de categorie Niet gecategoriseerd. Deze gids werd als nuttig beoordeeld door 296 mensen en kreeg gemiddeld 5.0 sterren uit 148.5 reviews. Heb je een vraag over Panasonic ER-1511 of wil je andere gebruikers van dit product iets vragen? Stel een vraag
Pagina 1/104

Operating Instructions
AC/Rechargeable Professional Hair Clipper
Model No. ER1511
Before operating this unit, please read these instructions completely and save them for future use.
English 2
Deutsch 7
Français 13
Italiano 19
Nederlands 24
Español 30
Dansk 35
Português 40
Norsk 45
Svenska 50
Suomi 55
Polski 60
Česky 65
Slovensky 70
Magyar 75
Română 81
Türkçe 86

2
English
Important
Before use
This clipper is designed for professional use to trim hair and
beards. Charge it for 8 hours before use for the fist time in order to
activate the built‑in rechargeable batteries. It can be operated on
either an AC adaptor or rechargeable batteries. Read all
instructions carefully before use.
Charging the clipper
Use the ER1511 hair clipper with the RE9‑41 adaptor only.
Avoid charging the batteries at temperatures below 5 °C or
above 35 °C.
Avoid charging the batteries in direct sunlight or near a radiating
heat source.
The charge status ( ) lamp may blink at an early stage when
it is used for the first time or if it has not been used for 6 or more
months even if it is fully charged. This is not a malfunction.
Even though the clipper may not be used for an extended period,
charge every 6 months to preserve battery life.
The power cord cannot be replaced. If it is damaged, the AC
adaptor should be discarded.
Using the clipper
Warning ‑ Keep the appliance dry.
The clipper may become warm during operation and/or charging.
This is normal.
Check that the blades and the attachments are not damaged
before use. Replace them if they are damaged.
You should not allow permanent wave lotion, hair restorer or hair
spray to come into contact with the main body or the blades.
Doing so may result in cracking, discoloring or corrosion.
You should not drop the clipper on the floor.
You should not knock the blades and the attachments against
hard objects.
You should not trim the hair of a pet.
•
•
•
•
•
•
•
•
•
•
•
•
•
Cleaning the clipper
Clean the housing using only a cloth slightly dampened with
water or a mild soap solution.
Never use a caustic solution.
Never submerge the clipper in water.
Storing the clipper
This appliance is not intended for use by persons (including
children) with reduced physical, sensory or mental capabilities, or
lack of experience and knowledge, unless they have been given
supervision or instruction concerning use of the appliance by a
person responsible for their safety. Children should be supervised
to ensure that they do not play with the appliance.
Never tamper with moving parts.
Avoid grabbing the clipper by the power cord, as it may become
detached, causing damage or injury.
If the clipper is not working properly, have it inspected at an
authorized service center.
Specifications
Power source: See the name plate on the product.
(Automatic voltage conversion)
Motor voltage: 2.4 V DC
Charging time: 1 hour
Airborne Acoustical Noise: 63 (dB (A) re 1 pW)
READ ALL INSTRUCTIONS BEFORE USE.
•
•
•
•
•
•
•

3
English
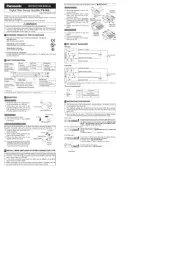
Parts identification
3
mm
0/0"
6
mm
0/0"
9
mm
0/0"
12
mm
0/0"
15
mm
0/0 "
4
mm
0/0"
A Main body
1 Trimming height indicator
2 Dial (Height adjustment
control)
3 0·CHARGE/1 switch
4 Battery capacity lamp
5 Charge status ( ) lamp
6 Appliance socket
B Blade
7 Mounting hook
8 Cleaning lever
9 Moving blade
Stationary blade
C 3 mm comb attachment
D 4 mm comb attachment
E 6 mm comb attachment
F 9 mm comb attachment
G 12 mm comb attachment
H 15 mm comb attachment
I AC adaptor (RE9‑41)
; Power cord
Appliance plug
J Cleaning brush
K Oil
L Charging stand
Charging plug
Socket
M Comb attachment shelves
(×2)
N Connectors (×2)
Charging the hair clipper
Charge
1
1
Connect the power
cord to the charging
stand.
2
2Slide the 0·CHARGE/1
switch to “0·CHARGE”.
3
3Place the clipper on
the charging stand and
plug in the adaptor
into a household
outlet.
Charge status ( ) lamp glows and charging starts.
Charging is completed when Charge status ( ) lamp
blinks. (Max. 1 hour later)
1 full charge will provide approximately 70 minutes of
continuous operation.
Connecting the comb attachment shelf to the charging
stand
Determine the connection position for the
charging stand and comb attachment
shelf. Firmly insert the connector into the
slot at the bottom of the charging stand.
If the unit wobbles, then further push in
the connector since it has not been
firmly inserted.
•
•
•
•
Product specificaties
| Merk: | Panasonic |
| Categorie: | Niet gecategoriseerd |
| Model: | ER-1511 |
Heb je hulp nodig?
Als je hulp nodig hebt met Panasonic ER-1511 stel dan hieronder een vraag en andere gebruikers zullen je antwoorden
Handleiding Niet gecategoriseerd Panasonic

29 Juli 2025
5 Juli 2025
23 Mei 2025
16 Mei 2025
2 Mei 2025
28 April 2025
17 April 2025
17 April 2025

17 April 2025

16 April 2025
Handleiding Niet gecategoriseerd
- Flavour Blaster
- Signature
- Cuggl
- Hover-1
- Naturn Living
- A-NeuVideo
- Maxdata
- Bricasti Design
- MikroElektronika
- Envitec
- Sky-Watcher
- Veise
- Sparco
- MagnaPool
- Aquatica
Nieuwste handleidingen voor Niet gecategoriseerd
2 Augustus 2025
2 Augustus 2025
2 Augustus 2025

2 Augustus 2025

2 Augustus 2025

2 Augustus 2025

2 Augustus 2025
2 Augustus 2025
2 Augustus 2025
2 Augustus 2025