Ozito ATAK-009 Handleiding
Ozito
Niet gecategoriseerd
ATAK-009
Bekijk gratis de handleiding van Ozito ATAK-009 (6 pagina’s), behorend tot de categorie Niet gecategoriseerd. Deze gids werd als nuttig beoordeeld door 42 mensen en kreeg gemiddeld 4.7 sterren uit 21.5 reviews. Heb je een vraag over Ozito ATAK-009 of wil je andere gebruikers van dit product iets vragen? Stel een vraag
Pagina 1/6

AIR TOOLS &
ACCESSORIES KIT
9 PIECE
INSTRUCTION MANUAL
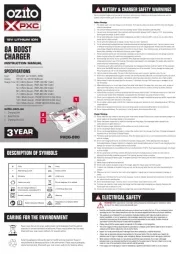
SPECIFICATIONS
Long Nose Air Blow Gun
Nozzle: 100mm
Working Pressure: 58psi (4bar)
Air Inflation Gun
Working Pressure: 116psi (8bar)
Spray Nozzle Washing Gun
Tank Size: 1L
Working Pressure: 87psi (6bar)
Air Water Washing Gun
Working Pressure: 87psi (6bar)
Max. Water Inlet Pressure: 50psi (3.4bar)
Gravity Fed Spray Gun
Cup Size: 0.6L
Flow Rate: 160 - 240mL/min
Working Pressure: 50psi (3.4bar)
Kit Weight: 2.9kg
ATAK-009
STANDARD EQUIPMENT
3 YEAR REPLACEMENT WARRANTY*
Your product is guaranteed for a period of If 36 months from the original date of purchase.
a product is defective it will be replaced in accordance with the terms of this warranty. Warranty
excludes consumable parts, for example: valve adapters and accessories.
*This product is intended for DIY use only and replacement warranty covers domestic use.
WARNING
The following actions will result in the warranty being void.
• If the tool has been operated on a supply voltage other than that specified on the tool.
• If the tool shows signs of damage or defects caused by or resulting from abuse, accidents
or alterations.
• Failure to perform maintenance as set out within the instruction manual.
• If the tool is disassembled or tampered with in any way.
• Professional, industrial or high frequency use.
WARRANTY
Ozito Industries Pty. Ltd. 25 Fox Drive, Dandenong South, Victoria, Australia 3175.
ozito.com.au
Air/Water Washing Gun & 1L Spray
Nozzle Washing Gun
Air Inflation Gun & Long Nose Air
Blow Gun
0.6L Gravity Fed Spray Gun
5m Air Hose & 3 x Inflation
Accessories
0921
IN ORDER TO MAKE A CLAIM UNDER THIS WARRANTY
YOU MUST RETURN THE PRODUCT TO YOUR NEAREST
BUNNINGS WAREHOUSE WITH YOUR BUNNINGS
REGISTER RECEIPT. PRIOR TO RETURNING YOUR
PRODUCT FOR WARRANTY PLEASE TELEPHONE OUR
CUSTOMER SERVICE HELPLINE:
Australia: 1800 069 486
New Zealand: 0508 069 486
The benefits provided under this warranty are in addition to other rights and remedies which
are available to you at law.
Our goods come with guarantees that cannot be excluded at law. You are entitled to a
replacement or refund for a major failure and for compensation for any other reasonably
foreseeable loss or damage. You are also entitled to have the goods repaired or replaced if the
goods fail to be of acceptable quality and the failure does not amount to a major failure.
Generally you will be responsible for all costs associated with a claim under this warranty,
however, where you have suffered any additional direct loss as a result of a defective product
you may be able to claim such expenses by contacting our customer service helpline above.
TO ENSURE A SPEEDY RESPONSE PLEASE HAVE
THE MODEL NUMBER AND DATE OF PURCHASE
AVAILABLE. A CUSTOMER SERVICE REPRESENTATIVE
WILL TAKE YOUR CALL AND ANSWER ANY QUESTIONS
YOU MAY HAVE RELATING TO THE WARRANTY POLICY
OR PROCEDURE.

Connecting The Air Tools
1. Pull back the sleeve on the
air hose Nitto fitting and
insert the male Nitto on the
desired air tool.
2. Release the sleeve; the Nitto
coupling should click into
place.
3. Check that the fitting is secure by tugging gently on the
connector. If the hose detaches, repeat steps 2 & 3, pushing the
Nitto connector firmly into the outlet.
4. To disconnect the air tool, retract the sleeve on the female Nitto
fitting and disconnect the air hose from the air tool.
WARNING! ENSURE YOU HAVE A FIRM GRIP ON THE
AIR HOSE WHEN DISCONNECTING IT FROM THE AIR
COMPRESSOR, AS PRESSURISED AIR IN THE TANK
MAY CAUSE IT TO WHIP AROUND AND INFLICT INJURY
OR DAMAGE.
Attaching The Inflation Nozzles
The inflation nozzles can be attached
to the air inflation gun.
The needle nose nozzle can be used
for sports balls.
The tapered nozzle can be used for rubber
dinghies, small inflatable swimming pools & air
bed.
Note: A suitable air compressor will be required to
inflate these.
1. Press down the clamp and
insert the desired nozzle.
2. Release the clamp and
ensure the nozzle is securely
attached by tugging gently
on it.
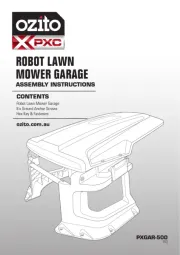
1. Water Nozzle
2. Water Inlet Port
3. Nitto Style Fitting
4. On/Off Trigger
5. Adjustable Nozzle
6. 1L Tank
7. Pressure Gauge
8. Hose Clamp
9. 100mm Inflator Nozzle
10. Material Cup
11. Spray Nozzle
12. Fan Adjustor
13. Spray Regulator Dial
14. Material Cup Lid
AIR TOOLS
KNOW YOUR PRODUCT
1. ASSEMBLY
SETUP & PREPARATION
2
6
7
8
9
10
11
1
5
13
12
14
4
3
WARNING! ENSURE THE TOOL IS TURNED OFF AND
DISCONNECTED FROM THE POWER SUPPLY BEFORE
PERFORMING ANY OF THE FOLLOWING OPERATIONS.
ONLINE MANUAL
Scan this QR Code with your mobile
device to take you to the online manual.
a.
b.
AIR/WATER WASHING GUN
1L SPRAY NOZZLE
WASHING GUN
AIR INFLATION GUN
LONG NOSE AIR
BLOW GUN
0.6L GRAVITY FED
SPRAY GUN

Thinning Paints
Thinning is particularly important when spraying. Most paints
are supplied ready for brush application and need to be diluted
sufficiently for spraying purposes. Follow the manufacturers
guide for thinning ratios which should be labelled on the paint
container.
1. Before pouring any paint or
thinners work out how much
of each substance is needed.
2. Pour the required paint and
thinners through a filter
into a mixing cup and mix
thoroughly.
3. Unscrew the lid of the
material cup and pour the
thinned paint in.
4. Replace the lid and attach the air tool to the air hose.
Spray Fan Size
The fan size of the spray can be controlled with the fan adjustor.
1. Turn the dial anti-clockwise
to increase the size of the
fan jet.
2. Turn the dial clockwise to
decrease the size of the jet.
2. SETTING UP THE SPRAY GUN
Choosing The Spray Direction
To change spray patterns, the
nozzle can be rotated to the
desired pattern.
1. For surfaces that are taller
than they are wide (vertical
surfaces), use a horizontal
fan spray. Rotate the nozzle
until it is in the position
shown.
2. For surfaces that are wider
than they are tall (horizontal
surfaces), use a vertical fan
spray. Rotate the nozzle until
it is in the position shown.
Spray Regulator Dial
The amount of paint being sprayed can be adjusted with the spray
regulator dial.
1. Fully tighten the spray regulator dial.
2. Slightly loosen the dial.
3. Test the setting on a scrap
piece of material. Squeeze
the on/off trigger to start
spraying.
4. Repeat steps 2 & 3 until the desired spray setting is achieved.
WARNING! FOR BEST RESULTS, SURFACE
PREPARATION AND PAINT THINNING SHOULD BE
PERFORMED. ENSURE ALL SURFACES ARE FREE OF
DUST, DIRT, & GREASE.
WARNING! PAINTING CAN BE A MESSY TASK.
WEAR SUITABLE CLOTHING AND ENSURE THE
SURROUNDINGS ARE PROPERLY COVERED
AND PROTECTED. USE OF A DROP SHEET IS
RECOMMENDED WITH THE SPRAYER.
PAINT
THINNERS
PAINT
THINNERS
WARNING! THE SPRAY GUN CANNOT BE USED WITH
MATERIALS CONTAINING ABRASIVE SUBSTANCES,
GLAZES, DISPERSION PAINTS, CAUSTIC AND
ALKALINE SUBSTANCES, OR TEXTURED COATINGS.
Product specificaties
| Merk: | Ozito |
| Categorie: | Niet gecategoriseerd |
| Model: | ATAK-009 |
Heb je hulp nodig?
Als je hulp nodig hebt met Ozito ATAK-009 stel dan hieronder een vraag en andere gebruikers zullen je antwoorden
Handleiding Niet gecategoriseerd Ozito
15 Augustus 2025
14 Augustus 2025
30 Juli 2025
29 Juli 2025

3 Juli 2025
3 Juni 2025

10 December 2024

2 November 2024

8 April 2024

8 April 2024
Handleiding Niet gecategoriseerd
- 9.solutions
- Garden Lights
- Infinity
- Scarlett
- Bitspower
- Broadcom
- Mirpol
- Hikvision
- Salora
- Naim
- Kreiling
- Bright Starts
- Schwinn
- Hudson Valley
- Burigotto
Nieuwste handleidingen voor Niet gecategoriseerd

14 September 2025

14 September 2025

13 September 2025

13 September 2025

13 September 2025

13 September 2025

13 September 2025

13 September 2025

13 September 2025

13 September 2025