OSD Audio PS12 Handleiding
Bekijk gratis de handleiding van OSD Audio PS12 (4 pagina’s), behorend tot de categorie Subwoofer. Deze gids werd als nuttig beoordeeld door 81 mensen en kreeg gemiddeld 4.7 sterren uit 41 reviews. Heb je een vraag over OSD Audio PS12 of wil je andere gebruikers van dit product iets vragen? Stel een vraag
Pagina 1/4

A U D I O
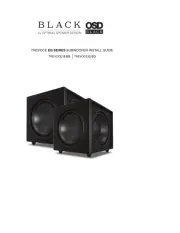
OSD PS10 / PS12
OWNER’S MANUAL
FEATURES:
Volume control
40Hz-180Hz variable crossover control
Status LED
Front firing ports
Speaker level input
Signal sensing “Power On”
180° Phase switch
Removable grill
Congratulations on your purchase of the OSD Audio PS10/PS12.
Please take a few moments to read this entire manual, and be sure to
retain this document for future reference. Please read and observe all
safety instructions detailed on page 2.
NOTE: if any part of this product is damaged or missing, please call your
dealer or OSD Audio directly at 1.888.779.4968 or 1.562.697.2600
Please read your warranty and retain your receipt and original carton for
possible future use.
For more information about OSD Audio electronics, speakers and
accessories please visit www.OSDAudio.com
PS10 / PS12
Home Audio Powered Subwoofer

EXPLANATION OF
SAFETY SYMBOLS
The exclamation point within an equilateral triangle is intended to alert the user of the presence of important
operating and maintenance (servicing) instructions in the literature accompanying the appliance.
The lightning with the arrowhead symbol within an equilateral triangle is intended to alert the user to the flash
presence of uninsulated “dangerous voltage” within the products’ enclosure that may be of magnitude sufficient
to constitute a risk of electric shock to persons.
IMPORTANT SAFETY INSTRUCTIONS
1. Read these instructions.
2. Keep these instructions.
3. Heed all warnings.
4. Follow all instructions.
5. Do not use this apparatus near water.
6. Clean only with dry cloth.
7. Do not block any ventilation openings. The ventilation should not be
impeded by covering the ventilation openings with items such as newspaper,
table-cloths, curtains etc. Install in accordance with the manufacturer’s instructions.
8. Do not install near heat sources such as radiators, heat registers, stoves,
or other apparatus (including amplifiers) that produce heat. No open flame
sources, such as lighted candles, should be placed on the apparatus.
9. Do not defeat the safety purpose of the polarized or grounding type
plug. A polarized plug has two blades with one wider than the other. A
grounding type plug has two blades and a third grounding prong. The
wide blade or third prong is provided for your safety. If the provided plug
does not fit into your outlet, consult an electrician for replacement of the
obsolete outlet.
10. Protect the power cord from being walked on or pinched particularly
at the plugs, convenience receptacles, and at the point of exit from the
apparatus.
11. Unplug the apparatus during lightning storms or when unused for long
periods of time.
12. Refer all servicing to qualified personnel. Servicing is required when the
apparatus has been damaged in any way, such as when the power supply
cord or plug is damaged, liquid has been spilled or objects have fallen into
the apparatus, the apparatus has been exposed to rain or moisture, does
not operate normally, or has been dropped.
13. The apparatus should be connected to a mains socket outlet with a
protective earthing connection.
14. There are two different types of mains fuse for different input voltage
rating. Please check the marking on the rear enclosure for rating and type
of mains fuse provided with the apparatus. Please ask local service
personnel for help to replace the fuse before connecting the apparatus
to a mains socket outlet with another voltage rating.
• WARNING: TO PREVENT FIRE OR SHOCK HAZARD, DO NOT EXPOSE THIS APPLIANCE TO RAIN OR MOISTURE. THE APPARATUS SHALL NOT
BE EXPOSED TO DRIPPING OR SPLASHING AND THAT OBJECTS FILLED WITH LIQUIDS, SUCH AS VASES, SHALL NOT BE
PLACED ON APPARATUS.
• WARNING: TO PREVENT FIRE OF SHOCK HAZARD, DO NOT USE THIS PLUG WITH AN EXTENSION CORD, RECEPTACLE OR OTHER OUTLET
UNLESS THE BLADES CAN BE FULLY INSERTED TO PREVENT BLADE EXPOSURE.
• WARNING: THE MAINS PLUG IS USED AS DISCONNECT DEVICE. THE DISCONNECT DEVICE SHALL REMAIN READILY AVAILABLE.
• WARNING: ONLY USE ATTACHMENTS OR ACCESSORIES SPECIFIED OR PROVIDED BY THE MANUFACTURER.
2

32
1
PS10 125W 10” Powered Subwoofer
Input
L
R
Line
On Off
AUTO
Rev Nor
Phase
Power
OFF
ON
Speaker Level Input
R+
-
L
+-
115V~ 60Hz 200W FUSE:T2.5AL 250V
FUSE:T1.25AL 250V230V~ 50Hz 200W
7
6
4 5
9
108
Figure 2. Back Panel PS10
Input
L
L
R
R
Speaker Level Input
Line
+ +
- -
On Off
Auto
Rev Nor
Phase
PS12 175W 12” Powered Subwoofer
Power
OFF ON
115V~ 60Hz 300W
FUSE:T4AL 250V
FUSE:T2AL 250V
230V~ 50Hz 300W
4 5
6 7
8 10
9
Figure 3. Back Panel PS12
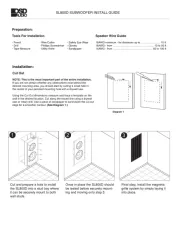
PLACEMENT
This unit features removable feet, a front firing woofer and ports. The bass output
of this unit is omnidirectional so this unit may be placed anywhere in the listening
environment. Walls or corners will help reflect the bass for fuller sound. During use,
unit will vibrate: care should be taken not to place any liquids or heavy items such as
drinks or houseplants on top as they may fall and damage your subwoofer.
1. Volume Control
Adjusts output volume.
Power/Protect LED indicator
Illuminates green indicating the unit is turned on while switch is in “Normal” position,
or when receiving signal in “Auto-On” mode. Illuminates red during standby/protect mode.
Variable Crossover
Sets crossover frequency between 40Hz and 180Hz. For stereo music or home
theater, set the frequency to a level that sounds pleasing to your ear and the overall
reproduction of your audio. If using LFE signal, set crossover to 180Hz.
BACK PANEL CONTROLS
2.
3.
10
(Figure 1)
Main Power Inlet & Fuse Holder
Accepts IEC type line cord. A fuse located in the integrated holder provides
safety from fault conditions: replace fuse with one of same type and rating only.
Main Voltage Selector
Voltage selection switch is preset to 115V (USA). For use in areas which
require 230V contact your dealer. Fuse must be of type and rating marked
on amplifier for use at local mains voltage.
Power Switch
Turns unit on and off in Normal power mode. Leave set to “ON” when using
Auto-On power mode.
8.
9.
10.
4.
5.
6.
7.
Autosensing
Sets the power-on/off option of the PS10/12. Set it to on for
manual control using switch . Set switch to Auto-On for automatic
power-on when signal is present; after 10 minutes with no signal, unit will
enter standby mode. For Auto-On the power switch is left in “ON” position.
Phase Control
Normally set to Nor. In rare instances, due to your unique sound system or the
size of your room, the output may be out of phase. If the sound is hollow
or the volume knob has little effect, set to Rev to compensate for these factors.
Line Level Input
Connect to the line level, subwoofer, or LFE output of your receiver, pre-amp,
or power amp. if Speaker Level Inputs are connected. For Do not use
single mono input: plug into either R or L terminal, or use a y-adaptor.
Speaker Level Input
Use when line level outputs are unavailable from your receiver, pre-amp or
power amp. Your existing stereo speakers can share these terminals, allowing
you to add bass to any stereo or home theater system. Always maintain
speaker polarity by connecting positive (+) and negative (-) terminals on
this unit with corresponding terminals on your existing speakers and source.
Do not use if Line Level Inputs are connected.
BACK PANEL CONTROLS
10
(Figures 2-3)
Min Max
Gain
40Hz 180Hz
Freq
PS10
PWR/PRT
Min Max
Gain
40Hz 180Hz
Freq
PS12
PWR/PRT
Min Max
Gain
40Hz 180Hz
Freq
PS10 / PS12
PWR/PRT
3
Figure 1. Back Panel
Product specificaties
| Merk: | OSD Audio |
| Categorie: | Subwoofer |
| Model: | PS12 |
| Kleur van het product: | Zwart |
| Breedte: | 428.6 mm |
| Diepte: | 381 mm |
| Hoogte: | 394 mm |
| Aan/uitschakelaar: | Ja |
| Impedantie: | 8 Ohm |
| Gemiddeld vermogen subwoofer: | 175 W |
| Diameter driver subwoofer (imperiaal): | 12 " |
| Subwoofertype: | Actieve subwoofer |
| Frequentiebereik subwoofer: | 25 - 180 Hz |
| Subwoofer sensitiviteit: | 100 dB |
| Stroomverbruik (typisch): | 300 W |
| Diameter driver subwoofer: | 304.8 mm |
Heb je hulp nodig?
Als je hulp nodig hebt met OSD Audio PS12 stel dan hieronder een vraag en andere gebruikers zullen je antwoorden
Handleiding Subwoofer OSD Audio

28 Januari 2025

28 Januari 2025
27 Januari 2025
27 Januari 2025

27 Januari 2025

3 November 2024

2 November 2024

23 September 2024

23 September 2024

18 September 2024
Handleiding Subwoofer
- Caliber
- KEF
- Quadral
- Kenwood
- PreSonus
- Focal
- AV:link
- Elac
- Memphis Audio
- Dayton Audio
- Wharfedale
- Argon
- Atlas Sound
- Monitor Audio
- Crunch
Nieuwste handleidingen voor Subwoofer

29 Juli 2025
29 Juli 2025

29 Juli 2025

24 Juli 2025

24 Juli 2025

21 Juli 2025

21 Juli 2025
15 Juli 2025
15 Juli 2025
15 Juli 2025