NUVO TH502 Handleiding
NUVO Verlichting TH502
Bekijk gratis de handleiding van NUVO TH502 (2 pagina’s), behorend tot de categorie Verlichting. Deze gids werd als nuttig beoordeeld door 2 mensen en kreeg gemiddeld 4.0 sterren uit 8 reviews. Heb je een vraag over NUVO TH502 of wil je andere gebruikers van dit product iets vragen? Stel een vraag
Pagina 1/2
INSTALLATION AND SAFETY INSTRUCTIONS
FOR YOUR SAFETY
WARNING: BE SURE THE ELECTRICITY TO THE WIRES YOU ARE
WORKING ON IS SHUT OFF; EITHER THE FUSE IS REMOVED OR THE
CIRCUIT BREAKER IS SHUT OFF.
GENERAL
You don’t need special tools to install this xture. Be sure to follow the
steps in the order given. Under no circumstances should a xture be hung
on house electrical wires, nor should a swag type xture be installed on
a ceiling which contains a radiant type heating system. Read instructions
carefully. If you are unclear as to how to proceed, consult a qualied
electrician.
NOTE: Proper wiring is essential for the safe operation of this xture.
FIXTURE ASSEMBLY
Carefully remove the xture from the carton and check that all parts are
included as shown in gure. Be careful not to misplace any of the screws
or parts, which are needed to install this xture.
INSTALLATION
IMPORTANT: Do not attach xture directly to outlet box.
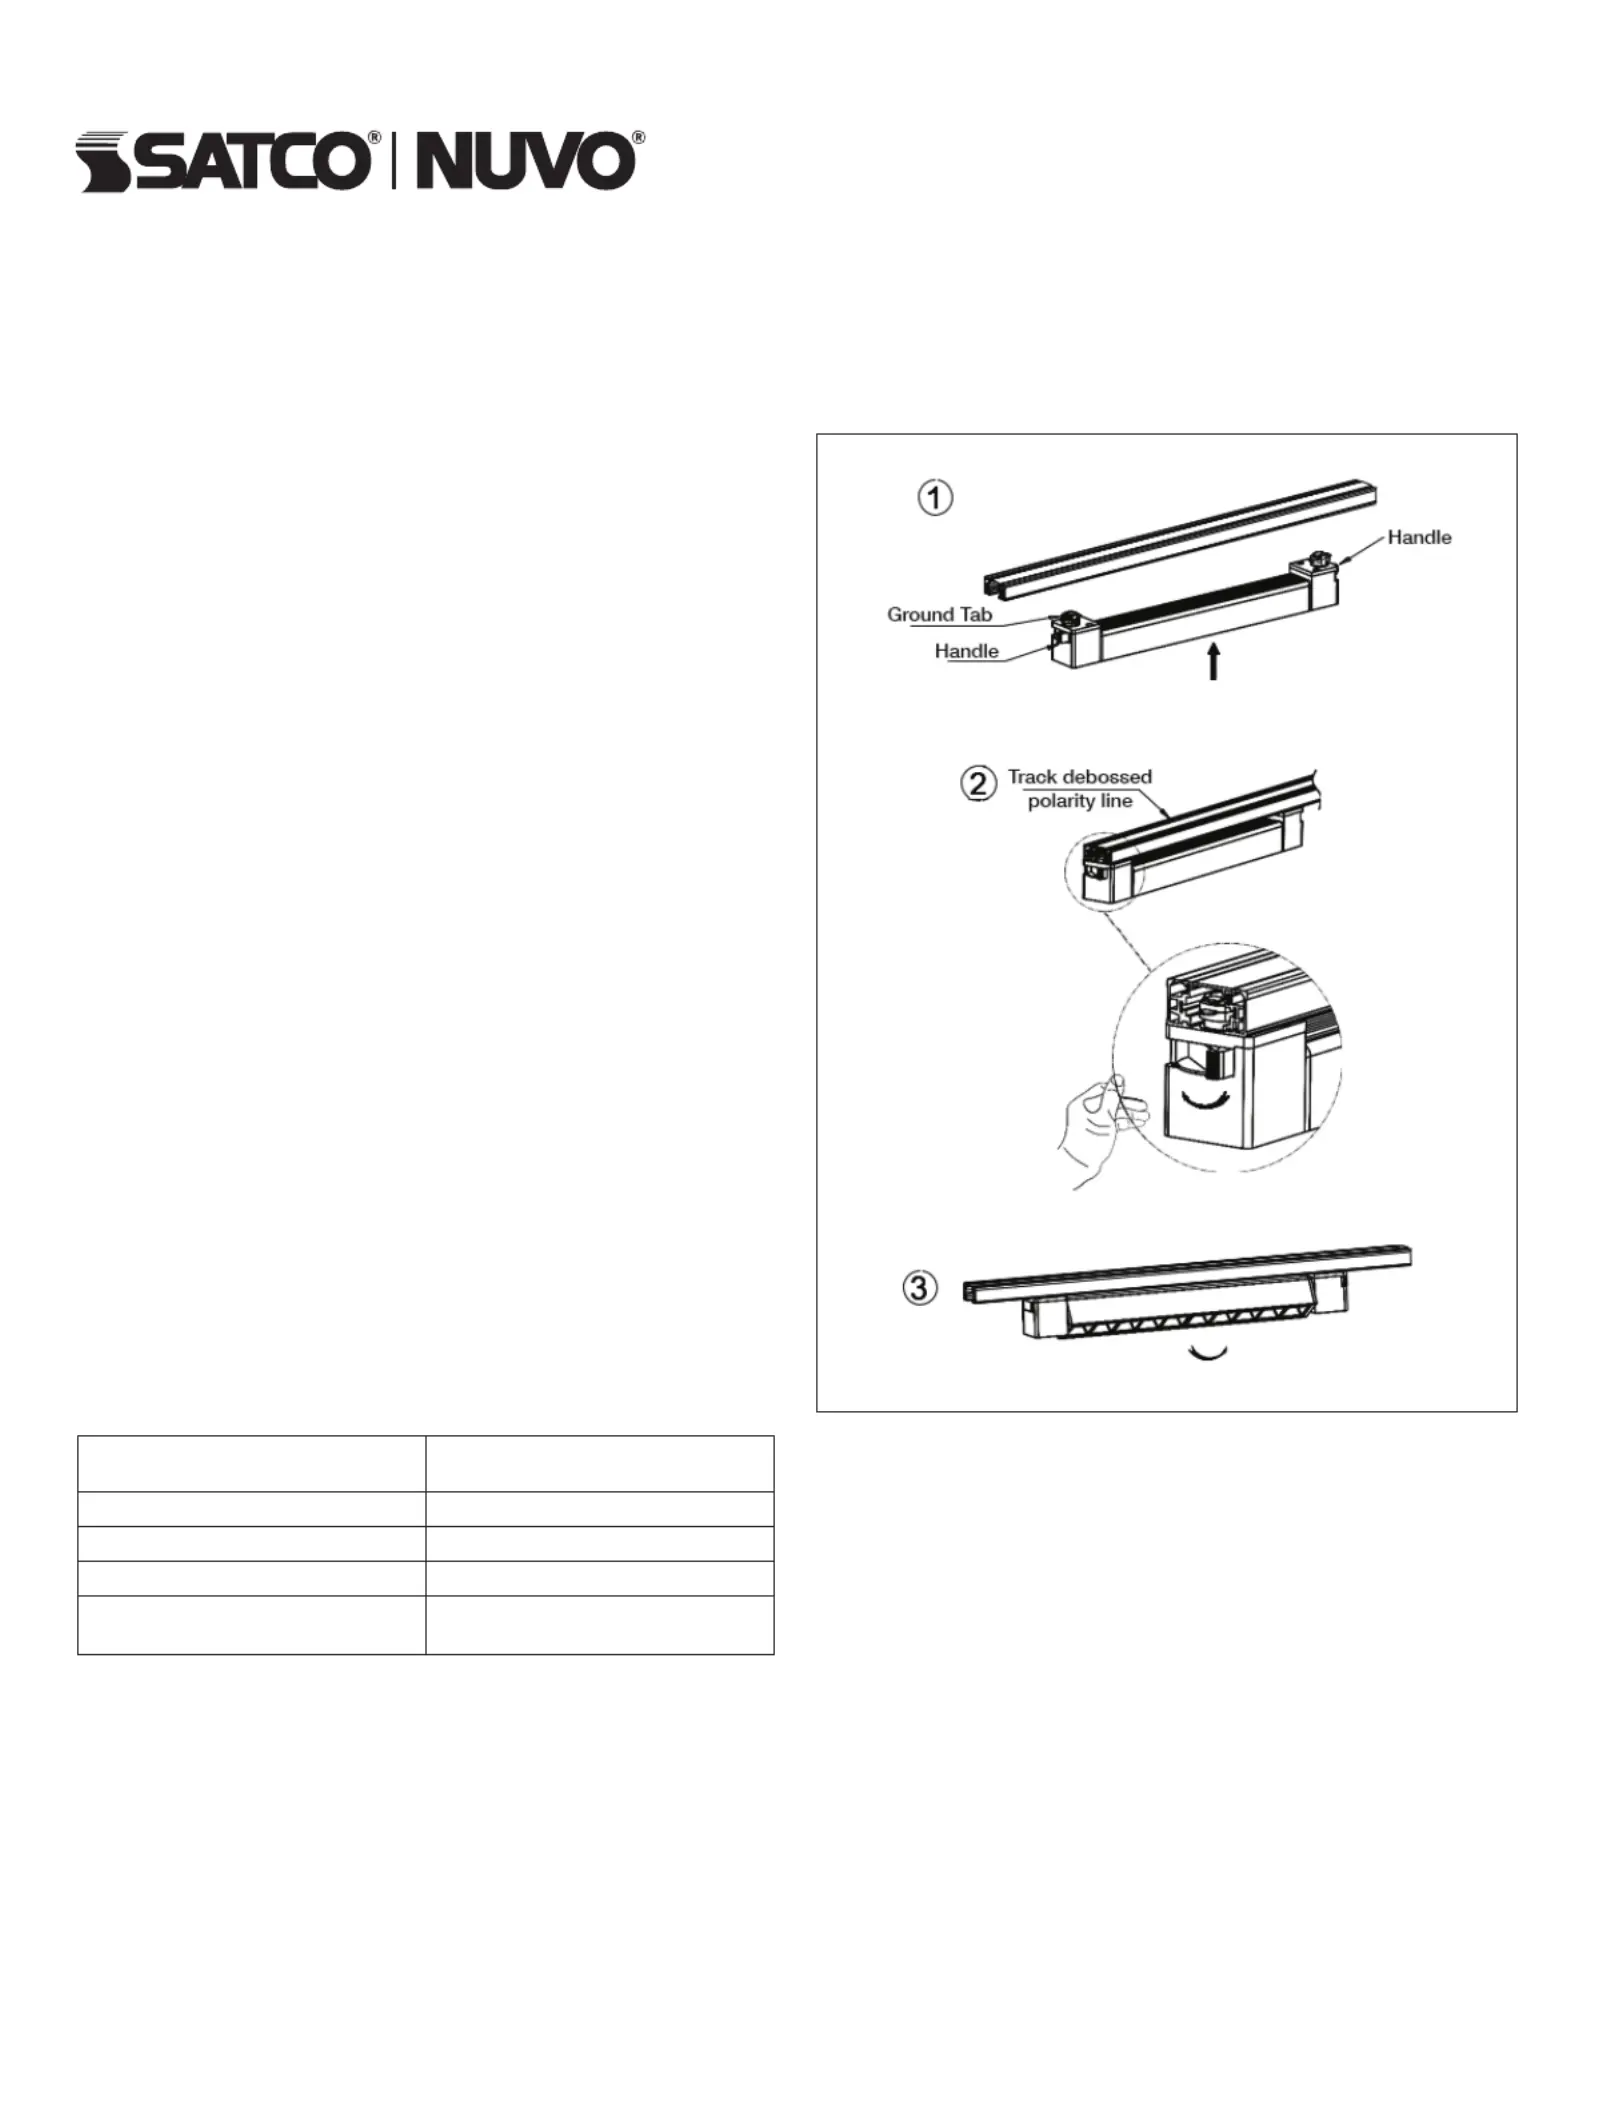
STEP 1: Insert both adapter ends of this xture into the slot of the track.
STEP 2: Rotate the handles at both ends to adjust the xture to completely
t into and lock the track.
NOTE: Ground tab of one of the adaptors must point to track debossed
polarity line when installed. If the handle does not turn freely, do not force.
Instead, turn in opposite direction.
STEP 3: Rotate the body of the xture to desired beam angle.
To remove, rotate both handles 90 degree.
GROUNDING INSTRUCTIONS
STEP 1: Insert the green grounding screw into the hole with two raised
dimples on the mounting bar. Wrap the ground wire from the xture
(if supplied) around the green grounding screw, then connect it to ground
wire from the outlet box (if not xed on the outlet box) using a wire
connector (not supplied). If ground wire from the xture is not supplied,
wrap the ground wire (if not xed on the outlet box) from the outlet box
around the green grounding screw and tighten it.
NEVER CONNECT GROUND WIRE TO BLACK OR WHITE POWER
SUPPLY WIRES.
STEP 2: Take note of the color of the wire(s) on your xture. Identify which
group your xture wire(s) falls into and connect the wires according to the
directions below:
GROUP A:
Connect to Black House Wire
GROUP B:
Connect to White House Wire
BLACKWHITE
* PARALLEL WIRE (round & smooth)* PARALLEL WIRE (square & ridged)
WHITE OR GREY WITH TRACERWHITE OR GREY WITHOUT TRACER
BROWN, GOLD OR BLACK
WITHOUT TRACER
BROWN, GOLD OR BLACK
WITH TRACER
NOTE: When parallel wire (SPT-I & SPT-2) is used, the tracer wire is square
shaped or ridged and the less tracer wire is round in shape or smooth (seen
best when viewed from wire end.)
STEP 3: Take your xture wire(s) from group A and place evenly against the
black wire from the outlet box. Do NOT twist wires together before using
wire connectors.
STEP 4: Fit a wire connector over the wires and screw the connector
clockwise until you feel rmness.
STEP 5: Try gently to pull the connector off the wires. If you can pull the
connector off, carefully re-do steps 3 and 4 as above, and check again for
a rm connection.
ITEM NO: TH500, TH501, TH502, TH503,
TH504, TH505, TH506, TH507
ARTÍCULO Nº: TH500, TH501, TH502, TH503,
TH504, TH505, TH506, TH507
ARTICLE N°: TH500, TH501, TH502, TH503,
TH504, TH505, TH506, TH507
STEP 6: Connect the xture wire from group B to the white wire from
the outlet box in the same manner. Make sure no bare wires can be seen
outside wire connectors.
CLEANING
To clean, wipe xture with a soft cloth. Clean glass with a mild soap. Do not
use abrasive materials such as scouring pads or powders, steel wool or
abrasive paper.
ORDERING PARTS
Keep this sheet for future reference, and in case you need to order
replacement parts. Be sure to use exact wording from illustration when
ordering parts.
Line art shown may not exactly match the xture enclosed. However, the installations
do apply to this xture.
La ilustración puede no concordar exactamente con la pieza enviada. Sin embargo,
las instalaciones sí aplican para esta pieza.
Les images peuvent ne pas correspondre exactement au luminaire de la boîte.
Par contre, les directives d’installation s’appliquent au luminaire.
Product specificaties
| Merk: | NUVO |
| Categorie: | Verlichting |
| Model: | TH502 |
Heb je hulp nodig?
Als je hulp nodig hebt met NUVO TH502 stel dan hieronder een vraag en andere gebruikers zullen je antwoorden
Handleiding Verlichting NUVO

1 September 2026
1 September 2026
14 Maart 2026
13 Maart 2026
13 Maart 2026
12 Maart 2026
30 December 2026
30 December 2026
30 December 2026
30 December 2026
Handleiding Verlichting
Nieuwste handleidingen voor Verlichting
28 Augustus 2026
27 Augustus 2026
27 Augustus 2026
27 Augustus 2026
26 Augustus 2026
26 Augustus 2026
26 Augustus 2026
25 Augustus 2026
25 Augustus 2026
25 Augustus 2026