Muse M-65 DM Handleiding

Muse Hifi systeem M-65 DM

Lees hieronder de 📖 handleiding in het Nederlandse voor Muse M-65 DM (2 pagina's) in de categorie Hifi systeem. Deze handleiding was nuttig voor 43 personen en werd door 2 gebruikers gemiddeld met 4.5 sterren beoordeeld

Pagina 1/2
M-65 DM
GB - 1
User Manual
DVD Micro system
Please read the instruction carefully before operating the unit.
LOCATION OF CONTROLS
English GB - 2 GB - 3
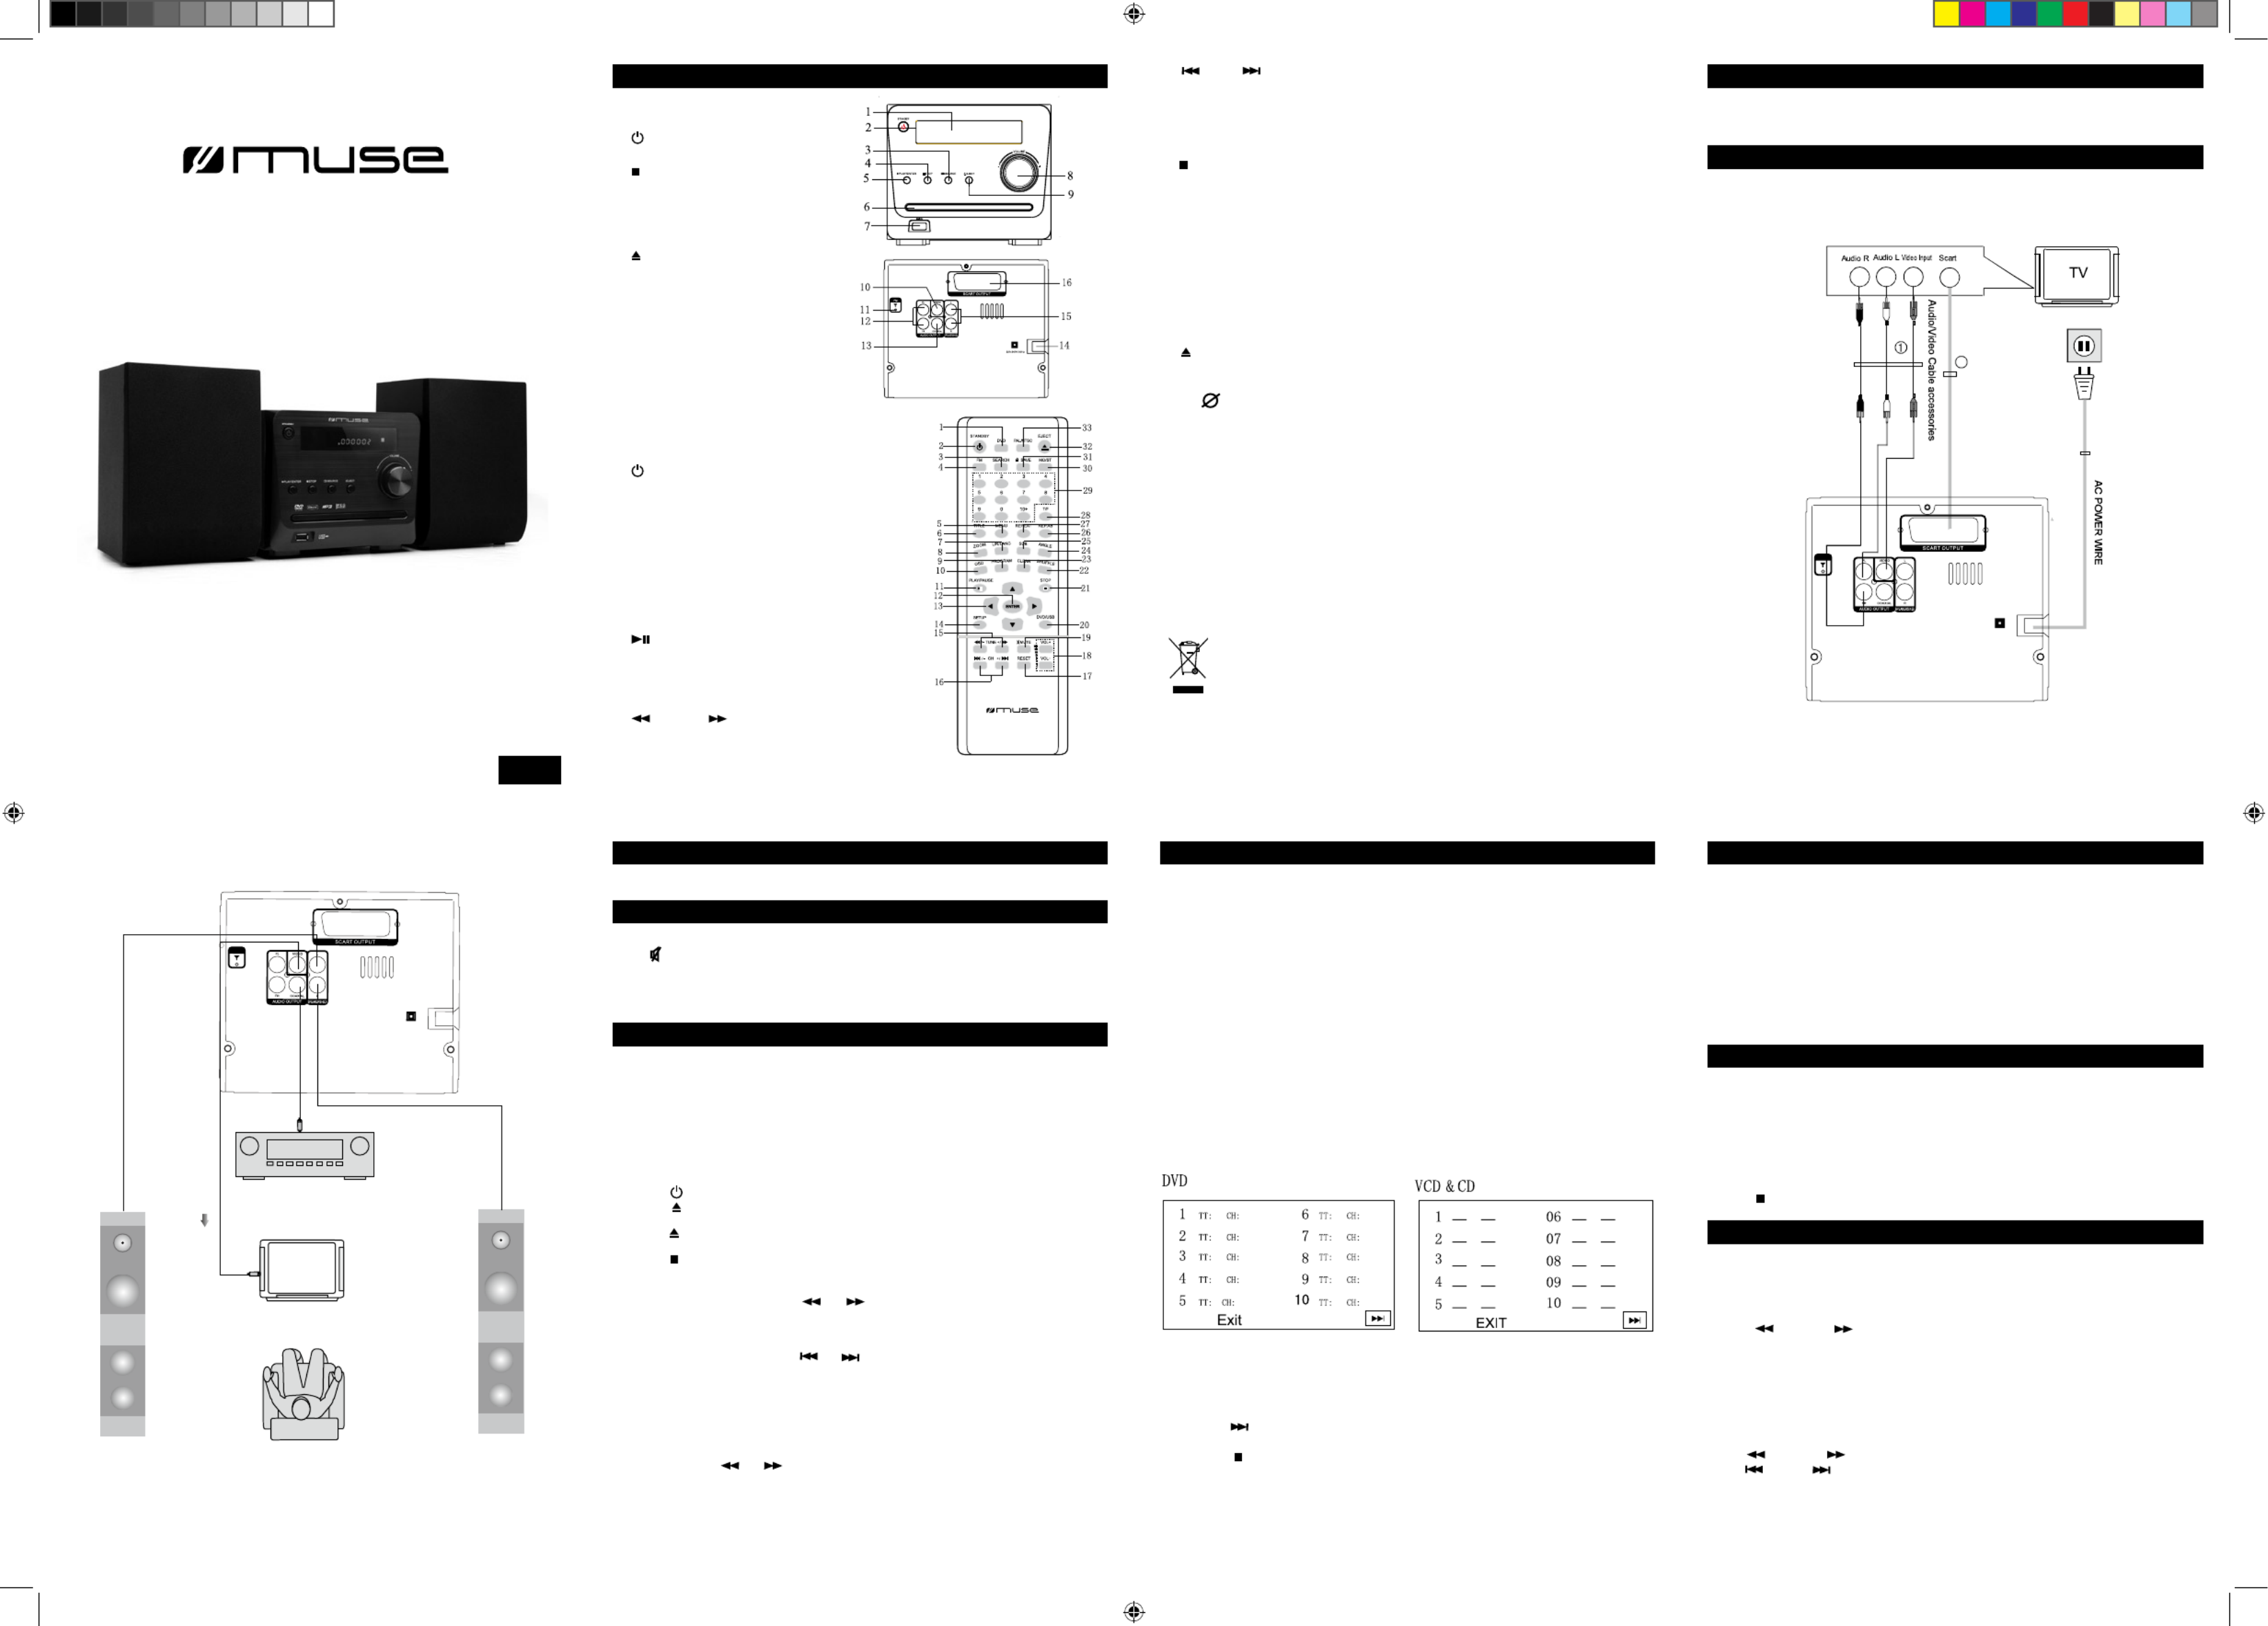
16. /-CH+/ : To select preset tuner stations / To directly access the next or previous
chapter (DVD) or track (CD).
17.RESET: Return the unit to the original setup or the default value.
18.VOLUME+/-: To adjust the volume.
19.MUTE: Press once to cut sound, press again to resume.
20.DVD/USB: Switch the function between DVD, USB mode.
21. STOP: Stop playback.
22.SHUFFLE: The songs play in a shufe order.
23.CLEAR: To clear the digitals you have inputted.
24.ANGLE: To access the camera angle function for DVD disc.
25.SUBTITLE: To change the subtitle setting.
26.REPEAT A-B: To repeat section A to B.
27.REPEAT: To repeat playback.
28.TIME/FREQUENCY: To input frequency in FM mode; To search favorite scene in
VCD/DVD mode.
29.0-10+: Number entry.
30.MONO/STEREO: - Select between Mono and Stereo in FM mode.
31.SAVE: To save the current frequency of band in FM mode.
32. EJECT: Open and close the disc tray.
33.PAL/NTSC: To switch TV system output from: PAL, AUTO, NTSC.
Note: “ ” will be displayed if the function you select is not available.
Installing Battery
Insert 2 “AAA/ UM4” batteries to the remote control prior to use. Make sure to match
their polarities (+/-) to the markings inside the compartment.
NOTES:
- Before throwing any batteries away, consult your distributor who may be able to take
them back for specic recycling.
-In order to avoid leakage, always remove the batteries when unit will not be used for a
long period of time.
-If the remote control is not going to be used for a long time, remove the battery to
avoid damage caused by battery leakage corrosion.
- CAUTION: Danger of explosion if battery is incorrectly replaced. Replace only with
the same or equivalent type.
GB - 4 GB - 5
Connecting to the amplier
GB - 6
POWER SUPPLY
Main unit
1. Display screen
2. Standby
3. Source
4. Stop
5. ► Play/enter
6. Disc tray
7. USB port
8. Volume+/-
9. Eject
10.Video output
11.FM antenna
12.L/R Audio output
13.Coaxial output
14.POWER SUPPLY
15.L/R Speaker
16.SCART output
PLAY MODES
ACCESSORIES
USING USB CONNECTOR PORT
One remote control
One A/V cable
GB - 7
PLAYING MP3/DIVX/JPG/AVI/VOB FILES
Remote control
1. DVD: To enter DVD mode.
2. STANDBY: Switch the unit to standby on/off mode.
3. SEARCH: To search ba nd frequency
au tomatical ly.
4. FM: To enter radio mode.
5. MENU: To access the disc menu during playback.
6 . TITLE: To access the disc title menu.
7. L/R/LANG: selecting playing mode (VCD/CD) or
select sound language (DVD).
8. ZOOM: To access the zoom function
9. PROGRAM: To program play a disc in a desired
sequence.
10.OSD: To display the time of different kinds of disc.
11. PLAY/PAUSE: To start and pause the playback.
12.ENTER: To conrm the selection during menu
navigation.
13.▲▼◄►: Cursor (Left/Right/Up/Down)
14.SETUP: Setup menu
15. /-TUNE+/ : To tune radio frequency in the
tuner mode /To start forward or reverse accelerated
or slow motion playback.
If at any time in the future you should need to dispose of this product
please note that Waste electrical products should not be disposed of with
household waste. Please recycle where facilities exist. Check with your Lo-
cal Authority or retailer for recycling advice.(Waste Electrical and Electronic
Equipment Directive)
CONNECTIONS
Disconnect all devices from the mains supply before connecting.
Connecting to the TV
You can connect the player to the TV-set in different ways. Choose only one of them.
2
FM
220
240V ~ 50H z
After connected, you should also select corresponding VIDEO mode in the SYSTEM
SETUP.
Left speaker Right speaker
t
u
p
t
u
o
l
a
i
x
a
o
C
Connected to video output
TV
Dolby Amplifier
FM
22 0
24 0V ~ 5 0H z
After connected, you should also select corresponding AUDIO mode in the SYSTEM
SETUP.
This set operates on 220-240V ~ 50Hz.
SOUND FEATURES
Muting sound
Press MUTE button on the remote control to mute the sound. Press MUTE or VOL
+/- buttons again to resume.
Sound mode.
To set the Sound mode, bass and treble in the AUDIO SETUP PAGE.
DISC PLAYBACK
Region Management Information
Region Management Information: This unit is designed and manufactured to respond
to the Region Management Information that is encoded on DVD discs. If the Region
number printed on the DVD disc does not correspond to the Region number of this
unit, this unit cannot play that disc.
The region number of this unit is 2.
Basic Playback
1. Turn on your TV set.
2. Press STANDBY button to turn on the unit.
3. Press EJECT to open the disc tray.
4. Insert a disc with label face up.
5. Press EJECT button again to close the disc tray.
6. After loading a disc, playback starts automatically.
7. Press on remote control to stop playback.
Accelerated play
While the disc is playing, press or one or more times to vary the speed and
direction of the accelerated play. Press ENTER to resume normal playback.
Changing chapter/track
While the disc is playing, press or to go immediately to the next or previous
chapter (DVD), or to the next or previous track(CD).
Zoom (DVD, VCD and JPEG)
While a disc is playing, press ZOOM until you reach the zoom size you want. The but-
ton cycles through 2x, 3x, 4x and then zooms out to 1/2x, 1/3x and 1/4x, then returns
to normal playback.
Note: Under Zoom function for JPEG le, press ZOOM button to go to Zoom 100%
mode, then Press or button a number of times to vary the Zoom steps which
you want, then press ZOOM to quit Zoom mode.
RESET:
In no disc, press RESET button will return the unit to the original setup or the default
value.
Repeat playback
While the disc is playing, press the REPEAT button repeatedly to select a play mode:
DVD: Repeat Chapter, Repeat Title, Repeat All, Repeat Off;
VCD (PBC switched off) and audio CD: Repeat track, Repeat All, Repeat Off;
MP3: Single, Repeat one, Repeat Folder, Repeat off.
A-B repeat
To repeat a sequence between two points A and B, press the A-B button at the beginning
of the sequence you want to repeat. Then press the A-B button again at the end of the
sequence. Then the sequence is played repeatedly until you press A-B to resume normal
playback.
Note: Some DVD discs do not allow A-B repeat function.
Program playback (DVD,VCD and audio CD)
With this option, you choose and program the playback order. You can store up to
20tracks.
1. Insert a disc.
2. In playing or stop mode , press the PROG button. The Program menu appears.
3. Use the number buttons to enter the title number and then the chapter number (for
DVD) or the track number ( for VCD and Audio CD).
4.Use ◄, ► ,,▲ button moving to the next input. Repeat step 3 until programming
is completed.
Note: press to go to next page for programming track 11 to 20.
5. Highlight the “START” icon, press ENTER button to start the program play.
6. Press the button to stop the program playback and clear the program memory.
You can connect a USB ash drive (not included) to the USB connector port on the unit
to play DivX movies as well as sound & picture les.
• Plug the USB ash drive into the USB port on the unit.
In DISC mode, press DVD/USB button on remote control to select USB mode. For
operation of playing les on the USB ash drive, please refer to the section “PLAYING
MP3/DivX / Picture FILES”
Note:
•It is recommended USB ash drive is plugged when the unit is in STANDBY mode
•There are many USB devices in the market. We cannot guarantee to support all differ-
ent models. Please try another USB device if your device is not supported.
This unit can play MP3, DivX JPG/AVI/VOB les recorded on CD-R/CD-RW discsand
USB ash drive.
Playing MP3/ DivX / Picture les
1. Insert a disc.
2. The content of disc will be displayed on screen.
3. Press the ◄►▲▼ button to view and select the les that you want to play, then
press ENTER button to conrm the selected le.
4.Press button to stop playback.
RADIO
1. Press FM on remote control to select FM band.
2. Select your desired frequencies
- Press the T/F button on the remote control, then input the frequency that you want.
The range of FM frequency is from 87.50MHz to 108.00 MHz.
- Press /-TUNE+/ button to adjust the frequency up or down a step. The step of
FM is 0.05 MHz.
3. Adjust volume to desired level.
Presetting radio stations
The unit can store up to 60 FM radio stations in its memory. You can program the
presets in two ways:
Manual preset
Press /-TUNE+/ or T/F button on remote to select desired frequencies.
Press /-CH+/ on remote to choose a preferred preset station number.
Press SAVE on remote control, then use number buttons to select a desired preset
location and save the radio station as the selected preset station.
Automatic preset
In tuner mode, press SEARCH on remote control to start automatic preset programming.
DVM-3191 IB MUSE 001 REV0 GB.ind1 1 2012-2-2 16:19:27
WARNING: TO PREVENT FIRE OR SHOCK HAZARD, DO NOT EXPOSE THIS
APPLIANCE TO RAIN OR MOISTURE.
ATTENTION: To reduce the risk of electric shock, do not remove
the cover or back. There are no user serviceable parts inside the
unit. Refer all servicing to qualied personnel.
GB - 15
SAFETY INSTRUCTION
WARNINGS
GB - 14GB - 13GB - 12
GB - 11GB - 10GB - 9GB - 8
The exclamation point within the triangle is a warning sign alerting the user of
important instructions accompanying the product.
The lightning ash with arrowhead symbol within the triangle is a warning
sign alerting the user of "dangerous voltage" inside the unit.
MAINTENANCE
Radio frequencies will be browsed and radio stations stored automatically. When all
the available radio stations are stored or all memory locations are full, the auto preset
programming function will stop.
Retrieving the preset stations
In radio mode, press / to access a preset station.
SETUP MENU
Navigating the setup menu
1. Press SETUP to display the setup main menu in DVD mode.
2. Press ◄ ,to select a menu icon,
3. Press ▼ ,▲ to select one of the available options under a menu icon.
4. Press to ► access the submenu and ▼ ,▲ to select an option.
5. Press ENTER to conrm your selection.
6. Press ◄ to return to a previous menu.
7. Press to exit from the setup menu.SETUP
GENERAL SETUP PAGE
..GENERAL SETUP ..
GO TO GENERAL SETUP PAGE
ANGLE MARK ON
CLOSE CAPTION OFF
SCREEN SAVER OFF
LAST MEMORY OFF
VERSION
DEFAULT
*ANGLE MARK
ON : To show angle mark when a disc with multiple camera angles is playing. You
can view different camera angles of a DVD disc by pressing button on remoteANGEL
control.
OFF : To hide angle mark.
NOTE: This function is only available for discs encoded with multiple camera angles.
*CLOSED CAPTION
Some discs have closed captions.
ON: Show the closed captions.
OFF: Hide the closed captions.
*SCREEN SAVER
To set screen saver ON or OFF.
* LAST MEMORY
When the player is stopped during DVD/VCD playback, the player will memorize the
last scene of the playback. When the disc is loaded again playback will continue from
the last scene.
ON: Activate the last memory function.
OFF: Deactivate the last memory function.
Note: This function will not be activated if the playback is stopped by pressing STOP
button twice.
* S/W Version
This option is used to display the model number of this unit.
*DEFAULT
In no disc or eject the disc tray condition,Pressing with this function selected ENTER
resets all settings to their initial factory
state, except for parental level.
AUDIO SETUP PAGE
ANALOG AUDIO SETUP
DIGITAL AUDIO
EQUALIZER
* ANALOG AUDIO SETUP
DOWNMIX:
LT/RT: left and right soundtrack audio output
STEREO: Stereo audio signal output
*DIGITAL AUDIO
DIGITAL OUTPUT:
SPDIF/OFF
When digital output is not in use, it is recommended to turn OFF” the digital output
setting for the purpose on minimizing circuit interference.
ALL (SPDIF/RAW)
Choose this setting, if your DVD player is connected to a power amplier with a coaxial
cable. When playing a disc recorded with Dolby Digital and MPEG audio formats, the
corresponding digital signals will be output from the Coaxial Output jack.
PCM ONLY (SPDIF / PCM)
Choose this setting, if your DVD player is connected to a 2-channel digital stereo amplier.
When playing a disc recorded with Dolby Digital and MPEG audio formats, audio signal will
be modulated into a 2-channel PCM signal and it will be output from the Coaxial Output jack.
* Equalizer
EQUALIZER Mode
This option is used to select the different balanced effect, such as OFF, ROCK, POP,
LIVE, DANCE, TECHNO, CLASSIC, SOFT.
Bass Boost
It use to adjust the sound effect of Bass boost to ON or OFF.
Super Bass
ON: set the super bass on, and adjust the super bass effect.
OFF: set the super bass off.
Treble Boost
ON: set the treble boost on and adjust the treble effect.
OFF: set the super treble boost off.
VIDEO SETUP PAGE
*VIDEO OUTPUT
CVBS: to set video output to composite.
RGB: This gives the best quality picture output from the TV AUDIO VIDEO OUT
SCART socket.
Note: If the video setting differs from the physical video connection, the TV set may
have no picture. In such case you should need to select a proper video output mode
under VIDEO SETUP PAGE.
*TV DISPLAY
4:3 Pan Scan
• When wide-screen video is played, this mode clips the right and left sides of the
image so that it can be viewed on a conventional screen.
• Some wide-screen DVDs that do not permit Pan Scan mode playback are automatically
played in letterbox mode (black bands top and bottom).
4:3 Letter Box
• When wide-screen video is played in this mode on a conventional screen, black
bands appear at the top and bottom of the screen.
16:9 (Wide)
• This is the correct mode for playing wide-screen videos on a wide-screen TV.
Wide squeeze
The wide-screen image will be displayed in full screen in its native aspect ratio and
so does the 4:3 image but with black borders on the left and the right side
Notes :
•The visible picture size is preset on the DVD disc. Therefore the playback picture of
some DVD discs may not conform to the picture size you select.
•When you play DVD discs recorded in the 4:3 aspect ratio, the playback picture will
always appears in the 4:3 aspect ratio regardless of the TV shape setting in the
function setup menu.
*TV TYPE
•To select your TV system among PAL, NTSC or AUTO.
*COLOR SETTING:
SHARPNESS: To adjust the sharpness of video output
BRIGHTNESS: To adjust the video brightness level on a scale of -20 to +20.
CONTRAST : To adjust the video contrast level on a scale of –16 to +16.
GAMMA : To adjust the video display gamma level (HIGH, MEDIUM, LOW or NONE)
HUE : To adjust the color hue level on a scale of –9 to +9.
SATURATION: To adjust the color saturation level on a scale of -9 to +9
* DivX(R) VOD
In this option, you can activate or deactivate the registration code.
Language setup page
LANGUAGE SETUP
OSD LANGUAGE ENG
AUDIO ENG
SUBTITLE OFF
DISC MENU ENG
GO TO LANGUAGE SETUP
* OSD LANGUAGE
•To select the language of unit’s menus.
*AUDIO
•To select the dialog language.
•If the selected language is not available on the disc, the disc’s language will be used
instead.
•To change the dialog language during playback, press on the remote control.AUDIO
*SUBTITLE
•To select the language of the DVD subtitles.
•If the selected language is not available on the disc, the disc’s language will be used
instead.
•To change the subtitle language during playback, press SUBTITLE on the remote control.
*DISC MENU (MENU LANGUAGE)
•To select the language of the DVD menus.
•If the selected language is not available on the disc, the disc’s language will be used
instead.
PARENTAL CTRI SETUP PAGE
This setup page is available in EJECT the disc tray or NO DISC status.
* PARENTAL
Some DVD discs are equipped with a password function and are rated according to
their content. The contents allowed by parental lock level and the way a DVD disc is
controlled may vary from disc to disc. For example, if the disc allows, you could lockout
violent scenes unsuitable for children or you could lock out playback of the disc
altogether.
You cannot play DVD discs rated higher than the level you selected unless you cancel
the parental lock function.
The parental lock levels are equivalent to the following ratings.
Level 1 : Kid Safe
Level 2 : G
Level 3 : PG
Level 4 : PG13
Level 5 : PGR
Level 6 : R
Level 7 : NC17
Level 8 : Adult
To change the password, enter the current 6-digit password( or the initial factory
password 138900) in the “Old Password” box. Then enter the new password in the
“New Password” box. You are then prompted to enter it again in the “Conrm Password
box to conrm and press ENTER.
CAUTION: Invisible laser radiation when open and interlocks defeated. Avoid exposure
to beam. Class 1 laser product.
SAFETY PRECAUTIONS
- The ventilation should not be impeded by covering the ventilation openings with
items such as newspapers, table-cloths, curtains, etc.
- No naked ame sources, such as lighted candles, should be placed on the apparatus.
- The use of apparatus in moderate climates.
- The apparatus should not be exposed to dripping or splashing.
- Ensure a minimum distance of 5cm around the apparatus for sufcient ventilation.
- Do not place objects lled with liquids, such as vases, on the apparatus.
- The marking plate is located on the back of unit.
- Mains plug is used as the disconnect device and it shall remain readily operable.
The mains plug should not be obstructed or should be easily accessed during intended use.
- Attention should be drawn to the environmental aspects of battery disposal.
- Do not throw batteries in re!
- Battery shall not be exposed to excessive heat such as sunshine, re or the like.
- Excessive sound pressure from earphones and headphones can cause hearing loss.
- Under the inuence of electrical fast transient or/and electrostatic phenomenon, the
product may malfunction and require user to power reset.
Heat - Do not use this unit near sources of heat, including heating vents, stoves, or
other appliances that generate heat.
Mounting surface - Place the unit on a at, even surface.
Ventilation - The unit should be situated with an adequate space around it so that
proper heat ventilation is assured. Allow 10cm(4 in.) clearance from the near and the
top of the unit and 5 cm (2in.) from each side.
-Do not place the unit on a bed, rug, or similar surface that may block the ventilation
openings.
-Do not install the unit in a bookcase, cabinet, or airtight rack where ventilation may be
impeded.
Object and liquid entry - Take care that objects or liquids do not get inside the unit
through the ventilation openings.
Condensation - Moisture may form on the CD Pickup lens when:
-The unit is moved from a cold spot to a warm spot
-The heating system has just been turned on
-The unit is used in a very humid room
-The unit is cooled by an air conditioner
When this unit has condensation inside, it may not function normally. Should this
occur, leave the unit for a few hours, then try to operate again.
Electric Power
1 Power sources-Use AC house current, as specied in the Operating instructions
and marked on the unit.
2 AC power cord
-When disconnecting the AC power cord, pull it out by the AC power plug. Do not pull
the cord itself.
-Never handle the AC power plug with wet hands, as this could result inre or electric shock.
-Power cords should be rmly secured to avoid being bent, pinched, or walked upon.
Pay particular attention to the cord from the unit to the power socket.
-Avoid overloading AC power plug and extension cords, beyond their capacity, as this
could result in re or electric shock.
- Do not repair or ret the power cord in any way.
3 When not in use-Unplug the AC power cord from the AC outlet if the unit will not be
used for several months or more. When the cord is plugged in a small amount of
current continues to ow to the unit, even when the power is turned off.
Cleaning
WARNING: Disconnect the unit from the mains supply before cleaning.
- Use a soft, dry, clean cloth. Regularly dust the vents at the back or sides.
- Using solvents, abrasive or alcohol-based products risks damaging the appliance.
-If an object or liquid enters inside the appliance, unplug it immediately and have it
checked by an authorized engineer.
* Do not try to open the disc compartment during playing.
* Do not touch the lens. Doing so may cause malfunction.
* If there is a scratch, dirt or ngerprints on the disc, it may cause tracking error.
Before playing, clean the disc with a cleaning cloth. Wipe the disc from the center out.
Don’t store discs in places with high temperatures or high humidity, they can become
warped. After playing, store the disc in its case.
SPECIFICATIONS
Power supply: AC~ 230V 50Hz
Power consumption: 25W
TROUBLE SHOOTING
The appliance does not switch on.
- Make sure it is plugged into a mains socket.
- Set POWER switch to ON position. If unit is in standby mode, press STANDBY button
to turn on the unit.
The remote control does not work or works only intermittently.
- Check that batteries are inserted or change them.
Aim the remote control at the appliance. The infrared beam must not be blocked or interrupted.
Operate the remote control within about 23ft (7m).
There is no picture.
Check you have switched on the TV set.
Check the connections.
Select the appropriate video input mode on the TV so the picture from the DVD player
appears on the TV screen.
The picture is of poor quality.
Check the connections.
Clean the disc.
The player does not start playback
Insert the disc with the printed side facing up.
Check that the disc can actually be played by this device.
Check that the disc’s regional code matches the player’s regional code. This player’s
regional code is 2.
Clean the disc.
There is no sound or the sound is of poor quality.
- Check the connections.
- Make sure the speakers are connected.
Make sure the MUTE function is not on.
Forget Password
If you forget your own password, enter “138900” to reset.
*PASSWORD
This option allows you to set or change the password.
Press to enter the Change Password menu.ENTER
Note on disc
* Do not use irregular shape CDs (example: heart-shaped, octagonal ones). It may
result in malfunctions.
* Do not place more than one disc in the disc compartment.
* Do not try to open the disc compartment during playing.
VIDEO OUTPUT CVBS
TV DISPL AY 16:9
TV T YPE PAL
COLOR SETTING
DIvX(R) VOD
PARENTAL CTRI SETUP
PARENTAL
PASSWORD
GO TO PREFERENCE PAGE
DVM-3191 IB MUSE 001 REV0 GB.ind2 2 2012-2-2 16:19:29


Product specificaties

Merk: Muse
Categorie: Hifi systeem
Model: M-65 DM
Kleur van het product: Zwart
Gewicht: 2800 g
Breedte: 156 mm
Diepte: 170 mm
Hoogte: 228 mm
Gewicht verpakking: 3500 g
Breedte verpakking: 294 mm
Diepte verpakking: 346 mm
Hoogte verpakking: 221 mm
Soort: Home audio-microsysteem
Ondersteund audioformaat: MP3
Ondersteunde videoformaten: DIVX
USB-poort: Ja
Aantal USB 2.0-poorten: 1
Ingebouwde luidsprekers: Ja
Gemiddeld vermogen: 20 W
Aantal luidsprekers: 2
Formaat analoog signaal: NTSC,PAL
Ondersteund beeldformaat: JPEG XR
Audio (L,R) out: 1
Ingangsspanning: 220-240 V
On Screen Display (OSD): Ja
Frequentie: 50 Hz
Aantal SCART-poorten: 1
Composiet video-uitgang: 1
MP3 afspelen: Ja
Digitale audio, coaxuitgang: 1
Optische drive type: DVD+R,DVD+RW,DVD-R
Ondersteunde frequentiebanden: FM
Aantal voorkeurszenders: 60
Optical disc player: Ja
Cassette deck: Nee
Luidspreker soort: 2-weg
Inclusief RDS tuner: Ja
RDS: PLL
Afstandsbediening inbegrepen: Ja
Cd-speler: Ja
DVD + R: Ja
DVD-R: Ja
DVD + RW: Ja

Heb je hulp nodig?

Als je hulp nodig hebt met Muse M-65 DM stel dan hieronder een vraag en andere gebruikers zullen je antwoorden


Handleiding Hifi systeem Muse

Handleiding Hifi systeem

Nieuwste handleidingen voor Hifi systeem