Muse M-380 GB Handleiding

Muse Hifi systeem M-380 GB

Lees hieronder de 📖 handleiding in het Nederlandse voor Muse M-380 GB (2 pagina's) in de categorie Hifi systeem. Deze handleiding was nuttig voor 41 personen en werd door 2 gebruikers gemiddeld met 4.5 sterren beoordeeld

Pagina 1/2
FR Manuel de l’utilisateur
GB User Manual
PT Manual do Utilizador
Benutzerhandbuch
DE
ES Manual de instrucciones
Manuale di istruzioni
IT
NL Handleiding
Lire attentivement les instructions avant de faire
fonctionner l’appareil.
Please read the instruction carefully before operating the
unit.
Leia este manual com atenção antes de qualquer
utilização.
Bitte lesen sie dieses handbuch vor dem gebrauch des
gerätes sorgfältig durch.
Antes de utilizar este aparato, lea atentamente las
siguientes instrucciones.
Leggere attentamente questo manuale prima di utilizzare
l’apparecchio.
Lees deze handleiding aandachtig voor u het toestel
gebruikt.
FR
GB
PT
DE
ES
IT
NL
M-380 GB / M-380 GBS
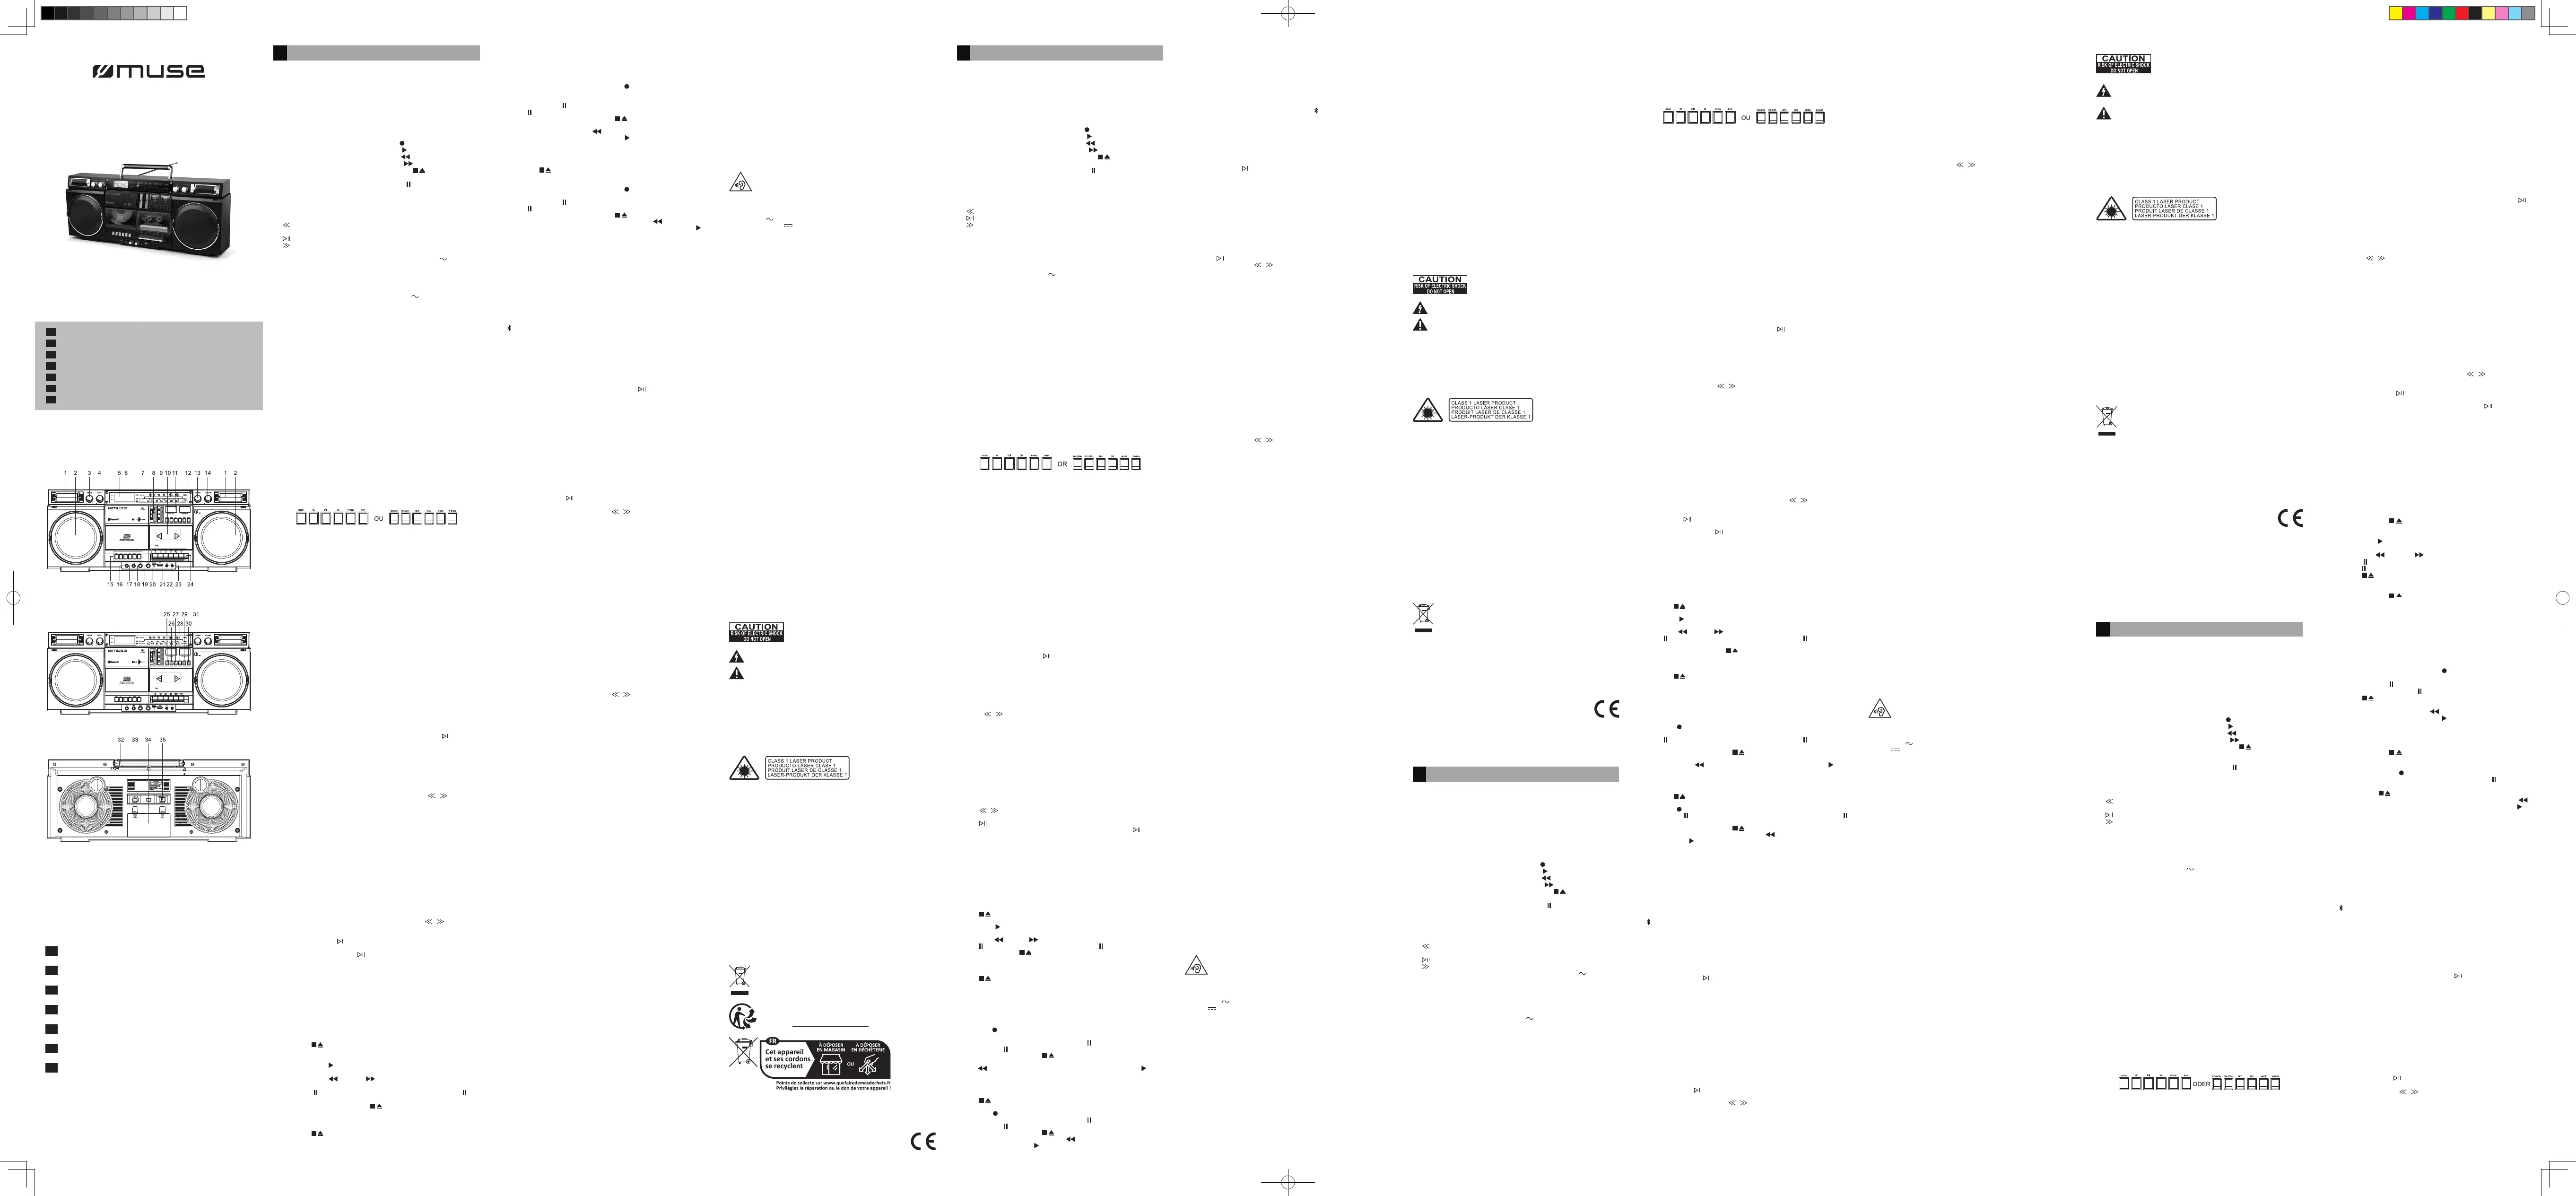
LOCATION OF CONTROLS
TURNING UNIT ON/OFF
MISE EN MARCHE ET ARRET DE L’APPAREIL
LIGAR / DESLIGAR A UNIDADE
EINSCHALTEN/ AUSSCHALTEN DES GERÄTS
CONNECTING AUXILIARY SOURCE
CONNEXION D’UNE SOURCE AUXILIAIRE
UTILIZAÇÃO DA ENTRADA AUXILIAR
LISTENING TO USB/ CARD
ÉCOUTE D’UN USB/ CARTE
LEITURA USB/ MICRO SD
BLUETOOTH FUNCTION
FONCTION BLUETOOTH
FUNÇÃO BLUETOOTH
BEDIENUNG
LISTENING TO THE CASSETTE
ÉCOUTER UNE CASSETTE
ESCUTANDO UMA FITA CASSETE
KASSETTEN ABSPIELEN
LISTENING TO THE RADIO
ÉCOUTE DE LA RADIO
AUDIÇÃO DO RÁDIO
RADIO HÖREN
SINGING THROUGH MIC JACK
UTILISATION DE LA PRISE MICRO
CANTANDO PELO CONECTOR DO MICROFONE
AUDIO CONTROLS
COMMANDES AUDIO
AUDIO CONTROLS
CD MAINTENANCE
MAINTENANCE
MANUTENÇÃO
LISTENING TO CD
ECOUTER UN CD
ESCUTANDO UM CD
CDs ABSPIELEN
POWER SUPPLY
ALIMENTATION
ALIMENTAÇÃO
STROMVERSORGUNG
PORTABLE BLUETOOTH RADIO WITH CD
CASSETTE RECORDER
ENREGISTREUR DE CASSETTE CD RADIO
BLUETOOTH PORTABLE
RÁDIO-GRAVADOR PORTÁTIL BLUETOOTH
COM CD E CASSETE
TRAGBARER KASSETTENREKORDER MIT
BLUETOOTH RADIO CD
GBFR
PT
DE
1. Tweeter
2. Main speaker
3. TREBLE -/+: Treble adjustment
knob
4. BASS -/+: Bass control knob
5. Display
6. CD compartment
7. OPEN/CLOSE: Open/ close the
CD door
8. Function switch
9. : FM selectorFM ST/FM
10. Cassette compartment
11. : Left level meterLEVEL LEFT
12. : Right level meterLEVEL RIGHT
13. control: Tuning adjustment TUNING
knob
14. VOLUME -/+: Volume adjustment
knob
15. CD playback keys:
: StopSTOP
: Previous track/ Fast rewind
: Play/ Pause
: Next track/ Fast forward
: ProgramPROG
: RepeatREP
16. : Microphone jack 1MIC1
17. : Microphone jack 2MIC2
1. Tweeter
2. Haut-parleur principal
3. TREBLE -/+: Bouton de réglage
des aigus
4. BASS -/+: Bouton de réglage des
basses
5. A󰀩chage
6. Trappe disque CD
7. OPEN/CLOSE: Ouverture/
Fermeture de la trappe disque CD
8. Commuteur de fonction
9. : Sélecteur de BandeFM ST/FM
10. Trappe de l'enregistreur cassette
11. LEVEL LEFT: Indicateur de niveau
gauche
12. LEVEL RIGHT: Indicateur de
niveau droit
13. Bouton TUNING (syntonisation)
14. contrôle: Réglage du VOLUME
volume
15. Touches du lecteur CD:
: Arrête la lectureSTOP
: Recherche arrière/
rembobinage rapide
: Lecture/ Pause
: Recherche suivante/ avance
rapide
: ProgrammationPROG
: RépétitionREP
16. : Entrée MIC.1MIC1
1. Tweeter
2. Coluna principal
3. TREBLE -/+: Botão de ajuste dos
agudos
4. BASS -/+: Botão de controlo dos
graves
5. Tela
6. Compartimento para disco
7. OPEN/CLOSE: Parar abrir ou
fechar a bandeja de discos
8. Seletor de funções
9. : Seleccionador FMFM ST/FM
10. Compartimento Da Fita Cassete
11. LEVEL LEFT: Medidor de nível
esquerdo
12. LEVEL RIGHT: Medidor de nível
direito
13. SINTONIZADOR com marcações
( )TUNING
14. Botão rotativo VOLUME
15. Teclas de reprodução de CD:
: PararSTOP
: Salto para a faixa anterior/
rebobinar rápido
: Leitura/ Pausa
: Salto para a faixa seguinte/
avançar rápido
: Guardar Na Memória PROG
: Para repetir a reprodução REP
16. : Entrada MIC.1MIC1
1. Hochtonlautsprecher
2. Hauptlautsprecher
3. TREBLE -/+: Regler zum Einstellen
der Hochtöne
4. BASS -/+: Regler zum Einstellen
der Tieftöne
5. Anzeige
6. Disk-Fach
7. OPEN/CLOSE: CD-Laufwerk
ö󰀨nen/schließen
8. Funktionsauswahl
9. : FrequenzbandwählerFM ST/FM
10. Kassettendeck
11. LEVEL LEFT: Pegel links einstellen
12. LEVEL RIGHT: Pegel rechts
einstellen
13. control: TUNING
Frequenzdrehknopf mit
Frequenzskalav
14. : VOLUME Knopf VOLUME -/+
15. Tasten CD-Wiedergabe:
: StoppSTOP
: Vorangehender titel/
Zurückspulen
: Wiedergabe/ Pause
: Vorangehender titel/ Vorspulen
: ProgrammierungPROG
: WiederholungREP
16. : Eingang MIC.1 MIC1
18. : Reverb control knobECHO
19. : Mic volume adjustment MIC VOL
knob
20. Micro SD card slot
21. USB slot
22. jackAUX IN
23. Headphone jack
24. Cassette recorder keys:
: Cassette recordingREC
PLAY : Cassette play
REW : Fast rewind
: Fast forwardFFWD
STOP/ EJ : Stop the tape/
open the cassette compartment
PAUSE : Pause
25. : Previous folder buttonFOLDER-
26. : Next folder buttonFOLDER+
27. : Record buttonREC
28. : Delete buttonDEL
29. : Mode switch buttonMODE
30. : Subwoofer buttonX-BASS
31. Cassette Internal recording
microphone
32. FM Rod antenna
33. AC IN: AC socket
34. Battery door
35. : Power switchAC ON/OFF
17. : Entrée MIC.2MIC2
18. : Bouton de réglage de la ECHO
réverbération
19. MIC VOL: Bouton de réglage du
volume du micro
20. Lecteur de carte micro SD (TF)
21. Port USB
22. Entrée auxiliaire
23. Prise pour écouteurs
24. Touches du lecteur cassette:
: EnregistrerREC
PLAY : Lecture
REW : Rembobinage rapide
: Avance rapideFFWD
STOP/ EJ : Arrête la cassette/
ouvre le compartiment cassette
PAUSE : Pause
25. FOLDER-: Bouton dossier précédent
26. : Bouton dossier suivantFOLDER+
27. : EnregistrementREC
28. : Bouton supprimerDEL
29. : Bouton de changement de MODE
mode
30. X-BASS: Bouton du caisson de
basses (Subwoofer)
31. Micro intégré
32. Antenne télescopique FM
33. Prise secteur ( )AC IN
34. Compartiment à piles
35. AC ON/OFF: INTERRUPTEUR M/A
17. : Entrada MIC.2MIC2
18. : Botão de controlo da ECHO
reverberação
19. MIC VOL: Botão de ajuste do
volume do microfone
20. Leitor de Cartões Micro SD (TF)
21. PORTA USB
22. Tomada AUX IN
23. Entrada de auriculares
24. Botões de gravação de ta cassete:
: GravarREC
PLAY : Inicia a reprodução
REW : Rebobinar rápido
: Avançar rápidoFFWD
STOP/ EJ : Para a ta/ abre o
compartimento da ta cassete
PAUSE : Pausar
25. FOLDER-: Botão para pasta anterior
26. FOLDER+: Botão para pasta
seguinte
27. : Botão GRAVARREC
28. : Botão de apagarDEL
29. : Botão de mudança de modo MODE
30. X-BASS: Botão do subwoofer
31. Microfone embutido
32. Cabo da antena FM
33. AC IN: Tomada AC ( ) AC IN
34. Compartimento para pilha
35. AC ON/OFF: Interruptor de Energia
LIGAR/DESLIGAR
17. : Eingang MIC.2MIC2
18. : Regler zum Einstellen des ECHO
Echos
19. MIC VOL: Regler zum Einstellen
der Mikrofonlautstärke
20. Micro-SD (TF)-Kartenleser
21. USB-Port
22. -EingangAUX
23. Kopf- / Ohrhörerbuchse
24. Wiedergabetasten kassettendeck:
REC : Aufnahme
PLAY : Wiedergabe starten
REW : Zurückspulen
: VorspulenFFWD
STOP/ EJ :
Kassettenwiedergabe beenden/
Kassettendeck ö󰀨nen
PAUSE : Pause
25. : Vorhergehender OrdnerFOLDER-
26. : Nächster OrdnerFOLDER+
27. REC: AUFNAHME-Taste
28. : Löschen-TasteDEL
29. : Modus-TasteMODE
30. : Subwoofer-TasteX-BASS
31. Mikrofon
32. FM-Teleskopantenne
33. AC IN: AC-Buchse
34. Batterie-Fach
35. : EIN/AUSAC ON/OFF
- If the device is in mains operation, set the power switch on the back AC ON/OFF
of the device to ON rst. To select the desired operating mode, set the MUSIC
(Bluetooth, AUX, USB, SD)/ CD/ TAPE/ RADIO switch to your desired operating
mode.
- If the device is in mains operation, set the power switch on the back AC ON/OFF
of the device to OFF to turn o󰀨 the device.
- Si l’appareil fonctionne sur secteur, placez d’abord l’interrupteur d’alimentation
AC ON/OFF à l’arrière de l’appareil sur ON. Ensuite, pour sélectionner le mode de
fonctionnement souhaité, réglez le commutateur de fonction (Bluetooth, AUX, USB,
SD)/ CD/ TAPE/ RADIO sur le mode de fonctionnement souhaité.
- Si l’appareil fonctionne sur secteur, réglez l’interrupteur d’alimentation AC ON/OFF
à l’arrière de l’appareil sur OFF pour éteindre l’appareil.
- Se o aparelho estiver a funcionar na rede elétrica, coloque primeiro o comutador
de alimentação , que se encontra na parte de trás do aparelho, na CA ON/OFF
posição ON. Em seguida, para selecionar o modo de funcionamento pretendido,
coloque o comutador MUSIC (Bluetooth, AUX, USB, SD) / CD / TAPE / RADIO no
modo de funcionamento pretendido.
- Se o aparelho estiver a funcionar na rede elétrica, coloque o comutador de
alimentação CA ON/OFF que se encontra na parte de trás do aparelho na
posição OFF para desligar o dispositivo.
- Wenn das Gerät mit dem Netzstrom verbunden ist, stellen Sie zunächst die EIN/
AUS-Taste an der Rückseite des Geräts auf die EIN-Position. Wählen Sie dann
den gewünschten Modus aus. Stellen Sie dafür den Regler MUSIC (Bluetooth,
AUX, USB, SD) / CD / TAPE / RADIO auf die entsprechende Position.
- Wenn das Gerät mit dem Netzstrom verbunden ist, stellen Sie die EIN/AUS-Taste
an der Rückseite des Geräts auf die AUS-Position, um das Gerät auszuschalten.
1. Slide the Function switch to position. Connect your auxiliary BT/AUX/USB/SD
source (e. g. mp3 player) to the jack (3.5mm) on the unit (cable not AUX
included). “AUX” will show on the display.
2. Start playback from your auxiliary source.
3. Adjust the volume to desired level.
4. To stop playback, disconnect your auxiliary source from the jack.AUX
1. Positionnez l'interrupteur de fonction sur la position . Connectez BT/AUX/USB/SD
votre source auxiliaire (par exemple lecteur MP3) sur la prise sur le coté AUX IN
droit de l’unité (câble non inclus). « AUX » s'a󰀩chera à l'écran.
2. Commencez la lecture de votre source auxiliaire.
3. Réglez le volume au niveau souhaité.
4. Pour arrêter la lecture, débranchez votre source auxiliaire de la prise .AUX IN
1. Coloque o Seletor de Função na posição . Conecte a origem BT/AUX/USB/SD
auxiliar (por exemplo um tocador mp3) ao conector (3.5mm) no lado AUX IN
direito do aparelho (o não acompanha).
2. Arranque a reprodução na sua fonte auxiliar.
3. Ajuste o volume sonoro para o nível pretendido.
4. Para parar a reprodução, desligue a fonte áudio externa com ligação à tomada
AUX IN.
1. Slide the Function switch to position. Press button to BT/AUX/USB/SD MODE
select you desired mode.
2. To insert an USB device (not included)
Connect your USB device to the USB port on front panel. It will switch to “USB
mode and start playback automatically.
To insert a Micro SD card (not included)
Insert a Micro SD card to the TF card slot. It will switch to “SD” mode and start
playback automatically.
3. Select desired track with / .
REPEAT
Repeatedly press button to select one of the following playback modes.REP
Track repeat: “REP” will ash on the display.
Repeat Folder: “REP” will stop ashing.
Repeat all: “REP” will stop ashing.
Random: “RAND” shows on the display.
Notes:
- The total number of MP3 les on the USB device and Micro SD should not exceed
999.
- The reading time takes about a few seconds or more depending on the amount of
MP3 les and folders on USB device and Micro SD card.
- Do not put anything other than a USB device to the port of this unit. Other objects
may damage the USB mechanism.
- Do not put anything other than a Micro SD card to Micro SD card slot of this unit.
Other objects may damage the card mechanism.
- The USB socket must not be connected to the computer directly, for that may
damage the unit.
- There are many USB devices and a Micro SD card in the market. We cannot
guarantee to support all di󰀨erent models. Please try another USB device and
Micro SD card if your device is not supported.
- The unit might not support all the multimedia les stored in USB or Micro SD
card because it includes some special playback procedure which might not be
compatible with the procedure of this unit.
- It cannot fast rewind to previous track in USB/SD mode.
Note:
- The pointer of the level will swing with the volume.
- Press the button to select the folder function.FOLDER-/ FOLDER+
Recording From Radio/ CD/ Auxiliary Source/ Bluetooth/ Cassette To USB
Or Micro SD
1. When playing any function of cassette/ radio/ BT/ CD/ AUX, then insert USB or
Micro SD card.
2. Long press REC” button to enter the recording function. ”USB” will ash on the
display when insert the USB device or “SD” will ash on the display when insert
the Micro SD card. And the currently playing music will be recorded to the USB
or Micro SD card.
3. Short press the REC” button to switch between the recording le and the
playback le.
4. To stop recording, press “ ” button. DEL
5. To delete the recording le, play the current le you want to deleted, then long
press the “ ” button, “DELE” will show on the display.DEL
Note:
* When there is no playback le in USB or Micro SD, play the recording le directly.
* If USB and Micro SD exist at the same time, USB will be recorded rst.
1. Positionnez l'interrupteur de fonction sur la position BT/AUX/USB/SD. Appuyez
sur le bouton pour sélectionner le mode souhaité.MODE
2. Connexion d’un périphérique USB (non fourni)
Connectez votre appareil USB sur le port USB de la façade. Il passera en mode
USB et commencera la lecture automatiquement.
Insertion d’une carte micro SD (non fournie)
Insérez une carte micro SD dans la fente pour carte TF. Il passera en mode SD
et commencera la lecture automatiquement.
3. Sélectionnez la piste de votre choix avec / .
RÉPÉTER
Appuyez successivement sur la touche pour sélectionner votre mode de REP
lecture:
Répétition de la piste: "REP" clignotera sur l'a󰀩chage.
Répéter le dossier: "REP" s'arrête de clignoter.
Répétition totale: "REP" cessera de clignoter.
Aléatoire: "RAND" s'a󰀩chera à l'écran.
Remarque:
- Le nombre total de chiers MP3 sur l'appareil USB et de cartes micro SD ne doit
pas dépasser 999.
- La durée de lecture prend quelques secondes ou plus en fonction de la quantité
de chiers MP3 et de dossiers USB sur l'appareil et de cartes micro SD.
- N’insérez rien d’autre qu’un périphérique USB dans le port prévu à cet e󰀨et. Vous
risqueriez d’abîmer l’appareil.
- Ne mettez rien d'autre qu'une carte SD dans la fente pour carte micro SD de
l'unité. Les autres objets pourraient endommager le mécanisme de la carte.
- Le port USB ne doit pas être directement connecà un ordinateur: cela pourrait
endommager l’appareil.
- Il existe sur le marché de nombreux modèles de clefs USB et de lecteurs MP3.
Nous ne pouvons garantir une compatibilité avec tous les formats. Merci d’utiliser
un autre périphérique USB ou de cartes micro SD si le vôtre ne fonctionne pas.
- Il se peut que certains chiers enregistrés sur le périphérique USB ou de cartes
micro SD ne puissent être lus. En e󰀨et, certains formats spéciaux ne sont pas
compatibles avec cet appareil.
- On ne peut pas revenir rapidement à la piste précédente en mode USB/SD.
Remarque:
- Laiguille du niveau oscillera avec le volume.
- Appuyez sur le bouton pour sélectionner la fonction Dossier.FOLDER -/FOLDER+
Enregistrement depuis la Radio/CD/source auxiliaire/Bluetooth/cassette vers
USB ou Micro SD
1. Lors de la lecture de n’importe quelle fonction de cassette/radio/BT/CD/AUX,
insérez un périphérique USB ou une carte Micro SD.
2. Appuyez longuement sur le bouton « REC » pour accéder à la fonction
d’enregistrement. « USB » clignotera sur l’écran lorsque vous insérez le
périphérique USB ou « SD » clignotera sur l’écran lorsque vous insérez la carte
Micro SD. La musique en cours de lecture sera enregistrée sur le périphérique
USB ou sur la carte Micro SD.
3. Appuyez brièvement sur le bouton « REC » pour basculer entre le chier
d’enregistrement et le chier de lecture.
4. Pour arrêter l’enregistrement, appuyez sur le bouton « DEL ».
5. Pour supprimer le chier d’enregistrement, lisez le chier actuel que vous
souhaitez supprimer, puis appuyez longuement sur le bouton « DEL », « DELE »
s’a󰀩chera sur l’écran.
Remarque:
* Lorsqu’il n’y a pas de chier de lecture sur le périphérique USB ou sur la carte
Micro SD, lisez directement le chier d’enregistrement.
* Si le périphérique USB et la carte Micro SD sont utilisés en même temps,
l’enregistrement sur le périphérique USB se fera en premier.
1. Coloque o Seletor de Função na posição . Prima o botão BT/AUX/USB/SD
MODE para selecionar o modo pretendido.
2. Para inserir dispositivos USB (não incluso)
Conecte um dispositivo USB na conexão USB do aparelho. O aparelho irá trocar
para o modo “USB” e começará a repro-duzir automaticamente.
Para inserir cartão Micro SD (não incluso)
Insira um cartão Micro SD na entrada para cartões TF. O aparelho irá trocar para
o modo “SD” e começará a repro-duzir automaticamente.
3. Selecione a faixa desejada com / .
REPETIR
Pressione mais de uma vez o botão para selecionar o modo de repetição REP
seguintes:
Repetir 1: “REP” piscará no visor.
Repetir Pasta: “REP” irá parar de piscar.
Repetir pasta: “REP” parará de piscar.
Aleatoria: “RAND” aparece no visor.
Observação:
- O número total de arquivos de MP3 no dispositivo USB ou cartão Micro SD não
deverá ser maior que 999.
- O tempo de leitura poderá ser de alguns segundos ou mais, dependendo da
quantidade de arquivos de MP3 e pastas no dispositivo USB ou cartão Micro SD.
- Não insira mais nada a o ser um periférico USB na porta prevista para este
efeito. Corre o risco de danicar o aparelho.
- Não coloque nenhum outro objeto que não seja um cartão micro SD no leitor de
cartões desse aparelho. Quaisquer outros objetos poderão causar defeitos ao
mecanismo de leitura do cartão.
- A porta USB não deve ser directamente ligada a um computador: tal pode
danicar o aparelho.
- Existem no mercado inúmeros modelos de chaves USB e de leitores de MP3.
Não podemos garantir uma compatibilidade com todos os formatos. Utilize um
outro periférico USB ou cartão Micro SD se o seu não funcionar.
- Alguns cheiros gravados no periférico USB ou cartão Micro SD não o
suportados. Com efeito, alguns procedimentos de leitura especiais não são
compatíveis com este aparelho.
- Não é possível retroceder rapidamente para a faixa anterior no modo USB/SD.
Observação:
- O ponteiro de nível oscila com o volume.
- Prima o botão para selecionar a função de pasta.FOLDER-/FOLDER+
Gravação a partir do Rádio/CD/Fonte auxiliar/Bluetooth/Cassete para USB ou
Micro SD
1. Quando reproduzir qualquer função de cassete/rádio/BT/CD/AUX, insira o
cartão USB ou Micro SD.
2. Prima continuamente o botão " " para entrar na função de gravação. "USB" REC
irá piscar no ec quando inserir o dispositivo USB. "SD" irá piscar no ecrã
quando inserir o cartão Micro SD. A sica que es a ser reproduzida será
gravada no dispositivo USB ou no cartão Micro SD.
3. Prima brevemente o botão "REC" para alternar entre o cheiro de gravação e o
cheiro de reprodução.
4. Para parar a gravação, premir o botão " ". DEL
5. Para apagar o cheiro de gravação, reproduza o cheiro atual que pretende
apagar e, em seguida, prima continuamente o botão " ", "DEL" apareceDEL
no ecrã.
Observação:
* Quando não existir nenhum cheiro de reprodução em USB ou Micro SD, é
reproduzido diretamente o cheiro de gravação.
* Se existirem USB e Micro SD ao mesmo tempo, o USB será gravado primeiro.
The Bluetooth® word mark and logos are registered trademarks owned by Bluetooth
SIG, Inc. and any use of such marks by New One S.A.S is under license. Other
trademarks and trade names are those of their respective owners.
Pairing a Bluetooth Device
1. When the unit is ON, Slide the function switch to position. “PAIR” will show on
the display. The “PAIR” will start to blink rapidly which indicated it is in pairing
mode.
2. On the Bluetooth device, enable Bluetooth and select “MUSE M-380BG” from the
Device List. (Refer to the user manual of the device to be connected for detailed
operations.) If the Bluetooth device prompts for a pass code, use “0000”. Some
Bluetooth devices will ask you to accept the connection. If the unit is paired
properly, the “PAIR” will stop blinking on the display.
Tip: If you want to connect your Bluetooth speaker to another Bluetooth audio
device, press and hold button to disconnect the device, the “PAIR” blinks quickly
on the display. Then, follow the steps above to make a new connection.
On some devices such as computers, once paired you must select the unit from
the Bluetooth menu and choose “Use as Audio Device (stereo)” or similar.
Pairing remains intact when the unit and/or your Bluetooth device is taken out
of communication range. An active connection will be re-established when your
Bluetooth device returns within range.
When the unit is turned on again, it will automatically try to reconnect with the most
recently paired Bluetooth device.
Using a Bluetooth Device
1. With a unit paired (see previous section), operate your Bluetooth device and its
sound will be heard through the M-380 GB’s speakers.
2. Press the button to pause playback. Press again to resume playback.
3. Select desired track with / .
4. Adjust the volume using the VOLUME control. You can also adjust the volume on
the device to which you are paired.
Hereby, NEW ONE S.A.S, declares that this MUSE M-380 GB/ M-380 GBS is
in compliance with the essential requirements and other relevant provisions
of Directive 2014/53/EU. The declaration of conformity may be consulted at
www.muse-europe.com
Le mot Bluetooth®
ainsi que les marques et logo sont des marques commerciales
déposées détenues par Bluetooth SIG, Inc. et l'utilisation de ces marques par New
One S.A.S se fait dans le cadre d'une autorisation. Les autres marques et noms
commerciaux sont les propriétés de leurs titulaires respectifs.
Coupler un appareil Bluetooth
1. Lorsque l’unité est allumée, .Positionnez l’interrupteur de fonction sur la position
« PAIR » s'a󰀩chera à l'écran. Le "PAIR" commencera à clignoter rapidement,
ce qui indique qu'il est en mode d'appairage.
2. Sur l’appareil Bluetooth, activez le Bluetooth et sélectionnez «MUSE M-380GB»
dans la liste des appareils. (consultez le manuel d’instruction de l’appareil pour
les détails de connexion). Si l’appareil Bluetooth vous demande un mot de
passe, utilisez 0000’.Certains appareils Bluetooth vous demanderont d’accepter
la connexion. Si les unités sont correctement couplées, le "PAIR" cessera de
clignoter sur l'a󰀩chage.
Astuce: Si vous souhaitez connecter votre haut-parleur Bluetooth à un autre
appareil audio Bluetooth, maintenez enfoncé le bouton du CD pour déconnecter
l'appareil. « PAIR » clignotera rapidement sur l’écran. Ensuite, suivez les étapes ci-
dessus pour établir une nouvelle connexion.
Sur certains appareils, comme les ordinateurs, une fois couplé, vous devrez
sélectionner l’uni dans le menu Bluetooth et choisir « utiliser comme un
dispositif audio (Stéréo) » ou une phrase similaire.
Le couplage reste intact lorsque l’unité et/ou l’appareil Bluetooth sont amenés
hors de la portée de liaison. Une connexion active sera rétablie lorsque votre
appareil Bluetooth reviendra dans la portée.
Lorsque vous rallumez l’unité, elle essayera automatiquement de reconnecter
avec le dernier appareil Bluetooth connecté.
Utiliser un appareil Bluetooth
1. Avec une unité couplée, (voir la section précédente), faites fonctionner votre
appareil Bluetooth et il di󰀨usera du son par le biais de l'enceinte M-380 GB.
2. Appuyez sur la touche pour mettre la lecture en pause. Touchez à nouveau
pour reprendre la lecture.
3. Sélectionnez la piste de votre choix avec / .
4. Réglez le volume à l'aide des touches de volume. Vous pouvez également régler
le volume sur l'appareil avec lequel vous êtes couplé.
Par la présente, NEW ONE S.A.S déclare que l'appareil "MUSE M-380 GB/
M-380 GBS" est conforme aux exigences essentielles et autres dispositions
pertinentes de la directive 2014/53/EU. La claration de conformité peut être
consultée sur le site www.muse-europe.com
A marca e logotipos Bluetooth
®
o marcas registradas da Bluetooth SIG, Inc. e
qualquer uso dessas marcas pela New One S.A.S está sob licença. Outras marcas
comerciais e nomes comerciaiso de seus respectivos proprietários.
Emparelhamento de um dispositivo Bluetooth
1. Quando a umidade estiver ligada, Coloque o Seletor de Funções na posição
. ”PAIR” apareceno visor. O “PAIR” começará a piscar rapidamente, o que
indica que está no modo de emparelhamento.
2. No dispositivo com Bluetooth, ative o Bluetooth e selecione “MUSE M-380GB"
na Lista de Dispositivos. (Consulte o manual de instruções do dispositivo que
estiver sendo conectado para mais detalhes). Caso o dispositivo com bluetooth
solicite uma senha, utilize "0000". Alguns dispositivos com Bluetooth solicitarão
que você aceite a conexão. Se as unidades estiverem adequadamente
emparelhadas, o ”PAIR” deixará de piscar no visor.
Dica: Se pretender ligar a sua coluna Bluetooth a outro dispositivo áudio Bluetooth,
prima e segure o botão para desligar o dispositivo, A indicação "PAIR" pisca
rapidamente no ecrã. Em seguida, siga as etapas acima para fazer uma nova
conexão.
Em alguns dispositivos, como computadores, uma vez pareado, você precisará
selecionar o aparelho em um Menu Bluetooth e escolher "Utilizar como Dispositivo
de Áudio (estéreo)" ou semelhante.
O pareamento permanecerá intacto quando o aparelho ou o seu dispositivo
com Bluetooth for retirado da área de comunicação. Uma conexão ativa será
restabelecida quando o dispositivo com Bluetooth voltar à área de alcance.
Quando o aparelho for ligado novamente, ele tentará automaticamente
se reconectar ao dispositivo de Bluetooth com o qual ele tenha sido mais
recentemente pareado.
Utilizando um dispositivo com Bluetooth
1. Com o aparelho pareado (veja seção anterior), utilize o seu dispositivo com
Bluetooth e o seu som pode ser escutado através das caixas de som do
M-380 GB.
2. Pressione o botão para pausar uma reprodução. Pressione novamente para
continuar uma reprodução.
3. Selecione a faixa desejada com / .
4. Ajuste o volume através dos botões de Volume. Votambém poderá ajustar o
volume através do dispositivo com o qual você estiver pareado.
A NEW ONE S.A.S aqui declara que este produto «MUSE M-380 GB/
M-380 GBS» cumpre os requisitos essenciais e outras disposições relevantes
da Norma 2014/53/EU. A declaração de conformidade pode ser consultada em
www.muse-europe.com.
Der Bluetooth®-Markenname und damit verbundene Logos sind Eigentum der
Firma Bluetooth SIG, Inc. Jegliche Benutzung dieser Marken durch die Firma New
One S.A.S stehen unter Lizenz. Alle anderen Produkt- und Markennamen sind
Eigentum ihrer der jeweiligen Besitzer.
Verbindungsaufbau mit einem Bluetooth-Gerät
1. Wenn das Gerät EINGESCHALTET ist, Schieben Sie den Funktionsschalter in
die -Position. Auf dem Display wird „PAIR“ angezeigt. „PAIR“ beginnt schnell zu
blinken, was anzeigt, dass es sich im Pairing-Modus bendet.
2. Aktivieren Sie die Bluetooth-Funktion auf Ihrem Bluetooth-Gerät, und wählen Sie
"MUSE M-380GB" in der Geräteliste. (Lesen Sie bitte die Bedienungsanleitung des
jeweiligen Geräts für detaillierte Bedienungsschritte zum Verbindungsaufbau.)
Wenn das Bluetooth-Gerät Sie zur Eingabe eines Schlüssels au󰀨ordert, geben
Sie bitte "0000" ein. Manche Bluetooth-Geräte erfordern es zudem, dass die
Verbindung bestätigt wird. Wenn der Verbindungsaufbau erfolgreich ist, „PAIR“
hört auf dem Display zu blinken.
Tipp: Wenn Sie Ihren Bluetooth-Lautsprecher mit einem anderen Bluetooth-
Audiogerät verbinden möchten, halten Sie die Taste gedrückt, um zunächst das
Gerät zu trennen, Die Anzeige „PAIR“ blinkt zügig im Display. Folgen Sie dann den
oben genannten Schritten zur Herstellung einer neuen Verbindung.
Auf einigen Geräten wie z. B. Computern müssen Sie bei bestehender Verbindung
das Gerät aus dem Bluetooth-Menü wählen und als Audiogerät aktivieren.
Die Verbindung bleibt bestehen, wenn das Bluetooth-Gerät außer Reichweite
bzw. ausgeschaltet ist. Eine aktive Verbindung wird dann wieder hergestellt, wenn
das Bluetooth-Gerät sich wieder in Reichweite bendet.
Wird das Gerät erneut eingeschaltet, versucht es automatisch, sich mit dem
zuletzt gekoppelten Bluetooth-Gerät zu verbinden.
Verwenden eines Bluetooth-Geräts
1. Bei bestehender Verbindung (siehe voriger Abschnitt), können Sie das Bluetooth-
Gerät bedienen und den Ton über das M-380 GB wiedergeben.
2. Betätigen Sie die Taste , um die Wiedergabe vorübergehend anzuhalten.
Betätigen Sie die Taste ein weiteres Mal, um mit der Wiedergabe fortzufahren.
3. Wählen Sie mit den Tasten / einen Titel aus.
4. Stellen Sie die Lautstärke mithilfe der Lautstärketasten ein. Sie können die
Lautstärke auch direkt auf dem Gerät, mit dem die Verbindung hergestellt wurde,
einstellen.
NEW ONE S.A.S erklärt hiermit, dass dieser „MUSE M-380 GB/ M-380 GBS“
den wesentlichen Anforderungen und anderen geltenden Vorgaben der
Richtlinie 2014/53/EU entspricht. Die Konformitätserklärung lässt sich unter
www.muse-europe.com herunterladen.
1. Slide the function switch to TAPE position. ”TAPE” will show on the display.
2. Press to open the cassette door and insert the cassette (tape at the bottom)
in the compartment. Then close the cassette door.
3. Press PLAY to start play.
4. Adjust the volume to desired level.
5. Press or to rewind or fast forward the cassette.REW FFWD
6. Press to suspend momentarily the tape and release to resume play.
7. To stop playing, press .
Recording From Radio/ CD/ Auxiliary Source/ Bluetooth/ USB/ Micro SD To
Cassette
1. Press to open the cassette door and insert the cassette (tape at the bottom)
in the compartment. Then close the cassette door.
2. Select the desired sound source.
In radio mode, tune to your desired radio station.
In CD mode, select your desired track and start playback.
In AUX mode, start playback from your auxiliary source.
In Bluetooth mode, start playback from your device.
In USB/SD card, select your desired track and start playback.
3. Press REC button to start recording from radio, CD, auxiliary source, Bluetooth
and USB/SD in the respective mode.
4. To suspend momentarily recording, press PAUSE button. To resume recording,
release PAUSE button.
5. To stop recording, press .STOP
6. To listen to your recording, slide the function switch to TAPE position, press
REW PLAY to rewind the tape to search your recording, then press button
to listen.
Recording From The Built-In Microphone
1. Slide the function switch to TAPE position. ”TAPE” will show on the display.
2. Press to open the cassette door and insert the cassette (tape at the bottom)
in the compartment. Then close the cassette door.
3. Press button to start recording the voice.REC
4. To suspend momentarily recording, press PAUSE button. To resume recording,
release PAUSE button.
5. To stop recording, press .STOP
6. To listen to your recording, press to rewind the tape to search your REW
recording, then press PLAY button to listen.
Note: The built-in microphone is located at the front of the cassette recorder. Place
the recorder near the sound source to be recorded.
1. Positionnez l'interrupteur de fonction sur la position TAPE. « TAPE » s'a󰀩chera
à l'écran.
2. Appuyez sur pour ouvrir le compartiment de cassette et insérez une cassette
(la bande vers le bas) dans le compartiment. Puis, fermez le compartiment de
cassette.
3. Appuyez sur PLAY pour commencer la lecture.
4. Réglez le niveau sonore.
5. Appuyez sur REW ou pour rembobiner ou avancer rapidement FFWD
la cassette.
6. Appuyez sur pour suspendre momentanément la bande et relâchez pour
reprendre la lecture.
7. Pour arrêter la lecture, appuyez sur .
Enregistrement à partir de la radio/CD/Source auxiliaire/Bluetooth/USB/Micro
SD vers cassette
1. Appuyez sur pour ouvrir le compartiment de cassette et insérez une cassette
(la bande vers le bas) dans le compartiment. Puis, fermez le compartiment de
cassette.
2. Sélectionnez la source sonore désirée.
En mode radio, réglez votre station de radio désirée
En mode CD, sélectionnez votre piste désirée et lancez la lecture.
En mode AUX, démarrez la lecture à partir de votre source auxiliaire.
En mode Bluetooth, démarrez la lecture depuis votre appareil.
En mode USB/SD, sélectionnez votre piste désirée et lancez la lecture.
3. Appuyez en même temps sur les boutons pour démarrer l’enregistrement REC
depuis la radio, le CD, Bluetooth, USB/CD, ou la source auxiliaire dans chaque
mode respectif.
4. Appuyez sur PAUSE pour suspendre momentanément la bande et relâchez
PAUSE pour reprendre la lecture.
5. Pour arrêter l'enregistrement, appuyez sur .
6. Pour écouter votre enregistrement, positionnez l'interrupteur de fonction sur la
position TAPE REW , appuyez sur pour rembobiner la cassette pour chercher
votre enregistrement, puis, appuyez sur PLAY pour écouter.
Enregistrement à partir du microphone intégré
1. Positionnez l’interrupteur de fonction sur la position TAPE. "TAPE" s'a󰀩chera
à l'écran.
2. Appuyez sur pour ouvrir le compartiment de cassette et insérez une cassette
(la bande vers le bas) dans le compartiment. Puis, fermez le compartiment de
cassette.
3. Appuyez en même temps sur les boutons pour démarrer l’enregistrement REC
vocal.
4. Appuyez sur PAUSE pour suspendre momentanément la bande et relâchez
PAUSE pour reprendre la lecture.
5. Pour arrêter l'enregistrement, appuyez sur .
6. Pour écouter votre enregistrement, appuyez sur pour rembobiner REW
la cassette pour chercher votre enregistrement, puis, appuyez sur PLAY to
écouter.
Remarque: Le microphone intégré est situé à l’avant de l’enregistreur cassette.
Placez l’enregistreur près de la source sonore à enregistrer.
1. Coloque o Seletor de Funções na posição TAPE. ”TAPE” aparecerá no visor.
2. Pressione para abrir o compartimento de tas e insira uma ta comum (ta
na parte inferior) vazia no compartimento de tas. Fechar a porta da cassete.
3. Prima PLAY para iniciar a reprodução.
4. Ajuste o volume sonoro para o nível pretendido.
5. Prima ou para rebobinar ou avançar rapidamente.REW FFWD
6. Prima para parar momentaneamente a reprodução e solte para retomar a
reprodução.
7. Para parar a reprodução prima .
Gravação a partir do rádio/ CD/ Fonte auxiliar /Bluetooth / USB/Micro SD para
cassete
1. Pressione para abrir o compartimento de tas e insira uma ta comum (ta
na parte inferior) vazia no compartimento de tas. Fechar a porta da cassete.
2. Selecionar a fonte de som desejada.
No modo rádio, sintonize a estação de rádio pretendida.
No modo CD, selecione a faixa desejada e inicie a reprodução.
Em modo AUX, inicie a reprodução a partir de uma fonte auxiliar.
No modo Bluetooth, inicie a reprodução a partir do seu aparelho.
No modo USB/SD, selecione a faixa desejada e inicie a reprodução.
3. Prima REC para iniciar a gravão a partir do rádio, CD, Bluetootth, USB/SD
ou fonte auxiliar no modo respetivo.
4. Prima para parar momentaneamente a reprodução e solte para retomar a
reprodução.
5. Para parar a gravação, pressione .
6. Para escutar a sua gravação, coloque o botão de funções na posição TAPE,
e pressione REW PLAY para rebobinar a ta, e então pressione para
escutar.
Gravar a partir do microfone embutido
1. Coloque o Seletor de Funções na posição TAPE. ”TAPE” aparecerá no visor.
2. Pressione para abrir o compartimento de tas e insira uma ta comum (ta
na parte inferior) vazia no compartimento de tas. Fechar a porta da cassete.
3. Prima para iniciar a gravão de voz.REC
4. Prima PAUSE PAUSE para parar momentaneamente a reprodução e solte
para retomar a reprodução.
5. Para parar a gravação, pressione .
6. Para escutar a sua gravação, e pressione REW para rebobinar a ta, e então
pressione PLAY para escutar.
Nota: O microfone embutido está localizado na frente do gravador de cassetes.
Coloque o gravador perto da fonte de som a ser gravado.
1. Schieben Sie den Funktionsschalter in die TAPE -Position. Auf dem Display wird
„TAPE“ angezeigt.
2. Drücken Sie die Taste , um das Kassettendeck zu ö󰀨nen und legen Sie
dann eine Kassette (Tonband an der Unterseite) ein. Schließen Sie dann das
Kassettendeck.
3. Drücken Sie PLAY , um die Wiedergabe zu starten.
4. Stellen Sie die Lautstärke auf den gewünschten Pegel ein.
5. Drücken Sie REW oder , um die Kassette vor- oder zurückzuspulen.FFWD
6. Drücken Sie , um die Kassettenwiedergabe vorübergehend zu unterbrechen.
Drücken Sie erneut, um die Wiedergabe fortzusetzen.
7. Drücken Sie , um die Wiedergabe zu beenden.
Aufnahme von Radio/ CD/ AUX/ Bluetooth/ USB/ Micro-SD auf Kassette
1. Drücken Sie die Taste , um das Kassettendeck zu ö󰀨nen und legen Sie
dann eine Kassette (Tonband an der Unterseite) ein. Schließen Sie dann das
Kassettendeck.
2. Stellen Sie den gewünschten Betriebsmodus ein.
Schalten Sie im Radiomodus den gewünschten Sender ein.
Wählen Sie im CD-Modus den gewünschten Titel aus und starten Sie die
Wiedergabe.
Starten Sie im AUX-Modus die Wiedergabe am externen Audiogerät.
Starten Sie im Bluetooth-Modus die Wiedergabe am Gerät.
Wählen Sie im USB/CD-Modus den gewünschten Titel aus und starten Sie die
Wiedergabe.
3. Drücken Sie gleichzeitig die Tasten , um im jeweiligen Modus die REC
Wiedergabe von Radio, Bluetooth, USB/SD, CD oder Audiogerät zu starten.
4. Drücken Sie PAUSE , um die Kassettenwiedergabe vorübergehend zu
unterbrechen. Drücken Sie PAUSE erneut, um die Wiedergabe fortzusetzen.
5. Drücken Sie , um die Aufnahme zu beenden.
6. Um sich die Aufnahme anzuhören, schieben Sie den Funktionsschalter auf die
TAPE REW -Position und betätigen Sie zum Zurückspulen der Kassette und
Suchen Ihrer Aufnahme. Betätigen Sie PLAY zur Wiedergabe.
Aufnahme über das integrierte Mikrofon
1. Schieben Sie den Funktionsschalter in die TAPE -Position. Auf dem Display wird
„TAPE“ angezeigt.
2. Drücken Sie die Taste , um das Kassettendeck zu ö󰀨nen und legen Sie
dann eine Kassette (Tonband an der Unterseite) ein. Schließen Sie dann das
Kassettendeck.
3. Drücken Sie die Taste REC .
4. Unterbrechen Sie die Aufnahme durch Drücken der Taste PAUSE . Drücken Sie
die Taste erneut, um die Aufnahme fortzusetzen.
5. Drücken Sie , um die Aufnahme zu beenden.STOP
6. Um Ihre Aufnahme abzuspielen, spulen Sie die Kassette mit der Taste REW ,
bis zur gewünschten Stelle zurück und drücken Sie dann die Taste PLAY für
die Wiedergabe.
Hinweis: Das integrierte Mikrofon bendet sich an der Vorderseite des Geräts. Stellen
Sie das Gerät in die Nähe der aufzunehmenden Audioquelle.
1. Slide the Function switch to position. “TUNE” will show on the display.RADIO
2. Slide the Band selector to select desired band: FM STEREO or FM.
3. Use the control to tune to your desired radio station.TUNING
4. Adjust the volume level.
To enhance radio reception ability:
FM: Extend the telescopic antenna.
1. Positionnez le commutateur de fonction sur la position . "TUNE" RADIO
s'a󰀩chera à l'écran.
2. Faites glisser le sélecteur Bande (Band) pour sélectionner la bande désirée:
STÉREO FM ou FM.
3. Utilisez ensuite le bouton de tuning pour atteindre la station de votre choix.
4. Réglez le niveau sonore.
Pour améliorer la réception radio:
FM: Déployez l’antenne FM.
1. Coloque o Seletor de Funções na posição . “TUNE” aparecerá no visor.RADIO
2. Deslize o seletor de Frequência para selecionar a frequência desejada: FM
STEREO ou FM.
3. Utilize, de seguida, o botão para regular a frequência pretendida.TUNING
4. Regule o nível sonoro com a ajuda do botão rotativo .VOLUME
Para melhorar a qualidade de recepção rádio:
FM: Estique a antena.
1. Schieben Sie den Funktionsschalter in die -Position. Auf dem Display RADIO
wird „TUNE“ angezeigt.
2. Verstellen Sie den Frequenzbandschalter zur Auswahl des gewünschten
Frequenzbands: UKW STEREO oder UKW .
3. Verwenden Sie anschließend den TUNING-Knopf, um die gewünschte Frequenz
einzustellen.
4. Stellen Sie die Lautstärke mit Hilfe des Drehrädchens Lautstärke ein.
Zur Verbesserung der Radioempfangsleistung:
UKW: Ziehen Sie den UKW-Antennendraht vollständig aus.
1. Sing along with the music by plugging in the microphone (not supplied) into either
one of the jacks on the unit. Rotate the directly to adjust the MIC (1/2) MIC VOL
volume as desired.
2. ECHO: Rotate this knob directly to adjust the echo intension.
Note:
* If the microphone is placed near the loudspeaker, a howling e󰀨ect (acoustic
feedback) may occur. If this happens, place microphone away from the loudspeaker.
* Tapping or dropping the microphone can permanently damage your microphone.
Resist the urge to swing the microphone around by the cord.
1. Chantez avec la musique en branchant le microphone dans l'une des prises
MIC (1/2) sur l'unité. Tournez le bouton directement pour ajuster le MIC VOL
niveau de volume.
2. : Tournez ce bouton directement pour régler l'intensité de l'écho. ECHO
Remarque:
Lorsque le microphone est pla près du haut-parleur, un e󰀨et de larsen
(phénomène de rétroaction acoustique) peut se produire. En cas de larsen,
éloignez le microphone du haut-parleur.
Taper ou faire tomber le microphone peut endommager de manière permanente
votre microphone. Ne pas faire tourner le microphone par le cordon.
1. Cante com a música tocando ao conectar um dos microfones inclusos em um
dos dois conecectores no aparelho (não incluso). Gire o MIC (1/2) MIC VOL
diretamente para ajustar o nível de volume desejado.
2. : Gire este botão diretamente para ajustar a intensidade do eco.ECHO
Observação:
Caso o microfone tenha sido posicionado próximo a um alto falante, um som
agudo (microfonia) poderá ocorrer. Caso isso ocorra, afaste o microfone do alto
falante.
Bater ou derrubar o microfone poderá danicar permanentemente o microfone.
Não balance o microfone pelo o.
X-BASS
Press this button to turn on the low-frequency boost, and the LCD screen X-BASS
will display the words "BASS", press this button again to turn o󰀨 the bass boost.
TREBLE/ BASS
Rotate Bass control or Treble control on unit to set bass/ treble level.
X-BASS
Appuyez sur ce bouton X-BASS pour activer l’amplication des basses fréquences,
et « BASS » s’a󰀩chera sur l’écran. Appuyez à nouveau sur ce bouton pour
désactiver l’amplication des basses.
AIGUS/ GRAVES
Tournez le contrôle des graves ou des aigus sur l'appareil pour régler le niveau
des aigus/ graves .
X-BASS
Prima este botão X-BASS para ativar o amplicador de baixa frequência e a
indicação "BASS" aparece no visor.
AGUDOS/ GRAVES
Gire o controle de graves ou o controle de agudos na unidade para denir o nível
de agudos/ graves.
Cleaning
WARNING: Disconnect the unit from the mains supply before cleaning.
Use a soft, dry, clean cloth. Regularly dust the vents at the back or sides.
Using solvents, abrasive or alcohol-based products risks damaging the appliance.
If an object or liquid enters inside the appliance, unplug it immediately and have it
checked by an authorized engineer.
Notes on disc
Do not use irregular shape CDs (example: heart-shaped, octagonal ones). It may
result in malfunctions.
Do not place more than one disc in the disc compartment.
Do not try to open the disc compartment during playing.
Do not touch the lens. Doing so may cause malfunction.
If there is a scratch, dirt or ngerprints on the disc, it may cause tracking error.
Before playing, clean the disc with a cleaning cloth. Wipe the disc from the center
out. Don't store discs in places with high temperatures or high humidity, they can
become warped. After playing, store the disc in its case.
Important Note
• Before transporting the unit, remove the disc from the disc compartment.
Notes on cassettes
Quit slacking -A little bit of slack in your tapes can cause scratches on the tape, or
worse yet, the tape could break. If you notice some slack in the tape, use a pencil
to tighten it up before you insert it into the cassette holder.
- To prevent accidental erasure, bread o󰀨 the plastic tabs on the cassette tape after
recording with a screw - driver or other pointed tool. To record on the tape again,
cover the tab opening with adhesive tape, etc.
- Any distortion or poor sound quality may be due to the dust or dirt on parts that
are in contact with the magnetic band (magnetic heads, pinch roller and capstan);
in this case, open the cassette door and clean them with a cotton bud dipped in
alcohol.
Nettoyage
ATTENTION: Déconnectez cet appareil de toute source d’alimentation avant
de le nettoyer.
Utilisez un chi󰀨on doux, propre et sec. Dépoussiérez régulièrement les orices de
ventilation à l'arrière ou sur les côtés de l'appareil.
L'utilisation de solvants ou de produits abrasifs ou à base d'alcool peut
endommager l'appareil.
Si un objet ou un liquide entre dans l'appareil, débranchez immédiatement ce
dernier et faites-le contrôler par un ingénieur agréé.
Remarques sur les disques
N’utilisez pas de disques de forme irrégulière (exemple: en forme de cœur,
octogonaux). L’appareil pourrait présenter des dysfonctionnements.
Ne placez pas plusieurs disques dans le compartiment.
N’essayez pas d’ouvrir le compartiment du disque pendant la lecture.
Ne touchez pas la lentille. Vous pourriez provoquer un dysfonctionnement.
Si le disque est rayé, sale ou macude traces de doigts, l’appareil peut ne pas
fonctionner. Avant la lecture, essuyez le disque avec un chi󰀨on. Procédez du
centre vers l’extérieur. Ne rangez pas les disques dans des endroits présentant
des températures élevées ou une humidité importante. Ils pourraient se déformer.
Après la lecture, replacez vos disques dans leur boîtier.
Remarque importante
Retirez le disque du compartiment si l’appareil doit être transporté.
Remarques sur les cassettes
Si la bande est relachée - Un petit peu de relâchement sur la bande de vos
cassettes peut causer des rayures sur la bande, ou pire encore, la bande pourrait
se casser. Si vous remarquez un relâchement sur la bande de la cassette, utilisez
un crayon pour la resserrer avant de l'insérer dans le support de cassette.
- Pour éviter l'e󰀨acement de cassette, cassez l"onglet de plastique sur la cassette
après l'enregistrement avec un tournevis ou un outil pointu. Pour enregistrer de
nouveau sur la cassette, couvrez l'onglet avec du scotch, etc.
- Toute déformation ou qualité médiocre du son peut être due à la poussière ou à
la saledes parties en contact avec la bande magnétique (têtes magnétiques,
galet presseur et cabestan). Dans ce cas, ouvrez le compartiment de la cassette
et nettoyez-les avec un coton-tige imbibé d’alcool.
Limpeza
ATENÇÃO: Desligue este aparelho de qualquer fonte de alimentação antes
de proceder à sua limpeza.
Utilize um pano macio, limpo e seco. Limpe regularmente os orifícios de ventilação
na parte de trás ou nos lados do aparelho para eliminar as partículas de pó.
A utilização de solventes ou de produtos abrasivos ou à base de álcool pode
danicar o aparelho.
Se um objecto ou líquido entrar no aparelho, desligue-o de imediato e solicite a
sua inspecção por um técnico autorizado.
Observações relativas aos discos
Não utilize discos de forma irregular (exemplo: em forma de coração, octogonais).
O aparelho pode car avariado.
Não coloque mais do que um disco no compartimento.
Não tente abrir o compartimento do disco durante a reprodução.
Não toque na lente dado que pode causar uma avaria no aparelho.
Se o disco estiver riscado, sujo ou marcado com dedadas, o aparelho pode
não funcionar. Antes da reprodução, limpe o disco com um pano. Proceda do
centro para fora. Não arrume os discos em locais com temperaturas altas ou
uma humidade signicativa. Podem car deformados. Após a reprodução, volte a
colocar os discos nas respectivas caixas.
Observação importante
Retire o disco do compartimento se o aparelho tiver de ser transportado.
Notas sobre cassetes
Elimine folgas- Um pouco de folga em suas tas pode causar arranhões, ou ainda
pior, a ta poderá se romper. Caso você perceba que existem folgas na ta, utilize
um lápis para apertá-la antes de inseri-la no compartimento de tas cassete.
- Para evitar apagar as suas tas por acidente, quebre as pequenas abas de
plástico da ta cassete depois de gravar com uma chave de fenda ou outra
ferramenta pontiaguda. Para gravar nessa ta novamente, cubra a abertura da
aba com uma ta adesiva, etc.
- Qualquer distorção ou fraca qualidade de som pode dever-se a ou sujidade
nas partes que estão em contacto com a banda magnética (cabeças magnéticas,
agulha); neste caso, abra a porta da cassete e limpe-os com uma bola de algodão
embebida em álcool.
1. Slide the function switch to position. “CD “will show on the display.CD
2. Press the OPEN/CLOSE button to open the CD door. Insert a CD with label
facing you and close the CD door. After a few seconds, the total number of tracks
will show on display.
3. The rst song will be played automatically.
PLAY/PAUSE
To temporarily stop playing, press button.
To resume play, press this button again.
STOP
If the button is pressed in the course of playing, the disc will cease to play. STOP
(Total number of tracks will show on display).
SKIP AND SEARCH
You can always skip forward or backward to your desired track number by pressing
the SKIP ( / ) buttons. When playing any audio CD, press and hold the SKIP
button. The CD will search at high speed in the forward or backward direction.
Normal play will continue when you release the button.
Note: CD-MP3 format cannot fast rewind to previous track.
REPEAT
Repeatedly press button to select one of the following playback modes.REP
Track repeat: “REP” will ash on the display.
Repeat Folder: “REP” will stop ashing.
Repeat all: “REP” will stop ashing.
Random: “RAND” shows on the display.
PROGRAM
1. In stop mode, press PROG button. “PROG“ and “P01” will ash on display.
2. Press / to select a desired track and press PROG button to conrm.
3. Repeat above steps to program up to 20 tracks.
4. Press button to start program playback.
5. To cancel program playback, press button twice. Then press button to STOP
switch to the normal play state.
If you encounter CD playback problem, either of the following ways may help:
1. Turn o󰀨 the unit. Disconnect the AC power cord from AC outlet and reconnect
it again.
2. Clean your CD disc.
Note: CD up to 20 programs, MP3 up to 99 programs.
1. Positionnez le commutateur de fonction sur la position CD. "CD" s'a󰀩chera à
l'écran.
2. Appuyez sur OPEN/CLOSE pour ouvrir le la trappe du disque, Insérez un CD
avec l'étiquette orientée vers vous et fermez le la trappe du CD, après quelques
secondes, le nombre total de piste apparaitra sur l'écran.
3. La première chanson sera lue automatiquement.
LECTURE/PAUSE
Pour interrompre la lecture temporairement, appuyez sur la touche .
Pour reprendre la lecture, appuyez sur cette touche de nouveau.
Arrêt
Si vous appuyez sur la touche pendant la lecture, le disque cessera d'être lu. STOP
(Le nombre total de pistes s'a󰀩chera sur l'écran).
SAUT ET RECHERCHE
Vous pouvez sauter une piste en avant ou en arrière pour atteindre le numéro
de piste de votre choix en appuyant sur les touches SAUT ( / ). Lors de la
lecture d'un CD audio, appuyez sur la touche SKIP et maintenez-la enfoncée. Le
CD e󰀨ectue une recherche à grande vitesse vers l'avant ou vers l'arrière. La lecture
normale se poursuit lorsque vous relâchez la touche.
Remarque: Le format CD-MP3 ne peut pas revenir rapidement à la piste
précédente.
RÉPÉTER
Appuyez successivement sur la touche pour sélectionner votre mode de REP
lecture:
Répétition de la piste: "REP" clignotera sur l'a󰀩chage.
Répéter le dossier: "REP" s'arrête de clignoter.
Répétition totale: "REP" cessera de clignoter.
Aléatoire: "RAND" s'a󰀩chera à l'écran.
PROGRAMME
1. Lorsque la lecture est à l’arrêt, appuyez sur la touche « PROG » et « 01 »PROG
clignotera sur l'écran.
2. lectionnez le chier de votre choix à l’aide des touches / . Appuyez sur
la touche PROG pour conrmer.
3. Répétez les étapes suivantes pour programmer jusqu'à 20 pistes.
4. Appuyez sur la touche pour commencer la lecture programmée.
5. Pour annuler la lecture programmée, appuyez deux fois sur la touche STOP.
Appuyez ensuite sur le bouton pour passer en mode de lecture normal.
Si vous rencontrez un problème de lecture CD, l'une des deux solutions peut
s'avérer utile:
1. Éteignez l'unité. Déconnectez le cordon d'alimentation CA de la prise CA et
reconnectez-le de nouveau.
2. Nettoyez votre disque CD.
Remarque: CD: jusqu’à 20 programmes; MP3: jusqu’à 99 programmes.
1. Coloque o Seletor de Funções na posição . “CD” aparecerá no visor.CD
2. Prima OPEN/CLOSE para abrir o tabuleiro de disco. Insira um CD com a
etiqueta voltada para cima e feche o compartimento do CD. Depois de alguns
segundos, o número total de faixas será exibido na tela.
3. A primeira música será reproduzida automaticamente.
REPRODUZIR/PAUSAR
Para interromper temporariamente, pressione o botão .
Para restaurar a reprodução, pressione esse botão novamente.
PARAR
Caso o botão for pressionado durante uma reprodução, a reprodução do STOP
disco irá parar. (o número total de faixas será exibido na tela).
PULAR E BUSCAR
Você sempre poderá avançar ou voltar para o número da faixa desejado ao
pressionar os botões PULAR ( / ). Quando estiver reproduzindo qualquer CD
de áudio, mantenha o botão PULAR pressionado. Uma busca em alta velocidade
para frente ou para trás será realizada no CD. A reprodução normal será restaurada
quando você soltar o botão.
Nota: O formato CD-MP3 não pode retroceder rapidamente para a faixa anterior.
REPETIR
Pressione mais de uma vez o botão para selecionar o modo de repetição REP
seguintes:
Repetir 1: “REP” piscará no visor.
Repetir Pasta: “REP” irá parar de piscar.
Repetir pasta: “REP” parará de piscar.
Aleatoria: “RAND” aparece no visor.
PROGRAMAR
1. Quando a reprodução estiver parada, prima o botão e “PROG”, “01PROG
piscará na tela.
2. Seleccione o cheiro pretendido com a ajuda dos botões / . Prima o botão
PROG para conrmar.
3. Repita os passos acima para programar até 20 faixas.
4. Prima o botão para iniciar a reprodução programada.
5. Para cancelar a reprodução programada, pressione o botão duas vezes. STOP
Em seguida, prima o botão para mudar para o estado de reprodução normal.
Caso você encontre problemas quando for tocar um CD, uma das seguintes
soluções poderá ajudá-lo:
1. Desligue o aparelho. Retire o o da tomada e conecte-o de volta.
2. Limpe o seu CD.
Observação: CD-até 20 programas; MP3-até 99 programas.
1. Schieben Sie den Funktionsschalter in die -Position. Auf dem Display wird CD
„CD“ angezeigt.
2. Drücken Sie die Taste OPEN/CLOSE, um das Laufwerk zu ö󰀨nen. Legen Sie
eine CD mit der beschrifteten Seite nach oben in das Ladefach und schließen
Sie es. Nach ein paar Sekunden wird die Gesamtzahl der Titel in der Anzeige
angezeigt.
3. Der erste Titel wird automatisch abgespielt.
WIEDERGABE / PAUSE
Um die Wiedergabe vorübergehend zu unterbrechen, betätigen Sie die Taste .
Zum Fortfahren der Wiedergabe betätigen Sie diese Taste bitte erneut.
STOPP
Wenn die Taste STOP während der Wiedergabe betätigt wird, wird die Wiedergabe
der Disc gestoppt. (Gesamtzahl der Titel wird in der Anzeige angezeigt.)
TITEL ÜBERSPRINGEN / SCHNELLSUCHLAUF
Sie nnen jederzeit zu der gewünschten Titelnummer springen, indem Sie die
Auswahltasten ( / ) benutzen.
Während der CD-Wiedergabe, halten Sie die SKIP-Taste gedrückt. Das Gerät
durchsucht die CD dann mit hoher Geschwindigkeit vor bzw. zurück. Die normale
Wiedergabe wird fortgesetzt, wenn Sie die Taste loslassen.
Hinweis: Im CD-MP3-Format kann nicht schnell zum vorherigen Titel zurückgespult
werden.
WIEDERHOLUNG
Drücken Sie die -Taste wiederholt, um den Repeat-Modus wählen: REP
Einzelwiederholung: „REP“ blinkt auf dem Display.
Ordner wiederholen: „REP“ hört auf zu blinken.
Alles wiederholen: „REP“ hört auf zu blinken.
Zufalls: Auf dem Display wird „RAND“ angezeigt.
PROGRAMMWIEDERGABE
1. Wenn die Wiedergabe angehalten ist, drücken Sie auf die Taste . “PROG” PROG
oder “ 01 “ blinkt in der Anzeige.
2. hlen Sie die gewünschte Datei mit Hilfe der Tasten / . Drücken Sie zur
Bestätigung die Taste PROG.
3. Wiederholen Sie die obigen Schritte für bis zu 20 Titel.
4. Drücken Sie auf die Taste , um die programmierte Wiedergabe zu beginnen.
5. Um die Programmwiedergabe abzubrechen, betätigen Sie die Taste STOP
zweimal. Wechseln Sie dann durch Drücken der Taste zur normalen
Wiedergabe.
Falls CD-Wiedergabeprobleme auftreten, versuchen Sie sie auf eine der folgenden
Weisen zu beheben:
1. Schalten Sie das Gerät aus, trennen Sie es von der Stromversorgung ab und
schließen Sie es erneut an.
2. Reinigen Sie Ihre Compact-Disc.
Hinweis:
CD-bis zu 20 programmierte Tracks; MP3 -bis zu 99 programmierte Tracks.
This set operates on AC 100-240V 50/60Hz or 8 x 1.5V R20/ UM-1/ “D” size
batteries (not provided).
AC OPERATION
Connect the detachable AC cord (included) to the AC socket on the rear of the unit.
Insert the AC power cord into a convenient standard AC wall outlet.
Note: AC cord is stored in the battery compartment. Please open the battery
compartment to get the AC cord.
DC OPERATION
Install the batteries in their compartment. Use only the size and type of batteries
specied. Respect the polarity indicated in the compartment. Improper polarity
can cause damage to the device. Do not attempt to recharge the batteries, they
can catch re or explode. The batteries need to be replaced when: The volume
decreases, or sound is distorted during operation. In order to avoid leakage,
remove the batteries when unit will not be used for a long period of time.
CAUTION: Danger of explosion if batteries are incorrectly replaced. Replace only
with the same or equivalent type.
Note:
- The AC cord must be unplugged from both the socket on the unit and the power
outlet for the unit to run on the batteries.
- When the set is connected to the mains, the power source automatically switches
to AC.
- In a concern of saving energy, when the product is in stop mode and no control
is operated on the device for a period of 15 minutes, the unit will automatically
switch to Standby mode. Press any key to wake up and enter the working mode.
Cet appareil fonctionne sur courant alternatif 100-240V 50/60Hz ou avec 8 piles
1,5V de type R20/ UM-1/ «D» (non fournies).
Alimentation secteur
Branchez le cordon d'alimentation détachable (inclus) à la prise secteur se trouvant
à l'arrière de l'appareil. Branchez le cordon d'alimentation sur une prise secteur
murale.
Remarque: Le cordon d’alimentation secteur est rangé dans le compartiment des
piles. Veuillez ouvrir le compartiment des piles pour obtenir le cordon d’alimentation.
FONCTIONNEMENT CC
Installez les piles dans leur compartiment. Utilisez uniquement la taille et le type
de piles spéciées. Respectez la polarité indiquée dans le compartiment. Une
mauvaise Polari peut causer des dommages à l'appareil. Ne pas essayer de
recharger les piles, elles peuvent prendre feu ou exploser. Les piles doivent être
remplacées lorsque: Le volume sonore diminue ou le son est déformé. An d'éviter
tout risque de fuites des piles, retirez-les si l'appareil n'est pas utilisé pendant une
période prolongée.
ATTENTION: Risque d’explosion si les piles ne sont pas insérées correctement.
Utilisez uniquement des piles identiques ou de type équivalent.
Attention:
- Le cordon d'alimentation doit être branché à la fois de l'appareil et de la prise
secteur pour que l'appareil fonctionne sur piles.
- Lorsque l’appareil est connecté au secteur, la source d'alimentation bascule
automatiquement en alimentation secteur.
- Dans un souci d'économie d'énergie, lorsque la lecture est terminée ou arrêtez,
période de 15 minutes celui-ci se mettra automatiquement en mode veille.
Appuyez sur n’importe quelle touche pour réveiller l’appareil et entrer en mode
de fonctionnement.
Este aparelho trabalha com AC 100-240V 50/60Hz ou 8 pilhas x 1,5V de
tamanho R20/ UM-1/ “D” (não incluídas)
Funcionamento AC
Ligue o cabo AC (incluído) na tomada AC nas costas da unidade, ligue o cabo de
alimentação numa tomada AC padrão adequada.
Nota: O cabo de alimentação CA está guardado no compartimento da bateria. Abra
o compartimento da bateria para obter o cabo CA.
Funcionamento DC
Instale as baterias em seu compartimento. Utilize apenas pilhas que respeitam as
recomendações do fabricante. Certique-se de que respeita a polaridade aquando
da colocação de pilhas (ver compartimento). A inobservância da polaridade pode
danicar o aparelho. Não tente recarregar pilhas não recarregáveis. Podem sofrer
um sobreaquecimento e explodir. As pilhas devem ser substituídas quando: O
volume diminuir, ou o som car distorcido durante o funcionamento. De forma a
evitar fugas, retire as pilhas se não usar o dispositivo durante um longo período.
ATENÇÃO: Riscos de explosão se as pilhas não forem inseridas correctamente.
Utilize apenas pilhas idênticas ou de tipo equivalente.
Nota:
- O cabo CA deve ser desligado tanto da tomada como do transformador para a
unidade poder funcionar com as baterias.
- Quando o cabo AC estiver ligado da unidade principal à tomada da parede, a
alimentação muda automaticamente para AC.
- Para poupar energia, quando o produto estiver parado e nenhum controle
for operado no dispositivo por um período de 15 minutos,a unidade passará
automaticamente para o modo de Standby. Prima qualquer tecla para despertar e
entrar no modo de funcionamento.
Dieses Gerät wird mit AC 100-240V 50/60Hz oder 8 x 1.5V Batterien der Größe
R20/ UM-1/ „D“ (nicht mitgeliefert) betrieben.
AC-Betrieb
Verbinden Sie das abnehmbare AC-Kabel (mitgeliefert) mit der AC-Buchse hinten
an der Einheit. Stecken Sie das AC-Netzkabel in eine günstig liegende normale
AC-Steckdose.
Hinweis: Das AC-Netzkabel ist im Batteriefach verstaut. Ö󰀨nen Sie das
Batteriefach, um das Kabel herauszunehmen.
Gleichstrombetrieb
Legen Sie die Batterien in das Batteriefach ein. Verwenden Sie nur Batterien, die
den Vorgaben des Herstellers entsprechen. Bitte beachten Sie die Polarität beim
Einlegen der Batterien (siehe Batteriefach). Die Nicht-Beachtung der Polarität kann
das Gerät beschädigen. Versuchen Sie nicht, nicht-wiederauadbare Batterien
wieder aufzuladen. Sie könnten überhitzen und explodieren.
Batterien müssen ersetzt werden, wenn: Die Lautstärke nachlässt oder der Klang
während des Betriebs unklar wird. Um Auslaufen zu vermeiden, entfernen Sie die
Batterien, wenn die Einheit über eine längere Zeit nicht gebraucht werden soll.
ACHTUNG: Wenn die Batterien nicht richtig eingelegt sind, besteht
Explosionsgefahr. Verwenden Sie nur gleiche oder gleichwertige Batterietypen.
Vorsicht!
- Damit die Einheit mit Batterien betrieben werden kann, muss zuerst das AC-Kabel
sowohl aus der Buchse der Einheit als auch aus der Steckdose gezogen werden.
- Wenn das AC-Kabel der Haupteinheit mit der Steckdose verbunden ist, schaltet
die Stromquelle automatisch auf AC.
- Um Energie zu sparen, wechselt das Gerät automatisch in den Standby-Modus,
wenn sich das Produkt im Stoppmodus bendet und 15 Minuten lang keine
Steuerung am Gerät erfolgt. Drücken Sie eine beliebige Taste, um das Gerät
aufzuwecken und den Betriebsmodus zu aktivieren.
IMPORTANT SAFETY INSTRUCTIONS
INSTRUCTIONS IMPORTANTES SUR LA SECURITE
INSTRUÇÕES DE SEGURANÇA IMPORTANTES
CAUTION: To reduce the risk of electric shock, do not open
the device, there is no party inside for the user. Refer all
servicing to qualied personnel.
ATTENTION: Pour réduire le risque de choc électrique,
ne pas ouvrir l'appareil, il n'y a aucune partie à l'intérieur
destinée à l'utilisateur. Conez toutes les réparations à un
personnel qualié.
ATENÇÃO: Para reduzir o risco de choque eléctrico, não
desmonte o aparelho. O aparelho não contém qualquer
peça passível de ser reparada pelo utilizador. Cone todas
as operações de manutenção a um técnico qualicado.
The Caution mark is located at the back of the device.
WARNING: TO PREVENT FIRE OR SHOCK HAZARD, DO NOT EXPOSE THIS
APPLIANCE TO RAIN OR MOISTURE.
CAUTION: Invisible laser radiation when open and interlocks defeated. Avoid
exposure to beam.
This compact disc player is classied as a CLASS 1 LASER product. The CLASS 1
LASER PRODUCT marking is located at the CD compartment.
La plaque de précaution est située à l’arrière de l’appareil.
AVERTISSEMENT: POUR PRÉVENIR TOUT RISQUE D’INCENDIE OU DE
CHOC ÉLECTRIQUE, N’EXPOSEZ PAS CET APPAREIL À LA PLUIE OU À
L’HUMIDITÉ.
ATTENTION: Radiations laser invisibles lorsque les dispositifs de curité sont
ouverts ou défectueux.
Ce lecteur de disque compact est classié comme un produit laser de CATEGORIE
1, Le marquage CLASS 1 LASER PRODUCT (PRODUIT LASER DE CLASSE 1)
est situé dans le compartiment du CD.
A placa de características situa-se na parte de trás deste aparelho.
ADVERTÊNCIA: PARA PREVENIR O RISCO DE INCÊNDIO OU DE CHOQUE
ELÉCTRICO, NÃO EXPONHA ESTE APARELHO A CHUVA OU HUMIDADE.
ATENÇÃO: São emitidas radiações invisíveis quando os dispositivos de segurança
são abertos ou defeituosos.
Esse reprodutor de discos compactos é classicado como um produto de
LASER DE CLASSE 1. A marca CLASS 1 LASER PRODUCT está localizada no
compartimento do CD.
IMPORTANT
- The use of apparatus in moderate climates.
- The Marking plate is located at the back of the device.
- Make sure to have a minimum distance of 5 cm around the unit for su󰀩cient
ventilation.
- Ensure that the ventilation openings is not covered with items such as newspapers,
tablecloths, curtains, etc.
- Do not place naked ame sources, such as lighted candles on the apparatus.
- Do not expose this appliance to dripping or splashing water.
- Do not place objects lled with liquids, such as glass, vase on the device.
- Do not throw batteries into re! Respect the environment when disposing of used
batteries.
- Batteries should not be exposed to excessive heat such as sunshine, re or other
similar heat source.
- The power plug is used as a disconnect device and must be easily accessible. To
be completely disconnected from the power, the plug of the appliance should be
disconnected completely. The socket must not be obstructed and should be easily
accessible during intended use.
- Before throwing any batteries away, consult your distributor who may be able to
take them back for specic recycling.
- Under the inuence of fast transient and / or electrostatic electric phenomenon,
the product may malfunction and the user must perform a power reset of the
device.
- The normal function of the product may be disturbed by strong Electro-Magnetic
Interference. If so, simply reset the product to resume normal operation by
following the instruction manual. In case the function could not resume, please
use the product in other location.
IMPORTANT
- Utilisez cet appareil sous un climat tempéré.
- La plaque signalétique se trouve à l’arrière de cet appareil.
- Veiller à avoir une distance minimale de 5 cm autour de l'appareil pour une
aération su󰀩sante et que la ventilation ne soit pas gênée en recouvrant les orices
d'aération de l'appareil avec des objets tels que journaux, nappes, rideaux…..
- Ne placez pas de sources de ammes nues, telles que des bougies allumées
sur l'appareil.
- Ne pas exposer l'appareil à des gouttes d'eau ou éclaboussures.
- Ne placez pas d'objets remplis de liquides, tels que verre, vase ou objets
similaires sur l'appareil.
- Ne pas jeter les piles dans le feu! Respectez l'environnement lors de la disposition
des piles usagées.
- Les piles ne doivent pas être exposées à une chaleur excessive comme le soleil,
le feu ou autre source de chaleur similaire.
- La che du cordon d'alimentation est utilisée comme dispositif de débranchement
et doit rester facilement accessible. Pour être totalement déconnecté, cette che
doit être débranchée du réseau complètement. La prise de courant ne doit pas
être obstruée et doit être facilement accessible lors de son utilisation .
- Avant de jeter des piles, consultez votre revendeur car celui-ci peut les reprendre
pour les recycler.
- Sous l'inuence du phénomène transitoire rapide et / ou phénomène
électrostatique électrique, le produit pourrait présenter des dysfonctionnements
et l'utilisateur devra faire une réinitialisation de l'appareil.
- Le fonctionnement normal du produit peut être perturbé par de fortes interférences
électromagnétiques. Si tel est le cas, il su󰀩t de réinitialiser le produit pour qu'il
reprenne son fonctionnement normal en suivant le manuel d'instructions. Si le
fonctionnement ne revient toujours pas à la normale, veuillez déplacer et utiliser
le produit dans un endroit o󰀨rant une meilleure réception.
ATENÇÃO
- Utilize este aparelho num clima temperado.
- A placa de características situa-se na parte de trás deste aparelho.
- Certique-se de que respeita uma distância mínima de 5 cm à volta do aparelho
de modo a permitir uma ventilação suciente.
- Certique-se de que garante uma ventilação correcta do aparelho e que não
tapa os orifícios de ventilação com objectos como jornais, toalhas, cortinas, etc.
- Não coloque qualquer fonte de calor, como uma vela acesa, sobre ou na
proximidade do aparelho.
- Não exponha o aparelho a salpicos ou a humidade.
- Não coloque objectos que contenham líquido, como uma jarra, sobre ou na
proximidade do aparelho.
- Não deite as pilhas no fogo! Certique-se de que respeita o ambiente quando
eliminar pilhas gastas.
- Não exponha as pilhas a calor excessivo, como raios do sol, fogo ou outras fontes
de calor semelhantes.
- A cha de alimentação de rede permite desligar o aparelho e deve car facilmente
acessível. Para cortar a alimentação do aparelho, desligue de vez a cha de
alimentação de rede da tomada de rede. A cha de alimentação de rede não pode
estar tapada e deve ser facilmente acessível durante a utilização.
- Antes de eliminar as pilhas, consulte o seu distribuidor que poderá estar em
condições de as aceitar de volta para ns de reciclagem especíca.
- Sob o efeito de fenómenos electrostáticos e/ou eléctricos transitórios, o produto
pode apresentar anomalias e pode acabar por ser necessário proceder-se a uma
reinicialização.
- A função normal do produto pode ser interrompida por fortes interferências
eletromagnéticas. Nesse caso, basta reiniciar o produto para retomar a operação
normal seguindo o manual de instruções. Caso a função não possa ser retomada,
utilize o produto noutro local.
The lightning with the arrow symbol in the triangle is a warning sign alerting
the user to "dangerous voltage" inside the unit.
L'éclair avec le symbole de la èche dans le triangle est un signe d'alerte
avertissant l'utilisateur de "tension dangereuse" à l'intérieur de l'unité.
O símbolo do relâmpago com uma seta e situado no interior de um triângulo
destina-se a alertar o utilizador para a presença de uma “tensão perigosa”
no aparelho.
The exclamation point in the triangle is a warning sign alerting the user of
important instructions accompanying the product.
Le point d'exclamation dans le triangle est un signe d'alerte avertissant
l'utilisateur d'instructions importantes accompagnant le produit.
O ponto de exclamação no interior de um triângulo destina-se a alertar
o utilizador para a presença de instruções importantes no manual que
acompanha o aparelho.
If in the future, you need to get rid of this product, please note that Waste
electrical products should not be disposed of with household waste.
Recycling facilities exist. Check with your municipality or ask your dealer
for advice. (Directive for Waste Electrical and Electronic Equipment)
Si à l’avenir, vous deviez vous débarrasser de ce produit, sachez que les
produits électriques usagés ne doivent pas être jetés avec les ordures
ménagères. Des installations destinées au recyclage existent. Vériez
auprès de votre municipalité ou demandez à votre revendeur des
conseils. (Directive Déchets d’Equipements Electriques et Electroniques)
Caso pretenda descartar-se deste aparelho, proceda à sua reciclagem
num centro de recolha para electrodomésticos. Procure obter
informações sobre o centro de reciclagem mais próximo. Informe-se junto
das autoridades locais ou do seu revendedor local para a obtenção de
pormenores adicionais (Directiva sobre os Resíduos dos Equipamentos
Eléctricos e Electrónicos).
Nos emballages peuvent faire l’objet d’une consigne de tri, pour en
savoir plus: www.quefairedemesdechets.fr
NEW ONE S.A.S
10, Rue de la Mission, 25480 Ecole Valentin, France
NEW ONE S.A.S
10, Rue de la Mission, 25480 Ecole Valentin, France
NEW ONE S.A.S
10, Rue de la Mission, 25480 Ecole Valentin, France
USING HEADPHONES / EARPHONES (NOT INCLUDED)
UTILISATION D’UN CASQUE / D’ÉCOUTEURS (câble non fourni)
UTILIZAÇÃO DE AURICULARES/AUSCULTADORES (Cabo não incluído)
TECHNICAL SPECIFICATION
FICHE TECHNIQUE
ESPECIFICAÇÕES
To prevent possible hearing damage, do not listen at high volume levels
for long periods.
An de réduire les risques de lésions auditives, n’écoutez pas de la
musique à un volume élevé pendant longtemps.
Para prevenir possíveis danos auditivos, não escute em volumes muito
altos por longos períodos de tempo.
Maximum output voltage ≤ 150 mV
HEADPHONE VOLUME WARNING
Connect earphones with the volume set low and increase it if required. Prolonged
listening through some earphones at high volume settings can result in hearing
damage. When headphones/earphones are connected, no sound will be emitted
from the unit’s speaker.
Caution: Avoid listening to sound at levels which may be harmful to your ears.
Tension de sortie maximale ≤ 150 mV
MISE EN GARDE SUR LE NIVEAU DE VOLUME DU CASQUE
Diminuez le volume avant de connecter un casque et augmentez-le ensuite
si nécessaire. L’utilisation prolongée d’un casque à un volume élevé peut
endommager votre système auditif. Lorsqu’un casque ou des écouteurs sont
connectés, les haut-parleurs du lecteur sont désactivés.
Attention: Évitez les niveaux sonores élevés pouvant nuire à votre système auditif.
Tensão de saída máxima ≤ 150 mV
PRECAUÇÕES RELATIVAS AO NÍVEL DO VOLUME DOS AURICULARES
Diminua o volume antes de ligar os auriculares e aumente-o de seguida, se
necessário. A utilização prolongada de auriculares com um volume alto pode
causar lesões no sistema auditivo. Quando se ligam auriculares ou auscultadores,
os altifalantes do leitor são desactivados.
Atenção: Evite os níveis sonoros altos que podem danicar o sistema auditivo.
POWER SUPPLY:
AC: 100-240V 50/60Hz
DC: 12V 8 x 1.5V R20/ UM-1/ “D” size batteries (not provided)
Consumption: 80W
RADIO Frequency range
FM: 88 - 108 MHz
BLUETOOTH
Bluetooth Version: V5.3 with EDR
Bluetooth: 2.402-2.48GHz
RF Output Power: -0.58 dBm
Working Distance: Up to 10 meters measured in open space (wall and structures
may a󰀨ect range of device)
CASSETTE SECTION
Tape speed: 4.75 CM / SEC.
Frequency response: 125 Hz - 8 kHz
COMPACT DISC SECTION
Optical pickup: 3 - BEAM LASER
Frequency response: 100 Hz - 16 kHz
Specications are subject to change without notice.
Alimentation:
CA: 100-240V 50/60Hz
Courant continu: 12V 8 x 1.5V R20/ UM-1/ “D” (non fournies)
Consommation: 80W
RADIO:
FM: 88 - 108 MHz
BLUETOOTH
Version Bluetooth: V5.3+EDR
Bluetooth: 2.402-2.48GHz
Puissance de sortie des RF (fréquences radios): -0.58 dBm
Distance de fonctionnement: Jusqu'à 10 tres mesurés en espace ouvert (les
murs et les structures peuvent a󰀨ecter la portée de l'appareil
SECTION CASSETTE
Vitesse de cassette: 4.75 CM / SEC.
Réponse en fréquence: 125 Hz - 8 kHz
SECTION DISQUE COMPACT
Micro optique: 3 - RAYON LASER
Réponse en fréquencE: 100 Hz - 16 kHz
Les caractéristiques et les spécications sont sujettes à modication sans préavi.
Alimentação:
AC: 100-240V 50/60Hz
DC: 12V 8 x 1,5V R20/ UM-1/ “D” (não inclusa)
Consumo: 80W
Rádio:
FM: 88 - 108 MHz
BLUETOOTH
Versão do Bluetooth: V5.3+EDR
Bluetooth: 2.402-2.48GHz
Potência de saíde de RF (Rádio Frequência): -0.58 dBm
Distância de Funcionamento: Até 10 metros, medido em espaço aberto (paredes e
estruturas poderão afetar a distância de funcionamento do dispositivo).
ÁREA DA FITA CASSETE
Velocidade da ta: 4,75 CM / SEGUNDO
Frequência de resposta: 125 Hz - 8 kHz
ÁREA DO CD (COMPACT DISC)
Captura ótica: 3 – FAIXO DE LASER
Frequência de resposta: 100 Hz - 16 kHz
O modelo e as especicações técnicas o passíveis de serem alterados sem
aviso prévio.
EMPLACEMENT ET DESCRIPTION DES COMMANDES
DESCRIÇÃO DO APARELHO
BESCHREIBUNG DES GERÄTES
RKD-5188 IB MUSE 001 REV0.indd 1
RKD-5188 IB MUSE 001 REV0.indd 1RKD-5188 IB MUSE 001 REV0.indd 1 2023/5/26 16:16:22
2023/5/26 16:16:22
2023/5/26 16:16:22
2023/5/26 16:16:222023/5/26 16:16:22
M-380GB/IB/V0
ENCNEDIDO/APAGADO DE LA UNIDAD ACCENSIONE / SPEGNIMENTO DELL’UNITÀ
FUNCIÓN BLUETOOTH
FUNZIONALITÀ BLUETOOTH
BLUETOOTH-FUNCTIE
PARA ESCUCHAR UN CASSETTE
RIPRODUZIONE DI UNA CASSETTA
EEN CASSETTEBANDJE BELUISTEREN
FUNCIONAMIENTO DE LA RADIO ASCOLTO DELLA RADIO
NAAR DE RADIO LUISTEREN
MIKROFON ANSCHLIESSEN UND MITSINGEN PARA CANTAR POR LA TOMA MIC
AMPLIFICAZIONE DEL MICROFONO
ZINGEN MET DE MIC-AANSLUITING
AUDIO-BEDIENELEMENTE
CONTROLES DE AUDIO
CONTROLLI AUDIO
MODUS EN VOLUMEREGELING
WARTUNG MANTENIMIENTO
MANUTENZIONE
ONDERHOUD
PARA ESCUCHAR UN CD ASCOLTO DI UN CD
NAAR EEN CD LUISTEREN
FUENTE DE ALIMENTACIÓN ALIMENTAZIONE
STROOMTOEVOER
GRABADORA PORTÁTIL DE CD, RADIO Y
BLUETOOTH A CASETE REGISTRATORE A CASSETTE CON RADIO
BLUETOOTH PORTATILE
DRAAGBARE BLUETOOTH RADIO CD-SPELER
CASSETTERECORDER
ES IT
NL
1. Tweeter
2. Altavoz principal
3. TREBLE -/+: Mando de ajuste de
agudos
4. BASS -/+: Botón de control de
graves
5. Pantalla
6. Compartimento del disco
7. OPEN/CLOSE: Para abrir/ cerra la
bandeja de los discos
8. Interruptor Function
9. : Selector FMFM ST/FM
10. Compartimento Del Cassette
11. LEVEL LEFT: Medidor de nivel
izquierdo
12. LEVEL RIGHT: Medidor de nivel
derecho
13. control: Control TUNING TUNING
con escala dial
14. VOLUME -/+: Botón giratorio
VOLUME (volumen)
15. Teclas de reproducción de CD:
: ParadaSTOP
: Salto a la pista anterior/
rebobinado rápido
: Reproducir/ Pausar
: Salto a la pista anterior/ avance
rápido
: ProgramPROG
: RepetirREP
16. MIC1: Toma MIC.1
17. MIC2: Toma MIC.2
1. Tweeters
2. Di󰀨usore principale
3. TREBLE -/+: Manopola di
regolazione degli alti
4. BASS -/+: Manopola di regolazione
dei bassi
5. Display
6. Compartimento disco
7. OPEN/CLOSE: Apertura/chiusura
del vano CD
8. Interruttore di funzione
9. : Selettore FMFM ST/FM
10. Vano Cassette
11. LEVEL LEFT: Tasto per cartella
precedente
12. LEVEL RIGHT: Tasto per cartella
successiva
13. control: Manopola di TUNING
SINTONIZZAZIONE con scala
graduata
14. VOLUME -/+: Manopola VOLUME
15. Tasti riproduzione CD:
: RestoSTOP
: Salto al brano precedente/
Riavvolgimento veloce
: Riproduzione/ Pausa
: Salto al brano successivo/
Avanzamento veloce
: ProgrammazionePROG
: RipetiREP
16. : Presa MIC.1MIC1
17. : Presa MIC.2MIC2
1. Tweeters
2. Hoofdluidspreker
3. TREBLE -/+: Regelknop voor hoge
tonen
4. BASS -/+: Regelknop voor lage tonen
5. Scherm
6. Diskcompartiment
7. OPEN/CLOSE: Disclade openen/
sluiten
8. Functieschakelaar
9. FM ST/FM: FM-bereikschakelaar
10. Cassettedeck
11. : Niveaumeter linksLEVEL LEFT
12. LEVEL RIGHT: Niveaumeter rechts
13. control: Afstemknop met TUNING
afstemschaal
14. : VOLUME-draaiknop VOLUME -/+
15. Toetsen voor het afspelen van cd’s:
: StopSTOP
: Terug naar de vorige track/
terugspoelen
: Spelen/ Pauze
: Verder naar de volgende track/
vooruitspoelen
: ProgrammeringPROG
: HerhalingREP
16. : MIC.1 INGANGMIC1
17. : MIC.2 INGANGMIC2
18. : Mando de control de ECHO
reverberación
19. MIC VOL: Mando de ajuste del
volumen del micrófono
20. Lector de tarjetas Micro SD (TF)
21. Puerto USB
22. Entrada auxiliar
23. Toma para auriculares
24. Botones de grabación de cassette
: GrabarREC
PLAY : Reproducción
REW : Rebobinado rápido
: Avance rápidoFFWD
STOP/ EJ : Detención de
la cinta/ abre el compartimento
del casete
PAUSE : Pausa
25. FOLDER-: Botón de carpeta
anterior
26. FOLDER+: Botón de carpeta
siguiente
27. : Botón de GRABACIÓNREC
28. : Botón de eliminarDEL
29. MODE: Botón de cambio de modo
30. X-BASS: Botón de altavoz de
subgraves
31. Micrófono integrado
32. Antena telescópica FM
33. AC IN: Entrada CA ( ) AC IN
34. Compartimento del disco
35. AC ON/OFF: Encendido/
Apagado
18. : Reverb control knobECHO
19. MIC VOL: Mic volume adjustment
knob
20. Lettore scheda micro SD (TF)
21. Porta USB
22. Ingresso ausiliario
23. Presa cu󰀩e
24. Tasti registratore a cassette:
: RegistraREC
PLAY : Riproduci
REW : Riavvolgimento veloce
: Avanzamento veloceFFWD
STOP/ EJ : Consente di
arrestare la riproduzione/ apertura
del vano cassette
PAUSE : Sospendi
25. FOLDER-: Tasto per cartella
precedente
26. FOLDER+: Tasto per cartella
successiva
27. : Tasto di registrazioneREC
28. DEL: Tasto elimina
29. MODE: Tasto per la selezione
della modalità
30. X-BASS: Tasto subwoofer
31. Microfono incorporato
32. Antenna telescopica FM
33. : Presa AC (AC IN) AC IN
34. Vano batterie
35. AC ON/OFF: Interruttore di
accensione ON/ OFF
18. : Reverb regelknopECHO
19. MIC VOL: Instelknop
microfoonvolume
20. Micro SD (TF)-kaartlezer
21. USB-POORT
22. Aux in-stekkerbus
23. Aansluiting hoofdtelefoon
24. Toetsen voor cassetterecorder:
: OpnemenREC
PLAY : Het afspelen starten
REW : Terugspoelen
: VooruitspoelenFFWD
STOP/ EJ : Stop de tape/
open het cassettecompartiment
PAUSE : Pauze
25. : Knop voor Vorige mapFOLDER-
26. FOLDER+: Knop voor Volgende
map
27. : RECORD-knopREC
28. : VerwijderknopDEL
29. : Modus schakelknopMODE
30. : Subwoofer knopX-BASS
31. Ingebouwde microfoon
32. Telescopische Antenne
33. AC IN: AC-aansluiting( AC IN)
34. Batterijcompartiment
35. AC ON/OFF: AAN/UIT-knop
- Si el aparato esconectado a la red eléctrica, coloque primero el interruptor de
alimentación AC ON/OFF de la parte posterior del aparato en la posición ON.
A continuación, para seleccionar el modo de funcionamiento deseado, ajuste el
interruptor MUSIC (Bluetooth, AUX, USB, SD) / CD / TAPE / RADIO al modo de
funcionamiento deseado.
- Si el aparato está conectado a la red eléctrica, coloque el interruptor de
alimentación AC ON/OFF de la parte posterior del aparato en OFF para apagarlo.
- Se il dispositivo è collegato alla rete elettrica, inizia spostando su ON l’interruttore
di alimentazione posto sul retro del dispositivo. Quindi, selezionare AC ON/OFF
la modalioperativa desiderata, imposta l’interruttore MUSIC (Bluetooth, AUX,
USB, SD) / CD / TAPE / RADIO sulla modalità operativa desiderata.
- Se il dispositivo è collegato alla rete elettrica, per spegnere l’apparecchio sposta
su OFF l’interruttore di alimentazione posto sul retro del dispositivo.AC ON/OFF
Los logos y nombres Bluetooth
®
son marcas registradas que pertenecen a Bluetooth
SIG, Inc. y cualquier uso de dichas marcas por parte de New One S.A.S tiene sus
respectivas licencias. Otras marcas comerciales y registradas son propiedad de sus
respectivos propietarios.
Emparejar un dispositivo Bluetooth
1. Cuando la unidad esté encendida, deslice el interruptor de función hasta la
posición . Aparecerá ”PAIR” en la pantalla. El “PAIR” comenzará a parpadear
rápidamente, lo que indica que está en modo de emparejamiento.
2. En el dispositivo Bluetooth, habilite Bluetooth y seleccione “MUSE M-380GB” de
la lista de dispositivos. (Para obtener el detalle de operaciones para conectarse,
consulte el manual de usuario del dispositivo). Si el dispositivo Bluetoothle
solicita una contraseña de acceso, utilice“0000”. Algunos dispositivos Bluetooth
le indicarán que acepte la conexión. Si las unidades está emparejadas
correctamente, el ”PAR” dejará de parpadear en la pantalla.
Consejo: Si desea conectar el altavoz Bluetooth a otro dispositivo de audio Bluetooth,
mantenga presionado el botón para desconectar el dispositivo, La palabra "PAIR"
(emparejar) parpadea rápidamente en la pantalla. Después, siga los siguientes
pasos para establecer una nueva conexión.
En algunos dispositivos como computadoras, una vez realizado el emparejamiento,
debe seleccionar la unidad del menú Bluetooth y elegir "Use as Audio Device
(stereo) or similar" (utilizar como dispositivo de audio (estéreo) osimilar).
El emparejamiento permanece intacto cuando launidad y/o su dispositivo Bluetooth
sale del rango de comunicación. Se restablecerá una conexiónactiva cuando su
dispositivo Bluetooth vuelva dentro del rango.
Cuando vuelva a encender la unidad, se intentará la reconexión automática con el
dispositivo Bluetooth al que se haya emparejado más recientemente.
Utilizar un dispositivo Bluetooth
1. Con alguna unidad emparejada (ver la sección anterior), haga funcionar su
dispositivo Bluetooth. El sonido se escuchará a través de los altavoces M-380 GB.
2. Oprima el botón para pausar la reproducción. Presione nuevamente para
retomar la reproducción.
3. Seleccione la pista que desee con / .
4. Ajuste el volumen con los botones de Volumen. También puede ajustar el volumen
en el dispositivo con el cual está emparejado.
Por la presente, NEW ONE S.A.S declara que el «MUSE M-380 GB/ M-380 GBS»
cumple con los requerimientos esenciales y otras provisiones aplicables de la
Directiva 2014/53/EU. La declaración de conformidad podrá consultarse en
www.muse-europe.com
Il marchio denominativo Bluetooth
® e i relativi loghi sono marchi registrati di
Bluetooth SIG, Inc., utilizzati da New One S.A.S su licenza. Altri marchi e nomi
commerciali sono di proprietà dei rispettivi titolari.
Associazione di un dispositivo Bluetooth
1. Da apparecchio acceso, scorrete l'interruttore di funzione in posizione . "PAIR"
apparirà sul display. Il "PAIR" inizierà a lampeggiare rapidamente, indicando che
è in modalità di associazione.
2. Attivare la funzione Bluetooth sul proprio dispositivo Bluetooth e selezionare
“MUSE M-380GB” dall’elenco dei dispositivi rilevati (consultare il manuale
di istruzioni del dispositivo per informazioni dettagliate su come connettere
il dispositivo). Se il dispositivo Bluetooth richiede la digitazione di una
password, inserire “0000”. Alcuni dispositivi Bluetooth richiedono di accettare la
connessione. Se dispositivo e unisono stati associati correttamente, "PAIR"
smetterà di lampeggiare sul display.
Suggerimento: Se desideri connettere il tuo di󰀨usore Bluetooth a un altro
dispositivo audio Bluetooth, tieni premuto il tasto per disconnettere il dispositivo.
La scritta “PAIR” lampeggerà velocemente sul quadrante. Quindi, segui i passaggi
precedenti per stabilire una nuova connessione.
Su alcuni dispositivi, come ad esempio computer, una volta associato il dispositivo
è necessario selezionare l’unità dal menu Bluetooth, quindi selezionare l’opzione
“Utilizza come dispositivo audio (stereo)” o similare.
Lassociazione rimane attiva quando l’unità e/o il dispositivo Bluetooth escono dal
raggio d’azione del Bluetooth. Una connessione attiva viene ristabilita quando il
dispositivo rientra nel raggio d’azione del Bluetooth.
Una volta riaccesa, l’unità tenta in automatico di riconnettersi all’ultimo dispositivo
Bluetooth associato.
Utilizzo di un dispositivo Bluetooth
1. Una volta associata l’unità a un dispositivo (vedi sezione precedente) l’audio del
dispositivo Bluetooth viene riprodotto mediante l’altoparlante.
2. Premere il tasto per sospendere la riproduzione. Premerlo di nuovo per
riprendere la riproduzione.
3. Utilizzare i tasti / per selezionare la traccia desiderata.
4. Regolare il volume utilizzando i tasti volume. È possibile regolare il volume anche
dal dispositivo a cui l’unità è associata.
Con la presente, NEW ONE S.A.S dichiara che « MUSE M-380 GB/ M-380 GBS »
è conforme ai requisiti essenziali e alle altre disposizioni fondamentali della
direttiva 2014/53/EU. La dichiarazione di conformità è consultabile alla pagina
www.muse-europe.com
3. Selecteer de gewenste track met / .
4. Stel het volume in met behulp van. U kunt het volume ook instellen op het
apparaat dat is verbonden met de luidspreker.
Hierbij verklaart NEW ONE S.A.S dat deze “MUSE M-380 GB/ M-380 GBS” voldoet
aan de essentiële eisen en andere relevante bepalingen uit richtlijn 2014/53/EU. De
verklaring van conformiteit kan worden geraadpleegd op www.muse-europe.com.
De Bluetooth® markering en de logo’s zijn geregistreerde handelsmerken die
eigendom zijn van Bluetooth SIG, Inc. en het gebruik van deze markeringen door
New One S.A.S is onder licentie. Andere handelsmerken en handelsnemen zijn van
hun respectieve eigenaars.
Een Bluetooth-apparaat koppelen
1. Druk wanneer het apparaat is ingeschakeld, Schuif de functieschakelaar naar de
stand . "PAIR" verschijnt op het display. De "PAIR" begint snel te knipperen,
wat aangeeft dat de koppelingsmodus actief is.
2. Schakel Bluetooth in op het Bluetooth-apparaat en selecteer “MUSE M-380GB
uit de lijst met apparaten. (Kijk in de handleiding van het apparaat waarmee
u verbinding wilt maken voor gedetailleerde instructies.) Als het Bluetooth-
apparaat vraagt om een wachtwoord, voer dan “0000” in. Sommige Bluetooth-
apparaten zullen u vragen de verbinding te accepteren. Als de apparaten goed
zijn gekoppeld, de "PAIR" stopt met knipperen op het display.
Tip: Als u uw Bluetooth luidspreker met een ander Bluetooth audiotoestel wilt
verbinden, houd dan de knop ingedrukt om de verbinding met het toestel te
verbreken. Het woord “PAIR” op uw scherm zal snel beginnen te knipperen. Volg
daarna de bovenstaande stappen om een nieuwe verbinding tot stand te brengen.
Op bepaalde apparaten, zoals computers, moet u, zodra er is gekoppeld, het
apparaat selecteren in het Bluetooth-menu en de optie “Gebruik als audioapparaat
(stereo)” (of een soortgelijke optie) gebruiken.
De verbinding blijft intact wanneer de luidspreker en/of uw Bluetooth-apparaat
buiten het communicatiebereik wordt verplaatst. Er wordt opnieuw een actieve
verbinding gemaakt wanneer uw Bluetooth-apparaat terugkeert binnen het bereik.
Als het apparaat weer wordt ingeschakeld, dan zal het automatisch proberen
opnieuw verbinding te maken met het Bluetooth-apparaat waarmee het laatst
werd gekoppeld.
Een Bluetooth-apparaat gebruiken
1. Als u verbinding heeft gemaakt met een apparaat (zie voorgaande paragraaf),
gebruik dan de bediening op uw Bluetooth-apparaat en wanneer het afspelen
wordt gestart, dan zal het geluid uit de luidsprekers van de M-380 GB klinken.
2. Druk op om het afspelen te pauzeren. Druk nogmaals om het afspelen te
hervatten.
1. Deslice el interruptor de función hasta la posición TAPE. Aparecerá ”TAPEen
la pantalla.
2. Pulse para abrir la pletina del cassette e introduzca un cassette (la cinta
en la parte inferior) en el compartimento. Cierre después la tapa de la pletina.
3. Presione PLAY para empezar a reproducir.
4. Ajuste el volumen hasta el nivel deseado.
5. Presione o para rebobinar o avanzar rápido el casete.REW FFWD
6. Para interrumpir momentáneamente la grabación, pulse PAUSE , y de nuevo
PAUSE para reanudarla.
7. Para detener la reproducción, presione .
Grabación desde Radio/ CD/ Fuente auxiliar/ Bluetooth/ USB/Micro SD a
casete
1. Pulse para abrir la pletina del cassette e introduzca un cassette (la cinta
en la parte inferior) en el compartimento. Cierre después la tapa de la pletina.
2. Seleccione la fuente de sonido deseada.
En modo radio, sintonice la emisora de radio deseada.
En modo CD, seleccione la pista deseada e inicie la reproducción.
En modo AUX ("auxiliar"), inicie la reproducción desde la fuente auxiliar.
En el modo Bluetooth, inicie la reproducción desde su dispositivo.
En modo USB/SD, seleccione la pista deseada e inicie la reproducción.
3. Presione el botón para iniciar la grabación de la radio, CD, Bluetooth, REC
USB/SD o fuente auxiliar en el modo respectivo.
4. Para interrumpir momentáneamente la grabación, pulse PAUSE , y de nuevo
PAUSE para reanudarla.
5. Para detener la grabación, pulse .STOP
6. Para escuchar su grabación, deslice el interruptor de función hasta la posición
TAPE REW , pulse para rebobinar la cinta y buscar su grabación. Pulse
PLAY para escucharla.
Grabación desde el micrófono integrado
1. Deslice el interruptor de función hasta la posición TAPE. Aparecerá ”TAPEen
la pantalla.
2. Pulse para abrir la pletina del cassette e introduzca un cassette (la cinta
en la parte inferior) en el compartimento. Cierre después la tapa de la pletina.
3. Presione el botón para iniciar la grabación de voz.REC
4. Para interrumpir momentáneamente la grabación, pulse PAUSE , y de nuevo
PAUSE para reanudarla.
5. Para detener la grabación, pulse .STOP
6. Para escuchar su grabación, deslice el interruptor de función hasta la posición
TAPE REW , pulse para rebobinar la cinta y buscar su grabación. Pulse
PLAY para escucharla.
Nota: El micrófono integrado está ubicado en la parte frontal de la grabadora de
casete. Coloque la grabadora cerca de la fuente de sonido a grabar.
1. Scorrete l'interruttore di funzione in posizione TAPE. "TAPE" apparirà sul display.
2. Premere il tasto per aprire lo sportello del vano cassette e inserire la
cassetta (con il nastro verso il basso) nel vano. Chiudere lo sportello.
3. Premere PLAY per avviare la riproduzione.
4. Regolate il volume al livello desiderato.
5. Premere REW o per riavvolgere o avanzare velocemente la FFWD
cassetta.
6. Premere PAUSE PAUSE per interrompere la riproduzione, e rilasciare per
riprenderla.
7. Per arrestare la produzione, premere .
Registrazione da Radio/CD/Sorgente Ausiliaria/Bluetooth/USB/Micro SD a
cassetta
1. Premere il tasto per aprire lo sportello del vano cassette e inserire la
cassetta (con il nastro verso il basso) nel vano. Chiudere lo sportello.
2. Selezionare la fonte audio desiderata.
In modalità radio, sintonizzarsi sulla stazione radio desiderata.
In modalità CD, selezionare il brano desiderato ed avviare la riproduzione.
In modalità AUX, avviare la riproduzione dalla fonte ausiliaria.
In modalità Bluetooth, avvia la riproduzione dal tuo dispositivo.
In modalità USB/SD, selezionare il brano desiderato ed avviare la riproduzione.
3. Premere insieme i tasti per registrare da radio, CD, Bluetooth, USB/SD REC
fonte ausiliaria nela rispettiva modalità.
4. Premere PAUSE PAUSE per interrompere la riproduzione, e rilasciare per
riprenderla.
5. Per arrestare la registrazione premere il tasto .
6. Per ascoltare la registrazione scorrere il tasto funzione in posizione TAPE,
quindi premere il tasto per riavvolgere il nastro e il tasto REW PLAY per
riprodurre la registrazione.
Registrate dal microfono incorporato
1. Scorrete l'interruttore di funzione in posizione TAPE. "TAPE" apparirà sul display.
2. Premere il tasto per aprire lo sportello del vano cassette e inserire la
cassetta (con il nastro verso il basso) nel vano. Chiudere lo sportello.
3. Premere insieme i tasti per registrare la voce.REC
4. Premere PAUSE PAUSE per interrompere la riproduzione, e rilasciare per
riprenderla.
5. Per arrestare la registrazione premere il tasto .
6. Per ascoltare la registrazione, premere il tasto per riavvolgere il nastro REW
e il tasto PLAY per riprodurre la registrazione.
Nota: Il microfono incorporato è situato sul davanti della piastra per cassette.
Colloca il registratore vicino alla fonte audio da registrare.
1. Schuif de functieschakelaar naar de stand . "TAPE" verschijnt op het TAPE
display.
2. Druk op om de cassettedeur te openen en plaats het bandje (tape naar
onderkant gericht) in het cassettedeck. Sluit daarna de cassettedeur.
3. Druk op PLAY om het afspelen te starten.
4. Stel het geluidsvolume in op het gewenste niveau.
5. Druk op of om de cassetteband terug of vooruit te spoelen.REW FFWD
6. Druk op om het afspelen van de cassetteband te pauzeren en laat de knop
los om het afspelen te hervatten.
7. Druk op om het afspelen te stoppen.
Opnemen van Radio/ CD/ Hulpbron /Bluetooth / USB/Micro SD naar Cassette
1. Druk op om de cassettedeur te openen en plaats het bandje (tape naar
onderkant gericht) in het cassettedeck. Sluit daarna de cassettedeur.
2. Selecteer de gewenste geluidsbron.
In de radiomodus: stem af op de gewenste radiozender.
In de CD-modus: selecteer de gewenste track en start het afspelen.
In de AUX-modus: start het afspelen op uw hulpbron.
In Bluetooth modus kunt u het afspelen starten vanaf uw apparaat.
In de USB/SD-modus: selecteer de gewenste track en start het afspelen.
3. Druk tegelijkertijd op om het opnemen van radio, CD, Bluetooth, USB/SD REC
of hulpbron in de desbetre󰀨ende modus te starten.
4. Druk op PAUSE om het afspelen van de cassetteband te pauzeren en laat de
knop PAUSE los om het afspelen te hervatten.
5. Druk om het opnemen te stoppen op .
6. Schuif, om naar uw opname te luisteren, de functieschakelaar naar de stand
TAPE REW , druk op om terug te spoelen en uw opname te zoeken en druk
op PLAY om te luisteren.
Opnemen met de ingebouwde microfoon
1. Schuif de functieschakelaar naar de stand . "TAPE" verschijnt op het TAPE
display.
2. Druk op om de cassettedeur te openen en plaats het bandje (tape naar
onderkant gericht) in het cassettedeck. Sluit daarna de cassettedeur.
3. Druk tegelijkertijd op om de stemopname te starten.REC
4. Druk op om het afspelen van de cassetteband te pauzeren en laat de knop
los om het afspelen te hervatten.
5. Druk om het opnemen te stoppen op .
6. Schuif, om naar uw opname te luisteren, druk op om terug te spoelen REW
en uw opname te zoeken en druk op PLAY om te luisteren.
Opmerking: De ingebouwde microfoon zit aan de voorzijde van de cassetterecorder.
Plaats de recorder in de buurt van de geluidsbron die u wilt opnemen.
1. Deslice el interruptor de función hasta la posición . “TUNE” aparecerá RADIO
en la pantalla.
2. Mueva el selector de banda para seleccionar la banda deseada: FM ESTÉREO
o FM .
3. Utilice el mando para sintonizar la emisora de radio que desee.TUNING
4. Regule el nivel del volumen.
Para mejorar la capacidad de recepción de la radio:
FM: Alargar la antena
1. Scorrete l'interruttore di funzione in posizione . “TUNE” apparirà sul RADIO
display.
2. Far scorrere il Selettore di Banda per selezionare la banda di frequenze
desiderata tra FM STEREO, e FM.
3. Servitevi quindi della manopola per impostare la frequenza desiderata.TUNING
4. Regolate il volume con la manopola volume.
Per migliorare la ricezione:
FM: Estendere l’antenna.
1. Schuif de functieschakelaar naar de stand . "TUNE" verschijnt op het RADIO
display.
2. Verschuif de bandselector om de gewenste band te selecteren: FM STEREO
of FM.
3. Gebruik de TUNING-knop om de radio op de gewenste frequentie af te stemmen.
4. Regel het volume met behulp van de -knop.VOLUME
Om de ontvangst van de radio te optimaliseren:
FM: Strek de FM-draadantenne volledig uit.
1. Singen Sie mit, indem Sie ein Mikrofon an einen der beiden MIC (1/2) -Eingänge
(nicht mitgeliefert) am Gerät anschließen. Drehen Sie den Regler MIC VOL für
die direkte Einstellung der gewünschten Lautstärke.
2. ECHO: Stellen Sie mit ECHO die Echounterdrückung ein, um die Stimme des
Sängers für einen Konzert- bzw. Hallene󰀨ekt zu verstärken.
Anmerkungen:
Falls Sie das Mikrofon zu nah an einem Lautsprecher verwenden, kann ein
dröhnendes Geräusch (Rückkopplung) verursacht werden. Bewegen Sie das
Mikrofon in solch einem Fall vom Lautsprecher weg.
Durch Aufprall oder Herunterfallen kann das Mikrofon permanent beschädigt
werden. Schwenken Sie das Mikrofon nicht am Kabel haltend umher.
1. Cante a coro con la música conectando el micrófono que se incluyeen una de
las tomas de la unidad. Gire el directamente para ajustar el MIC (1/2) MIC VOL
volumen según sus preferencias.
2. : Gire esta manecilla para ajustar la intensidad del eco.ECHO
Notas:
Si colocara el micrófono cerca del altavoz, podría darse un efecto de eco
(retroalimentación acústica). de ser así, aleje el micrófono del altavoz.
Si golpea o deja caer el micrófono podría dañarlo permanentemente. Resista la
tentación de darle vueltas al micrófono por el cable.
1. Per amplicare il microfono e cantare mentre si suona, collegare il microfono
fornito a una delle due prese sull'apparecchio. Ruotare per MIC (1/2) MIC VOL
regolare direttamente il volume al livello desiderato.
2. : Ruotare direttamente questa manopola per regolare l’intensità dell’eco. ECHO
Nota:
Lavvicinamento del microfono alla cassa può causare feedback acustico (e󰀨etto
Larsen). In tal caso, allontanare il microfono dalla cassa.
Picchiettare sul microfono o sottoporre il microfono a cadute p causarne il
danneggiamento. Non far oscillare il microfono a󰀨errandolo dal cavo.
1. Zing mee met de muziek door de meegeleverde microfoon in een van de MIC
(1/2) aansluitingen op het apparaat te steken. Draai rechtstreeks aan de knop
MIC VOL om het volume naar wens in te stellen.
2. ECHO: Draai rechtstreeks aan deze knop om de intensiteit van de echo aan
te passen.
Opmerking:
Als de microfoon in de buurt van de luidspreker wordt gebruikt, dan kan er een
huilend e󰀨ect (akoestische terugkoppeling) optreden. Als dit het geval is, vergroot
dan de afstand tot de luidspreker.
De microfoon laten vallen of kloppen op de microfoon kan de microfoon permanent
beschadigen. Weersta de drang om de microfoon rond te zwaaien aan het snoer.
X-BASS
Drücken Sie die Taste , um niedrige Frequenzen zu verstärken; im Display X-BASS
erscheint die Anzeige „BASS“. Drücken Sie die Taste erneut, um die Funktion
wieder zu deaktivieren.
HÖHEN/BASS
Drehen Sie den Bassregler oder den Höhenregler am Gerät, um den Bass-/
Höhenpegel einzustellen.
X-BASS
Pulse este botón para activar el refuerzo de graves, y "BASS" se mostrará X-BASS
en la pantalla, pulse este botón de nuevo para desactivar el refuerzo de graves.
AGUDOS/GRAVES
Gire el control de graves o el control de agudos en la unidad para ajustar el nivel
de agudos/ graves . X-BASS
Premi il tasto per aumentare il volume delle basse frequenze e X-BASS
sul quadrante appari “BASS”, premi ancora questo tasto per disattivare il
potenziamento dei bassi.
ALTI/BASSI
Ruota il controllo dei bassi o il controllo degli alti sull'unità per impostare il livello
dei alti/ bassi. X-BASS
Druk op de knop om de low-frequency boost aan te zetten. Daarop zal het X-BASS
woord "BASS" op het scherm verschijnen. Druk opnieuw op deze knop om de bas
boost uit te schakelen.
TREBLE/BASS
Draai aan de basregelaar of hogetonenregeling op het apparaat om het lage / hoge
niveau in te stellen.
Reinigung
ACHTUNG: Entfernen Sie alle Geräte von den vorhandenen Stromquellen,
bevor Sie das Gerät reinigen.
Verwenden Sie ein weiches, trockenes und sauberes Tuch. Entfernen Sie
regelmäßig den Staub von den Lüftungsö󰀨nungen hinten und an den Seiten.
Die Verwendung von Lösungsmitteln, scharfen Reinigungsmitteln oder
alkoholhaltigen Reinigungsmitteln kann das Gerät beschädigen.
Wenn ein Gegenstand oder eine Flüssigkeit in das Gerät gelangt, ziehen Sie
sofort den Netzstecker und lassen Sie das Gerät von einem zugelassenen
Fachmann prüfen.
HINWEISE ZU DEN DISKS
Verwenden Sie keine CDs mit speziellen Formen (achteckige, herzförmige
CDs...), die Störungen des Gerätes hervorrufen könnten.
Legen Sie nicht mehr als eine Disk in das CD-Fach ein.
Versuchen Sie nicht, das CD-Fach während der Wiedergabe zu ö󰀨nen.
Berühren Sie nicht die Linse, denn dadurch könnten Störungen des Gerätes
hervorgerufen werden.
Eine CD, die Kratzer, Staub oder Fingerspuren aufweist, kann Störungen
verursachen. Nach dem Abspielen, reinigen Sie die CD mit einem Tuch. Reinigen
Sie die CD immer von innen nach außen. Räumen Sie CDs nicht an zu heißen
oder nassen Stellen auf, damit sie nicht verformt werden. umen Sie Ihre CDs
nach dem Abspielen in der zugehörigen Hülle auf.
Wichtiger Hinweis
Vor dem Transport des Geräts die eventuell vorhandene Disc herausnehmen.
Limpieza
ATENCIÓN: Desconecte este aparato de toda fuente de alimentación antes
de limpiarlo.
Utilice un paño suave, limpio y seco. Limpie regularmente los oricios de
ventilación de la parte trasera del aparato y de los laterales.
El uso de disolventes o productos abrasivos o a base de alcohol puede dañar
el aparato.
Si un objeto o un líquido penetra en el aparato, desenchúfelo inmediatamente y
póngase en contacto con personal técnico cualicado.
Notas relativas a los disco
No utilice discos con formas especiales (octogonales, en forma de corazón, etc.),
ya que podrían ocasionar un fallo en el funcionamiento del aparato.
No introduzca más de un disco en el compartimento.
No intente abrir el compartimento del disco durante la reproducción.
No toque la lente del reproductor; si lo hace, podría producirse un fallo en el
funcionamiento del aparato.
Un disco cuya supercie esté rayada, contenga polvo o huellas puede ocasionar
fallos en el funcionamiento del aparato. Antes de comenzar la reproducción,
limpie el disco con un paño limpio. Para ello, frótelo desde el centro hacia los
bordes. No guarde los discos en lugares con temperaturas elevadas o una
humedad considerable; podrían deformarse. Una vez que haya escuchado el
disco, guárdelo en su estuche.
Nota importante
• Retire el disco del compartimento cuando transporte el aparato.
Pulizia
ATTENZIONE: Scollegare l’apparecchio dalla fonte di alimentazione prima di
pulirlo.
Servitevi di un panno morbido e asciutto. Spolverate regolarmente le aperture di
ventilazione poste sul retro o ai lati dell’apparecchio.
Il ricorso a solventi oppure a prodotti abrasivi o a base d’alcool rischia di
danneggiare l’apparecchio.
Se un oggetto o un liquido entra nell’apparecchio, scollegate immediatamente
l’apparecchio dalla corrente e a󰀩datelo ad un tecnico autorizzato.
Osservazioni sui dischi
Non utilizzate dischi di forma irregolare (ad esempio ottagonali o a forma di
cuore). Lapparecchio potrebbe non funzionare correttamente.
Non inserite più di un disco nello scomparto.
Non cercate di aprire il compartimento CD mentre la riproduzione è in corso.
Non toccate la lente per non provocare un malfunzionamento.
Se il disco è rigato, sporco o presenta impronte digitali, è possibile che
l'apparecchio non funzioni. Prima della riproduzione, pulite il disco con un
panno. Pulite delicatamente dal centro verso l'esterno. Non riponete i dischi in
luoghi soggetti a temperature elevate o a forte umidità. Potrebbero deformarsi.
Terminato l’ascolto, riponete il disco nella sua custodia.
• Raak de lens niet aan om disfunctie van het toestel te vermijden.
Een disk met krassen, stof of vingerafdrukken kan slecht werken. Gebruik een
zachte, droge doek om de disk schoon te maken, vooraleer de disk weer te geven.
Doe dit van het midden uit naar de zijkanten toe. Plaats de disks nooit bloot aan
vochtigheid of extreme temperaturen om ze niet te vervormen. Plaats uw disks na
de weergave opnieuw in hun doosjes.
Belangrijke opmerking
• Haal de disk uit het compartiment als het toestel vervoerd moet worden.
Opmerkingen over cassettebandjes
Voorkom verslappen- Als de bandjes niet strak zijn gewikkeld, dan kan dit krassen
of zelfs breken van de bandjes tot gevolg hebben. Wanneer u merkt dat het bandje
minder strak is gewikkeld, gebruik dan een potlood om het bandje te spannen
alvorens u het in het cassettedeck plaatst.
- Om het per ongeluk wissen van gegevens te voorkomen kunt u na het opnemen
de plastic lipjes van het bandje verwijderen met een schroevendraaier of ander
spits gereedschap. Als u weer wilt opnemen op het bandje, plak dan een stukje
plakband over de opening.
- Vervorming of een slechte geluidskwaliteit kan het gevolg zijn van stof of vuil op de
delen die in contact staan met de magnetische band (magneetkoppen, aandrukrol
en capstan); als dit het geval is, open de cassettedeur en reinig de onderdelen
met een wattenstaafje gedrenkt in alcohol.
OPGEPAST: Koppel het toestel los van elke voedingsbron vooraleer het
schoon te maken.
Gebruik een propere, zachte, droge doek. Stof de verluchtingsopeningen aan de
achterzijde of zijkanten van het toestel regelmatig af.
Het gebruik van solventen of bijtende middelen op basis van alcohol kan het
toestel beschadigen.
Als een object of een vloeistof in het toestel loopt, koppel het dan meteen los en
laat het nakijken door een gekwaliceerd technieker.
Opmerkingen ivm disks
Gebruik geen disks met een speciale vorm (achthoek, hartvorm, enz.) die het
toestel slecht zou doen werken.
Plaats maar 1 disk in het compartiment.
Open het compartiment niet tijdens de weergave.
Hinweise zu Kassetten
Kassettenband stra󰀨en- Wenn Kassettenbänder zu locker sind, können diese
zerkratzen oder im schlimmsten Fall die Kassette beschädigen. Verwenden Sie
in solch einem Fall einen Bleistift und ziehen Sie damit das Band stra󰀨, bevor Sie
die Kassette einlegen.
- Um ein versehentliches Löschen der Inhalte zu vermeiden, entfernen Sie die
Plastiklasche nach der Aufnahme mit einem Schraubenzieher oder anderen
spitzen Gegenstand. Überkleben Sie die Lasche mit Klebeband, um erneut
Inhalte auf die Kassette aufzunehmen.
- Ein verzerrter oder schlechter Sound kann durch Schmutz oder Staub auf
den Teilen verursacht werden, die in Kontakt mit dem Magnetband kommen
(Magnetköpfe, Andruckrolle, Tonwelle). Ö󰀨nen Sie in solch einem Fall die
Kassettentür und reinigen Sie die Teile mit einem mit Alkohol angefeuchteten
Wattestäbchen.
Notas sobre los casetes
Para evitar la distensión- Si la cinta del cassette no estuviera tensa, aunque solo
fuera un poco, esta podría rayarse, o incluso peor, la cinta podría partirse. Si notara
que la cinta se hubiera aojado, utilice un piz para tensarla antes de introducirla
en la pletina.
- Para evitar borrarlas accidentalmente, parta las lengüeta de plástico del cassette
con un destornillador u otro objeto puntiagudo después de la grabación. Para
volver a grabar en la cinta, cubra el oricio dejado por la lengüeta partida con
cinta adhesiva, etc.
- Cualquier distorsión o calidad de sonido pobre puede deberse al polvo o suciedad
presente en las partes que están en contacto con la banda magnética (cabezales
magnéticos, rodillo de presión y capstan). En este caso, abra la tapa del casete y
limpie las partes con un bastoncillo de algodón humedecido en el alcohol.
Nota importante
• Estraete il disco dal compartimento se l’apparecchio deve essere trasportato.
Note sulle cassette
Evitare allentamenti- L’allentamento dei nastri delle cassette può causare
gra󰀩ature sui nastri stessi o nel peggiore dei casi la loro rottura. Se si nota un
allentamento, utilizzare una matita per riavvolgere il nastro della cassetta prima di
inserire la cassetta nel relativo vano.
- Per evitare cancellazioni accidentali, bread o󰀨 le linguette di plastica sul
nastro dopo la registrazione con un cacciavite o altro oggetto appuntito. Per
sovraregistrare un nastro, coprire l’apertura con linguetta con del nastro adesivo.
- Eventuali distorsioni o una bassa qualità audio potrebbero dipendere da polvere
e sporco sulle parti in contatto con il nastro magnetico (testine magnetiche, rullo
pressore e piedino metallico); in questo caso, aprire lo sportello del vano cassette
e pulirlo con dei bastoncini di cotone intinti in alcol.
1. Deslice el interruptor de función hasta la posición . “CD” aparece en la CD
pantalla.
2. Pulse OPEN/CLOSE para abrir la bandeja para discos. Introduzca un CD con la
cara impresa mirando hacia arriba y cierre la tapa. Pasados unos segundos, el
número total de pistas se mostrará en el display.
3. La primera canción se reproducirá automáticamente.
REPRODUCCIÓN/PAUSA
Para detener la reproducción temporalmente, pulse el botón .
Pra reanudar la reproducción, pulse de nuevo este botón.
DETENCIÓN
Si se pulsa el botón durante la reproducción, el disco dejade reproducir. STOP
(El número total de pistas se mostrará en el display).
SALTO Y BÚSQUEDA
Podrá saltar hacia delante o hacia atrás hasta el número de pista que desee
pulsando los botones de SALTO ( / ). Cuando reproduzca un CD de audio,
mantenga pulsado el botón de SALTO ( / ). El CD buscará a alta velocidad
hacia delante o hacia atrás. La reproducción normal se reanudará cuando deje de
pulsar el botón.
Nota: El formato CD-MP3 no puede retroceder rápidamente a la pista anterior.
REPETICIÓN
Pulse repetidamente el botón para seleccionar uno de los siguientes modos REP
de reproducción:
Repetir 1: “REP” parpadeará en la pantalla.
Repetir carpeta: “REP” dejará de parpadear.
Repetir todo: ”REP dejará de parpadear.
Reproducción aleatoria: "RAND" aparece en la pantalla".
PROGRAMACIÓN
1. En modo de parada, pulse el botón , ‘’PROG’’ 01 parpadeará en el PROG
display.
2. Utilice los botones / para seleccionar el archivo que desee. Pulse el botón
PROG, para conrmar.
3. Repita los pasos apenas descritos para programar hasta 20 pistas.
4. Pulse el botón para iniciar la reproducción programada.
5. Para cancelar la reproducción programada, pulse el botón dos veces. El STOP
indicador de programación se apagará. A continuación, pulse el botón para
cambiar al estado de reproducción normal.
Si tuviera problemas con la reproducción del CD, cualquiera de los siguientes
procedimientos podría ayudarle:
1. Apague la unidad. Desconecte el cable de alimentación de la toma de corriente
y después vuelva a conectarlo.
2. Limpie el CD.
Nota: Podrá programar hasta 20 pistas de un CD- y 99 pistas de MP3.
1. Scorrete l'interruttore di funzione in posizione . “CD” apparirà sul display.CD
2. Premere il tasto per aprire il vano CD. Inserite un CD con il lato OPEN/CLOSE
stampato rivolto verso l'alto. Richiudete lo sportello. Dopo alcuni secondi sul
display viene visualizzato il numero totale delle tracce.
3. Il primo brano verrà riprodotto automaticamente.
RIPRODUZIONE/SOSPENSIONE
Per sospendere temporaneamente la riproduzione, premete il tasto .
Per riprendere la riproduzione, premete di nuovo il tasto .
ARRESTO
Premendo il tasto durante la riproduzione, la riproduzione viene arrestata STOP
(sul display viene visualizzato il numero totale delle tracce).
AVANZAMENTO, RIAVVOLGIMENTO E RICERCA
L'unità consente di avanzare a una traccia successiva o tornare a una precedente
in qualsiasi momento utilizzando i tasti / . Durante la riproduzione di un CD,
tenete premuto uno dei due tasti. L'unità avvia il riavvolgimento o l'avanzamento
rapido delle tracce del CD. Per arrestare il riavvolgimento o l'avanzamento
rilasciate il tasto.
Nota: Il formato CD-MP3 non può riavvolgere velocemente alla traccia precedente.
RIPETIZIONE
Premere più volte il tasto per selezionare tra: REP
Ripeti 1: “REP” lampeggerà sul display.
Ripeti cartella: "REP" smetterà di lampeggiare.
Ripeti Tutto: ”REP” smetterà di lampeggiare.
Riproduzione Casuale: Sul display viene visualizzato "RAND".
RIPRODUZIONE PROGRAMMATA
1. Quando la riproduzione è in modalità di arresto, premete il tasto . “PROG”, PROG
“01“ inizia a lampeggiare sul display.
2. Selezionate il le che desiderate ascoltare con i tasti e . Premete il tasto
PROG per confermare.
3. Riperi i passi precedenti per programmare no a 20 tracce.
4. Premete il tasto per avviare la riproduzione programmata.
5. Per annullare la funzione premete due volte il tasto . Quindi premi il tasto STOP
per passare allo stato di riproduzione normale.
In caso di problemi con la riproduzione di CD audio cercare di risolvere il problema
come suggerito di seguito:
1. Spegnere l'unità. Scollegare la presa di alimentazione CA e ricollegare.
2. Pulire il CD.
Nota: CD-no a 20 brani programmabili; MP3 -no a 99 brani programmabili.
1. Schuif de functieschakelaar naar de stand . "CD" verschijnt op het display.CD
2. Druk op OPEN/CLOSE om de disclade te openen. Plaats een CD met het label
omhoog gericht en sluit de CD-deur. Na een paar seconden zal het totaal aantal
tracks op het display worden getoond
3. Het eerste nummer wordt automatisch afgespeeld.
AFSPELEN/PAUZEREN
Druk om het afspelen tijdelijk te stoppen op .
Druk om het afspelen te hervatten nogmaals op de knop.
STOPPEN
Als er tijdens het afspelen op wordt gedrukt, dan stopt het afspelen van de STOP
disc. (Het totaal aantal tracks wordt getoond op het display)
OVERSLAAN EN VOORUIT-/TERUGSPOELEN
U kunt altijd naar het volgende of vorige nummer gaan door op OVERSLAAN (
/ ) te drukken. Houd tijdens het afspelen van een audio-CD de OVERSLAAN-
knoppen ingedrukt om vooruit of achteruit te spoelen. Het normale afspelen wordt
hervat wanneer u de knop loslaat.
Opmerking: CD-MP3-formaat kan niet snel terugspoelen naar het vorige nummer.
HERHALEN
Druk op de -knop aan een van de volgende manieren van afspelen: REP
Herhaal 1: "REP" knippert op het display.
Map herhalen: "REP" stopt met knipperen.
Herhaal alle: ”REP" stopt met knipperen.
Willekeurig afspelen: ”RAND" verschijnt op het display.
PROGRAMMA AFSPELEN
1. Druk als het afspelen gestopt is op de toets. “PROG“ 01 knippert op PROG
het display.
2. Selecteer het bestand dat u wilt afspelen via de / toetsen. Druk op de
PROG toets om te bevestigen.
3. Herhaal de bovenstaande stappen om tot 20 tracks te programmeren.
4. Druk op de toets om het geprogrammeerd afspelen te starten.
5. Druk om het afspelen van het programma te annuleren twee keer op de toets
STOP. Druk daarna op de knop om naar de normale afspeelstand te gaan.
Als u problemen tegenkomt bij het afspelen van CD's, kunt u dit op de volgende
manieren verhelpen:
1. Schakel het apparaat uit. Trek de stekker uit het stopcontact en steek hem
daarna weer in het stopcontact.
2. Maak de CD schoon.
Opmerking:
CD-tot 20 geprogrammeerde nummers; MP3 -tot 99 geprogrammeerde nummers.
Este aparato funciona con CA 100-240V 50/60Hz o pilas 8 x 1.5V tipo R20/
UM-1 tamaño "D" (no incluidas).
Funcionamiento CA (corriente alterna)
Conecte el cable de CA (incluido) a la entrada CA de detrás del aparato. Conecte
el cable CA a la toma de corriente de la pared.
Nota: El cable AC está guardado en el compartimento de las pilas. Por favor, abra
el compartimento de las pilas para coger el cable AC.
Funcionamiento DC
Introduzca la pila en el compartimento de la pila. Utilice únicamente pilas que
cumplan las recomendaciones del fabricante. Respete la polaridad al colocar
las pilas (véase el interior del compartimento de las pilas). Si no lo hace, podría
estropear el aparato. No intente recargar las pilas no recargables. Podrían
sobrecalentarse y explotar. Las baterías se tienen que sustituir cuando: el volumen
disminuye, o el sonido está distorsionado durante el funcionamiento. Con el n de
evitar cualquier tipo de derrame de líquido, extraiga las baterías cuando no vaya a
utilizar el aparato durante un largo periodo de tiempo.
ATENCIÓN: Riesgo de explosión si las pilas no se introducen correctamente.
Cambie las pilas únicamente por otras del mismo tipo o uno equivalente.
¡Precaución!
- Para que el dispositivo funcione con baterías, el cable CA debe estar
desenchufado tanto del enchufe del dispositivo como de la toma de corriente.
- Cuando el aparato esconectado a la red eléctrica, la fuente de alimentación
cambia automáticamente a CA.
- Con el objetivo de ahorrar energía, cuando la reproducción haya alcanzado el
nal y no se use ningún control en el dispositivo por un periodo de 15 minutos, la
unidad pasará al modo de espera automáticamente. Pulse cualquier tecla para
despertar y entrar en el modo de trabajo.
Questo apparecchio è alimentato da un alimentatore CA 100-240V 50/60Hz o 8
batterie x 1.5V R20/ UM-1/ ”D” (non forniti).
Alimentazione con CA
Collegare il cavetto del CA (fornito) alla presa CA sulla parte posteriore
dell’apparecchio. Inserire il cavetto di alimentazione CA in una presa da parete
CA standard.
Nota: Il cavo CA è contenuto nel vano batteria, apri il vano per prendere il cavo.
Alimentazione con CC
Inserire le batterie nel relativo vano. Utilizzate soltanto pile che corrispondono
alle indicazioni del fabbricante. Rispettate la polarità durante l’inserimento delle
pile (vedi illustrazione nel comparto). Non rispettare la polari può arrecare
danni all’apparecchio. Non cercate di ricaricare pile non ricaricabili. Potrebbero
surriscaldarsi ed esplodere. Le batterie devono essere sostituite quando: il volume
diminuisce, o il suono risulta distorto durante l’uso. Per evitare perdite di acido,
rimuovere le batterie se l’unita non viene utilizzata per un periodo prolungato.
ATTENZIONE: Rischio di esplosione se le pile non sono inserite correttamente.
Utilizzate solamente pile identiche o equivalenti.
Nota:
- Il cavo di alimentazione deve essere staccato sia dalla presa dell'apparecchio,
che dalla presa di corrente, per far operare l'apparecchio con batterie.
- Quando l’apparecchio è collegato con la presa da parete mediante il cavetto CA,
l’alimentazione passa automaticamente a CA.
- Per risparmiare energia, al termine della riproduzione oppure quando di 15 minuti
non viene eseguita nessuna operazione, l'apparecchio passa in automatico
alla modalidi Standby. Premi un tasto qualsiasi per svegliare l’apparecchio e
accedere alla modalità operativa.
Dit apparaat werkt op AC 100-240V 50/60Hz of 8 x 1.5V R20/ UM-1/ “D”-
batterijen (niet meegeleverd).
AC
Sluit het afneembare AC-snoer (inbegrepen) aan op de AC-aansluiting aan de
achterkant van het apparaat. Steek het AC-snoer in een standaard AC-stopcontact.
N.B.: Het netsnoer is opgeborgen in het batterijvak. Gelieve het batterijvak te
openen om het netsnoer te pakken.
Gebruik van de batterijen
Installeer de batterijen in hun compartiment. Gebruik uitsluitend batterijen die
voldoen aan de aanbevelingen van de fabrikant. Respecteer de polariteit wanneer
u batterijen plaatst (zie compartiment). Anders kan het toestel beschadigd raken.
Zorg ervoor dat u geen niet-oplaadbare batterijen oplaadt. Ze zouden kunnen
verhitten en ontplo󰀨en. Vervang de batterijen wanneer het volume vermindert of
het geluid vervormt tijdens het gebruik. Om lekken te vermijden dienen de batterijen
verwijderd te worden wanneer het apparaat voor langere tijd niet wordt gebruikt.
OPGELET: Ontplo󰀩ngsgevaar als de batterijen niet juist geplaatst zijn. Gebruik
enkel identieke of gelijkwaardige batterijen.
Let op!
- Om het apparaat op batterijen te laten werken moet het AC-snoer afgekoppeld zijn
van zowel de aansluiting op het apparaat als van het stopcontact.
- Wanneer het AC-snoer aangesloten is op het apparaat en op het stopcontact,
wijzigt de stroombron automatisch naar AC.
- Als het product in de stopmodus staat en er gedurende 15 minuten geen bediening
op het apparaat wordt uitgevoerd, schakelt het apparaat automatisch over naar de
stand-bymodus om energie te besparen. Druk op een willekeurige toets om het
apparaat te laten ontwaken en naar de werkmodus te gaan.
WICHTIGE SICHERHEITSANWEISUNGEN INSTRUCCIONES DE SEGURIDAD
ISTRUZIONI DI SICUREZZA IMPORTANTI
BELANGRIJKE VEILIGHEIDSINSTRUCTIES
ACHTUNG: Um Elektroschockgefahr zu vermeiden, dürfen
Sie dieses Gerät nicht demontieren. Das Gerät enthält keine
Teile, die der Benutzer selbst reparieren kann. Vertrauen
Sie die Instandhaltung des Geräts einem Fachmann an.
ATENCIÓN: Para reducir el riesgo de descarga eléctrica,
no desmonte el aparato. En el interior de este aparato no
existe ninguna pieza que pueda ser reparada por el usuario.
Para cualquier operación de mantenimiento y reparación,
póngase en contacto con personal técnico cualicado.
ATTENZIONE: Per ridurre il rischio di scossa elettrica, non
smontate l’apparecchio. Questo apparecchio non contiene
pezzi riparabili dall’utente. Per ogni riparazione rivolgetevi
esclusivamente a tecnici qualicati.
OPGEPAST: Om het risico op elektrische schokken te
vermijden, mag u het toestel niet demonteren. Het toestel
bevat geen enkel onderdeel dat door de gebruiker zelf kan
gerepareerd worden. Contacteer altijd een gekwaliceerde
technieker indien een reparatie nodig is.
Der Sicherheitshinweis bendet sich an der Rückseite des Geräts.
WARNUNG: UM BRAND- UND ELEKTROSCHOCKGEFAHR VORZUBEUGEN,
DÜRFEN SIE DIESES GERÄT WEDER REGEN NOCH FEUCHTIGKEIT
AUSSETZEN.
ACHTUNG: Beim Umgehen der Sicherheitsvorrichtungen oder wenn diese defekt
sind, kann aus dem Gerät unsichtbare Laserstrahlung austreten. Dieser CD-Player
wurde als Klasse I Laserprodukt eingestuft. Der Schriftzug LASERPRODUKT DER
KLASSE 1 bendet sich im Inneren des CD-Fachs.
La marca de precaución se encuentra en la parte posterior del dispositivo.
ADVERTENCIA: PARA PREVENIR EL RIESGO DE INCENDIO O DE DESCARGA
ELÉCTRICA, NO EXPONGA ESTE APARATO A LA LLUVIA O A LA HUMEDAD.
ATENCIÓN: Radiación láser invisible en caso de apertura o fallo de los cierres de
seguridad. Evite la exposición al láser. Producto láser de clase 1.
Il simbolo di allerta è posto sul retro del dispositivo.
AVVERTENZA: PER EVITARE IL RISCHIO DI INCENDIO O SCOSSA ELETTRICA,
NON ESPONETE L’APPARECCHIO ALLA PIOGGIA O ALL’UMIDITÀ.
ATTENZIONE: Emissione di radiazioni laser invisibili quando i dispositivi di
sicurezza sono aperti o difettosi.
Questo lettore CD è un prodotto a laser di classe 1. Il marchio CLASS 1 LASER
PRODUCT si trova nel vano CD.
De waarschuwingsmarketing zit op de achterkant van het apparaat.
WAARSCHUWING Stel het toestel niet bloot aan vocht of regen om het risico
op brand of elektrische schokken te vermijden.
OPGEPAST: onzichtbare laserstralen wanneer het veiligheidsmechanisme open
of stuk is. Deze cd-speler is geclassiceerd als een KLASSE 1 LASERPRODUCT.
De CLASS 1 LASER PRODUCT markering kunt u vinden in het cd-compartiment.
ACHTUNG
- Verwenden Sie dieses Gerät in klimatisch gemäßigter Umgebung.
- Das Typenschild bendet sich auf der Rückseite des Geräts.
- Achten Sie auf einen Mindestabstand von 5 cm zu Ihrem Gerät, um eine
ausreichende Belüftung zu gewährleisten.
- Stellen Sie eine ausreichende Belüftung des Geräts sicher und behindern Sie die
Belüftungsö󰀨nungen nicht mit Gegenständen wie z. B. Zeitungen, Tischdecken,
Vorhängen, usw.
- Stellen Sie keine Wärmequelle wie eine angezündete Kerze auf oder in der Nähe
des Geräts ab.
- Setzen Sie das Gerät niemals Wasserspritzern oder Feuchtigkeit aus.
- Stellen Sie kein mit Wasser gefülltes Gefäß, wie z. B. Vasen, in der Nähe des
Geräts ab.
- Werfen Sie Batterien nicht ins Feuer! Entsorgen Sie leere Batterien umweltgerecht.
- Batterien dürfen keiner übermäßigen Hitze ausgesetzt werden (wie zum Beispiel
praller Sonne, Feuer oder anderen ähnlichen Hitzequellen).
- Mit dem Netzstecker kann das Gerät vom Netz getrennt werden, er muss daher
leicht zugänglich sein. Um das Gerät vollständig vom Netz zu trennen, trennen
Sie den Netzstecker komplett von der Netzsteckdose. Der Netzstecker darf nicht
behindert werden und muss während der Verwendung leicht zugänglich sein.
- Aufgebrauchte Batterien bitte nicht wegwerfen, sondern fragen Sie bei Ihrem
Händler nach ob dieser glicherweise Batterien zum speziellen Wiederverwerten
(Recycling) entgegen nimmt und sammelt.
- Unter der Einwirkung von elektrostatischen und/oder elektrischen Phänomen
kann das Produkt Fehlfunktionen aufweisen. Ein Zurücksetzen auf die
Werkseinstellungen kann sich als notwendig erweisen.
- Der ordnungsgemäße Betrieb des Geräts kann durch starke elektromagnetische
Störungen beeinträchtigt werden. Setzen Sie das Gerät in solch einem Fall
gemäß den Angaben in der Bedienungsanleitung zurück, um den normalen
Betrieb wieder herzustellen. Falls der ordnungsgemäße Betrieb nicht fortgesetzt
werden kann, versuchen Sie das Gerät an einem anderen Ort zu verwenden.
ATENCIÓN
- Utilice este aparato en lugares con climas templados.
- La placa de datos técnicos está situada en la parte posterior del dispositivo.
- Deje libre alrededor del aparato una distancia nima de 5 cm para garantizar una
correcta ventilación del mismo.
- Para asegurar una ventilación correcta del aparato, no cubra los oricios de
ventilación con objetos tales como periódicos, manteles, cortinas, etc.
- No coloque ninguna fuente de calor, como por ejemplo una vela encendida, sobre
el aparato o cerca de él.
- No exponga el aparato a salpicaduras o a la humedad.
- No coloque objetos que contengan líquido, como un jarrón, encima del aparato.
- No tire las pilas al fuego. Respete el medio ambiente cuando se deshaga de las
pilas usadas.
- No exponga las pilas a temperaturas demasiado altas, como las producidas por la
exposición directa a los rayos del sol, al fuego o a otras fuentes de calor.
- El acceso al enchufe p2-ha de permanecer despejado. Para cortar por completo la
alimentación del aparato, desenchúfelo de la toma de corriente. Se p2-ha de poder
acceder fácilmente al enchufe durante el uso del aparato; procure que el acceso
al mismo esté despejado.
- Antes de tirar las pilas, consulte a su proveedor: puede entregárselas para
reciclarlas.
- Como resultado de fenómenos electroestáticos y/o eléctricos transitorios, pueden
producirse fallos en el funcionamiento del producto. En estos casos, el usuario
deberá reiniciar el aparato desenchufándolo y volviéndolo a enchufar.
- El funcionamiento normal del producto podría verse alterado por fuertes
interferencias electromagnéticas. En caso de ocurrir, simplemente reinicie el
producto y continúe utilizándolo con normalidad siguiendo las indicaciones del
manual de instrucciones. En el caso de que no volviera a funcionar, utilícelo en
una ubicación diferente.
ATTENZIONE
- Utilizzate l’apparecchio in ambienti temperati.
- La targhetta segnaletica si trova nella parte posteriore dell'apparecchio.
- Lasciate uno spazio minimo di 5 cm intorno all’apparecchio per permettere una
ventilazione su󰀩ciente.
- Garantite sempre una ventilazione corretta dell’apparecchio e non coprite le
aperture di ventilazione con oggetti come giornali, tovaglie, tende, ecc.
- Non collocate nessuna fonte di calore, come una candela accesa, sopra o nei
pressi dell’apparecchio.
- Non esponete l’apparecchio all'acqua o all’umidità.
- Non collocate nessun recipiente contenente liquidi, come ad esempio un vaso,
nelle vicinanze dell’apparecchio.
- Non gettate le pile nel fuoco! Abbiate cura di rispettare l’ambiente quando gettate
le pile.
- Non esponete le pile ad un calore eccessivo, come raggi solari, fuoco o fonti di
calore analoghe.
- La presa di alimentazione permette di scollegare l’apparecchio dalla corrente
elettrica e deve quindi restare facilmente accessibile. Per interrompere
completamente l’alimentazione dell’apparecchio, scollegate la spina di
alimentazione dalla presa di corrente. La presa di alimentazione deve restare
facilmente accessibile durante l’uso, accertatevi che l’accesso alla presa sia
libero.
- Prima di gettare le pile, rivolgetevi al vostro rivenditore, qualora provveda al
riciclaggio delle pile usate.
- Per e󰀨etto di fenomeni transitori elettrostatici e/o elettrici, è possibile che il prodotto
non funzioni correttamente. In tal caso è opportuno reinizializzarel’apparecchio.
- Il normale funzionamento del prodotto può essere compromesso da forti
interferenze elettromagnetiche. In tal caso, segui le istruzioni nel manuale per
reimpostare il prodotto per riprendere il normale funzionamento. Nel caso in cui il
funzionamento non venga ripristinato, utilizzare il prodotto in altro luogo.
OPGELET
- Gebruik dit toestel bij een gematigd klimaat.
- Het kenmerkenplaatje bevindt zich aan de achterkant van het toestel.
- Zorg voor een afstand van minimum 5 cm rondom uw toestel voor voldoende
ventilatie.
- Zorg voor een juiste ventilatie van het toestel en bedek de ventilatie-openingen
niet met voorwerpen zoals dagbladen, tafellakens, gordijnen, enz.
- Plaats geen warmtebron, zoals een brandende kaars, op of in de buurt van het
toestel.
- Stel het toestel niet bloot aan waterspatten of vochtigheid.
- Plaats geen voorwerpen met vloeistof, zoals een vaas, op of in de buurt van het
toestel.
- Gooi de batterijen niet in het vuur. Respecteer het milieu als u gebruikte batterijen
wegwerpt.
- Stel de batterijen niet bloot aan overdreven hitte zoals zonnestralen, vuur of
gelijkaardige warmtebronnen.
- Met de netspanningsstekker kan het toestel uitgetrokken worden, deze moet
dus gemakkelijk toegankelijk blijven. Om de voeding van het toestel volledig te
onderbreken dient u de voedingsstekker helemaal uit het stopcontact te trekken.
De netspanningsstekker mag niet verhinderd worden en moet gemakkelijk
toegankelijk zijn tijdens gebruik.
- Voor u batterijen wegwerpt, raadpleegt u eerst uw verdeler die wellicht batterijen
terugneemt voor specieke recyclage.
- Onder invloed van tijdelijke elektrostatische en/of elektrische verschijnselen kan
het product storingen ondervinden en kan een heropstart nodig blijken.
- De normale functie van het product kan worden verstoord door sterke
elektromagnetische storing. Als dit het geval is, reset het product dan gewoon
door de handleiding te volgen. Als het normale gebruik daarna niet kan worden
hervat, probeer het product dan op een andere locatie te gebruiken.
Das in einem Pfeil endende Blitzsymbol innerhalb eines Dreiecks weist den
Benutzer auf die Gegenwart einer „gefährlichen Spannung“ im Gerät hin. El símbolo del rayo con una echa dentro de un triángulo equilátero advierte
al usuario de la presencia de voltaje peligroso en el interior del aparato. Il simbolo del fulmine con una freccia all’estremiall’interno di un triangolo
equilatero avverte l’utente della presenza di una “tensione pericolosa
nell’apparecchio.
Het symbool van een zwarte driehoek met daarin een witte bliksemschicht
eindigend in een driehoek, waarschuwt de gebruiker dat er een gevaarlijke
spanning aanwezig is in het toestel.
Das Ausrufezeichen im Inneren eines Dreiecks weist den Benutzer
auf wichtige Anweisungen hin, die sich in dem das Gerät begleitenden
Handbuch benden.
El signo de exclamación dentro de un triángulo equilátero advierte al
usuario de la presencia de importantes instrucciones de funcionamiento y
mantenimiento en el manual que acompaña al producto. Il punto esclamativo inscritto nel triangolo equilatero indica all'utente che
nel manuale di istruzioni si trovano importanti avvertenze per l'uso e la
manutenzione dell'apparecchio.
Het bovenstaande symbool (zwarte driehoek met daarin een wit
uitroepingsteken) waarschuwt de gebruiker dat er belangrijke
gebruiksaanwijzingen in verband met het gebruik en het onderhoud ter
beschikking zijn in de bijgeleverde handleiding.
Wenn Sie dieses Gerät entsorgen möchten, denken Sie daran, es bei
einer Sammelstelle für elektrische Haushaltsgeräte zu entsorgen.
Erkundigen Sie sich nach Ihrer nächstgelegenen Wertsto󰀨sammelstelle.
Für detaillierte Informationen wenden Sie sich an die örtlichen Behörden
oder an Ihren Händler. (Richtlinie über elektrische und elektronische
Abfallgeräte).
Si en un futuro desea deshacerse de este aparato, recuerde que los
productos eléctricos no deben tirarse junto a los desechos domésticos.
Deposítelo en centros de reciclaje adecuados. Póngase en contacto con
las autoridades locales o con el vendedor del producto para obtener
más información al respecto. (Directiva sobre Residuos de Aparatos
Eléctricos y Electrónicos)
Se in futuro volete sbarazzarvi di questo apparecchio, ricordate che le
apparecchiature elettroniche non devono essere gettate insieme ai riuti
domestici. Informatevi per sapere dove si trova il centro di riciclaggio
più vicino. Per ulteriori dettagli, rivolgetevi alle autorilocali o al vostro
rivenditore. (Direttiva sui riuti delle apparecchiature elettriche ed
elettroniche).
Indien u dit toestel in de toekomst wilt weggooien, denk er dan aan om het
te recycleren via een inzamelpunt voor elektrische huishoudapparaten.
Informeer naar het dichtstbijzijnde recyclagecentrum. Voor meer
informatie wendt u zich tot de lokale overheden of uw verdeler (richtlijn
met betrekking tot Afval afkomstig van elektrische en elektronische
apparaten).
NEW ONE S.A.S
10, Rue de la Mission, 25480 Ecole Valentin, France
NEW ONE S.A.S
10, Rue de la Mission, 25480 Ecole Valentin, France
NEW ONE S.A.S
10, Rue de la Mission, 25480 Ecole Valentin, France
NEW ONE S.A.S
10, Rue de la Mission, 25480 Ecole Valentin, France
GEBRAUCH EINES KOPFHÖRERS / OHRHÖRERS (nicht enthalten)
USO DE CASCOS O AURICULARES (cable no incluido)
COLLEGAMENTO DI CUFFIE O AURICOLARI (cavo non incluso)
GEBRUIK VAN EEN HOOFDTELEFOON (kabel niet meegeleverd)
TECHNISCHE DATEN FICHA TÉCNICA
SPECIFICHE
TECHNISCHE KENMERKEN
Um mögliche Gehörschäden zu vermeiden, sollten Sie nicht über
längere Zeit bei hohen Lautstärken Musik hören.
Para evitar posibles daños en el oído, no escuche a un volumen elevado
durante largos periodos.
Per prevenire possibili danni all’apparato uditivo,non ascoltare la radio
con il volume alto per un lungo periodo.
Luister niet voor lange perioden op hoog volume om mogelijke
gehoorschade te voorkomen.
Maximale Ausgangsspannung ≤ 150 mV
WARNUNG IN ZUSAMMENHANG MIT DER LAUTSTÄRKE BEIM GEBRAUCH
DES KOPFHÖRERS
Vor dem Anstecken eines Kopfhörers zuerst die Lautstärke verringern; sie kann
danach bei Bedarf wieder erhöht werden. Das längere Hören mit einem Kopfhörer
bei großer Lautstärke kann Ihr Gehör unwiderruich schädigen. Wenn ein Kopf-
oder Ohrhörer an das Gerät angeschlossen wird, deaktiviert das die Lautsprecher
des Players.
Achtung: Vermeiden Sie große Lautstärken, sie schädigen Ihr Gehör.
Tensión de salida máxima ≤ 150 mV
ADVERTENCIA SOBRE EL NIVEL DE VOLUMEN DE LOS CASCOS O DE LOS
AURICULARES
Disminuya el volumen antes de conectar los cascos o auriculares y auméntelo a
continuación en caso de que sea necesario. El uso prolongado de los auriculares
(o de los cascos) a un volumen elevado puede dañar el sistema auditivo. Cuando
se utilicen cascos o auriculares, la salida de audio de los altavoces queda
automáticamente desactivada.
Atención: No utilice los cascos o auriculares a un volumen demasiado alto. Podría
dañar su sistema auditivo.
Tensione massima di uscita ≤ 150 mV
AVVERTENZA SUL VOLUME DELLE CUFFIE
Diminuite il volume prima di collegare le cu󰀩e e aumentatelo successivamente se
necessario. L’uso prolungato delle cu󰀩e ad alto volume può danneggiare l’udito.
Se le cu󰀩e / auricolari sono collegati all’apparecchio, gli altoparlanti del lettore si
disattivano automaticamente.
Attenzione: Evitate di utilizzare l’apparecchio ad un volume troppo elevato per non
danneggiare il vostro udito. Maximaal vermogen ≤ 150 mV:
WAARSCHUWING MET BETREKKING TOT HET VOLUME VAN DE
HOOFDTELEFOON
Verminder het geluidsvolume vooraleer u een hoofdtelefoon aansluit. Vervolgens
kan u het geluid naar wens luider zetten. Langdurig luisteren naar het toestel op
hoog volume kan het oor van de gebruiker beschadigen. Het geluid wordt niet
langer door de luidsprekers gestuurd, van zodra u een hoofdtelefoon aansluit.
OPGEPAST: Vermijd het luisteren naar het toestel op hoge volumes die het oor van
de gebruiker kunnen beschadigen.
ALLGEMEIN:
AC: 100-240V 50/60Hz
DC: 12V 8 x 1,5V Batterien Typ R20/UM-1/ “D” (nicht im Lieferumfang enthalten)
Stromverbrauch: 80W
RADIO
FM: 88 - 108 MHz
BLUETOOTH
Bluetooth-Version: V5.3+EDR
Bluetooth: 2.402-2.48GHz
RF-Ausgangsleistung (Radiofrequenz-Augangsleistung): -0.58 dBm
Betriebsreichweite: Bis zu 10 Meter in o󰀨enen Räumen (Wände und Hindernisse
können die Reichweite des Geräts beeinträchtigen)
KASSETTENREKORDER
Bandgeschwindigkeit: 4,75 CM/SEK.
Frequenzgang: 125 Hz - 8 kHz
CD-PLAYER
Optischer lesekopf: 3-STRAHLEN-LASER
Frequenzgang: 100 Hz - 16 kHz
Das Modell und die technischen Spezikationen können jederzeit unangekündigt
geändert werden.
Alimentación:
AC: 100-240V 50/60Hz
DC: 12V 8x1,5V pilas R20/ UM-1/ del tipo ”D” (no incluidas)
Consumo: 80W
RADIO
FM: 88 - 108 MHz
BLUETOOTH
Versión Bluetooth: V5.3+EDR
Bluetooth: 2.402-2.48GHz
Salida de corriente RF (radiofrecuencia): -0.58 dBm
Distancia de rendimiento: Hasta 10 m medidos en espacio abierto (la pared y las
estructuras pueden afectar el rango del dispositivo)
SECCIÓN DE CASETE
Velocidad de la cinta: 4,75 CM / SEG.
Respuesta de frecuencia: 125 Hz - 8 kHz
SECCIÓN DE DISCO COMPACTO
Lectura óptica: 3 - RAYO LÁSER
Respuesta de frecuencia: 100 Hz - 16 kHz
El diseño y las especicaciones técnicas pueden modicarse sin noticación
previa.
Alimentatore:
CA: 100-240V 50/60Hz
DC: 12V 8x1.5V batteria tipo R20/UM-1/”D” (non forniti).
Potenza assorbita: 80W
Intervallo di frequenza della radio
FM: 88 - 108 MHz
BLUETOOTH
Versione del Bluetooth: V5.3+EDR
Bluetooth: 2.402-2.48GHz
Potenza RF (radiofrequenza) irradiata: -0.58 dBm
Raggio d’azione: Fino a 10 metri in spazi aperti (pareti e altre strutture possono
inuire sul raggio d’azione del dispositivo).
CASSETTE
Velocità di scorriemnto del nastro: 4,75 CM/SEC.
Risposta in frequenza: 125 Hz - 8 kHz
CD
Pickup ottico: FASCIO LASER CLASSE 3
Risposta in frequenza: 100 Hz - 16 kHz
Ci riserviamo il diritto di modicare il modello e le speciche tecniche senza obbligo
di preavviso.
Netstroom:
AC: 100-240V 50/60Hz
DC: 12V 8x1.5V, batterijtype R20/ UM-1/ ”D” (niet meegeleverd)
Verbruik: 80W
RADIO
FM: 88 - 108 MHz
BLUETOOTH
Bluetooth-versie: V5.3+ EDR
Bluetooth: 2.402-2.48GHz
RF-vermogen (radiofrequentievermogen): -0.58 dBm
Werkafstand: Tot 10 meter gemeten in een open ruimte (muren en bouwwerken
kunnen invloed hebben op het bereik van de luidspreker)
CASSETTE-SPELER
Snelheid tape: 4,75 CM / SEC.
Frequentierespons: 125 Hz - 8 kHz
CD-SPELER
Optische pickup: 3 - LASERSTRALEN
Frequentierespons: 100 Hz - 16 kHz
Ontwerp en specicaties zijn onderhevig aan verandering zonder kennisgeving.
DESCRIPCIÓN DEL APARATO DESCRIZIONE DEL PRODOTTO
BESCHRIJVING VAN HET TOESTEL
ANSCHLUSS EINER ZUSATZQUELLE CONEXIÓN DE UN DISPOSITIVO EXTERNO COLLEGAMENTO SORGENTE AUSILIARIA
GEBRUIK VAN DE HULPINGANG
WIEDERGABE VON USB- ODER MICRO-SD-WIEDERGABE OÍR UN DISPOSITIVO USB O MICRO SD ASCOLTO DA DISPOSITIVO USB O MICRO SD
LUISTEREN NAAR USB-APPARAAT OF MICRO SD
1. Schieben Sie den Funktionsschalter in die BT/AUX/USB/SD-Position. Schließen
Sie ein externes Gerät (z.B. MP3-Spieler) an die (3.5mm) Buchse rechts AUX IN
am Gerät an (Kabel nicht mitgeliefert). „AUX“ wird auf dem Display angezeigt.
2. Beginnen Sie mit dem Playback Ihrer Zusatzquelle.
3. Stellen Sie die Lautstärke auf den gewünschten Pegel ein.
4. Um das Playback zu beenden, nehmen Sie Ihre Zusatzquelle aus der AUX IN
Buchse heraus.
1. Deslice el interruptor de función hasta la posición . Conecte BT/AUX/USB/SD
su fuente auxiliar (por ejemplo, un reproductor de MP3) a la toma de la AUX IN
parte derecha de la unidad (cable no incluido). Aparecerá “AUX” en la pantalla.
2. Empiece el playback desde la fuente AUX IN.
3. Ajuste el volumen hasta el nivel deseado.
4. Para parar el playback, desconecte la fuente AUX-IN de la entrada .AUX-IN
1. Scorrete l'interrutore di funzione in posizione . Collegate la BT/AUX/USB/SD
sorgente ausiliaria (es.lettore MP3) alla presa (3.5mm) posta sul retro AUX IN
dell’apparecchio (cavo non incluso). "AUX" verrà visualizzato sul display.
2. Avviate la riproduzione dalla sorgente ausiliaria.
3. Regolate il volume al livello desiderato.
4. Per arrestare la riproduzione scollegate la sorgente ausiliaria dalla presa AUX IN.
1. Schuif de functieschakelaar naar de stand . Sluit uw hulpbron BT/AUX/USB/SD
(bv. mp3-speler) aan op de (3.5mm)-aansluiting aan de rechterkant van AUX IN
het apparaat (kabel niet meegeleverd).
2. Start het afspelen van uw hulpbron.
3. Stel het geluidsvolume in op het gewenste niveau.
4. Om het afspelen te stoppen, trekt u de externe audiobron uit de AUX IN
aansluiting.
1. Schieben Sie den Funktionsschalter in die -Position. Wählen Sie BT/AUX/USB/SD
nun mit der -Taste den gewünschten Modus aus.MODE
2. Anschluss von USB-Speichermedien (nicht im Lieferumfang)
Schließen Sie Ihr USB-Gerät am USB-Anschluss an der Bedientafel an. Das Gerät
schaltet in den USB-Modus und startet Sie die Wiedergabe automatisch.
Anstecken einer Micro-SD -Karte (nicht mitgeliefert)
Schließen Sie Ihre Micro-SD -Karte an den TF Kartenschlitz an. Das Gerät schaltet
automatisch den Modus „SD“ ein.
3. Wählen Sie mit den Tasten / einen Titel aus.
WIEDERHOLUNG
Drücken Sie die -Taste wiederholt, um den Repeat-Modus wählen: REP
Einzelwiederholung: „REP“ blinkt auf dem Display.
Ordner wiederholen: „REP“ hört auf zu blinken.
Alles wiederholen: „REP“ hört auf zu blinken.
Zufalls: Auf dem Display wird „RAND“ angezeigt.
Anmerkungen:
- Auf dem USB-Gerät oder Micro-SD-Karte dürfen nicht mehr als 9999 MP3-Dateien
gespeichert sein.
- Je nach Anzahl der MP3-Dateien und Ordner auf dem USB-Gerät oder Micro-SD-
Karte benötigt einige Sekunden oder länger zum Lesen der Dateien.
- Stecken Sie nur ein USB-Gerät in den dazu vorgesehenen USB-Port. Sie könnten
das Gerät ansonsten beschädigen.
- Verwenden Sie keine anderen Objekte außer Micro-SD-Karten im Micro-SD-Slot
dieses Radios. Andere Objekte können den Mechanismus zerstören.
- Der USB-Port darf nicht direkt an einen PC angeschlossen werden: Dadurch könnte
das Gerät beschädigt werden.
- Auf dem Markt sind zahlreiche USB-Sticks und MP3-Player erhältlich. Die
Kompatibilität mit allen Formaten kann daher nicht gewährleistet werden. Benutzen
Sie bitte einen anderen USB-Stick, falls der Ihre nicht funktionieren sollte.
- Möglicherweise werden einige Dateien, die auf dem USB-Gerät oder Micro-SD-
Karte gespeichert sind, nicht vom Gerät unterstützt. Denn bestimmte spezielle
Wiedergabe-Prozeduren sind mit diesem Gerät nicht kompatibel.
- Die Wiederholungsfunktionen im USB-Modus oder TF-Modus funktionieren
möglicherweise nicht richtig, wenn sowohl ein USB-Gerät und eine TF-Karte
angeschlossen sind. Trennen Sie in solch einem Fall entweder das USB-Gerät
oder die TF-Karte.
- Im USB/SD-Modus kann nicht schnell zum vorherigen Titel zurückgespult werden.
Anmerkungen:
- Der Pegelzähler bewegt sich zur Lautstärke.
- Drücken Sie die Taste , um die Ordnerfunktion aufzurufen.FOLDER-/FOLDER+
Aufnahme von Radio/CD/AUX/Bluetooth/Kassette auf USB oder Micro-SD
1. Schließen Sie während der Kassetten-/ Radio-/ BT-/ CD- oder AUX-Wiedergabe
ein USB-Gerät oder eine Micro-SD-Karte an.
2. Halten Sie die Taste gedrückt, um die Aufnahmefunktion zu starten. Im REC
Display blinkt die Anzeige „USB“ bzw. „SD“, wenn ein USB-Gerät bzw. eine Micro-
SD-Karte angeschlossen ist, und der aktuell wiedergegebene Titel wird auf das
USB-Gerät bzw. auf die Micro-SD-Karte aufgenommen.
3. Drücken Sie kurz die Taste “, um zwischen der aufgenommenen und der REC
wiedergegebenen Datei umzuschalten.
4. Um die Aufnahme zu beenden, drücken Sie die Taste „DEL.
5. Um eine aufgenommene Datei zu löschen, spielen Sie zunächst die zu löschende
Datei ab und halten Sie dann die Taste gedrückt; im Display erscheint die DEL
Anzeige „DELE“.
Anmerkungen:
* Falls sich auf dem USB-Gerät bzw. auf der Micro-SD-Karte keine Wiedergabedatei
bendet, wird die aufgenommene Datei direkt abgespielt.
* Falls gleichzeitig ein USB-Gerät und eine Micro-SD-Karte angeschlossen sind, wird
das USB-Gerät bespielt.
1. Deslice el interruptor de función hasta la posición . Pulse el BT/AUX/USB/SD
botón para seleccionar el modo deseado.MODE
2. Para insertar dispositivos USB (no incluidos)
Conecte su dispositivo USB al puerto USB del panel frontal. Pasará entonces al
modo “USB” y la reproducción comenzará automáticamente.
Utilización de una tarjeta Micro SD (no incluidos)
Introduzca una tarjeta Micro SD en la ranura para tarjetas TF. Pasará entonces
al modo “SD” y la reproducción comenzará automáticamente. To insert an USB
device (not included)
3. Seleccione la pista que desee con / .
REPETICIÓN
Pulse repetidamente el botón para seleccionar uno de los siguientes modos REP
de reproducción:
Repetir 1: “REP” parpadeará en la pantalla.
Repetir carpeta: “REP” dejará de parpadear.
Repetir todo: ”REP” dejará de parpadear.
Reproducción aleatoria: "RAND" aparece en la pantalla".
Notas:
- El número total de archivos MP3 en el dispositivo USB o Micro SD no deberá
exceder los 9999.
- El tiempo de lectura llevaunos segundos o más, dependiendo de la cantidad de
archivos MP3 y carpetas en el dispositivo USB o Micro SD.
- Introduzca sólo dispositivos USB en el puerto USB. En caso contrario, podría
dañar el aparato.
- No introduzca más que tarjetas micro SD por la ranura SD de esta unidad. Otros
objetos podrían dañar el mecanismo de la tarjeta.
- No conecte el puerto USB directamente a un ordenador: podría dañar el aparato.
- En el mercado pueden encontrarse numerosos modelos de dispositivos USB y de
reproductores MP3. No podemos garantizarle que este aparato sea compatible
con todos los formatos. En caso de que su dispositivo USB o Micro SD no
funcione, utilice otro.
- Es posible que algunos archivos grabados en un dispositivo USB o Micro SD no
sean compatibles. En efecto, algunos formatos de reproducción especiales no
son compatibles con este aparato.
- Es posible que la función de repetición en los modos USB o TF no funcione
correctamente cuando tanto el dispositivo USB como la tarjeta TF están
insertados en la unidad. En este caso, desconecte el dispositivo USB o la tarjeta
TF de la unidad.
- No puede retroceder rápidamente a la pista anterior en modo USB/SD.
Notas:
- El puntero del nivel oscilará con el volumen.
- Pulse el botón para seleccionar la función de carpeta.FOLDER-/FOLDER+
Grabación desde Radio/CD/Fuente Auxiliar/Bluetooth/Cassette a USB o
Micro SD
1. Cuando reproduzca cualquier función de casete/radio/BT/CD/AUX, a
continuación, inserte la tarjeta USB o Micro SD.
2. Mantenga pulsado el botón " " para acceder a la función de grabación. La REC
palabra "USB" parpadeará en la pantalla cuando inserte el dispositivo USB o
"SD" parpadeará en la pantalla cuando inserte la tarjeta Micro SD. Y la música
que se esté reproduciendo se grabará en el USB o en la tarjeta Micro SD.
3. Pulse brevemente el botón " " para cambiar entre el archivo de grabación y REC
el archivo de reproducción.
4. Para detener la grabación, pulse el botón " ". DEL
5. Para eliminar el archivo de grabación, reproduzca el archivo que desea eliminar
y, a continuación, mantenga pulsado el botón " ".DEL
Notas:
* Si no hay ningún archivo de reproducción en USB o Micro SD, reproduzca
directamente el archivo de grabación.
* Si hay un USB y una Micro SD al mismo tiempo, el USB se grabará primero.
1. Scorrete l'interrutore di funzione in posizione . Premi il tasto BT/AUX/USB/SD
MODE per selezionare la modalità desiderata.
2. Collegamento di un dispositivo USB (non incluso)
Collegare il dispositivo USB alla porta USB sul frontalino. Lapparecchio passerà
alla modalità “USB” e avvierà la riproduzione in automatico.
Per inserire una scheda micro SD (non incluso)
Inserire una scheda micro SD nel relativo slot TF. L’apparecchio passerà alla
modalità “SD” e avvierà la riproduzione in automatico.
3. Utilizzare i tasti / per selezionare la traccia desiderata.
RIPETIZIONE
Premere più volte il tasto per selezionare tra: REP
Ripeti 1: “REP” lampeggerà sul display.
Ripeti cartella: "REP" smetterà di lampeggiare.
Ripeti Tutto: ”REP” smetterà di lampeggiare.
Riproduzione Casuale: Sul display viene visualizzato "RAND".
Nota:
- Il numero totale di le MP3 contenuti nel dispositivo USB o scheda micro SD non
deve essere superiore a 9999.
- Il tempo di lettura può variare a seconda del numero di le MP3 o di cartelle
contenuti nel dispositivo USB o scheda micro SD.
- Inserire esclusivamente periferiche USB nello slot corrispondente. Inserire altri
oggetti rischia di danneggiare l’apparecchio.
- Non inserire oggetti diversi dalla scheda micro SD nella porta micro SD di questo
apparecchio, in quanto potrebbero danneggiare il meccanismo di lettura della
scheda.
- La porta USB non deve essere direttamente collegata ad un PC, in quanto ciò
potrebbe danneggiare l’apparecchio.
- Sul mercato esistono numerosi modelli di periferiche USB e di lettori MP3. Non è
possibile garantire la compatibilità con tutti i formati. Qualora un modello di periferica
USB o scheda micro SD non sia compatibile, provate con un’altro.
- L’apparecchio potrebbe non essere compatibile con alcuni le multimediali
memorizzati sulla periferica USB o scheda micro SD, poiché tali dispositivi
richiedono particolari procedure di riproduzione non sempre compatibili con quelle
dell’apparecchio.
- In modalità USB o TF, la funzione di ripetizione potrebbe non funzionare
correttamente quando sia il dispositivo USB che la scheda TF sono collegati
all’apparecchio. In questa eventualità, scollega il dispositivo USB o la scheda TF
dall’apparecchio.
- Non è possibile riavvolgere rapidamente la traccia precedente in modalità USB/SD.
Nota
- L’indicatore del livello oscillerà con il volume.
- Premi il tasto per selezionare la funzione cartella.FOLDER-/FOLDER+
Registrazione da Radio/CD/Sorgente Ausiliaria/Bluetooth/Cassetta su USB o
Micro SD
1. Quando si riproduce una qualsiasi funzione di Cassetta/Radio/BT/CD/AUX,
inserisci la scheda USB o Micro SD.
2. Tieni premuto il tasto per accedere alla funzione di registrazione. Quando REC
si collega un dispositivo USB sul quadrante lampeggerà “USB”, o “SD” nel caso
si inserisca una scheda Micro SD. La musica attualmente in riproduzione verrà
registrata sul dispositivo USB o sulla scheda Micro SD.
3. Premi brevemente il tasto REC per passare dal le di registrazione al le di
riproduzione;
4. Per interrompere la registrazione, premi il tasto “DEL”.
5. Per eliminare un le registrato, riproduci il le da eliminare, quindi tieni premuto il
tasto “ ”, e sul quadrante apparirà “DELE”.DEL
Nota
* Quando non è presente alcun le di riproduzione nel dispositivo USB o nella scheda
Micro SD, verrà riprodotto direttamente il le di registrazione.
* Se il dispositivo USB e la scheda Micro SD sono entrambi collegati, il dispositivo
USB verrà registrato per primo.
1. Schuif de functieschakelaar naar de stand . Druk op de BT/AUX/USB/SD MODE
knop om de gewenste modus te selecteren.
2. Een USB-apparaat aansluiten (niet meegeleverd)
Sluit uw USB-apparaat aan op de USB-poort op het voorpaneel. Het apparaat
schakelt naar de “USB” modus en start het afspelen automatisch.
Een Micro SD-kaart plaatsen (niet meegeleverd)
Plaats een Micro SD -kaart in de kaartsleuf TF. Het apparaat zal automatisch naar
de “SD” modus schakelen en het afspelen starten.
3. Selecteer de gewenste track met / .
HERHALEN
Druk op de -knop aan een van de volgende manieren van afspelen: REP
Herhaal 1: "REP" knippert op het display.
Map herhalen: "REP" stopt met knipperen.
Herhaal alle: "REP" stopt met knipperen.
Willekeurig afspelen: "RAND" verschijnt op het display.
Opmerking:
- Het totaal aantal MP3-bestanden op het USB-apparaat of Micro SD-kaart mag niet
groter zijn dan 9999.
- Het inlezen van de bestanden duurt een paar seconden of langer, afhankelijk van
het aantal MP3bestanden en mappen op het USB-apparaat of Micro SD-kaart.
- Teek niets anders dan USB-randapparatuur in de hiertoe voorziene poort. U riskeert
het toestel te beschadigen.
- De USB-poort mag niet rechtstreeks aangesloten worden op een computer: dit kan
het toestel beschadigen.
- Plaats niets anders dan een Micro SD-kaart in de MicroSD-kaartsleuf van dit
apparaat. Andere voorwerpen kunnen het kaartmechanisme beschadigen.
- Er bestaan verschillende USB-sleutels en MP3-spelers op de markt. Wij kunnen
niet garanderen dat het toestel compatibel is met alle formaten. Gebruik daarom
een andere USB-drager indien uw USB-drager niet werkt.
- Het is mogelijk dat bepaalde bestanden die opgeslagen zijn op het USB-
apparaat of Micro SD-kaart niet kunnen gelezen worden omdat deze speciale
afspeelprocedures vereisen die niet compatibel zijn met dit toestel.
- Het kan niet snel terugspoelen naar het vorige nummer in USB/SD-modus.
Opmerking:
- De niveauwijzer zal meebewegen met het volume.
- Druk op de knop om de mapfunctie te selecteren.FOLDER-/FOLDER+
Opnemen van Radio/ CD/ Hulpbron/ Bluetooth/ Cassette naar USB of Micro SD
1. Voor het afspelen van elke willekeurige functie van cassette/radio/BT/CD/AUX
moet u de USB of Micro SD-kaart inbrengen.
2. Houd de ” knop ingedrukt om de opnamefunctie in te schakelen. Als REC
u het USB-apparaat aansluit, zal het woord ”USB” op het scherm beginnen te
knipperen, en als u een Micro SD-kaart aansluit, zal “SD” op het scherm beginnen
te knipperen. De op dat moment afgespeelde muziek zal op de USB of Micro SD-
kaart worden vastgelegd.
3. Druk kort op de " " knop om heen en weer te schakelen tussen het REC
opnamebestand en het afspeelbestand;
4. Om het opnemen stop te zetten moet u op de “ ” knop drukken. DEL
5. Om het opnamebestand te verwijderen moet u, terwijl u het te verwijderen bestand
afspeelt, de “ ” knop gedurende langere tijd ingedrukt houden. Op het scherm DEL
zal het woord “DELE” verschijnen.
Opmerking:
* Als de USB of Micro SD-kaart geen afspeelbestand bevat, moet u het
opnamebestand direct afspelen.
* Als zowel een USB als een Micro SD-kaart zijn aangesloten, zal de USB het eerst
opgenomen worden.
HET APPARAAT IN-/UITSCHAKELEN
- Als het apparaat op de netspanning is aangesloten, zet dan eerst de AAN/UIT
knop op de achterkant op AAN. Om de gewenste bedrijfsmodus in te stellen kunt
u daarna de MUSIC-knop (Bluetooth, AUX, USB, SD) / CD / TAPE / RADIO) op de
gewenste bedrijfsmodus zetten.
- Als het apparaat op de netspanning is aangesloten, moet u de AAN/UIT knop op
de achterkant op UIT zetten om het apparaat uit te schakelen.
RKD-5188 IB MUSE 001 REV0.indd 2
RKD-5188 IB MUSE 001 REV0.indd 2RKD-5188 IB MUSE 001 REV0.indd 2 2023/5/26 16:16:26
2023/5/26 16:16:26
2023/5/26 16:16:26
2023/5/26 16:16:262023/5/26 16:16:26


Product specificaties

Merk: Muse
Categorie: Hifi systeem
Model: M-380 GB

Heb je hulp nodig?

Als je hulp nodig hebt met Muse M-380 GB stel dan hieronder een vraag en andere gebruikers zullen je antwoorden


Handleiding Hifi systeem Muse

Handleiding Hifi systeem

Nieuwste handleidingen voor Hifi systeem