Mobius ActionCam Camcorder Handleiding

Mobius Camcorder ActionCam Camcorder

Lees hieronder de 📖 handleiding in het Nederlandse voor Mobius ActionCam Camcorder (15 pagina's) in de categorie Camcorder. Deze handleiding was nuttig voor 33 personen en werd door 2 gebruikers gemiddeld met 4.5 sterren beoordeeld

Pagina 1/15
Instruction Manual for the Mobius ActionCam
Description
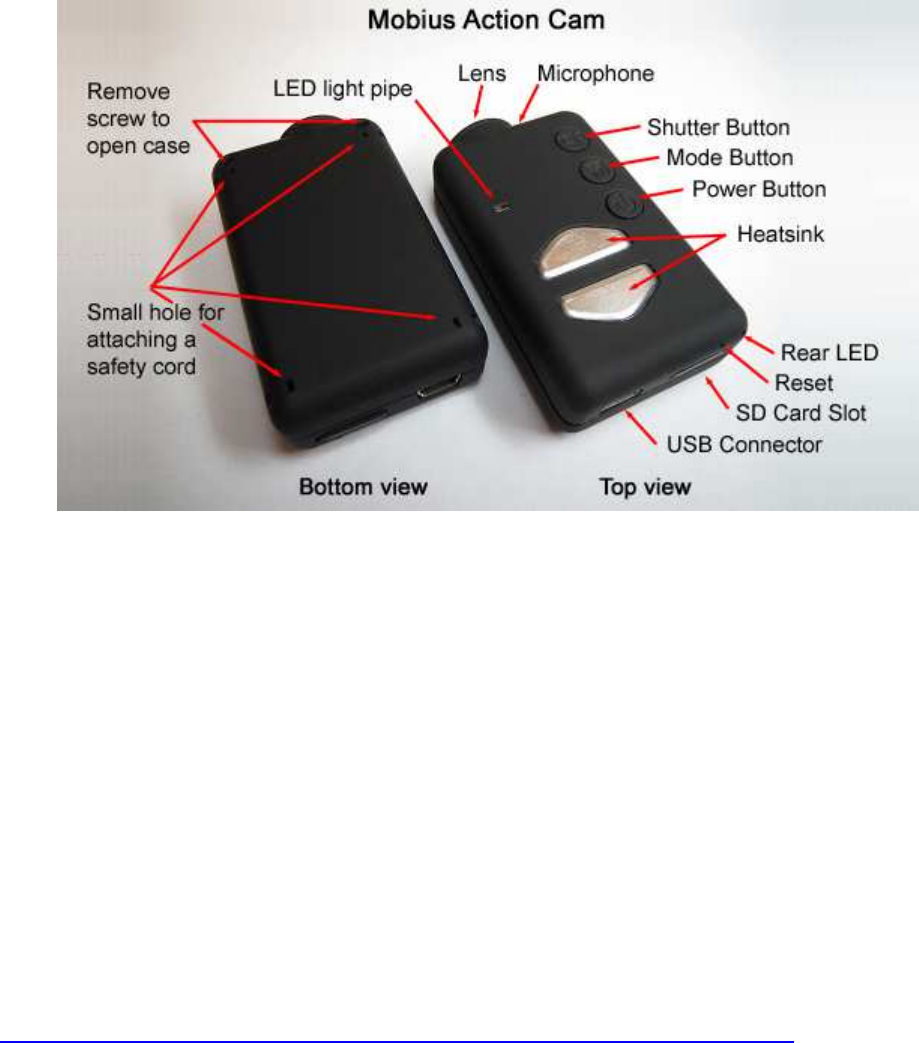
The above picture shows the arrangement of the user operating features.
The two heat sinks can become very hot during operation. This is normal, but all the same
you should never leave the camera turned on where the surrounding temperature exceeds
~47°C (118°F) - for example in a car parked in the baking sun. If you wish to use the
camera in very hot conditions you should ensure the heat sinks are adequately cooled, for
example by directing cool air onto the metal plates or using a ventilator to dissipate the heat
away from the metal plates. High temperatures will also damage the internal LiPo battery. If
you use your camera in very hot conditions with external power, for example as a dashcam,
you should consider replacing the battery with a Super Capacitor pair. These can be
purchased from most suppliers who sell the Mobius. A Super Capacitor pair enables the
camera to correctly save the last recording when external power is removed. A fully
charged Supercap has enough energy to keep the RTC (Real Time Clock) running for
several days (about 7-10) without external power connected. It only takes a few minutes to
fully charge the Supercap.
â–ºThis manual does not cover replacing the internal battery or lens. If you need to do this,
please refer to the very detailed instructions found at
http://www.rcgroups.com/forums/showpost.php?p=25170910&postcount=4.
â–ºThis manual assumes the camera is loaded with the latest firmware available at the time
of writing. Functionality may vary with earlier or later firmware versions.
Cards
In general you may use any micro SD, micro SDHC or Micro SDXC card with a capacity of
up to 128GB with this camera. Larger cards are most likely also supported but not yet
available. To avoid card compatibility problems, always use quality cards with a speed
rating of Class 4. There are known problems with a few cards that have a higher class
rating, for example some, but not all, Sandisk 32GB Ultra (class 10) will not work properly
with earlier firmware versions. You should use firmware v1.17 or above with these cards.
For the best compatibility use cards with a class 4 rating if you have them. There is
absolutely no advantage in using cards with a higher rating. The most compatible cards are
genuine Kingston. At the time of writing there are known problems with some 64GB cards
when formatted with exFAT. For this reason it is recommended to format 64GB cards with
FAT32. 128GB cards will also work but cannot be correctly formatted to FAT32 using the
built-in formatting routine (as of firmware v2.18).
Most firmware versions support cards formatted with FAT, FAT32 or exFAT but v2.03 -
v2.10 only support FAT and FAT32. Firmware v2.18 and above support both FAT32 and
exFAT. Cards with a capacity of 64GB and greater must be formatted using the In-Camera
formatting routine (see below) if they are to be used with firmware v2.03 - v2.10.
Due to technical reasons you cannot update the firmware if your card is formatted as
exFAT. The In-Camera formatting routine (see below) will format cards to the format
required by the firmware. With firmware versions up to v2.03 the routine will format cards
with a capacity greater than 32GB to exFAT. All other cards will be formatted as
FAT/FAT32. Firmware v2.18 and above allows the user to set which type of formatting will
be used with 64GB cards and above. Older operating systems, for example XP 64-Bit and
Windows 2003, do not support exFAT file systems unless you install additional drivers.
There are a few programs available, for example guiformat, that are capable of formatting
large capacity cards with FAT32.
â–ºYou should always use cards from well known brands. Low quality and no-name cards,
as well as some class 2 (or less) cards, may draw more than 20mA current than quality
cards. This can result in unwanted electrical noise such as clicks, chirps, hum and buzzing
in the audio recording.
â–ºThe following approx. recording times for 1080p videos with a standard data rate are as
follows: 32GB Card = 4 hours 30 mins., 16GB Card = 2 hours 15 mins., 8GB Card = 1 hour
7 mins., 4GB Card = 33 mins.
â–ºThis manual assumes a compatible SD card is inserted in the card slot (except for
WebCam mode).
â–ºThe card must be carefully inserted face down with the gold contacts upwards and facing
forward. Do not use force or you could damage the lock mechanism inside the card holder.
USB connector
The Mobius uses a standard Mini USB connector where pin #4 is used as a sense pin. If
this pin is connected to pin #5 (ground) then a built in USB switch will connect pin #2 to
video out and pin #3 will be connected to audio-out (playback mode only). Do not connect
the Mobius to a computer or Smartphone if pin #4 is shorted to pin #5. In normal use, pin #2
carries the Data- signal and pin #3 carries the Data+ signal whereas pin #4 is unused.
Cables
The camera requires a standard USB cable for charging or connecting to external battery
packs for continuous recording. A standard USB cable is also used to connect the camera
to the PC in order to set the parameters or access the camera as an external disk or
webcam.
A/V-out (or Video-Out) requires a special cable where pin #4 is shorted to pin #5 (ground).
When the firmware detects pin #4 connected to ground it will output the video signal on pin
#2 and the audio signal on pin #3. Special cables can be ordered from the supplier in the
form of a harness or you can make one yourself using a 5-pin mini USB plug. You can also
modify a Smartphone OTG (On The Go) cable which already has pins #4 and #5 shorted in
the mini USB plug. The audio signal is only available in playback mode. The #16 "special"
cable will not work with this camera.
You must under no circumstances use any other "special" cable, especially the "special"
cable supplied with the #11. Doing so will destroy your camera beyond repair. So, do not
use a #11 "special" cable under any circumstances.
â–ºAlways use HIGH QUALITY USB cables. Cheap cables will lead to all sorts of problems.
If possible, keep the cable as short as possible.
Video-Out (composite or TV-out)
The optional Video-Out cable (see above) should always be connected or disconnected
while the camera is in standby or turned off. If the cable is connected or disconnected
during recording then the recording will be stopped and the camera will enter standby. The
camera will never be recognized as a removable drive when the video-out cable is
connected.
â–º Do not confuse this with webcam mode. The signal is an old, low resolution, composite
(TV) video signal in either PAL or NTSC format.
Before you start
Before using the camera for the first time, ensure that the internal battery is fully charged.
See below under "Charging". A new, fully charged 520mAh battery will last about 80
minutes. A new, fully charged 820mAh battery will last over 2 hours. The 820mAh battery is
slightly larger and heavier than the 520mAh battery. The batteries are interchangeable.
For recording or playback, refer to the picture above and insert a micro SD card upside-
down into the SD Card slot with the gold contacts pointing forward.
The Reset button
The reset button is located on the right side, above the card slot. It can be pressed by
carefully inserting a bent paper clip or similar instrument. The Reset button should only be
pressed in case the camera no longer reacts to button presses. Pressing the Reset button
will force the processor to restart. No parameter settings will be lost and the RTC (Real
Time Clock) will not be interrupted. Do not confuse the reset button with the rear LED.
The Power button
Press the power button to turn the camera on. The blue LED will turn on for about 1 second
before the firmware starts to load. After about 3 seconds the yellow LED will turn on
indicating the camera is ready for use (standby). If Power On Delay is set to ON, press the
power button for about 4 seconds until the yellow LED turns on.
•
Power On Delay is useful to prevent the camera from being inadvertently turned on.
•
If the camera has been configured with Auto Power On Record set to On, the
camera will automatically begin recording in Mode 1.
•
To turn off the camera, first stop any recordings that may be running by pressing the
shutter button and then press the power button for at least half a second (some
firmware versions require you to press the button for 2 seconds). The camera will
turn off.
The Mode button
The Mode button enables the camera to be sequentially switched between 4 different
modes. Each button press advances to the next mode indicated by the LED color.
•
Video Mode 1 (yellow LED). The frame rate, resolution, AOV and rotation can
be individually configured.
•
Video Mode 2 (blue LED). The frame rate, resolution, AOV and rotation can
be individually configured.
•
Photo Mode (red LED) which includes Time-Lapse photos.
•
Playback Mode (red LED) is only possible when the special A/V-out cable is
connected.


Product specificaties

Merk: Mobius
Categorie: Camcorder
Model: ActionCam Camcorder

Heb je hulp nodig?

Als je hulp nodig hebt met Mobius ActionCam Camcorder stel dan hieronder een vraag en andere gebruikers zullen je antwoorden


Handleiding Camcorder Mobius

Handleiding Camcorder

Nieuwste handleidingen voor Camcorder