Metra AXLOC-CH4 Handleiding
Bekijk gratis de handleiding van Metra AXLOC-CH4 (8 pagina’s), behorend tot de categorie Carkit. Deze gids werd als nuttig beoordeeld door 43 mensen en kreeg gemiddeld 4.4 sterren uit 9 reviews. Heb je een vraag over Metra AXLOC-CH4 of wil je andere gebruikers van dit product iets vragen? Stel een vraag
Pagina 1/8
AXLOC-CH4
INSTALLATION INSTRUCTIONS
AxxessInterfaces.com © COPYRIGHT 2022 METRA ELECTRONICS CORPORATION REV. 12/2/22 INSTAXLOC-CH4
ATTENTION: With the key out of the ignition,
disconnect the negative battery terminal
before installing this product. Ensure that all
installation connections, especially the air
bag indicator lights, are plugged in before
reconnecting the battery or cycling the
ignition to test this product.
NOTE: Refer also to the instructions included
with the aftermarket accessory before
installing this device.
TOOLS REQUIRED
• Crimping tool and connectors, or solder gun,
solder, and heat shrink
• Tape • Wire cutter • Zip-ties
TABLE OF CONTENTS
Applications.............................................................1
Installation ............................................................. 2
Diagram .................................................................. 3
Chrysler LOC (Line Output Converter)
AXLOC-CH4(for Non-Amplified Vehicles) 2007-2021
APPLICATIONS
Chrysler
200 2011-2014
300 2008-2010
Aspen 2008-2009
Sebring 2007-2010
Town & Country 2008-2017
Dodge
Avenger 2008-2014
Caliber 2009-2012
Caravan and
Grand Caravan 2008-2020
Challenger 2008-2014
Charger 2008-2010
Dakota 2008-2011
Durango 2008-2013
Journey 2009-2010
Magnum 2008-2009
RAM 2009-2011
Jeep
Commander 2008-2010
Compass 2009-2017
Grand Cherokee 2008-2013
Liberty 2008-2012
Patriot 2009-2017
Wrangler(JK) 2007-2021
Visit AxxessInterfaces.com for more detailed information about the product and up-to-date vehicle specific applications
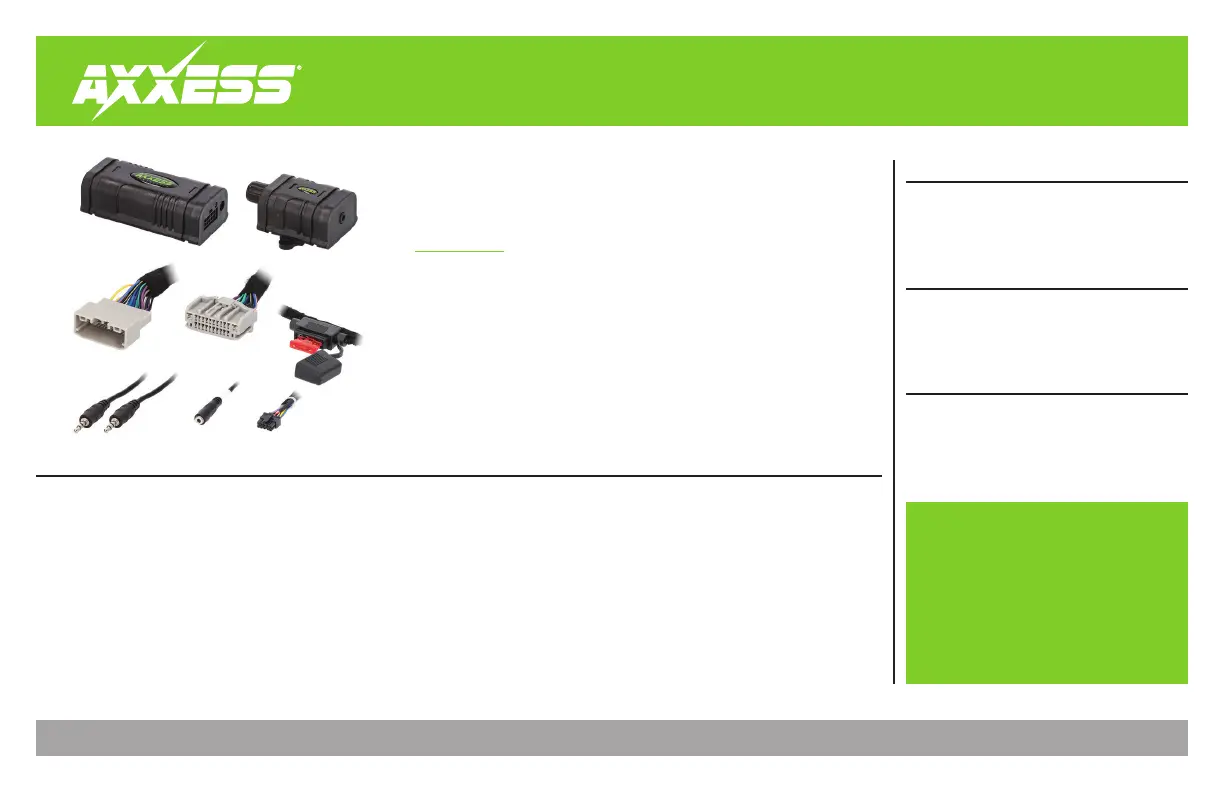
KIT COMPONENTS
For dash disassembly instructions, refer to metraonline.com. Enter the year, make, and model of the vehicle in the Vehicle Fit Guide for Radio Install Kits.
• Designed to provide (2) channels of low-level audio output from the factory system.
• Allows for the installation of an amplifier for speakers or subwoofers.
• Gain Controller included to adjust the overall output.
• 12v-500mA remote wire activated with signal sense.
• 55-watts per channel.
• Designed for non-amplified vehicles.
Note: A single pole double throw (SPDT) relay is recommended when installing multiple amplifiers.
• AXLOC-CH4 Wiring Harness
• Gain Controller
• 12v-500mA Remote Wire
• Auxiliary Cable
Product specificaties
| Merk: | Metra |
| Categorie: | Carkit |
| Model: | AXLOC-CH4 |
Heb je hulp nodig?
Als je hulp nodig hebt met Metra AXLOC-CH4 stel dan hieronder een vraag en andere gebruikers zullen je antwoorden
Handleiding Carkit Metra

7 Oktober 2025
7 Oktober 2025
7 Oktober 2025
6 Oktober 2025
3 Juni 2025
3 Juni 2025
7 Mei 2025
3 April 2025
3 April 2025
3 April 2025
Handleiding Carkit
Nieuwste handleidingen voor Carkit
3 November 2025
21 September 2025
4 Augustus 2025
5 Juli 2025
3 Juni 2025
2 Juni 2025
19 Mei 2025
27 April 2025
31 Maart 2025
11 Februari 2025