MeldaProduction MLimiterX Handleiding
MeldaProduction Audiosoftware MLimiterX
Bekijk gratis de handleiding van MeldaProduction MLimiterX (62 pagina’s), behorend tot de categorie Audiosoftware. Deze gids werd als nuttig beoordeeld door 50 mensen en kreeg gemiddeld 4.8 sterren uit 7 reviews. Heb je een vraag over MeldaProduction MLimiterX of wil je andere gebruikers van dit product iets vragen? Stel een vraag
Pagina 1/62
MLimiterX
Overview
MLimiter is a state-of-the-art mastering brickwall limiter that makes your recordings sound louder with minimum distortion and artifacts and
best of all, you do not need to be a scientist to use it!
MLimiter is built on top of our MDynamics kernel, and its highly simplified user interface provides all the features you need to perform high-
quality limiting quickly and easily.
Introduction
A brickwall limiter increases loudness by reducing the ratio between the average and peaks in the signal, however the dynamics of the audio
material is always sacrificed. MLimiter is simple to use. Watch the gain reduction meter ("R") to the right, and manipulate the Threshold.
Decreasing the threshold increases the output gain and allows limiting up to 0dB. Care is needed as this can cause severe distortions if not
used correctly. In most cases you don't need to worry about the edit screen, just simply focus on the easy screen, with its simplified 4-knob
interface.
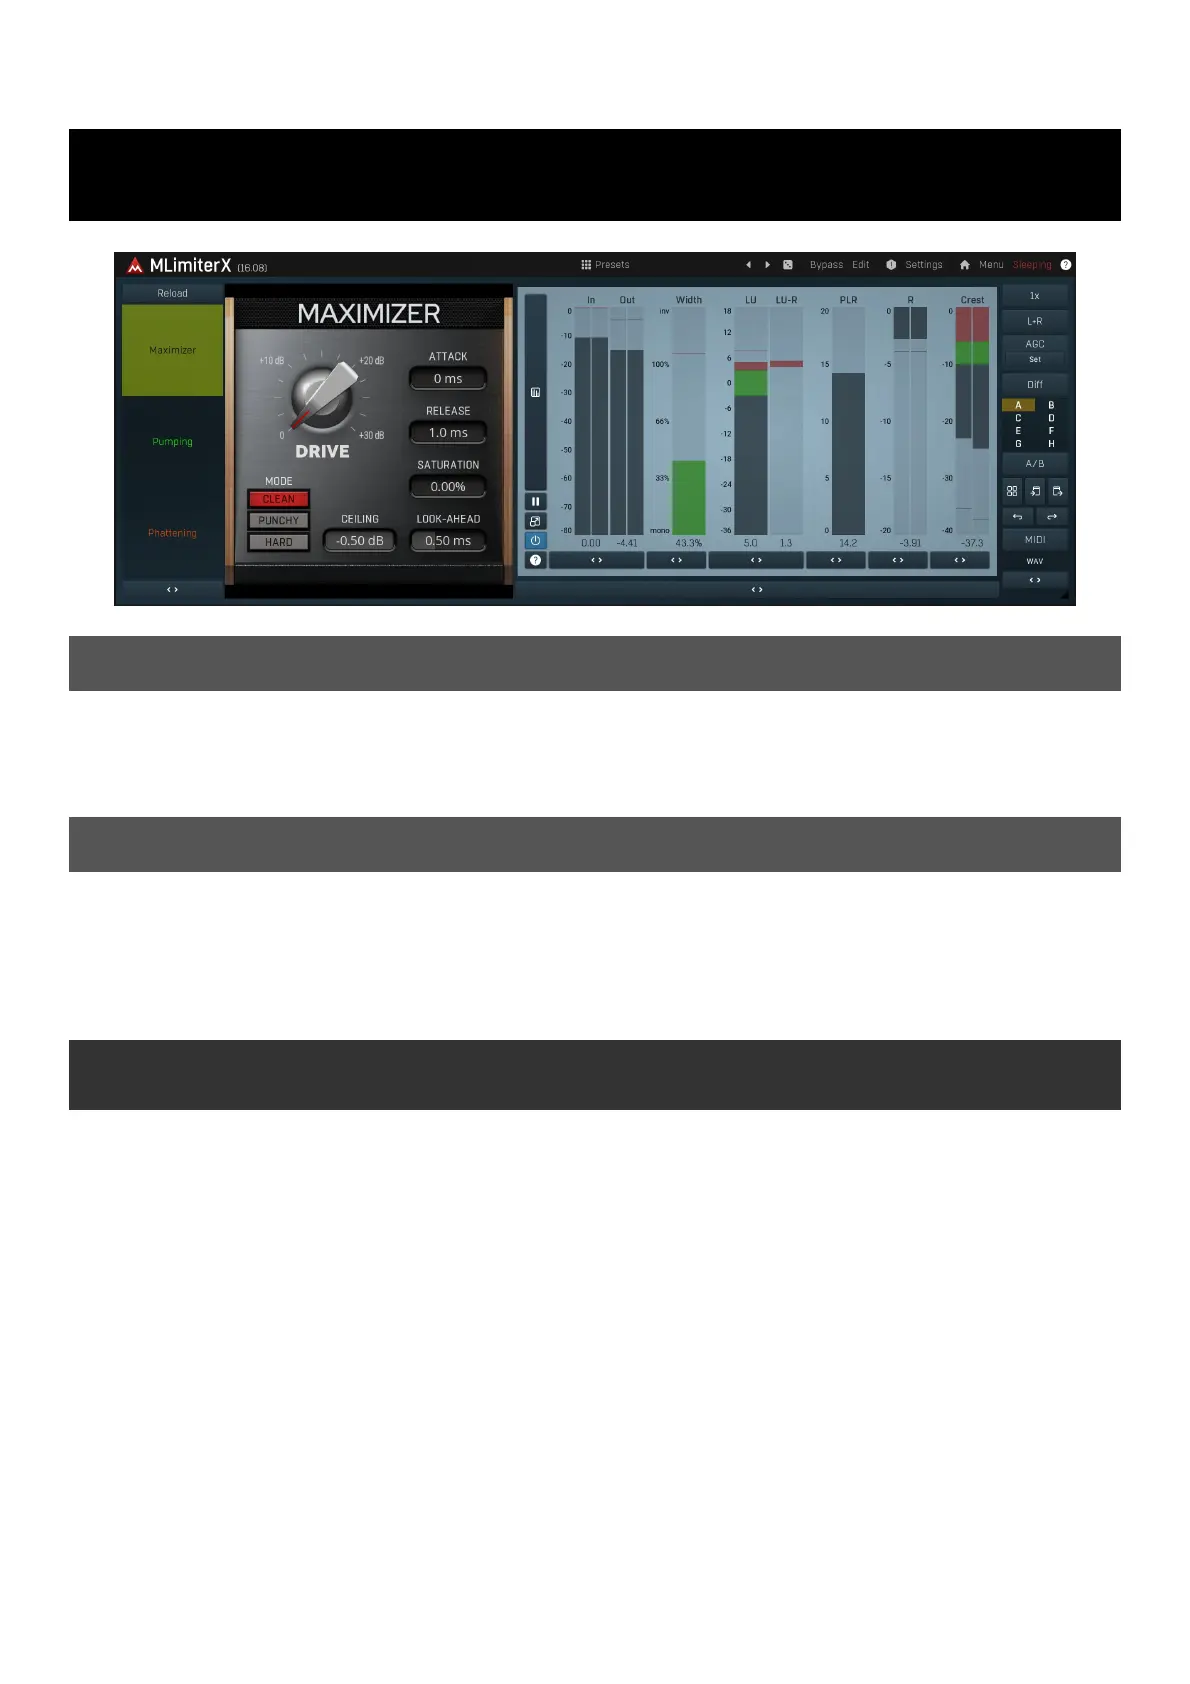
Easy screen vs. Edit screen
The plugin provides 2 user interfaces - an easy screen and an edit screen. Use the Edit button to switch between the two.
By default most plugins open on the easy screen (edit button released). This screen is a simplified view of the plugin which provides just a
few controls. On the left hand side of the plugin you can see the list of available devices / instruments (previously called 'active presets'),
that is, presets with controls. These controls are actually nothing more than multiparameters (single knobs that can control one or more of
the plug-in's parameters and sometimes known as Macro controls in other plug-ins) and are described in more detail later. Each device may
provide different controls and usually is intended for a specific purpose. The easy screen is designed for you to be able to perform common
tasks, quickly and easily, without the need to use the advanced settings (that is, those available on the Edit screen).
In most cases the devices are highlighted using different text colors. In some cases the colors only mark different types of processing, but in
most cases the general rule is that black/white devices are the essential ones designed for general use. Green devices are designed for
a specific task or audio materials, e.g. de-essing or processing vocals in a compressor plugin. Red devices usually provide some very
special processing or some extreme or creative settings. In a distortion plugin, for example, these may produce an extremely distorted
output. Blue devices require an additional input, a side-chain or MIDI input usually. Without these additional inputs these Blue presets
usually do not function as intended. Please check your host's documentation about routing side-chain and MIDI into an effect plugin.
To the right of the controls are the meters or time-graphs for the plugin; the standard plugin Toolbar may be to the right of these or at the
bottom of the plugin.
By clicking the Edit button you can switch the plugin to edit mode (edit button pushed). This mode provides all the of the features that
the plugin offers. You lose no settings by toggling between edit mode and the easy screen unless you actually change something. This way
you can easily check what is "under the hood" for each device, or start with an device and then tweak the plugin settings further.
Devices are factory specified and cannot be modified directly by users, however you can still make your own and store them as normal
Product specificaties
| Merk: | MeldaProduction |
| Categorie: | Audiosoftware |
| Model: | MLimiterX |
Heb je hulp nodig?
Als je hulp nodig hebt met MeldaProduction MLimiterX stel dan hieronder een vraag en andere gebruikers zullen je antwoorden
Handleiding Audiosoftware MeldaProduction

27 Januari 2025
10 December 2024
5 Augustus 2024
11 Juli 2024
13 Maart 2024
13 Maart 2024
13 Maart 2024
13 Maart 2024
12 Maart 2024
12 Maart 2024
Handleiding Audiosoftware
Nieuwste handleidingen voor Audiosoftware
14 Juli 2026
26 Juni 2026
24 Juni 2026
1 April 2026
1 April 2026
1 April 2026
31 Maart 2026
31 Maart 2026