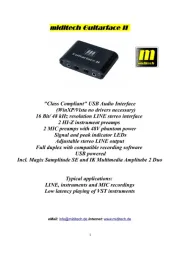
M-Audio AIR 192|6 Handleiding
Bekijk gratis de handleiding van M-Audio AIR 192|6 (24 pagina’s), behorend tot de categorie DJ Gear. Deze gids werd als nuttig beoordeeld door 63 mensen en kreeg gemiddeld 3.6 sterren uit 32 reviews. Heb je een vraag over M-Audio AIR 192|6 of wil je andere gebruikers van dit product iets vragen? Stel een vraag
Pagina 1/24

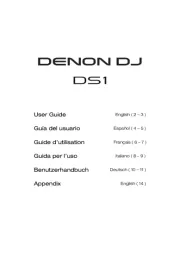
User Guide
English ( 2 – 5 )
Guía del usuario
Español ( 6 – 9 )
Guide d'utilisation
Français ( 10 – 13 )
Guida per l'uso
Italiano ( 14 – 17 )
Benutzerhandbuch
Deutsch ( 18 – 21 )
Appendix
English ( 22 – 23 )

2
User Guide (English)
Introduction
Box Contents
AIR 192|6
USB-C-to-USB-C Cable
USB-C-to-USB-A Cable
Software Download Cards
User Guide
Safety & Warranty Manual
Support
For the latest information about this product (system requirements, compatibility information, etc.)
and product registration, visit m-audio.com.
For additional product support, visit m-audio.com/support.
Quick Start
Windows users: Before connecting AIR 192|6 to your computer, install the drivers:
1. Go to m-audio.com/drivers and download the latest AIR 192|6 driver for your operating
system.
2. Open the file you downloaded and double-click the driver installer file.
3. Follow the on-screen instructions to install the drivers.
Software: We've included Pro Tools | First M-Audio Edition and Ableton Live Lite with your AIR
192|6 so you can get started making music with professional software right out of the box. Register
your AIR 192|6 on m-audio.com, and follow the install instructions in your User Account. Also, visit
ableton.com to check for any available software updates.
Virtual Instruments: Follow the instructions on the software download card for installing the
included virtual instrument plugins. After installation, most DAWs will not load virtual instrument
plugins automatically. In order to access the virtual instrument plugins with Pro Tools | First M-Audio
Edition and Ableton Live Lite, you will need to choose the plugin folder for the software to scan:
Pro Tools | First M-Audio Edition (AAX) plugin folders:
Windows (32-bit): C:\Program Files (x86)\Common Files\Avid\Audio\Plug-Ins
Windows (64-bit): C:\Program Files\Common Files\Avid\Audio\Plug-Ins
macOS: Macintosh HD/Library/Application Support/Avid/Audio/Plug-Ins
Ableton (VST) Plugins:
Windows (32-bit): C:\Program Files (x86)\VSTplugins
Windows (64-bit): C:\Program Files\VSTplugins
macOS: Macintosh HD\Library\Audio\Plugins\VST
To set your plugin folder in Ableton Live Lite:
1. Go to the Preferences menu.
2. Select the File Folder tab. Under Plug-In Sources click Browse and select the
appropriate plugin folder.
3. After making your selection, the Use VST Custom Plug-In Folder button should be ON. If
it is not, click the button to turn it on.
4. Exit the Preferences menu.

3
Connection Diagram
Items not listed under Introduction > Box Contents are sold separately.
Note:
• Use the +48V (Phantom Power) Switch only if a microphone requires phantom power. Most
dynamic microphones and ribbon microphones do not require phantom power, but most
condenser microphones do. Consult your microphone's documentation to find out whether it
needs phantom power.
Setting Up AIR 192|6 with Your Software
Setting Up AIR 192|6 with Pro Tools | First M-Audio Edition
1. Use the included USB cable to connect the AIR 192|6 to your computer.
2. Open Pro Tools | First M-Audio Edition.
3. Go to Setup > Playback Engine….
4. Open the Playback Engine dropdown menu and select M-Audio AIR 192|6.
Note: You may need to save and restart your project.
5. Select your Sample Rate and then click OK to close the Setup window.
6. Go to the Setup > I/O and select M-Audio AIR 192|6 for the Input and Output devices.
You can now add tracks to send and receive audio and MIDI from sources connected to AIR 192|6
inputs and stream recorded audio back through the AIR 192|6 outputs.
Setting Up AIR 192|6 with Ableton Live Lite
1. Use the included USB cable to connect the AIR 192|6 to your computer.
2. Open Ableton Live Lite.
3. Go to Preferences > Audio tab.
4. Click on Driver Type to select CoreAudio (Mac) or ASIO (Windows).
5. Select AIR 192|6 in the Input and Output Config section.
6. Select your Sample Rate and then close the audio preferences window.
You can now add tracks to send and receive audio and MIDI from sources connected to AIR 192|6
inputs and stream recorded audio back through the AIR 192|6 outputs.
Front Panel Rear Panel
Monitors Headphones
Guitar Computer
External MIDI Devices
Microphone
Product specificaties
| Merk: | M-Audio |
| Categorie: | DJ Gear |
| Model: | AIR 192|6 |
| Kleur van het product: | Zwart |
| Gewicht: | 950 g |
| Breedte: | 204.2 mm |
| Diepte: | 152.4 mm |
| Hoogte: | 70 mm |
| Materiaal behuizing: | Metaal |
| Stroombron: | USB |
| LED-indicatoren: | Stroom |
| Vormfactor: | Desktop |
| Meegeleverde kabels: | USB |
| Snelstartgids: | Ja |
| Garantiekaart: | Ja |
| Aantal USB-aansluitingen: | 1 |
| MIDI in: | Ja |
| MIDI out: | Ja |
| USB-versie: | 2.0 |
| Audio-ingangen: | 2 |
| Audio-uitgang: | 2 |
| Ondersteunt Windows: | Windows 10, Windows 7, Windows 8 |
| Aansluiting: | USB |
| Ondersteunt Mac-besturingssysteem: | Mac OS X 10.10 Yosemite, Mac OS X 10.11 El Capitan, Mac OS X 10.12 Sierra, Mac OS X 10.13 High Sierra, Mac OS X 10.14 Mojave, Mac OS X 10.15 Catalina, Mac OS X 10.8 Mountain Lion, Mac OS X 10.9 Mavericks |
| Audio A/D-converter (ADC): | 24-bit/192kHz |
| 6,35 mm (1⁄4-inch) gebalanceerde uitgangen: | 2 |
| Ingebouwde microfoonvoorversterker: | Nee |
| XLR-combo-inputs: | 2 |
Heb je hulp nodig?
Als je hulp nodig hebt met M-Audio AIR 192|6 stel dan hieronder een vraag en andere gebruikers zullen je antwoorden
Handleiding DJ Gear M-Audio

14 Juni 2023

3 Juni 2023

27 Mei 2023

27 Mei 2023

17 Mei 2023

12 Mei 2023

12 Mei 2023
Handleiding DJ Gear
- QTX
- Behringer
- Sencor
- AFX
- Arturia
- Nevir
- MoFi
- Fenton
- McIntosh
- Mixars
- EVO
- Apart
- Akai
- Fun Generation
- Reloop
Nieuwste handleidingen voor DJ Gear
5 Augustus 2025

5 Augustus 2025
4 Augustus 2025
4 Augustus 2025
4 Augustus 2025
3 Augustus 2025
29 Juli 2025
29 Juli 2025
29 Juli 2025

28 Juli 2025