Little Giant 513288 Handleiding
Little Giant Pomp 513288
Bekijk gratis de handleiding van Little Giant 513288 (1 pagina’s), behorend tot de categorie Pomp. Deze gids werd als nuttig beoordeeld door 24 mensen en kreeg gemiddeld 4.4 sterren uit 9 reviews. Heb je een vraag over Little Giant 513288 of wil je andere gebruikers van dit product iets vragen? Stel een vraag
Pagina 1/1
ASSEMBLY INSTRUCTIONS FOR
PREMIUM SIMPLEX SYSTEMS
PRE-PACKAGED UNIT:
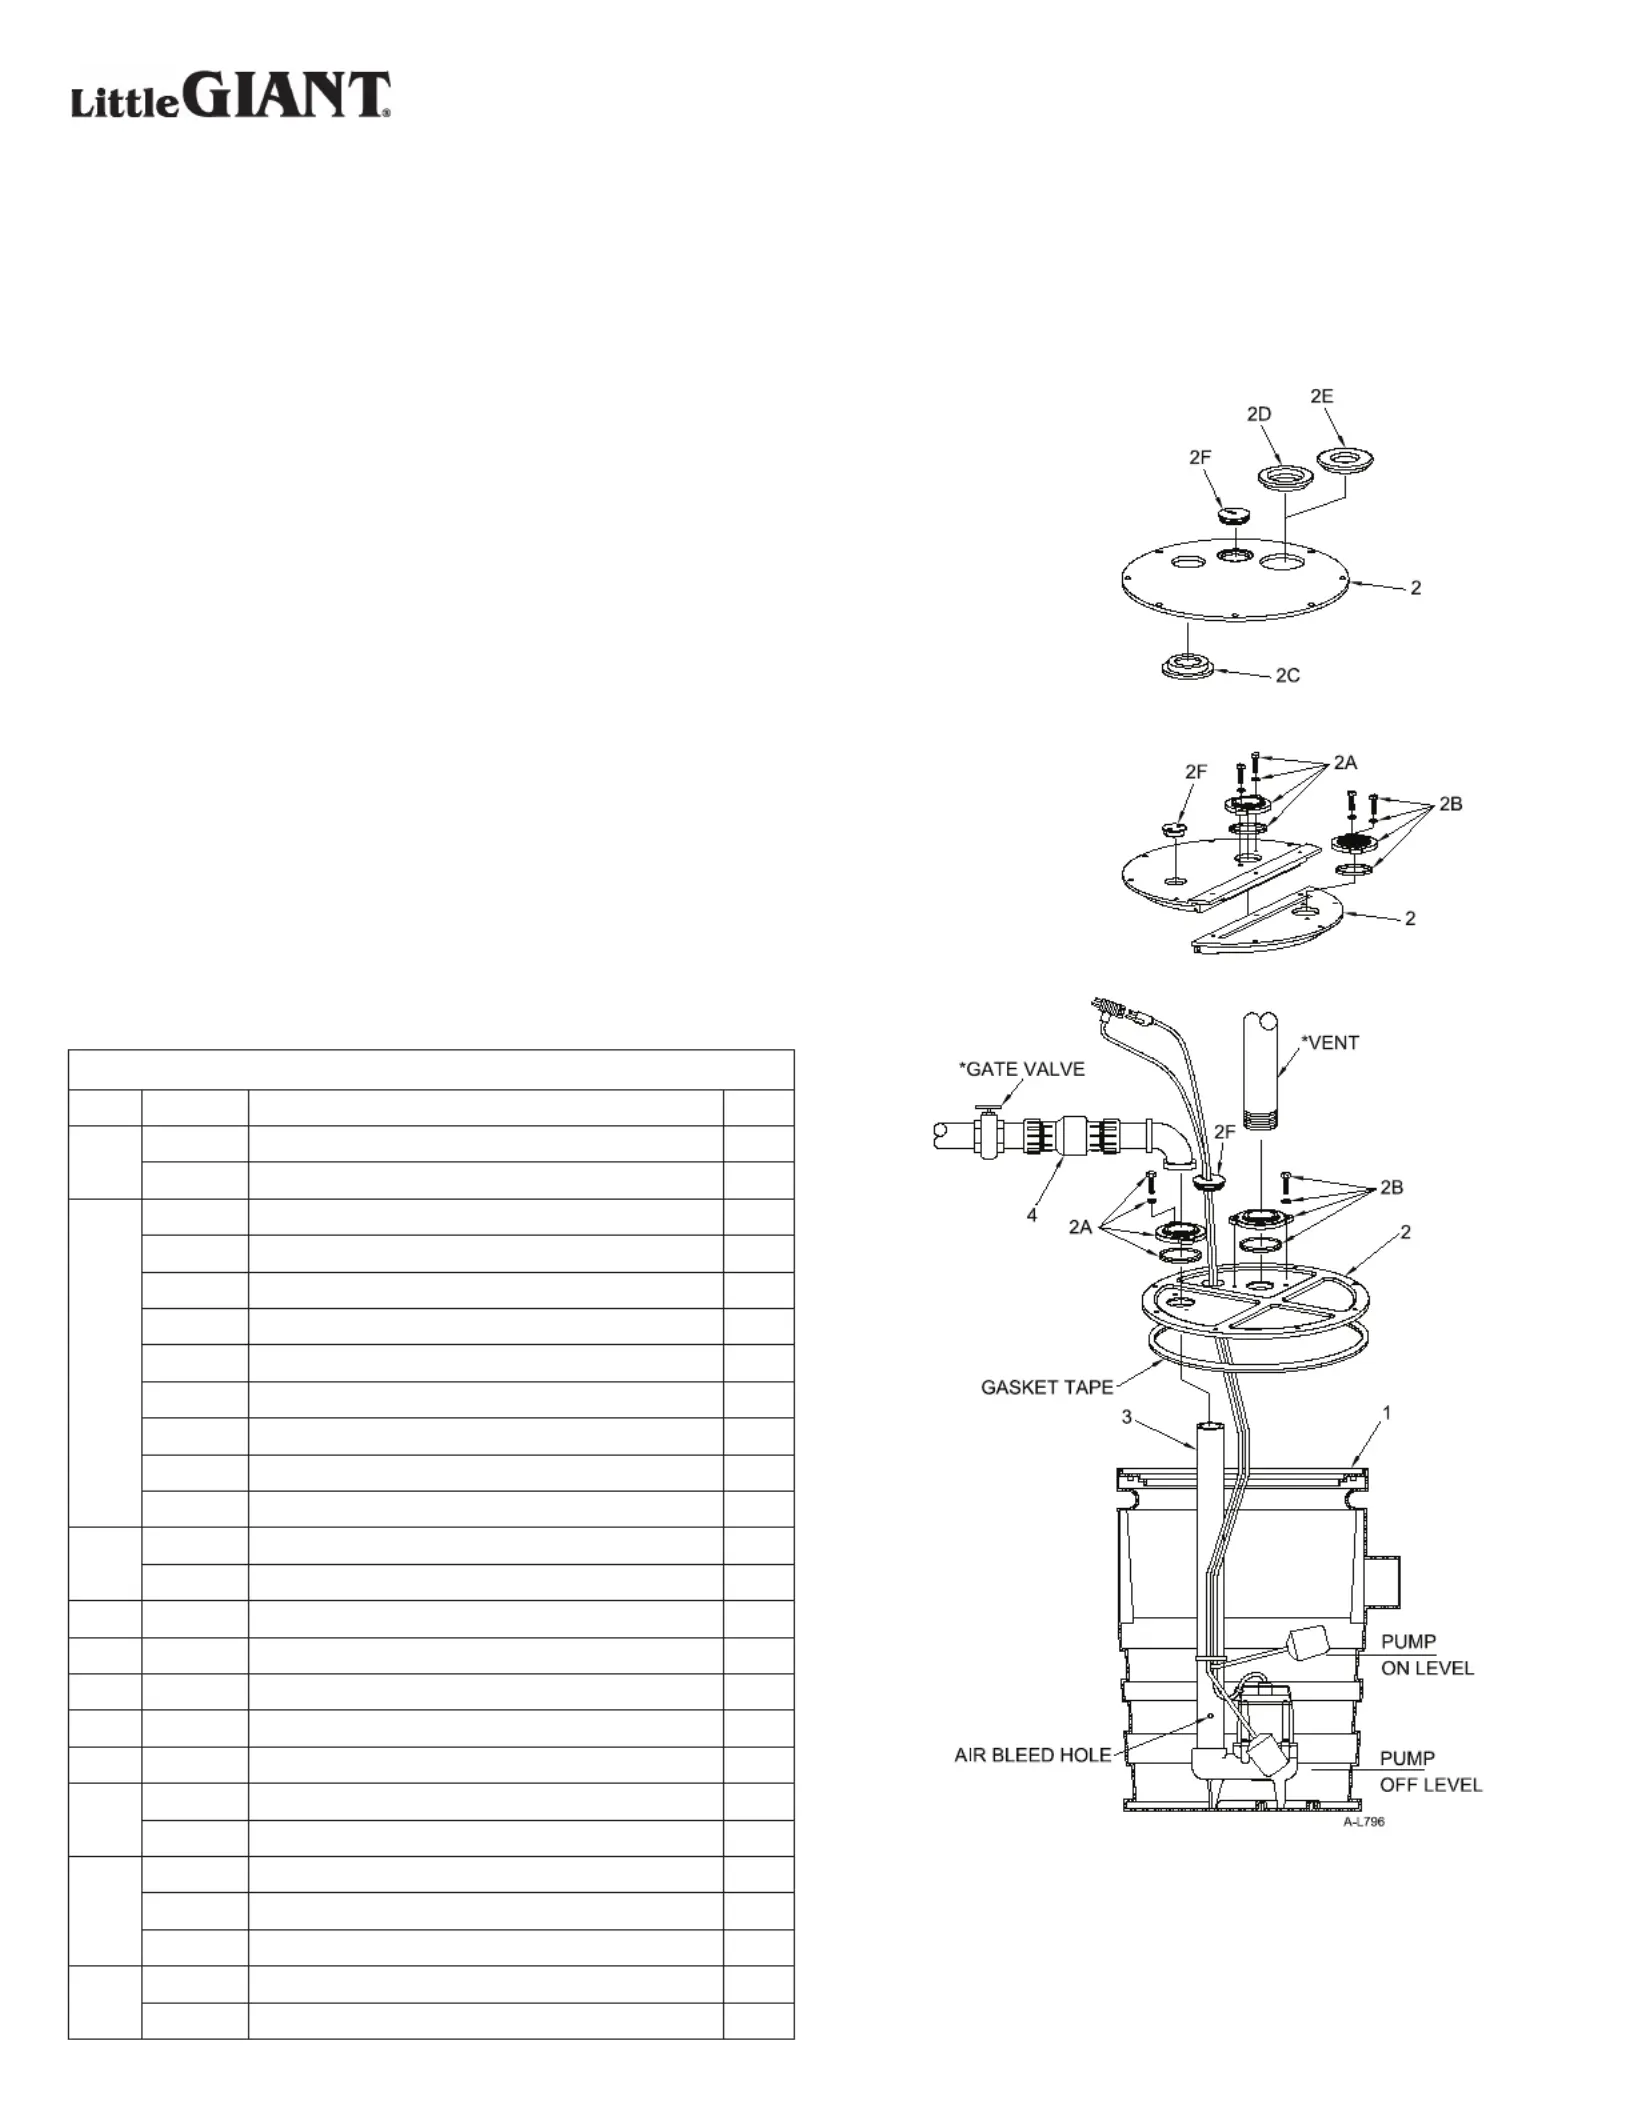
Verify all parts with basin and cover assemblies are received intact. The
flanges provided will allow the following discharge/vent combinations to be
used: 3” discharge/2” vent, or a 2” discharge/2” vent, depending on cover
configuration. Please note that basin should be backfilled with cover secured
on basin to ensure that cover holes will align properly.
1. Remove bolts and washers in cover and set aside.
2. Remove gasket material from hardware kit and place material around
circumference of basin inside of bolt circle.
3. Place the pump on a flat surface and install the discharge pipe in the
discharge of the pump.
4. Install float switch 4” above discharge of pump with a 3-1/2” tether length.
Float switch should be installed in a manner that will not allow it to contact
the pump or side of basin during operation. Refer to float switch instruction
manual for alternative settings. Place the pump in the basin in the torque
stops.
5. To install the cover, pull the pump and float cords through the smallest hole
in the cover. Place the cover on the basin, making sure the discharge pipe
is through the proper hole in the cover. (Holes are labeled on bottom of
cover.) Secure the lid to the basin using the bolts and washers provided.
Place the larger, square-cut O-ring on discharge pipe, beveled edge down.
Install flange and tighten bolts. Place the remaining O-ring in the bottom of
the vent flange with beveled edge down. Install flange and tighten bolts.
6. Pull the slack out of the cords and install them through the grommet 1–2
inches above the cover. Press the grommet in the hole in the cover.
7. Install a 2” vent pipe by threading it on the vent flange. Make sure the flange
bolts are tight.
LITTLE GIANT
SEWAGE ACCESSORIES
& INSTRUCTIONS FOR
TYPICAL INSTALLATION
Figure 1 - Typical Installation
Franklin Electric Co., Inc.
P. O. Box 12010
Oklahoma City, OK 73157-2010
Phone: 405-947-2511 • Fax: 405-947-8720
www.LittleGiantPump.com
CustomerService-[email protected]
REPLACEMENT PARTS LIST
ITEMPART NO.DESCRIPTIONQTY.
1
113093Basin, 24” x 24”1
113095Basin, 20” x 30”1
2
1130571Cover, 1-piece, slip-fit flanges, foam, 3V2D, 2V3D, or 2V2D
11318000Cover, 1-piece, bolt-on flanges, foam, 2V2D1
113181Cover, 1-piece, bolt-on flanges, foam, 2V3D1
113182Cover, 1-piece, bolt-on flanges, foam, 3V2D1
113183Cover, 1-piece, bolt-on flanges, foam, 3V3D1
113184Cover, 2-piece, bolt-on flanges, foam, 2V2D1
113185Cover, 2-piece, bolt-on flanges, foam, 2V3D1
113186Cover, 2-piece, bolt-on flanges, foam, 3V2D1
113187Cover, 2-piece, bolt-on flanges, foam, 3V3D1
2A
113214Discharge flange kit, 2”1
113216Discharge flange kit, 3”1
2B113215Vent flange kit, 2” (threaded)1
2C925024Grommet, 2” pipe1
2D113341Grommet, 3” pipe1
2E113418Grommet, reducer 3” to 2” pipe1
2FN/AGrommet, 2-hole 1
3
113423Discharge pipe, 2”1
113424Discharge pipe, 3”1
4
940022Swing check valve, 2”1
940023Swing check valve, 3”1
940026Swing check/ball valve combo, 2”1
5
513288HWAB tank alert, indoor only (not shown)1
513273303HWXT tank alert, indoor/outdoor (not shown)1
Form 998264 - 12/01/2010
© 2006 Franklin Electric Co., Inc.
Little Giant® is a registered trademark of Franklin Electric Co., Inc.
PRE-ASSEMBLED UNIT:
The pre-assembled unit is furnished fully assembled and ready for installation.
Remove check valve or ball/check valve from discharge pipe and re-install as
shown on typical installation. For best performance of check valves CAUTION:
when handling solids, install in a horizontal position or at an angle of not more
than 45°. Do not install check valve in a vertical position, as solids may settle in
valve and prevent opening on start-up. Remove the cord from the vent hole and
install the vent pipe. See Figure 1 to complete a typical installation.
To test the unit, plug the unit in and run water into the basin until the unit
switches on. If the unit does not operate, refer to the troubleshooting information
in the instructions for the pump.
Product specificaties
| Merk: | Little Giant |
| Categorie: | Pomp |
| Model: | 513288 |
Heb je hulp nodig?
Als je hulp nodig hebt met Little Giant 513288 stel dan hieronder een vraag en andere gebruikers zullen je antwoorden
Handleiding Pomp Little Giant

7 Januari 2026
6 Januari 2026
28 December 2025
28 December 2025
27 December 2025
27 December 2025
25 December 2025
25 December 2025
19 December 2025
19 December 2025
Handleiding Pomp
Nieuwste handleidingen voor Pomp
5 Juni 2026
2 Juni 2026
2 Juni 2026
2 Juni 2026
1 Juni 2026
26 Mei 2026
21 Mei 2026
21 April 2026
6 April 2026
1 April 2026