Lenovo IdeaCentre 310 Handleiding
Bekijk gratis de handleiding van Lenovo IdeaCentre 310 (2 pagina’s), behorend tot de categorie Desktop. Deze gids werd als nuttig beoordeeld door 52 mensen en kreeg gemiddeld 4.4 sterren uit 6 reviews. Heb je een vraag over Lenovo IdeaCentre 310 of wil je andere gebruikers van dit product iets vragen? Stel een vraag
Pagina 1/2
ideacentre
310/510 Series
Quick Start Guide
Replacing or upgrading hardware
Safety information for replacing CRUs
Do not open your computer or attempt any repairs before reading the “Important
safety information” in the Safety, Warranty, Environment, Recycling Information
GuideImportant Product Information Guide and that was included with your
computer.
If you no longer have this copy of the Safety, Warranty, Environment, Recycling
Information GuideImportant Product Information Guide and , you can obtain
one online from the website at http://www.lenovo.com/UserManuals.
Pre-disassembly instructions
Before proceeding with the disassembly procedure, make sure that you do the
following:
1. Turn off the power to the system and all peripherals.
2. Unplug all power and signal cables from the computer.
3. Place the system on a flat, stable surface.
The CRUs for your computer including: keyboard, mouse, hard disk drive,
optical drive, card reader module, PCI express adapter, and memory module.
This part contains instructions for replacing the following parts:
• Cardreadermodule(Followsteps:
1
2
3
)
• Opticaldrive(Followsteps:
1
2
4
)
• Harddiskdrive(Followsteps:
1
2
5
)
• PCIexpressadapter(Followsteps:
1
2
6
)
• Memorymodule(Followsteps:
1
2
7
)
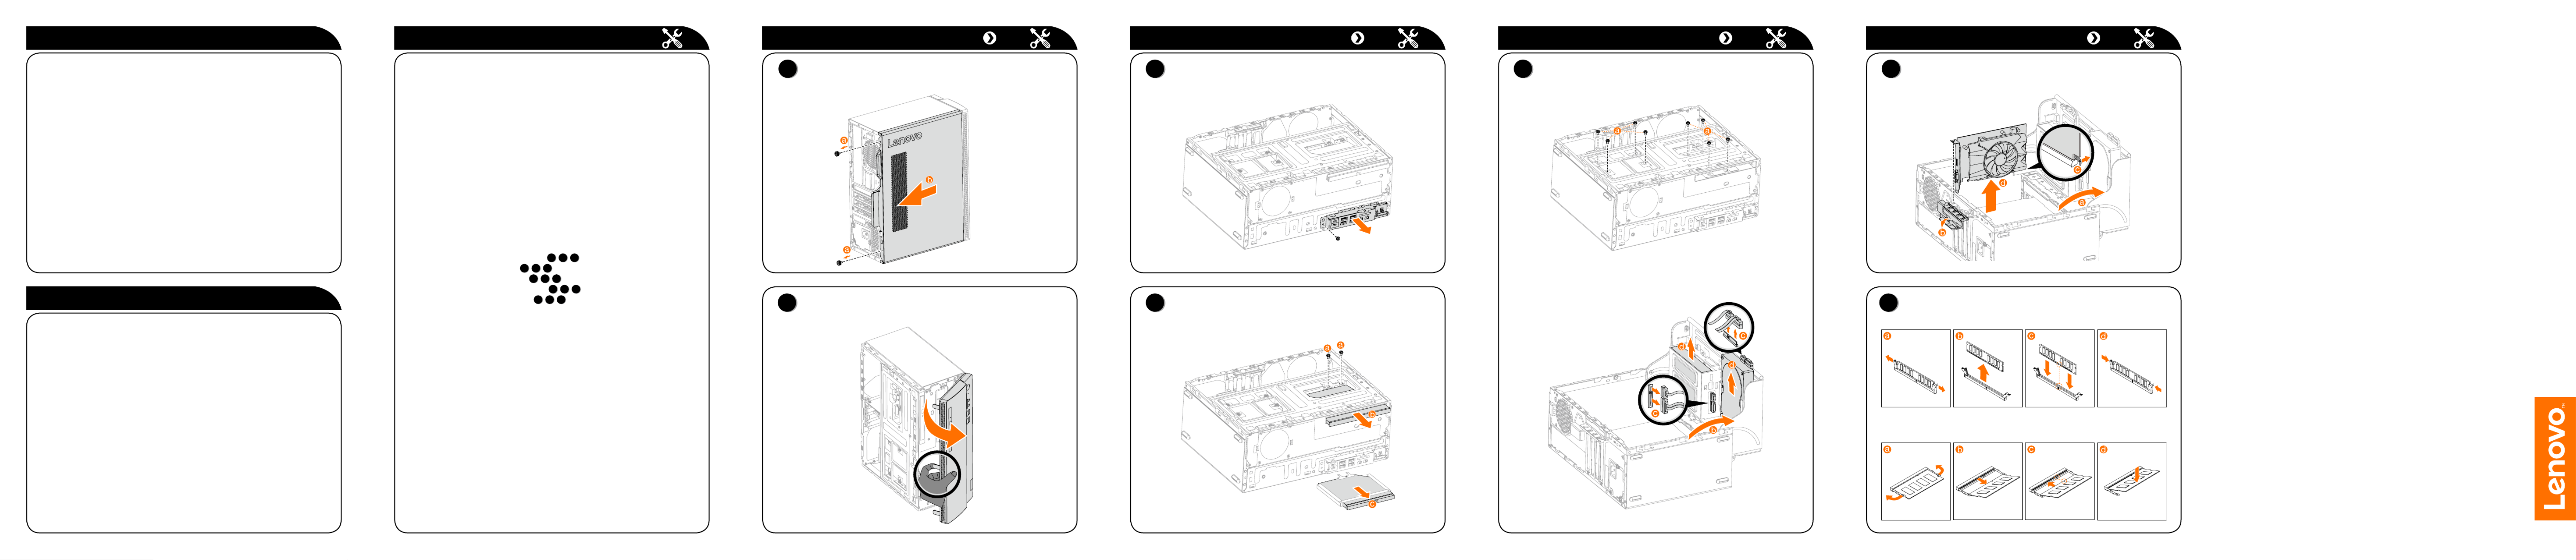
Replacing or upgrading hardware
1
Removing the computer cover
2
Removing the front bezel
Replacing or upgrading hardware
4
Replacing the optical drive
Replacing or upgrading hardware Replacing or upgrading hardware
3
Replacing the card reader module
7
Replacing a memory module
Service and Support information
The following information describes the technical support that is available for
your product, during the warranty period or throughout the life of your product.
Refer to the Lenovo Limited Warranty for a full explanation of Lenovo warranty
terms. See “Lenovo Limited Warranty notice” later in this document for details
on accessing the full warranty. If you purchased Lenovo services, refer to the
following terms and conditions for detailed information:
– ForLenovoWarrantyServiceUpgradesorExtensions,
go to: http://support.lenovo.com/lwsu
– ForLenovoAccidentalDamageProtectionServices,
go to: http://support.lenovo.com/ladps
– Onlinetechnicalsupportisavailableduringthelifetimeofaproductat:
http://www.lenovo.com/support
Accessing other manuals
The has been preloaded onto your Important Product Information Guide
computer. To access this guide, do the following:
For models come with Lenovo Companion:
1. OpentheStartmenuandthenclickortapLenovo Companion.
2. Click or tap Support →.User Guide
For models without Lenovo Companion:
OpentheStartmenuandthenclickortapManual to access this guide.
For models without preinstalled operating systems:
Go to the Lenovo Support Web site to access your manuals. See “Downloading
manuals” for additional information.
Downloading manuals
The latest electronic publications for your computer are available from the
Lenovo Support Web site. To download the publications,
go to: www.lenovo.com/UserManuals.
5
Replacing a hard disk drive
6
Replacing a PCI express adapter
or
Product specificaties
| Merk: | Lenovo |
| Categorie: | Desktop |
| Model: | IdeaCentre 310 |
Heb je hulp nodig?
Als je hulp nodig hebt met Lenovo IdeaCentre 310 stel dan hieronder een vraag en andere gebruikers zullen je antwoorden
Handleiding Desktop Lenovo

24 Maart 2026
10 Maart 2026
28 November 2025
23 September 2025
4 Augustus 2025
13 Mei 2025
10 April 2025
8 April 2025
8 April 2025
30 Maart 2025
Handleiding Desktop
Nieuwste handleidingen voor Desktop
6 Mei 2026
5 Mei 2026
3 Mei 2026
2 Mei 2026
2 Mei 2026
2 Mei 2026
1 Mei 2026
1 Mei 2026
25 Maart 2026
25 Maart 2026