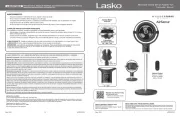
Lasko Outdoor Living 4305 Handleiding
Lasko
Ventilator
Outdoor Living 4305
Bekijk gratis de handleiding van Lasko Outdoor Living 4305 (6 pagina’s), behorend tot de categorie Ventilator. Deze gids werd als nuttig beoordeeld door 20 mensen en kreeg gemiddeld 4.7 sterren uit 10.5 reviews. Heb je een vraag over Lasko Outdoor Living 4305 of wil je andere gebruikers van dit product iets vragen? Stel een vraag
Pagina 1/6

Rev. A 10/07 12 2085460
MODELO 4305
READ AND SAVE THESE INSTRUCTIONS
READ CAREFULLY BEFORE ATTEMPTING TO ASSEMBLE,
INSTALL, OPERATE OR MAINTAIN THE PRODUCT DESCRIBED.
PROTECT YOURSELF AND OTHERS BY
OBSERVING ALL SAFETY INFORMATION.
FAILURE TO COMPLY WITH INSTRUCTIONS COULD RESULT IN
PERSONAL INJURY AND/OR PROPERTY DAMAGE!
KEEP INSTRUCTIONS FOR FUTURE REFERENCE.
IMPORTANT INSTRUCTIONS -
OPERATING MANUAL
SAVE THESE INSTRUCTIONS
Rev. A 10/07 12085460
OUTDOOR LIVING™ FAN
MODEL 4305
MANTENIMIENTO
Para reducir el riesgo de choque eléctrico e incendio, por favor siga las siguientes instrucciones:
- Siempre desconecte el cable eléctrico antes de trasladarlo o limpiarlo.
- intente desarma el ventilador.NUNCA
- Limpie el cuerpo del ventilador con un trapo suave humedecido con agua y detergente suave únicamente.
- NO use ningún tipo de manguera de jardín y/o equipamiento de lavado a presión para limpiar este ventilador. Este
ventilador no está diseñado para soportar una corriente de agua concentrada a alta presión.
- use ALCOHOL o SOLVENTES tales como gasolina, bencina, adelgazador para pintura u otros limpiadores duros para NUNCA
limpiar este ventilador.
REPARACIONES: Todas las reparaciones, a excepción de la limpieza general, deben ser realizadas por un técnico de Lasko. Llame
al 1-800-233-0268, de lunes a viernes, entre las 8 am y las 5 pm HORA DEL ESTE o envíe un correo electrónico a: producthelp@laskoprod
ucts.com para recibir asistencia sobre su ventilador Outdoor Living (Modelo No. 4305).
ALMACENAMIENTO: Almacene el ventilador con estas instrucciones, en la caja original en un lugar fresco y seco.
This Fan is for residential and commercial use.
It is not intended to be used in industrial or agricultural settings.
GARANTÍA LIMITADA DE LASKO PRODUCTS, INC. (NO VÁLIDO EN MÉXICO)
QUÉ CUBRE ESTA GARANTÍAS: Este producto está garantizado contra defectos de mano de obra y/o materiales.
CUÁNTO DURA ESTA GARANTÍA: Esta garantía se extiende únicamente al comprador original del producto y dura un (1) año a partir de la fecha original
de compra o hasta que el comprador original del producto venda o transera el producto, cualesquiera de ambas que ocurriera en primer lugar.
QUÉ HARÁ LASKO: Durante el período de garantía, Lasko, a opción propia, reparará o reemplazará cualquier parte o partes que demuestren ser
defectuosas o reemplazará el producto completo por el mismo modelo u otro comparable.
QUÉ NO CUBRE ESTA GARANTÍA: Esta garantía no tiene validez si el producto fue dañado o falló debido a un accidente, manipulación u operación
inadecuadas, daño en el envío, abuso, mal uso, reparaciones no autorizadas hechas o el intento de hacerlas, o el uso del producto para servicio comercial
o no residencial. Esta garantía no cubre los costos de envío para la devolución de productos a Lasko para su reparación o reemplazo. Lasko abonará los
cargos de envío de devolución a Lasko con posterioridad a las reparaciones o el reemplazo bajo garantía
CUALESQUIERA Y TODAS LAS GARANTÍAS, EXPLÍCITAS O IMPLÍCITAS (INCLUYENDO, SIN LIMITACIÓN, CUALESQUIERA GARANTÍA IMPLÍCITA
DE COMERCIABILIDAD), DURAN UN AÑO A PARTIR DE LA FECHA ORIGINAL DE COMPRA O HASTA QUE EL COMPRADOR ORIGINAL DEL
PRODUCTO VENDA O TRANSFIERA EL PRODUCTO, CUALESQUIERA DE AMBAS QUE OCURRIERA EN PRIMER LUGAR Y EN NINGÚN CASO
LA RESPONSABILIDAD DE LASKO BAJO CUALQUIER GARANTÍA EXPLÍCITA O IMPLÍCITA INCLUIRÁ (I) DAÑOS INCIDENTALES O POR
CONSECUENCIA POR CUALQUIER CAUSA QUE FUERE, O (II) REEMPLAZO O REPARACIÓN DE CUALESQUIERA FUSIBLES HOGAREÑOS,
CORTA-CIRCUITOS O TOMACORRIENTES. INDEPENDIENTEMENTE DE CUALQUIER DECLARACIÓN CONTRARIA, EN NINGÚN CASO LA
RESPONSABILIDAD DE LASKO BAJO CUALQUIER GARANTÍA EXPLÍCITA O IMPLÍCITA PODRÁ EXCEDER EL PRECIO DE COMPRA DEL
PRODUCTO Y DICHA RESPONSABILIDAD TERMINARÁ AL VENCIMIENTO DEL PERÍODO DE GARANTÍA.
Algunos estados y provincias no permiten limitaciones sobre la duración de una garantía implícita, o sobre la exclusión o limitación de los daños incidentales
o por consecuencia, por lo tanto dichas exclusiones o limitaciones podrían no aplicarse en su caso. Esta garantía le otorga a usted derechos legales
especícos. Usted también podría tener otros derechos que varían de estado en estado y de provincia en provincia.
Se requiere prueba de compra antes que se acepte un reclamo bajo garantía.
SERVICIO AL CLIENTE:
Línea gratuita (800) 233-0268. Correo electrónico: producthelp@laskoproducts.com
Nuestro equipo de Servicio al Cliente está disponible para ayudarle con preguntas sobre productos, ubicaciones de los centros de reparación y repuestos. Se
puede comunicar con el mismo de lunes a viernes, de 8 a.m. a 5 p.m. hora del Este. Por favor tenga a manos su número de modelo, como así también el tipo
y estilo (ubicados en la parte inferior de su producto). Por favor no devuelva el producto al lugar de compra.
Customer Service Dept., 820 Lincoln Ave., West Chester, PA 19380 (Por favor no envíe el producto a este lugar)
www.laskoproducts.com
LOS REPUESTOS PARA PRODUCTOS DISCONTINUADOS, OBSOLETOS Y ALGUNOS OTROS PRODUCTOS PODRÍAN NO ESTAR DISPONIBLES.
DEBIDO A RAZONES DE SEGURIDAD, MUCHOS COMPONENTES ELECTRÓNICOS Y LA MAYORÍA DE LOS COMPONENTES DE LOS CALENTADORES
NO ESTÁN DISPONIBLES AL CONSUMIDOR PARA SU INSTALACIÓN O REEMPLAZO.

Rev. A 10/07 2 2085460 Rev. A 10/07 11 2085460
MODELO 4305
SAVE THESE INSTRUCTIONS
GENERAL SAFETY INFORMATION
When using electrical appliances, basic precautions should always be followed to reduce
the risk of re, electrical shock and injury to persons, including the following:
Read all instructions before using this Fan.
1. Make certain the power source conforms to the electrical requirements of the Fan.
2. Make certain that the room is equipped with a working smoke detector if using this Fan indoors.
3. Use this Fan only as described in this manual. Any other use not recommended by the manufacturer may cause re, electrical shock, or
injury to persons.
4. To reduce the risk of personal injury and electric shock, the Fan should not be played with or placed where small children can reach it or
climb on it.
5. Unplug power cord before moving the Fan - DO NOT attempt to unplug or move the Fan during inclement weather.
6. This Fan must NOT be used in potentially dangerous locations such as ammable, explosive or chemical-laden atmospheres where gaso-
line, paint or ammable liquids are used or stored.
7. DO NOT use extension cords because the extension cord may overheat and cause a re.
8. NEVER operate any Fan with a damaged cord or plug or after the Fan malfunctions, has been dropped or damaged in any man-
ner. There are no user serviceable parts. This GFCI plug does not protect against electrical shock due to contact with both circuit
conductors or a fault in any wiring supplying this device. Do not use an extension cord between the Fan GFCI cord and power
outlet. Customer service is available at 800-233-0268, Monday through Friday, 8am to 5pm to answer your questions.
9. insert or allow ngers or foreign objects to enter any ventilation or exhaust opening as it may cause an electric shock or re, or NEVER
damage the Fan. To reduce the risk of re, DO NOT block or tamper with the Fan in any manner while it is in operation.
10. Always place the Fan on a stable, at, level surface when operating to avoid the chance of the Fan overturning. Locate the Power Cord
so the Fan or other objects are not resting on it. run Power Cord under carpeting. cover Power Cord with throw rugs, DO NOT DO NOT
runners or the like. Arrange Power Cord away from area trafc and where it will not be tripped over.
11. Never locate a Fan where it may fall into a pool, hot tub or other water container. NEVER use Fan where ammable liquids are used or stored.
12. Do not use this Fan in close proximity to cooking grills, re pits or other open ames.
13. For outdoor stability, this Fan is weighted. Please use caution when moving or lifting.
14. This Fan is not suitable for use in agricultural facilities including areas where livestock, poultry or other animals are conned. Please refer
to National Electric Code (NEC) Article 547-7 (2002), or applicable state or local codes or standards relating to electrical requirements for
Agricultural Buildings. THIS FAN DOES NOT MEET THE REQUIRMENTS OF NEC ARTICLE 547-7 (2002).
15. This Fan is not suitable for use in hazardous locations. Please refer to National Electric Code (NEC) Article 500 or applicable state or local
codes or standards relating to electrical requirements for Hazardous locations. THIS FAN DOES NOT MEET THE REQUIRMENTS OF
NEC ARTICLE 500 (2002).
DO NOT DEPEND ON THE ON/OFF SWITCH AS THE SOLE MEANS OF DISCONNECTING POWER WHEN MOVING THE FAN.
ALWAYS UNPLUG THE POWER CORD. ALWAYS TURN OFF AND UNPLUG FAN BEFORE LEAVING THE AREA. NEVER LEAVE
CHILDREN UNATTENDED WHEN THE FAN IS ON OR PLUGGED IN. DO NOT UNPLUG FAN FROM OUTLET DURING INCLEM-
ENT WEATHER.
REDUCE THE RISK OF FIRE OR ELECTRIC SHOCK - DO NOT USE THIS FAN WITH ANY
SOLID STATE SPEED CONTROL DEVICES.
The power cord is equipped with a three-prong, grounded GFCI (Ground Fault Circuit Interrupter) plug that
must be inserted into a grounded receptacle. Under no circumstances must the grounding prong be cut off
the plug. Where a two-prong wall receptacle is encountered, it must be replaced with a properly grounded
three-prong receptacle installed in accordance with the National Electrical Code (NEC) and all applicable
local codes and ordinances. This work must be done only by a qualied electrician, using copper wire only.
The GFCI Fan cord set can be plugged into an existing GFCI outlet if present.
RISK OF ELECTRIC SHOCK. TEST GFCI PLUG BEFORE EACH USE.
1. PLUG GFCI INTO POWER OUTLET. INDICATOR LIGHT SHOULD TURN ON.
2. PRESS TEST BUTTON. INDICATOR LIGHT SHOULD TURN OFF.
3. PRESS AND RELEASE RESET BUTTON. INDICATOR LIGHT SHOULD TURN ON.
If above test fails, DO NOT USE THIS GFCI. Call 800-233-0268, Mon - Fri, 8:00 a.m. and 5:00 p.m. Eastern.
USE OF A THREE-PRONG TO TWO-PRONG ADAPTER IS NOT PERMITTED. IMPROPER CONNECTION MAY
CREATE THE RISK OF ELECTROCUTION. USE OF SUCH ADAPTERS ARE NOT PERMITTED IN CANADA.
This plug is a safety feature to reduce the risk of re, electric shock and personal injury. DO NOT re-
move, replace, repair or tamper with the originally supplied plug or GFCI. If the Fan does not function
properly, it may be due to the safety device incorporated in this plug. Call 800-233-0268, Monday - Friday,
between 8:00 a.m. and 5:00 p.m. Eastern. If the plug warning label is missing or damaged, call the toll
free number for a replacement label.
Figura 6
Inserto 6A
Función de apagado automático:
Este ventilador está equipado con una función de apagado automático. Si el panel de control no es tocado durante 14 horas continuas, el
ventilador se apagará. Oprima el botón de encendido/velocidad para retomar el uso. Esta función NO afecta la iluminación especíca.
Para desactivar la función de apagado automático, oprima y mantenga oprimido el botón de oscilación hasta que oiga 4‘bips’.
Para activar la función de apagado automático, desconecte la unidad durante 30 segundos, conecte el cable eléctrico en el tomacorriente, siga
las instrucciones para la prueba del enchufe del interruptor de circuito sin conexión a tierra (GFCI) y continúe con el uso normal.
Trasladando su ventilador armado:
Si es necesario trasladar el ventilador después de su armado, desconecte el ventilador y cuidadosamente levántelo por la sección central del ventilador
y colóquelo en su nueva ubicación. NO incline el ventilador tomándolo de la cubierta o de la base del mismo. NO ARRASTRE EL VENTILADOR.
NOTA: Para su estabilidad al aire libre, este ventilador posee contrapesos. POR FAVOR TENGA CUIDADO AL TRASLADARLO O
LEVANTARLO.
Control de Rejilla (Figura 6)
Además de la función de oscilación, este ventilador posee rejillas en la parrilla frontal que permiten el ajuste vertical del ujo de aire. Mueva
el hacia arriba o hacia abajo para ajustar el ujo aire según lo desee.Control de la Rejilla (Inserto 6A)
GUÍA DE SOLUCIÓN DE PROBLEMAS
PROBLEMA CAUSA PROBABLE SOLUCIÓN
El ventilador no funciona
El panel de control no
está encendido
La luz del ventilador no
funciona
El interruptor de circuito sin conexión a
tierra (GFCI) necesita ser reiniciado
Desconecte el ventilador y siga las instrucciones para
reiniciar el interruptor de circuito sin conexión a tierra (GFCI)
en la sección de Funcionamiento #2.
El tomacorriente no funciona Asegúrese que el ventilador esté conectado a un
tomacorriente eléctrico que funcione.
Uso de cable de alargue (NO
RECOMENDADO)
Si el ventilador está conectado a un cable de alargue y no
directamente a un tomacorriente eléctrico, desconecte y enchufe
el ventilador directamente a un tomacorriente eléctrico.
Función de apagado automático
activada
Como mecanismo de seguridad, el ventilador se apagará
automáticamente después de haber estado en uso durante
14 horas continuas. Para ENCENDER el ventilador después
que esto ocurra, simplemente oprima el botón de encendido/
velocidad.
El ventilador está apagado Oprima el botón de encendido/velocidad ( ) para asegurarse
que el ventilador esté encendido.
La luz del panel de control está
apagada
Oprima y mantenga oprimido el botón de encendido/velocidad
( ) durante 3 segundos. La luz del panel de control debería
encenderse ahora.
La luz del ventilador está apagada La
luz está en su posición más atenuada Oprima el botón de luz ( ) en el panel de control para
ENCENDER la luz del ventilador. Oprima y mantenga
oprimido el botón de luz ( ) para controlar la función de
atenuación de la luz.

MODELO 4305
Rev. A 10/07 10 2085460 Rev. A 10/07 32085460
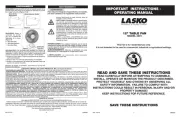
MODEL 4305
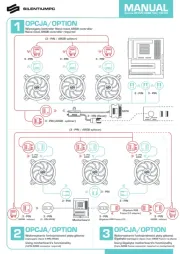
ASSEMBLY (Figures 1 through 4) NO TOOLS REQUIRED
1. Remove Fan and parts from carton.
2. Place Fan in desired location outdoors or indoors on a stable, at level surface.
3. Thread Metal Rod into hole in top of Fan by hand. The Metal Rod is securely in place when you are unable to screw it any further. (Figure 1)
4. Place Fan Lid on top of Fan with arrow on the underside of Fan Lid facing the front of the Fan where the control buttons are located. (Figures 2 and 3)
5. Set onto the in the center of the Fan Cap Metal Rod Fan Lid. (Figure 4)
6. Thread the onto until fully secure. Fan Cap Metal Rod DO NOT OVERTIGHTEN.
Figure 1
Metal Rod
Top of Fan
Figure 4
Fan Lid
Fan Cap
Metal Rod
Figure 3
Metal Rod
Fan Lid
Arrow on underside of
Fan Lid Face arrow towards
front of Fan
Figure 2
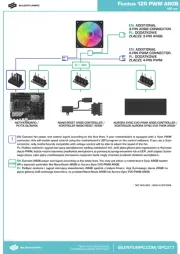
FUNCIONAMIENTO (Figura 5)
1. Conecte el cable eléctrico a un tomacorriente de 120 voltios. Cuando el ventilador esté conectado, hará un “bip” para indicar que está pasando
electricidad al ventilador. NO USE CABLES DE ALARGUE CON ESTE VENTILADOR. Los cables de alargue pueden sobrecalentarse y
provocar un incendio.
Asegúrese que el enchufe encaje rmemente en el tomacorriente.
Cuando los enchufes quedan ojos en los tomacorrientes, pueden deslizarse parcial o completamente fuera del tomacorriente con
un leve movimiento del cable adosado. Los tomacorrientes en este estado podrían sobrecalentarse y representar un grave peligro de
incendio; si están cubiertos por una cortina o tela, el riesgo de incendio es aún mayor.
2. Pruebe el enchufe del interruptor de circuito sin bajada a tierra (GFCI por sus siglas en inglés) ANTES DE CADA USO:
1. Conecte el GFCI en el tomacorriente eléctrico. La luz del indicador debería encenderse.
2. Oprima el botón de prueba. La luz del indicador en el GFCI debería apagarse.
3. Oprima el botón de reinicio para usar. La luz del indicador en el GFCI debería encenderse.
4. NO USE SI FALLA LA PRUEBA ANTES MENCIONADA.
Control de Encendido y Velocidad:
1. ENCIENDA el ventilador oprimiendo el Botón de Encendido/Velocidad ( ) ubicado al frente de la unidad. El ventilador se encenderá en
Alta Velocidad.
2. Oprima el Botón de Encendido/Velocidad ( ) por segunda vez para velocidad media.
3. Oprima el Botón de Encendido/Velocidad ( ) por tercera vez para velocidad baja.
4. Oprima el Botón de Encendido/Velocidad ( ) por cuarta vez para APAGAR el ventilador.
Control de Oscilación Interna:
NOTA: Este ventilador está equipado con una función de oscilación interna. El movimiento ocurre DENTRO del estuche del ventilador
– el ventilador en sí NO se moverá de un lado a otro.
1. Para la función de oscilación interna, oprima el ( ) una vez. El botón de oscilación ‘parpadeará’ para ENCENDER Botón de Oscilación
indicar que el ventilador está oscilando.
2. Para APAGAR la función de oscilación interna, oprima el ( ) por segunda vez.Botón de Oscilación
Luz del Panel de Control:
Cuando el ventilador sea encendido por primera vez, el panel de control se encenderá.
1. Para APAGAR la , oprima y MANTENGA OPRIMIDO el ( ) durante 3 Luz del Panel de Control Botón de Encendido/Velocidad
segundos.
2. Para volver a ENCENDER la Luz del Panel de Control nuevamente, oprima y MANTENGA OPRIMIDO el Botón de Encendido/Velocidad
( ) durante 3 segundos.
Iluminación Especíca:
Este ventilador incluye una función de iluminación especíca para uso nocturno que consta de un diodo emisor de luz (LED por sus siglas en
inglés) suave que no necesita mantenimiento. Esta función puede ser usada mientras el ventilador esté ENCENDIDO o APAGADO.
1. Oprima y suelte el ( ) para la función de iluminación especíca del ventilador en brillo total (luz plena).Botón de Luz ENCENDER
2. Oprimir y mantener oprimido el ( ) permitirá que el nivel de luz sea incrementado o atenuado hasta conseguir el brillo Botón de Luz
deseado.
3. Oprima el ( ) para Botón de Luz APAGAR la función de iluminación especíca del ventilador.
Luz Encendido/
Velocidad
Oscilación
Panel de Control
Figura 5
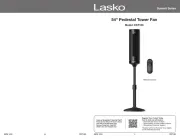
Product specificaties
| Merk: | Lasko |
| Categorie: | Ventilator |
| Model: | Outdoor Living 4305 |
Heb je hulp nodig?
Als je hulp nodig hebt met Lasko Outdoor Living 4305 stel dan hieronder een vraag en andere gebruikers zullen je antwoorden
Handleiding Ventilator Lasko
14 Juni 2025
13 Juni 2025
17 Maart 2025

17 Maart 2025

17 Maart 2025
17 Maart 2025
17 Maart 2025

17 Maart 2025

17 Maart 2025

17 Maart 2025
Handleiding Ventilator
- Air & Me
- Vox
- Soler & Palau
- Claro
- Life On Products
- Eurolite
- SereneLife
- Midea
- Oceanic
- Emerio
- NEO Tools
- Xiaomi
- Sharkoon
- SPC
- Sencor
Nieuwste handleidingen voor Ventilator
30 Juli 2025

29 Juli 2025
29 Juli 2025
29 Juli 2025
28 Juli 2025
23 Juli 2025
23 Juli 2025
22 Juli 2025
22 Juli 2025
22 Juli 2025