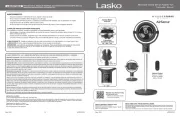
Lasko 3016 Handleiding
Lasko
Ventilator
3016
Bekijk gratis de handleiding van Lasko 3016 (4 pagina’s), behorend tot de categorie Ventilator. Deze gids werd als nuttig beoordeeld door 42 mensen en kreeg gemiddeld 4.8 sterren uit 21.5 reviews. Heb je een vraag over Lasko 3016 of wil je andere gebruikers van dit product iets vragen? Stel een vraag
Pagina 1/4

MANTENIMIENTOPara reducir el riesgo de choque eléctrico e incendio, por favor obedezca las
siguientes instrucciones.
- Siempre desconecte el cable eléctrico antes de trasladar, reparar o limpiar.
- NUNCA coloque el Ventilador dentro de o cerca de agua.
- Asegúrese de usar un paño suave humedecido con un limpiador templado. Evite usar gasolina, bencina,
solventes, limpiadores concentrados, etc. Esto dañará el material. Remueva todo resido del limpiador y déjelo
secar completamente antes de reensamblar el Ventilador.
- NUNCA use ALCOHOL o SOLVENTES tales como gasolina, bencina, disolvente para pinturas u otros
limpiadores duros.
Rev. E 10/08 8 2084327
MODELO 3012 y 3016
REPARACIONES: Cualesquiera otras reparaciones, con la excepción del mantenimiento general a cargo del usuario, deben ser realizadas
por un representante de servicio autorizado. Llame al 1-800-233-0268, de lunes a viernes, entre las 8:00 a.m. y las 5:00 p.m. EST para
conocer la ubicación de su centro de reparaciones más cercano.
ALMACENAMIENTO: Almacene el Ventilador con estas instrucciones, en la caja original en un lugar fresco y seco.
LUBRICACIÓN: Los cojinetes de precisión se sellan permanentemente en la fábrica, y no requieren más lubricación.
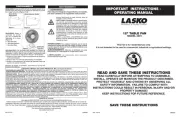
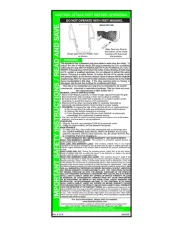
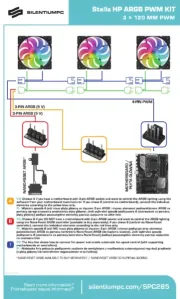
12" and 16" WALLMOUNT OSCILLATING FANS
MODEL 3012 and 3016
READ AND SAVE THESE INSTRUCTIONS
READ CAREFULLY BEFORE ATTEMPTING TO ASSEMBLE,
INSTALL, OPERATE OR MAINTAIN THE PRODUCT DESCRIBED.
PROTECT YOURSELF AND OTHERS BY OBSERVING ALL SAFETY
INFORMATION. FAILURE TO COMPLY WITH
INSTRUCTIONS COULD RESULT IN PERSONAL INJURY AND/OR
PROPERTY DAMAGE!
KEEP INSTRUCTIONS FOR FUTURE REFERENCE.
This Fan is for residential use only.
It is not intended to be used in commercial, industrial or agricultural settings.
IMPORTANT INSTRUCTIONS -
OPERATING MANUAL
SAVE THESE INSTRUCTIONS
Rev. E 10/08 12084327
Después de limpiar el Ventilador según las recomendaciones anteriores, todas las protecciones
y cubiertas DEBEN SER vueltas a colocar antes de su uso. El no hacerlo podría resultar en
graves lesiones personales.
OPERATIÓN
1. OSCILACIÓN: Hale hacia ARRIBA la perilla de oscilación
que está en la parte superior detrás del motor. Posicione la
cabeza del ventilador hacia la izquierda, la derecha, o hacia
el frente. Presione la perilla de oscilación hacia ABAJO
para que el ventilador oscile en la dirección fijada.
2. INCLINACIÓN VERTICAL: Para ajustar la inclinación
vertical, posicione la cabeza del ventilador hacia arriba
o hacia abajo, según preflera.
3. VELOCIDAD: La velocidad se ajusta con la cadenilla de
trio para controlar la velocidad. La velocidad se registra
en el conmutador de botón que está en el panel frontal.
4. CABLE CONDUCTOR DE CORRIENTE ELÉCTRICA:
Conecie el cable conductor a un tomacorriente eléctrico
de la corriente eléctrica a un enchufe de pared de pared
estándar (120V AC, 60HZ).
Hacia Abajo:
Oscilar
Hacia Arriba:
Estacionario
GARANTÍA LIMITADA DE LASKO PRODUCTS, INC. (NO VÁLIDO EN MÉXICO)
QUÉ CUBRE ESTA GARANTÍAS: Este producto está garantizado contra defectos de mano de obra y/o materiales.
CUÁNTO DURA ESTA GARANTÍA: Esta garantía se extiende únicamente al comprador original del producto y dura un (1) año a partir de la fecha
original de compra o hasta que el comprador original del producto venda o transfiera el producto, cualesquiera de ambas que ocurriera en primer lugar.
QUÉ HARÁ LASKO: Durante el período de garantía, Lasko, a opción propia, reparará o reemplazará cualquier parte o partes que demuestren ser
defectuosas o reemplazará el producto completo por el mismo modelo u otro comparable.
QUÉ NO CUBRE ESTA GARANTÍA: Esta garantía no tiene validez si el producto fue dañado o falló debido a un accidente, manipulación u operación
inadecuadas, daño en el envío, abuso, mal uso, reparaciones no autorizadas hechas o el intento de hacerlas. Esta garantía no cubre los costos de
envío para la devolución de productos a Lasko para su reparación o reemplazo. Lasko abonará los cargos de envío de devolución a Lasko con
posterioridad a las reparaciones o el reemplazo bajo garantía.
CUALESQUIERA Y TODAS LAS GARANTÍAS, EXPLÍCITAS O IMPLÍCITAS (INCLUYENDO, SIN LIMITACIÓN, CUALESQUIERA GARANTÍA IMPLÍCITA
DE COMERCIABILIDAD), DURAN UN AÑO A PARTIR DE LA FECHA ORIGINAL DE COMPRA O HASTA QUE EL COMPRADOR ORIGINAL DEL
PRODUCTO VENDA O TRANSFIERA EL PRODUCTO, CUALESQUIERA DE AMBAS QUE OCURRIERA EN PRIMER LUGAR Y EN NINGÚN
CASO LA RESPONSABILIDAD DE LASKO BAJO CUALQUIER GARANTÍA EXPLÍCITA O IMPLÍCITA INCLUIRÁ (I) DAÑOS INCIDENTALES O POR
CONSECUENCIA POR CUALQUIER CAUSA QUE FUERE, O (II) REEMPLAZO O REPARACIÓN DE CUALESQUIERA FUSIBLES HOGAREÑOS,
CORTA-CIRCUITOS O TOMACORRIENTES. INDEPENDIENTEMENTE DE CUALQUIER DECLARACIÓN CONTRARIA, EN NINGÚN CASO
LA RESPONSABILIDAD DE LASKO BAJO CUALQUIER GARANTÍA EXPLÍCITA O IMPLÍCITA PODRÁ EXCEDER EL PRECIO DE COMPRA DEL
PRODUCTO Y DICHA RESPONSABILIDAD TERMINARÁ AL VENCIMIENTO DEL PERÍODO DE GARANTÍA.
Algunos estados y provincias no permiten limitaciones sobre la duración de una garantía implícita, o sobre la exclusión o limitación de los daños
incidentales o por consecuencia, por lo tanto dichas exclusiones o limitaciones podrían no aplicarse en su caso. Esta garantía le otorga a usted
derechos legales específicos. Usted también podría tener otros derechos que varían de estado en estado y de provincia en provincia.
Se requiere prueba de compra antes que se acepte un reclamo bajo garantía.
SERVICIO AL CLIENTE:
Línea gratuita (800) 233-0268. Correo electrónico: producthelp@laskoproducts.com
Nuestro equipo de Servicio al Cliente está disponible para ayudarle con preguntas sobre productos, ubicaciones de los centros de
reparación y repuestos. Se puede comunicar con el mismo de lunes a viernes, de 8 a.m. a 5 p.m. hora del Este. Por favor tenga a
manos su número de modelo, como así también el tipo y estilo (ubicados en la parte inferior de su producto). Por favor no devuelva el
producto al lugar de compra.
Customer Service Dept., 820 Lincoln Ave., West Chester, PA 19380 (Por favor no envíe el producto a este lugar)
www.laskoproducts.com

SAVE THESE INSTRUCTIONS
Rev. E 10/08 2 2084327 Rev. E 10/08 7 2084327
MODELO 3012 y 3016
1Inclinar la Cabeza del Ventilador
hacia atrás. Coloque la REJILLA
TRASERA en el MOTOR.
Alinear la lengüeta de la Rejilla Trasera con
la ranura enla parte superior de la cubierta
delantera del MOTOR.
2
4
3Asiente la REJILLA y sujetela con la
TUERCA DE PLÁSTICO. HACIA LA
DERECHA.
Deslice la HÉLICE en el EJE del MOTOR. (Alinear la Ranura Del Cubo de la
TAPA con el Pasador del Eje del Motor.) 5
6Instale el ADORNO. Inserte las PATITAS en
las RANURAS rectangulares. Apriete para
asegurar.
Para asegurar la PALETA, enroscarla hasta
que quede apretada en el CUBO DE LA TAPA
haciéndola girar HACIA LA IZUIERDA.
7Con la Cabeza del Ventilador inclinada hacia atrás y centrada, alinear el ADORNO
de tal manera que la divisa quede horizontal. Insertar la parte inferior de la REJILLA
DELANTERA dentro de la REJILLA TRASERA. La proyección de la parte inferior de
la REJILLA TRASERA debe quedar entre dos Alambres de la parte delantera. Cerrar
apretando la parte delantera contra la parte trasera empezando en la parte superior
y continuar cerrando hacia abajo ambos lados. NO NECESITO EL GANCHOS DE
LA REJILLA PARA ENSAMBLE.
MOTOR
REJILLA
TRASERA
MOTOR
TUERCA DE
PLÁSTICO
HÉLICE
TAPA DE
VENTILADOR DE
16"
RANURA
Adorno: Vista Lateral APÉNDICE
PUNTO
DE
CIERRE
ADORNO
RANURA
DEL CUBO
PATITA
REJILLA
TRASERA
PASADOR
TAPA DE
VENTILADOR DE
12"
PUNTO
DE
CIERRE
APÉNDICE
FUNCIONAMIENTO
1. Cuidadosamente retire el Ventilador de la bolsa plástica y la caja. Arme la unidad siguiendo estas instrucciones.
2. Conecte el cable eléctrico a un tomacorriente de 120 voltios.
3. Después de apagar el Ventilador, desconecte la unidad del tomacorriente eléctrico.
Asegúrese que el enchufe encaje firmemente en el tomacorriente.
Cuando los enchufes quedan flojos en los tomacorrientes, pueden deslizarse parcial o completamente fuera del tomacorriente con
un leve movimiento del cable adosado. Los tomacorrientes en este estado podrían sobrecalentarse y representar un grave
peligro de incendio; si está cubierto por una cortina o tela, el riesgo de incendio es aún mayor.
Read all instructions before using this Fan.
1. Make certain the power source conforms to the electrical requirements of the Fan.
2. Make certain that the room is equipped with a working smoke detector.
3. Use this Fan only as described in this manual. Any other use not recommended by the manufacturer may cause fire, electrical shock,
or injury to persons.
4. To reduce the risk of personal injury and electric shock, the Fan should not be played with or placed where small children can reach it.
5. Unplug power cord before installing, servicing, or moving the Fan.
DO NOT DEPEND ON THE ON/OFF SWITCH AS THE SOLE MEANS OF DISCONNECTING POWER WHEN SERVICING
OR MOVING THE FAN. ALWAYS UNPLUG THE POWER CORD. ALWAYS TURN OFF AND UNPLUG FAN BEFORE
LEAVING THE AREA. NEVER LEAVE CHILDREN UNATTENDED WHEN THE FAN IS ON OR PLUGGED IN.
REDUCE THE RISK OF FIRE OR ELECTRIC SHOCK - DO NOT USE THIS FAN WITH ANY SOLID STATE SPEED
CONTROL DEVICES.
WARNING: USE OF A THREE-PRONG TO TWO-PRONG ADAPTER IS NOT RECOMMENDED. IMPROPER CONNECTION MAY CREATE
THE RISK OF ELECTROCUTION. USE OF SUCH ADAPTERS IS NOT PERMITTED IN CANADA.
WARNING: THIS PLUG IS A SAFETY FEATURE. TO REDUCE THE RISK OF FIRE, ELECTRIC SHOCK AND PERSONAL INJURY, DO NOT
REMOVE, REPLACE, REPAIR OR TAMPER WITH THE ORIGINALLY SUPPLIED PLUG. IF THE FAN DOES NOT FUNCTION PROPERLY,
IT MAY BE DUE TO THE SAFETY DEVICE INCORPORATED IN THIS PLUG. RETURN TO AN AUTHORIZED SERVICE CENTER OR CALL
800-233-0268, MONDAY - FRIDAY, BETWEEN 8:00 AM AND 5:00 PM EST. IF THE PLUG WARNING LABEL IS MISSING OR DAMAGED,
CALL THE TOLL FREE NUMBER FOR A REPLACEMENT LABEL.
6. This Fan must be used in potentially dangerous locations such as flammable, explosive, chemical-laden or wet atmospheres NOT
where gasoline, paint or flammable liquids are used or stored.
7. Where possible, avoid the use of extension cords because the extension cord may overheat and cause a fire. If you must use an exten-
sion cord, minimize the risk of overheating by using the shortest cord possible and ensuring that it is UL listed. NEVER use a single
extension cord to operate more than one Fan.
8. - The power cord is equipped with a three-prong grounded plug that must be inserted into a matching receptacle. Under no cir
cumstances must the grounding prong be cut off the plug. Where a two-prong wall receptacle is encountered, it must be replaced
with a properly grounded three-prong receptacle installed in accordance with the National Electrical Code (NEC) and all applicable
local codes and ordinances. This work must be done only by a qualified electrician, using copper wire only.
9. operate any Fan with a damaged cord or plug or after the Fan malfunctions, has been dropped or damaged in any manner. NEVER
Return Fan to an authorized service facility for examination, electrical or mechanical adjustment or repair.
10. insert or allow fingers or foreign objects to enter any ventilation or exhaust opening as it may cause an electric shock or fire, NEVER
or damage the Fan. To reduce the risk of fire, block or tamper with the Fan in any manner while it is in operation.DO NOT
11. Always place the Fan on a stable, flat, level surface when operating, to avoid the chance of the Fan overturning. Locate the Power
Cord so the Fan or other objects are not resting on it. run Power Cord under carpeting. cover Power Cord with DO NOT DO NOT
throw rugs, runners or the like. Arrange Power Cord away from room traffic and where it will not be tripped over.
12. This Fan is not intended for use in wet or damp locations. Never locate a Fan where it may fall into a bathtub or other water container.
NEVER use Fan where flammable liquids are used or stored.
13. use Fan outdoors. NEVER
14. This Fan is not suitable for use in agricultural facilities including areas where livestock, poultry or other animals are confined. Please
refer to National Electric Code (NEC) Article 547-7 (2008), or applicable state or local codes or standards relating to electrical require-
ments for Agricultural Buildings. THIS FAN DOES NOT MEET THE REQUIREMENTS OF NEC ARTICLE 547-7 (2008).
15. This Fan is not suitable for use in hazardous locations. Please refer to National Electric Code (NEC) Article 500 or applicable state
or local codes or standards relating to electrical requirements for Hazardous locations. THIS FAN DOES NOT MEET
THE REQUIREMENTS OF NEC ARTICLE 500 (2008).
MODEL 3012 and 3016
GENERAL SAFETY INFORMATION
When using electrical appliances, basic precautions should always
be followed to reduce the risk of fire, electric shock and injury to persons,
including the following:
INSTALACIÓN
1. Coloque un perno prisionero detrás de la pared. Si no puede encontrar un perno prisionero, usted podrá encontrar tipos especiales
de pernos de anclaje en su ferretería local.
2. Fije la Placa de Montaje a la pared con los Tornillos que vienen incluidos (Tornillos para Madera #8 X 1 1/4"). Procure que la brida
apunte hacia arriba.
3. El Ventilador ahora está listo para ser colgado en la Placa de Montaje.

Rev. E 10/08 6 2084327 Rev. E 10/08 3 2084327
MODEL 3012 and 3016
1Tilt FAN HEAD back. Put REAR
GRILL on MOTOR. Align tab of Plastic REAR GRILL with groove
on top of front MOTOR cover.
2
4
3Fully seat REAR GRILL and secure with
PLASTIC NUT turning CLOCKWISE.
Slide BLADE onto MOTOR SHAFT. (Align groove on blade hub with pin on
motor shaft.)
5
6Install ORNAMENT into FRONT GRILL. Insert
TABS into rectangular SLOTS. Snap into
place.
To secure BLADE, screw SPINNER onto
SHAFT COUNTER CLOCKWISE until tight
on BLADE hub.
7With Fan Head tilted back and centered, align ORNAMENT of FRONT GRILL so it is
horizontal. Insert bottom of FRONT GRILL into REAR GRILL. TAB at the bottom of
REAR GRILL should be between two SPOKES of FRONT GRILL. Snap FRONT into
REAR beginning at the top and working down both sides. NO GRILL CLIPS ARE
NEEDED FOR ASSEMBLY.
MOTOR
REAR GRILL REAR GRILL
MOTOR
PLASTIC
NUT
BLADE
PIN
16" FAN
SPINNER
SLOT Ornament Side View TAB TAB
SNAPS
SNAPS
ORNAMENT
GROOVE
TAB
12" FAN
SPINNER
OPERATION
1. Carefully remove the Fan from the plastic bag and the carton. Assemble unit per these instructions.
2. Plug the cord set into a 120 volt outlet.
3. After turning the Fan off, unplug the unit from the electrical outlet.
Be sure that the plug fits tightly into outlet.
When plugs fit loosely into receptacles, they may slip partially or completely out of the receptacle with only the slight move-
ment of the attached cord. Receptacles in this condition may overheat and pose a serious fire hazard; if covered by a curtain
or drape, the fire hazard is even greater.
INFORMACIÓN GENERAL DE SEGURIDAD
Al usar artefactos eléctricos, siempre deben tomarse precauciones básicas para reducir el
riesgo de incendio, choque eléctrico y lesiones a personas, incluyendo las siguientes:
CONSERVE ESTAS INSTRUCCIONES
Lea todas las instrucciones antes de usar este Ventilador.
1. Asegúrese que la fuente de alimentación coincida con los requerimientos eléctricos del Ventilador.
2. Asegúrese que la habitación esté equipada con un detector de humo en funcionamiento.
3. Use este Ventilador únicamente como se describe en este manual. Cualquier otro uso no recomendado por el fabricante puede
causar incendio, choque eléctrico o lesiones a personas.
4. Para reducir el riesgo de lesiones a personas y choque eléctrico, el Ventilador no debe ser encendido o colocado donde los niños
pequeños puedan alcanzarlo.
5. Desconecte el cable eléctrico antes de instalar, reparar o trasladar el Ventilador.
NO DEPENDA DEL INTERRUPTOR DE ENCENDIDO / APAGADO COMO ÚNICO MEDIO DE DESCONECTAR
LA ALIMENTACIÓN ELÉCTRICA CUANDO ESTÉ REPARANDO O TRASLADANDO EL VENTILADOR. SIEMPRE
DESCONECTE EL CABLE ELÉCTRICO. SIEMPRE APAGUE Y DESCONECTE EL VENTILADOR ANTES DE
ABANDONAR EL ÁREA. NUNCA DEJE A LOS NIÑOS SIN ATENCIÓN CUANDO EL VENTILADOR ESTÉ
ENCENDIDO O CONECTADO.
ADVERTENCIA: NO SE RECOMIENDA EL USO DE UN ADAPTADOR DE TRES A DOS ESPIGAS. LA CONEXIÓN INDEBIDA PODRÍA
CREAR EL RIESGO DE SER ELECTROCUTADO. EL USO DE TALES ADAPTADORES NO ESTÁ PERMITIDO EN CANADÁ.
ADVERTENCIA: ESTE ENCHUFE ES UNA MEDIDA DE SEGURIDAD. PARA REDUCIR EL RIESGO DE INCENDIO, CHOQUE ELÉCTRICO
Y LESIONES PERSONALES, NO QUITE, NI REEMPLACE, NI REPARE O ALTERE EL ENCHUFE QUE SE PROVEE ORIGINALMENTE. SI
EL VENTILADOR NO FUNCIONA CORRECTAMENTE, PUEDE DEBERSE AL DISPOSITIVO DE SEGURIDAD INCORPORADO EN ESTE
ENCHUFE. REGRESE A UN CENTRO DE SERVICIOS AUTORIZADO O LLAME AL 800-233-0268, DE LUNES A VIERNES ENTRE LAS
8.30 A.M. Y LAS 4.00 P.M. EST. SI LA ETIQUETA DE ADVERTENCIA DEL ENCHUFE FALTA O ESTA DAÑADA, LLAME AL NÚMERO DE
CONSULTA GRATUITO PARA PEDIR UNA ETIQUETA DE REEMPLAZO.
6. Este Ventilador NO debe ser usado en lugares potencialmente peligrosos tales como atmósferas inflamables, explosivas, cargadas
de sustancias químicas o húmedas donde se usen o almacenen gasolina, pintura o líquidos inflamables.
7. Donde sea posible, evite el uso de cables de alargue porque el cable de alargue podría sobrecalentarse y provocar un incendio. Si
debe usar un cable de alargue, minimice el riesgo de sobrecalentamiento usando el cable más corto posible y garantizando que esté
autorizado por UL (Underwriters Laboratories). NUNCA use un solo cable de alargue para hacer funcionar a más de un Ventilador.
8. El cordón eléctrico está equipado con una clavija a tierra de tres espigas que tiene que ser enchufada a un receptáculo del mismo
diseño. Bajo ninguna circunstancia deberá cortarse la espiga a tierra de la clavija. De existir un receptáculo de pared de dos espigas,
deberá reemplazarse por uno de tres espigas debidamente puesto a tierra e instalado de conformidad con el Código Nacional de
Electricidad y todos los códigos y ordenanzas locales aplicables. El trabajo deberá hacerlo un electricista calificado, utilizando
exclusivamente alambre de cobre.
9. NUNCA ponga en funcionamiento ningún Ventilador con un cable o enchufe dañado o después que el Ventilador haya tenido fallas
de funcionamiento, haya sido arrojado o dañado de cualquier manera. Devuelva el Ventilador a una instalación autorizada de servicio
para su revisión, ajuste eléctrico o mecánico o reparación.
10. NUNCA inserte o permita que los dedos u objetos extraños ingresen en ninguna abertura de ventilación o escape, ya que esto podría
causar un choque eléctrico o incendio, o dañar el Ventilador. Para reducir el riesgo de incendio, NO bloquee ni altere el Ventilador
de ninguna manera mientras esté en funcionamiento.
11. Siempre coloque el Ventilador en una superficie estable, plana y nivelada mientras esté en funcionamiento, para evitar la posibilidad
de que el Ventilador se caiga. Coloque el Cable Eléctrico de modo tal que el Ventilador u otros objetos no estén apoyados sobre
el mismo. NO coloque el Cable Eléctrico debajo de las alfombras. NO cubra el Cable Eléctrico con tapetes, alfombras de hule o
similares. Coloque el Cable Eléctrico lejos del paso de la habitación y donde nadie pueda tropezarse con él.
12. Este Ventilador no está destinado para ser usado en lugares húmedos o mojados. Nunca coloque un Ventilador donde pueda caer
dentro de una tina de baño u otro recipiente de agua. NUNCA use un Ventilador donde se usen o almacenen líquidos inflamables.
13. NUNCA use el Ventilador al aire libre.
14. Este Ventilador no es adecuado para usar en instalaciones de agricultura incluyendo áreas donde se almacene ganado, aves de
corral u otros animales. Por favor consulte el Articulo 547-7 (2008) del Código Eléctrico Nacional (NEC), o los códigos o normas
estatales o locales aplicables con relación a los requisitos eléctricos para edificios destinados a las agricultura. ESTE VENTILADOR
NO CUMPLE CON LOS REQUISITOS DEL ARTICULO 547-7 DEL NEC (2008).
15. Este Ventilador no es adecuado para usar en lugares peligrosos. Por favor consulte el Artículo 500 del Código Eléctrico Nacional
(NEC), o los códigos o normas estatales o locales aplicables con relación a los requisitos eléctricos para lugares peligrosos. ESTE
VENTILADOR NO CUMPLE CON LOS REQUISITOS DEL ARTICULO 500 (2008).
DISMINUYA EL RIESGO DE INCENDIO O GOLPES DE ELECTRICIDAD – NO USE ESTE VENTILADOR CON ARTEFACTOS
DE CONTROL DE VELOCIDAD EN ESTADO SÓLID.
MODELO 3012 y 3016
INSTALLATION
1. Locate a stud behind wall. If stud cannot be found, special types of mounting anchors are available at your hardware store.
2. Secure Mounting Plate to wall with Screws supplied (#8 X 1 1/4" Wood Screws). Make sure flange is pointing up.
3. Fan is now ready to hang on Mounting Plate.
Product specificaties
| Merk: | Lasko |
| Categorie: | Ventilator |
| Model: | 3016 |
Heb je hulp nodig?
Als je hulp nodig hebt met Lasko 3016 stel dan hieronder een vraag en andere gebruikers zullen je antwoorden
Handleiding Ventilator Lasko
14 Juni 2025
13 Juni 2025
17 Maart 2025

17 Maart 2025

17 Maart 2025
17 Maart 2025
17 Maart 2025

17 Maart 2025

17 Maart 2025

17 Maart 2025
Handleiding Ventilator
- N'oveen
- Worx
- Orbegozo
- Magnavox
- Clas Ohlson
- Wallair
- Hunter
- Adler
- White Knight
- Quigg
- Dimplex
- Tesy
- InLine
- JBL
- Itho
Nieuwste handleidingen voor Ventilator
30 Juli 2025

29 Juli 2025
29 Juli 2025
29 Juli 2025
28 Juli 2025
23 Juli 2025
23 Juli 2025
22 Juli 2025
22 Juli 2025
22 Juli 2025