Lancom LX-7300 Handleiding
Lancom Access point LX-7300
Bekijk gratis de handleiding van Lancom LX-7300 (2 pagina’s), behorend tot de categorie Access point. Deze gids werd als nuttig beoordeeld door 62 mensen en kreeg gemiddeld 4.2 sterren uit 2 reviews. Heb je een vraag over Lancom LX-7300 of wil je andere gebruikers van dit product iets vragen? Stel een vraag
Pagina 1/2
Hardware Quick Reference
Mounting & connecting
LANCOM, LANCOM Systems, LCOS, LANcommunity and Hyper Integration are registered trademarks. All other names or descriptions used may be trademarks or registered trademarks of their
owners. This document contains statements relating to future products and their attributes. LANCOM Systems reserves the right to change these without notice. No liability for technical errors
and / or omissions. 0824
Before initial startup, please make sure to take notice of the information regarding the intended use in the
enclosed installation guide!
Please note that support for third-party accessories is not provided.
Please observe the following when setting up the device
→Donotplaceanyobjectsonthetopofthedeviceorstackseveraldevices
→Lockablewallandceilingmountingusingthesuppliedwallmount
i
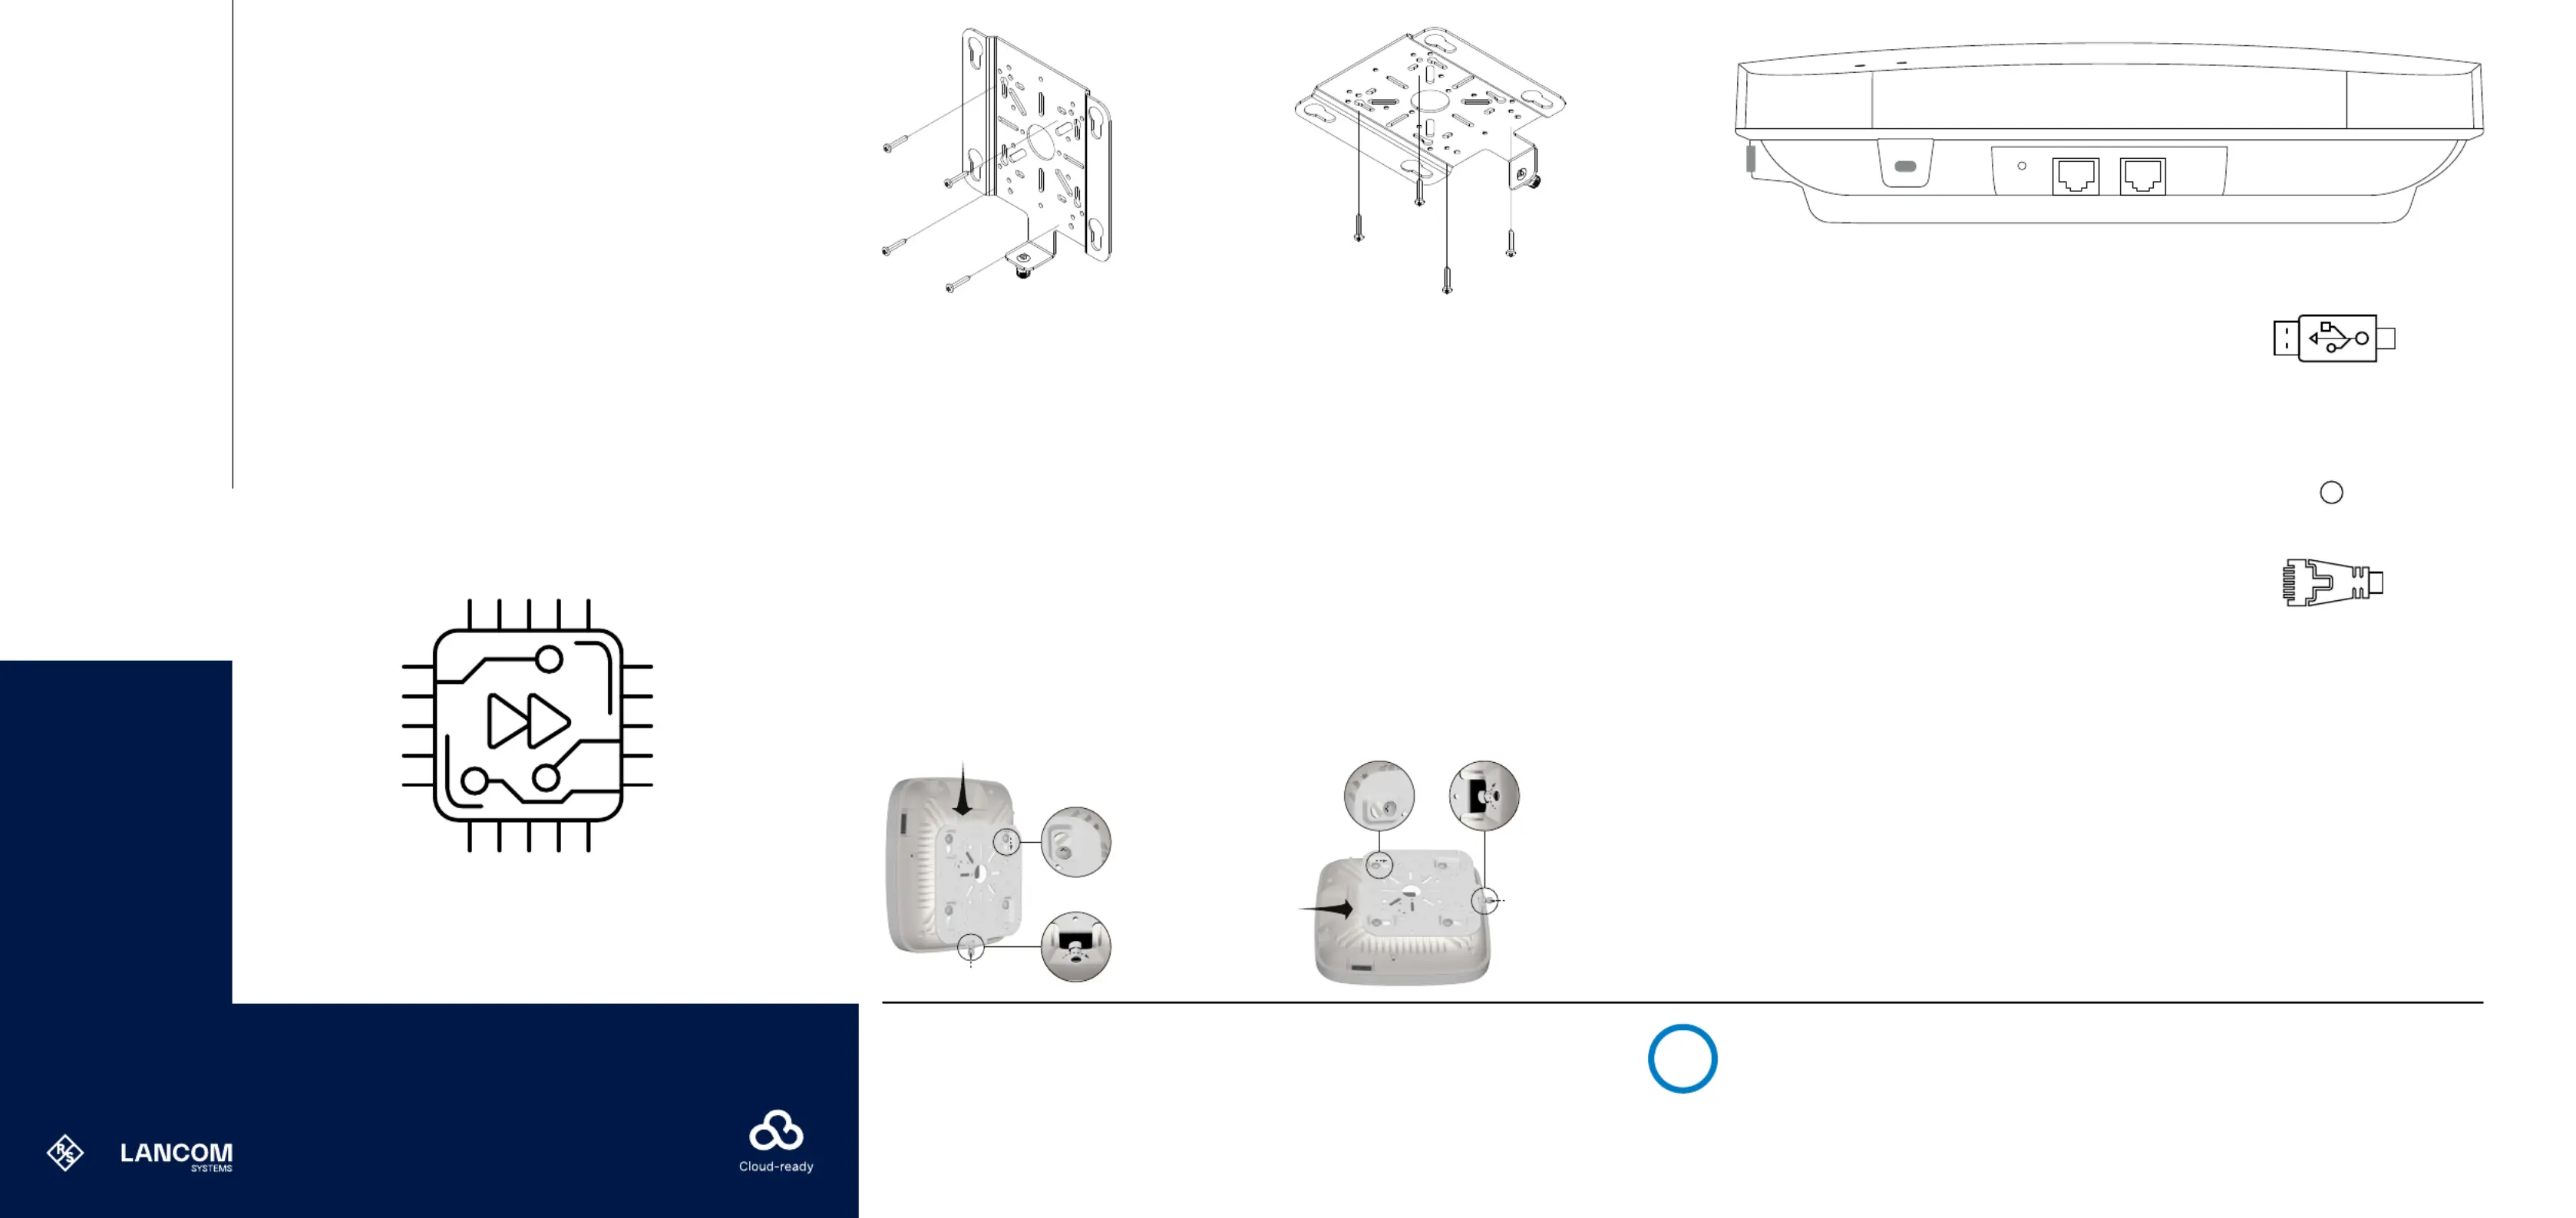
LANCOM LX-7300
Wall mounting
Depending on the wall material structure, select 4 suitable pan
head screws M4x35
➀ and, if necessary, suitable dowels for
mounting the retaining plate
➁ on a sufficiently load-bearing
wall.
Mount the retaining plate
➁➀with the screws through the
holes marked in the illustration to the wall.
The access point is already prepared for mounting on the
mounting plate.
Insert the access point into the mounting plate so that the locking
mechanisms on the device and mounting plate are opposite each
other and the screws M6x10
➃ already pre-assembled on the
device reach into the keyhole-shaped recesses of the retaining
plate. Then push the device towards the locking mechanism up
to the stop.
Ensure that the appliance is locked by tightening the locking
screw
➂ in the direction of the device and then turn it 90°
clockwise.
To remove the device, turn the locking screw
➂ 90°
counterclockwise and pull it away from the device. The device
can now be removed from the retaining plate in the opposite
direction to the locking direction.
➃
➂
Ceiling mounting
Depending on the ceiling material structure, select 4 suitable
pan head screws M4x35
➀ and, if necessary, suitable dowels
for mounting the retaining plate
➁ on a sufficiently load-bearing
ceiling.
Mount the retaining plate
➁➀with the screws through the
holes marked in the illustration to the ceiling.
The access point is already prepared for mounting on the
mounting plate.
Insert the access point into the mounting plate so that the locking
mechanisms on the device and mounting plate are opposite each
other and the screws M6x10
➃ already pre-assembled on the
device reach into the keyhole-shaped recesses of the retaining
plate. Then push the device towards the locking mechanism up
to the stop.
Ensure that the appliance is locked by tightening the locking
screw
➂ in the direction of the device and then turn it 90°
clockwise.
To remove the device, turn the locking screw
➂ 90°
counterclockwise and pull it away from the device. The device
can now be removed from the retaining plate in the opposite
direction to the locking direction.
➃➂
➀
USB 2.0 interface
Connect compatible USB devices to the USB interface either
directly or via a suitable USB cable.
➁
Kensington Lock holder
For mechanical theft protection of the access point
➂
Reset button
Pressed up to 5 seconds: Device restart
Pressed longer than 5 seconds:
Configuration reset and device restart
RESET
➃
TP-Ethernet interfaces ETH1 / ETH2
Connect the ETH1 or ETH2 interfaces to other network
components using suitable Ethernet cables.
➁➃➂
➀
➀
➁
➂
➂
➁
➀
Product specificaties
| Merk: | Lancom |
| Categorie: | Access point |
| Model: | LX-7300 |
Heb je hulp nodig?
Als je hulp nodig hebt met Lancom LX-7300 stel dan hieronder een vraag en andere gebruikers zullen je antwoorden
Handleiding Access point Lancom

19 Mei 2026
5 Oktober 2025
5 Augustus 2025
5 Augustus 2025
5 Augustus 2025
5 Februari 2025
5 September 2024
5 September 2024
21 Februari 2024
18 Februari 2024
Handleiding Access point
Nieuwste handleidingen voor Access point
20 Mei 2026
25 April 2026
6 April 2026
13 Maart 2026
13 Maart 2026
13 Maart 2026
13 Maart 2026
12 Maart 2026
6 Maart 2026
5 Maart 2026