Kodak BCS100 Handleiding


Lees hieronder de 📖 handleiding in het Nederlandse voor Kodak BCS100 (2 pagina's) in de categorie Verrekijker. Deze handleiding was nuttig voor 31 personen en werd door 2 gebruikers gemiddeld met 4.5 sterren beoordeeld

Pagina 1/2
KODAK BCS100
BINOCULARS
1 year limited warranty garantie limitée un an 1 Jahr eingeschränkte / /
Garantie / garantía limitada de 1 año / garanzia limitada di 1 anno /
garantia limitada de 1 ano / 1 jaar beperkte garantie / roczna ograniczona
gwarancja / 1 év kortozott garancia omezená ruka 1 rok/
Made in China Fabriqué en Chine Hergestellt in China Hecho en / / /
China / Prodotto in Cina / Feito na China / Gemaakt in China / Wykonane
w Chinach / Vyrobeno v Čí/ Kínában készült
Notice of compliance for the European Union
Products bearing the CE mark comply with the applicable European
directives and associated harmonised European standards.
Disposal of waste equipment by users in the European Union
This symbol means that according to local laws and regulations,
it is prohibited to dispose of this product with household waste.
Instead, it is your responsibility to protect the environment and
human health by handing over your used device to a designated
collection point for the recycling of waste electrical and electronic
equipment. For more information about where you can drop off
your waste equipment for recycling, please contact your local city
ofce, your household waste disposal service or the shop where
you purchased the product.
After-sales service Service après-vente / / Kundendienst Servicio /
postvenda / Servizio post-vendita / Serviço s-venda / Service na verkoop /
Serwis posprzedny / Poprodejní servis Érkesítés uni szolgáltatás: /
@ : aftersales@kodak.gtcie.com
: + 33 (0) 1.85.49.10.26
The Kodak trademark, logo and trade dress are used under license
from Eastman Kodak Company.
© 2022 GT Company
All rights reserved.
GT COMPANY FR :
5 rue de la Galmy 77700 CHESSY – FRANCE
GT COMPANY UK LTD :
11 Old Jewry EC2R 8DU LONDON – UNITED KINGDOM
www.kodak.gtcie.com
Product description Description du produit/ / Beschreibung des Produkts /
Descripción del product Descrizione del prodotto / / Descrição do produto /
Beschrijving van het product / Opis produktu / Termékleírás
/
Popis výrobku
Specications / Caractéristiques / Merkmale / Especicaciones / Speciche /
Especicações Specicaties Specykacje ellemzők Specikace / / / J /
1 Flexible eye cups Œilletons souples Weiche / /
Augenmuscheln / Bordes del ocular ligeros /
Conchiglie oculari morbidi Copos oculares /
maleáveis / Soepele oogschelpen / Gumowe muszle
oczne / Puha szemkagylók / Měkké očnice
2 Right eyepiece with diopter adjustment function /
Oculaire droit avec fonction de réglage dioptrique /
Gerades Okular mit Dioptrieneinstellung /
Ocular derecho con funcn de regulación de
dioptrías / Oculare diritto con funzione di regolazione
diottrica / Ocular direita com função de regulação
ótica / Rechteroculair met dioptrie-instelling / Prawy
okular z możliwością regulacji dioptrii / Jobb oldali
okulár dioptriabeállítással Pra okulár s funk/
nastavení dioptrií
3 Centrally positioned focussing wheel Molette de /
mise au point centrale Zentrales Fokussierrad / /
Rueda de ajuste de la puesta a punto central /
Rotella di messa a fuoco centrale Roda de focagem /
central / Centraal scherpstelwiel / Środkowy
pierścień regulacji ostrości zépső fókuszkerék / /
Středové zaostřovací kolečko
4 Strap loops / Passages de sangles Gurtführungen / /
Pasajes de la correa Passaggi per il cinturino / /
FR
Nous vous remercions d’avoir choisi nos jumelles KODAK BCS100 pour votre enfant et esrons qu’elles lui
procureront entière satisfaction. Veuillez lire attentivement avec lui les instructions relatives au réglage, à l’utilisation
et à l’entretien de ces jumelles avant qu’il ne s’en serve et conserver cette notice pour référence ultérieure.
CONSIGNES DE SÉCURITÉ
- Ne jamais regarder le soleil ou une source de lumière intense à travers les jumelles pour éviter tout risque de
lésion oculaire grave ou de cécité.
- Ne jamais orienter les jumelles de manière à capter directement les rayons du soleil. La focalisation de la lumière
peut provoquer la combustion de ce qu’elles visent s’il s’agit d’une matière facilement inammable.
- Ne pas se servir des jumelles en marchant pour ne pas se blesser en cas de chute.
- Ne pas balancer les jumelles au bout de leur tour de cou pour ne pas heurter une personne à proximité.
- Faire attention à ne pas se pincer les doigts en réglant l’écart interpupillaire des jumelles.
- Un maintien prolongé des œilletons sur une peau sensible peut provoquer une irritation cutae. En cas
d’inammation du contour des yeux, il faut immédiatement cesser l’utilisation des jumelles et consulter un médecin.
- Tenir les accessoires (tour de cou, tissu en microbres) et matériaux demballage hors de portée des enfants en bas
âge et animaux domestiques pour éviter tout risque d’étouffement ou de strangulation.
ATTENTION! Ne convient pas aux enfants de moins de 36 mois. Petits éléments et long tour de cou. Dangers
d’étouffement et de strangulation.
PRÉCAUTIONS D’EMPLOI
- Cette paire de jumelles reste un instrument optique nécessitant une manipulation et un transport avec les plus
grandes précautions possibles. Une manipulation brutale, un choc violent ou une chute accidentelle peuvent dérégler
l’alignement des optiques et provoquer un dédoublement de l’image à l’observation. Il faut donc veiller à ce que le
tour de cou fourni soit bien attaché aux deux passages de sangle des jumelles et à lenler avant chaque utilisation.
- Les jumelles doivent être poes sur une surface plane lorsque le tour de cou est retiré.
- Lorsque les jumelles ne sont plus utilies, il est recomman de les ranger dans leur étui puis de les entreposer
dans un endroit frais et sec.
- Ces jumelles ne sont pas étanches, il ne faut donc pas les exposer à des éclaboussures deau, une forte pluie ou
de l’humidité excessive. Si de la condensation se forme sur les oculaires et les objectifs, un séchage à température
ambiante est cessaire avant de les ranger dans leur étui.
- Ne pas laisser les jumelles à proximid’une source de chaleur excessive pour ne pas altérer les lubriants et
isolants qu’elles intègrent.
- Ne surtout pas démonter les jumelles en cas de défaut ! Adressez-vous à l’enseigne auprès de laquelle vous les
avez achetées an qu’elle en cone l’éventuelle réparation à notre service après-vente.
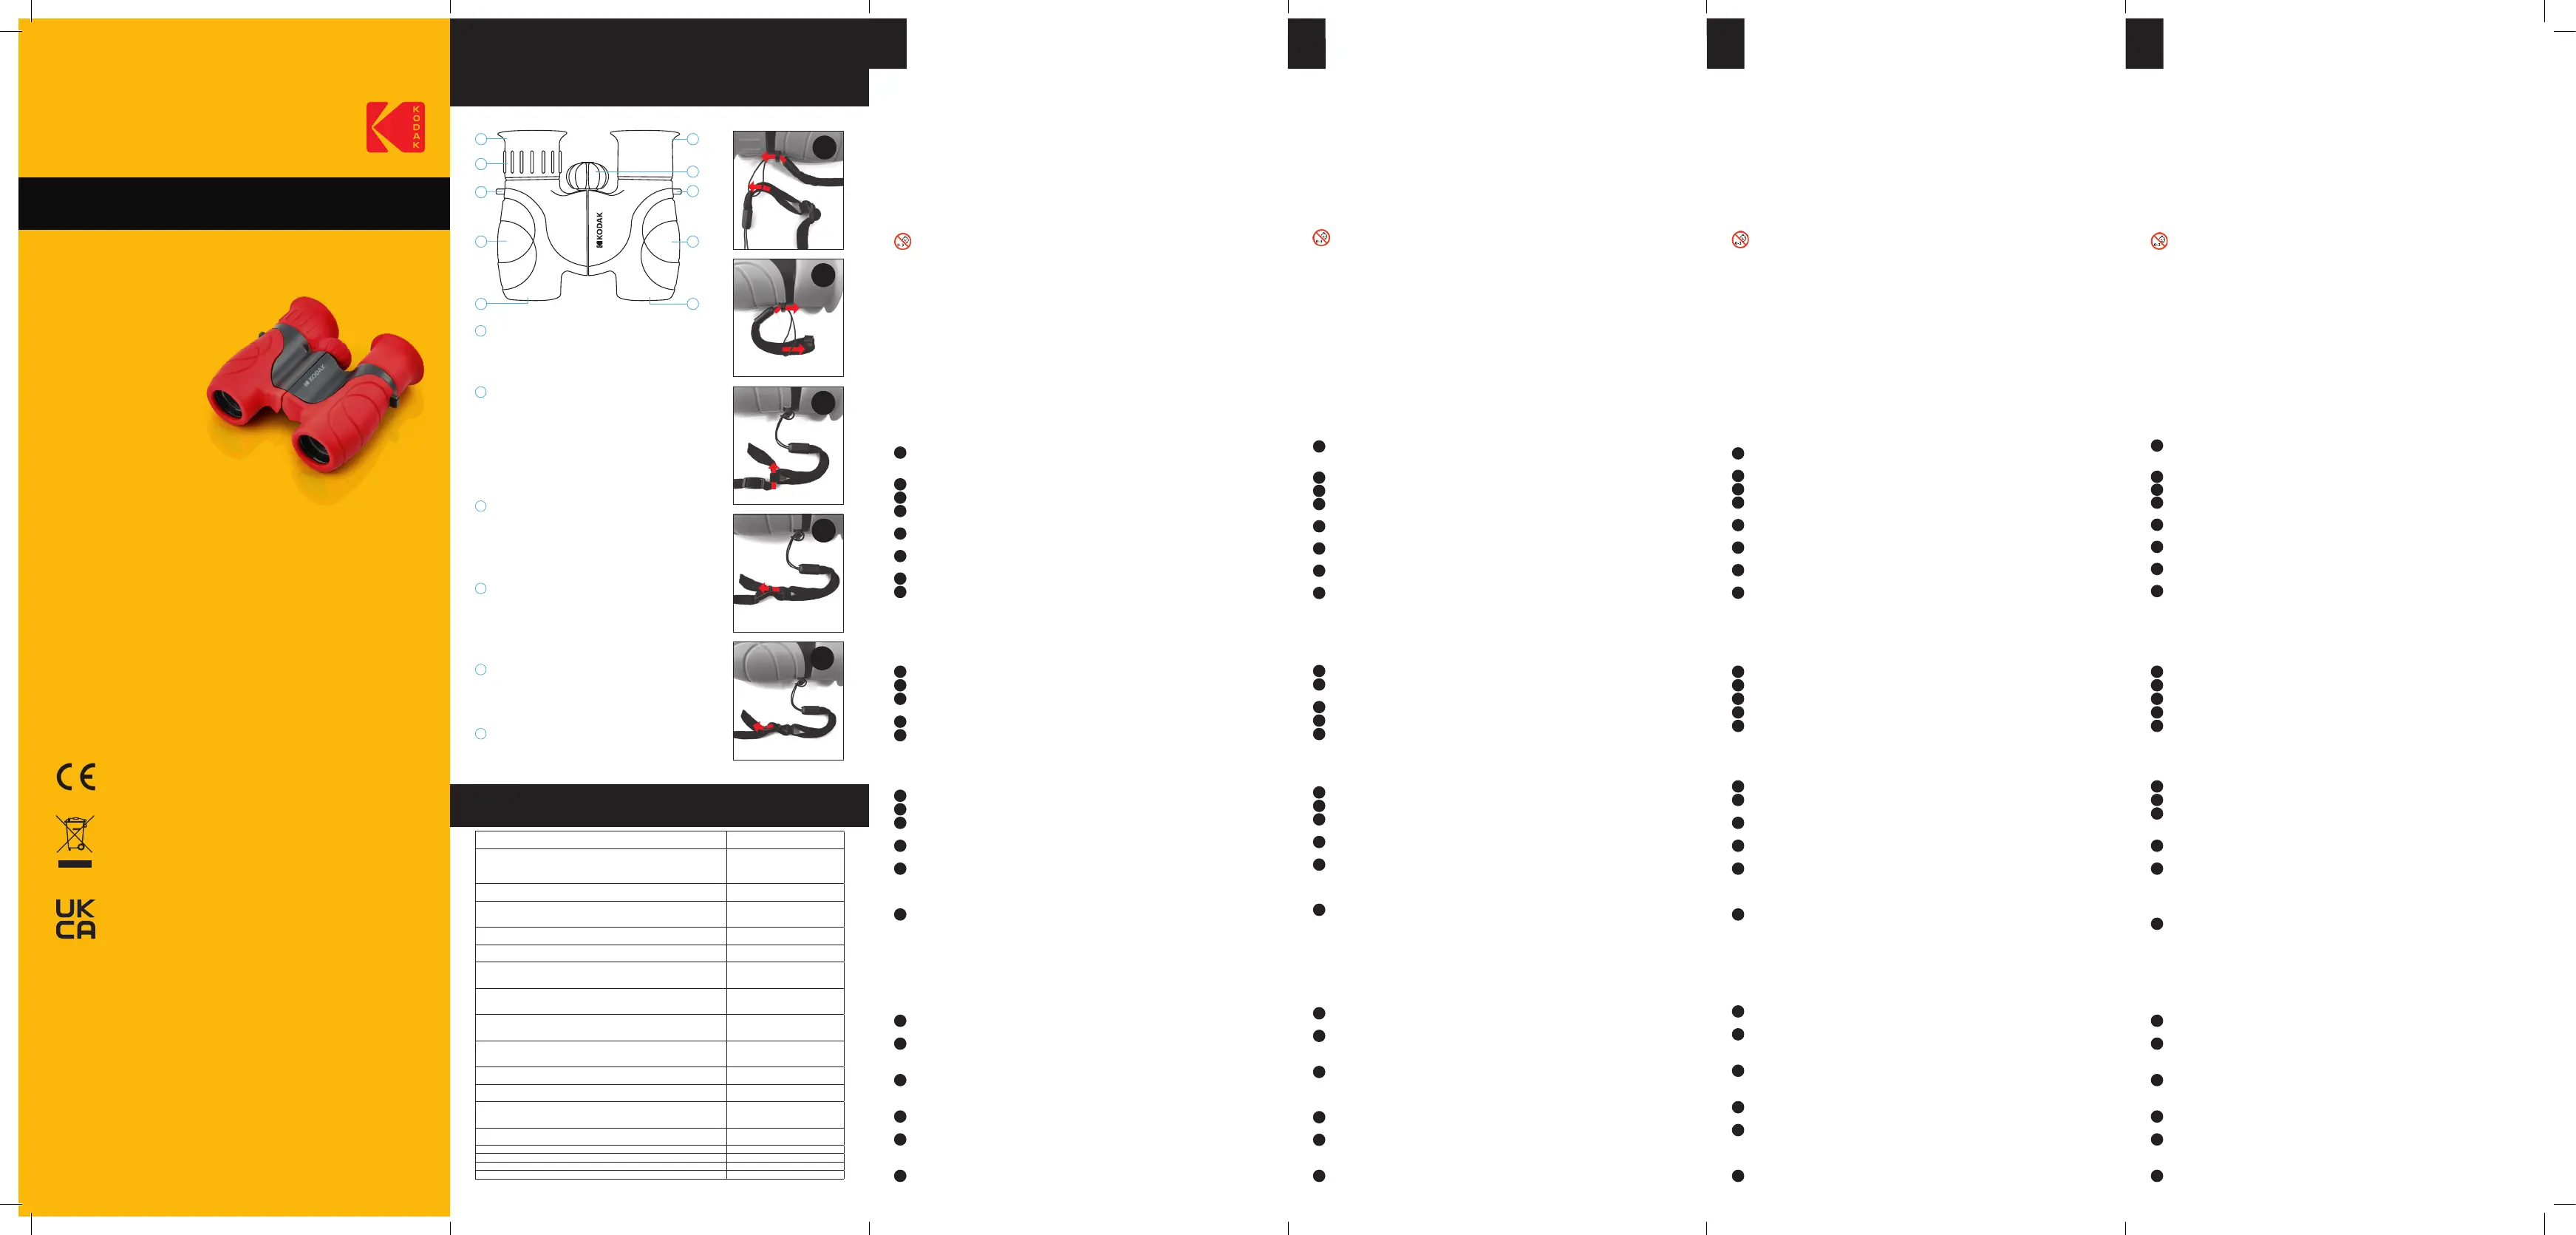
FIXATION DU TOUR DE COU
Pour attacher solidement le tour de cou aux jumelles, il faut procéder comme suit :
1
Attacher la partie du tour de cou dont la sangle est la plus longue aux jumelles en insérant la boucle ne de
son extrémité dans l’un des passages de sangle (par le dessous de celui-ci) puis la faire ressortir entièrement
(cf. 1 sur l’illustration 1 page 2).
2
Faire déler intégralement le tour de cou dans la boucle ne (cf. n°2 sur l’illustration 1 page 2).
3
tacher la partie du tour de cou raccordée avec un anneau en plastique.
4
Insérer la boucle ne de cette extrémité dans l’autre passage de sangle des jumelles (par le dessous de celui-ci)
puis la faire ressortir entièrement (cf. n°3 sur l’illustration 2 page 2).
5
Faire déler la sangle avec l’anneau plastique dans la boucle ne jusqu’à passer l’embout en plastique de cette
extrémité (cf. 4 sur l’illustration 2 page 2).
6
Prendre le bout de la sangle de la partie du tour de cou ayant été attachée en premier aux jumelles puis la passer
dans l’anneau en plastique de la partie courte du tour de cou (cf. illustration 3 page 2).
7
Tirer sur la sangle an de pouvoir ensuite la passer dans la boucle en plastique se trouvant en amont
(cf. illustrations 4 et 5 page 2).
8
Enler le tour de cou et ajuster la position des jumelles à sa guise en faisant plus ou moins ler la sangle
dans la boucle.
1
5
6
4
2
1
5
6
3
4
Prism type Type de prisme / / Prismentyp Tipo de prisma Tipo di prisma Tipo de prisma / / / /
Soort prisma Prizma típus / Typ pryzmatu / / Typ hranolu
Roof
/
Toit
/
Dach
/
Techo
/
Tetto
/
Telhado
/
Dak
/
Dachowy
/
Tető
/
Střecha
Lens coating Revêtement des lentilles Linsenvergütung Revestimiento de la lente / / / /
Rivestimento dell’obiettivo Revestimento de lente Lenscoating Powłoka soczewki / / / /
Lencsebevonat / Povrchová úprava objektivu
Fully coated
/
Revêtement intégral
/
Vollvergütet
/
Totalmente revestida
/
Totalmente rivestito
/
Totalmente revestida
/
Volledig gecoat
/
W pełni powlekana
/
Teljesen bevont
/
Plně potažený
Magnication / Grossissement / Vergrösserung / Amplicación Ingrandimento Ampliação / / /
Vergroting / Powiększenie Nagyítás / / Zvětšení
8 x
Objective diameter Diamètre d’objectif Objektivdurchmesser Diámetro de los objetivos / / / /
Diametro degli obiettivi Diâmetro das objetivas Objectiefdiameter Średnica obiektywów / / / /
Objektív átmérője Průměr objektivů/
21 mm
Exit pupil Pupille de sortie Austrittspupille Pupila de salida Pupilla in uscita Pupila de saída / / / / / /
Uittreepupil / Źrenica wyjściowa Kilépő pupilla / / Výstupní pupily
2.6 mm
Eye relief Dégagement oculaire Augenabstand / / / Alivio ocular Distanza interoculare / /
Distância olho-ocular / Oogafstand Odstęp źrenicy / / Pupillatávolság Oční reliéf/
11.5 mm
Field of view at 1000 m Champ de vision à 1000 m Sehfeld auf 1000 m Campo de visión a 1000m / / / /
Campo visivo a 1000 m Campo de visão A 1000 m Gezichtsveld op 1000 m / / / Polewidzenia na 1000 m /
Látómező 1000 m Zorné pole na 1000 m/
126 m
Real eld of view Champ de vision réel / / Tatsächliches Sehfeld / Campo de visión real /
Campo visivo reale Campo de visão real / / Werkelijk gezichtsveld / Rzeczy wiste pole widzenia /
ényleges látómező / Skutečné zorné pole
7.2°
Apparent eld of view Champ de vision apparent Scheinbares Sehfeld Campo de visión aparente / / / /
Campo visivo apparente Campo de visão aparente Schijnbaar gezichtsveld Pozorne pole widzenia / / / /
Látszólagos látómező Zdánlivé zorné pole/
57.6°
Close focusing distance Distance de mise au point minimale Naheinstellgrenze Distancia de enfoque / / /
cercana / Distanza di messa a fuoco ravvicinata Distância de focagem ao perto Scherpstelafstand / /
dichtbij / Bliska odległość ogniskowania Közeli fókusztávolság Nejkratší zaostřovací vzdálenost/ /
3 m
Relative brightness Luminosité relative Relative Helligkeit Brillo relativo Luminosità relativa / / / / /
Brihlo relativo Relatieve helderheid Jasność względna Jasność względna Relativní jas/ / / /
6.9
Twilight factor Indice crépusculaire Dämmerungsfaktor Factor crepuscular Fattore crepuscolare / / / / /
Fator de penumbra / Twilight factor / Sprawność zmierzchowa Szürkületi faktor Faktor Stmívání/ /
13
Interpupillary distance Distance interpupillaire Augenabstand Distancia interpupilar / / / /
Distanza interpupillare Distância interpupilar Pupilafstand Rozstawu okularów / / / /
Pupillatávolság / Mezipupilární vzdálenost
57-72 mm
Dioptric correction Correction dioptrique Dioptrienkorrektur Corrección dióptrica Correzione diottrica / / / /
/ / / / / Correção dióptrica Dioptrische correctie Korekcja dioptryczna Dioptriakorrekció Dioptrická korekce
-2~+2
Width / Largeur Breite / / Anchura Larghezza Largura / Breedte Szerokość Szélesség / / / / / / Šířka
108 mm
Height / Hauteur Höhe / / Altura Altezza Altura Hoogte Magasság / / / / Wysokość / / Výška
97 mm
Thickness / Épaisseur Strärke / / Espesor Spessore Espessura Dikte Grubość / / / / / Vastagság / Tloušťka
34 mm
Weight / Poids / Gewicht / Peso / Peso / Peso / Gewicht / Waga / Súly / Hmotnost
160 g
EN
We would like to thank you for having chosen KODAK BCS100 binoculars for your child and hope that
they will be to their complete satisfaction. Please read the instructions relating to their adjustment, use,
and maintenance carefully with your child prior to their use, and retain this information for future reference.
SAFETY INSTRUCTIONS
- Never look at the sun or an intense source of light through the binoculars, so as to avoid any risk of serious eye
injury or blindness.
- Never direct the binoculars so as to directly capture the suns rays. If the objects towards which the binoculars
are directed happen to be easily ammable, the concentration of the light may cause these objects to combust.
- Avoid using the binoculars while walking, as they could injure you should you fall.
- Do not swing the binoculars by their neck strap, as you may hit someone standing nearby.
- Take care not to pinch with your ngers while adjusting the interpupillary distance of the binoculars.
- Holding the eye cups against the skin for an extended period may cause skin irritation. In case of inammation
around the eyes, stop using the binoculars and consult a doctor immediately.
- Keep the accessories (neck strap, microbre cloth) and packaging materials out of reach of children and pets,
to avoid any risk of choking or strangulation.
WARNING! Not suitable for children under 36 months. Small parts and long neck strap. Choking and
strangulation hazards.
PRECAUTIONS FOR USE
- This pair of binoculars is a precision optical instrument that must be handled and transported with the utmost of
care. Rough handling, severe impact, or accidental dropping may disrupt the alignment of the lenses and cause
double vision when looking through the binoculars. Therefore, you must ensure that the provided neck strap is
securely attached to the two strap loops on the binoculars, and pass the strap over your head prior to each use.
- Gently place the binoculars on a at surface when you remove them from around your neck.
- When the binoculars are no longer in use, it is recommended that you put them in their case and then store them in
a cool, dry place.
- These binoculars are not watertight, and therefore they must not be exposed to splashes of water, heavy rain,
or excessive humidity. If condensation forms on the eyepieces and lenses, the binoculars must be left to dry at
room temperature, before storing them away in their case.
- Do not leave the binoculars close to an excessive source of heat, so as to avoid affecting the lubricating and
insulating materials they contain.
- Above all, do not disassemble the binoculars should a fault occur! Return to the store from which you purchased
them, so that they can be forwarded to our aftersales service for repair, if necessary.
FIXING THE NECK STRAP
To securely attach the neck strap to the binoculars, proceed as follows:
1
Attach the section of the strap with the longest length of strap to the binoculars, by inserting the ne buckle at
the end into one of the strap loops (through the underside of the loop), then pulling it all the way through (see no.
1 in illustration 1 on page 2).
2
Thread the entire neck strap into the ne buckle (see no. 2 in illustration 1 on page 2).
3
Detach the section of the neck strap that is connected with a plastic ring.
4
Insert the ne buckle on this end into the other strap loop on the binoculars (through the underside of the loop),
then pull it all the way through (see no. 3 in illustration 2 on page 2).
5
Thread the strap with the plastic ring into the ne buckle, until you reach the plastic tip at the end (see no. 4 in
illustration 2 on page 2).
6
Take the end of the part of the neck strap that was rst attached to the binoculars, then pass it through the
plastic ring on the short part of the neck strap (see illustration 3 on page 2).
7
Pull the strap so that you can then pass it into the plastic loop further up (see illustrations 4 and 5 on page 2).
8
Pass the neck strap over your head and adjust the position of the binoculars to suit you, by adjusting how much
of the strap is threaded into the buckle.
DE
Vielen Dank, dass Sie das KODAK BCS100 Fernglas für Ihr Kind ausgewählt haben. Wir hoffen, dass es ihm viel Freude
bereiten wird. Bitte lesen Sie vor der Benutzung gemeinsam mit Ihrem Kind die Hinweise zur Einstellung, Bedienung
und Pege dieses Fernglases sorgfältig durch und bewahren Sie diese Anleitung zum steren Nachschlagen auf.
SICHERHEITSHINWEISE
- Niemals durch das Fernglas in die Sonne oder in eine starke Lichtquelle schauen, da dies zu schweren
Augenverletzungen oder Blindheit führen kann.
- Das Fernglas niemals so ausrichten, dass es direktes Sonnenlicht einfängt. Durch die ndelung des Lichts kann das,
worauf sie das Fernglas richten, Feuer fangen, wenn es sich um leicht entammbares Material handelt.
- Das Fernglas niemals beim Gehen benutzen, um sich bei einem Sturz nicht zu verletzen.
- Das Fernglas nicht am Halsband schwingen, um keine Person in der Nähe zu treffen.
- Darauf achten, sich beim Einstellen des Augenabstands des Fernglases nicht die Finger einzuklemmen.
- Ein ngeres Belassen der Augenmuscheln auf empndlicher Haut kann zu Hautreizungenhren. Bei Entzündungen im
Augenbereich das Fernglas nicht mehr benutzen und sofort einen Arzt aufsuchen.
- Zubehör (Halsband, Mikrofasertuch) und Verpackungsmaterial außerhalb der Reichweite von Kleinkindern und Haustieren
aufbewahren, um Erstickungs- oder Strangulationsgefahr zu vermeiden.
ACHTUNG! Nicht r Kinder unter 36 Monaten geeignet. Kleine Teile und langes Umhängeband. Erstickungs-
und Strangulierungsgefahr.
VORSICHTSMASSNAHMEN
- Dieses Fernglas ist ein optisches Instrument, das mit größtglicher Vorsicht behandelt und transportiert werden
muss. Durch grobe Handhabung, starke Stöße oder versehentliches Fallenlassen kann die optische Ausrichtung
beeinträchtigt werden, sodass das Bild bei der Betrachtung verdoppelt wird. Darauf achten, dass das mitgelieferte
Halsband fest an den beiden Gurtführungen des Fernglases befestigt ist und vor Gebrauch anlegen.
- Das Fernglas sollte auf einer ebenen Fläche abgelegt werden, wenn das Halsband abgenommen wird.
- Wenn das Fernglas nicht mehr gebraucht wird, sollte es in seinem Etui verstaut und dann an einem hlen, trockenen
Ort aufbewahrt werden.
- Dieses Fernglas ist nicht wasserdicht. Nicht Spritzwasser, starkem Regen oder übermäßiger Feuchtigkeit aussetzen.
Wenn sich auf den Okularen und Objektiven Kondenswasser bildet, muss das Fernglas bei Raumtemperatur trocknen,
bevor es in der Tasche verstaut wird.
- Das Fernglas nicht in der Nähe einer übermäßigen Hitzequelle liegen lassen, um die darin enthaltenen Schmiermittel und
Isolierungen nicht zu beeinträchtigen.
- Das Fernglas bei einem Defekt auf keinen Fall auseinanderbauen! Wenden Sie sich an den ndler, bei dem Sie es
gekauft haben, damit dieser eine eventuelle Reparatur durch unseren Kundendienst vornehmensst.
BEFESTIGUNG DES HALSBANDES
Um das Halsband sicher am Fernglas zu befestigen, gehen Sie wie folgt vor:
1
Den Teil des Halsbandes, dessen Riemen am längsten ist, am Fernglas befestigen, indem Sie die nne Schlaufe des
Endes in eine der Gurthrungen (von unten) einführen und dann ganz herausziehen (siehe Nr. 1 in Abbildung 1 auf Seite 2).
2
Das Halsband vollständig durch die nne Schlaufe hren (siehe Nr.2 in Abbildung 2 auf Seite 2).
3
Den mit einem Kunststoffring verbundenen Teil des Halsbandes lösen.
4
Die nne Schlaufe dieses Endes in die andere Gurtführung des Fernglases (von unten) einführen und dann ganz
herausziehen (siehe Nr. 3 in Abbildung 2 auf Seite 2).
5
Das Gurtband mit dem Kunststoffring durch die dünne Schlaufe führen, bis die Kunststoffkappe dieses Ende durchläuft
(siehe Nr. 4 in Abbildung 2 auf Seite 2).
6
Das Ende des Gurts von dem Teil des Halsbandes, der zuerst am Fernglas befestigt wurde, nehmen und durch den
Plastikring am kurzen Teil des Halsbandes ziehen (siehe Abbildung 3 auf Seite 2).
7
Am Band ziehen, um es anschließend durch die vorgelagerte Kunststoffschlaufe zu ziehen (siehe Abbildungen 4 und
5 auf Seite 2).
8
Das Halsband anlegen und die Position des Fernglases nach Belieben einstellen, indem Sie mehr oder weniger Band
durch die Schnalle laufen lassen.
ES
Le agradecemos que haya escogido nuestros prismáticos KODAK BCS100 para su hijo y esperamos que le
satisfagan por completo. Por favor, lea con él atentamente las instrucciones relativas a la regulación, la utilización y
el mantenimiento de estos prismáticos antes de usarlos y conservar estas instrucciones para posteriores consultas.
CONSIGNAS DE SEGURIDAD
- No mire nunca el sol o una fuente de luz intensa a través de los prismáticos para evitar cualquier riesgo de lesión
ocular o de ceguera.
- No oriente nunca los pristicos de forma que capten directamente los rayos del sol. La focalización de la luz
puede provocar la combustión de lo que están enfocando si se trata de un material cilmente inamable.
- Evite usar los prismáticos mientras va andando: si se le caen, le pueden hacer daño.
- No se divierta balanceando los prismáticos por la correa de cuello, podría golpear a alguna persona próxima.
- Tenga cuidado de no pillarse los dedos al regular la distancia interpupilar de los prismáticos.
-
Un mantenimiento prolongado de los bordes de los oculares en una piel sensible puede provocar una irritacn cutánea.
En caso de inamación del contorno de ojos, deje de usar los prismáticos de inmediato y consulte a un médico.
- Mantenga los accesorios (correa de cuello, tela de microbra) y materiales de embalaje fuera del alcance de los
niños y los animales domésticos para evitar cualquier riesgo de ahogamiento o estrangulación.
¡ATENCIÓN! No conviene para niños menores de 36 meses. Piezas pequeñas y corn largo. Peligro de
asxia y estrangulamiento.
PRECAUCIONES DE EMPLEO
- Estos prismáticos son un instrumento óptico de precisión que necesitan ser manipulados y transportados con las
mayores precauciones posibles. Una manipulación brusca, un golpe violento o una caída accidental pueden alterar
la alineación de los cristales y provocar un desdoblamiento de la imagen al mirar por ellos. Por tanto, procure que
la correa de cuello esté bien sujeta a los dos pasajes de la correa de los prismáticos y ponérselos antes de cada uso.
- Coloque delicadamente los prismáticos en una supercie plana cuando se quite la correa de cuello.
-
Cuando p1-ya no esté usando los prismáticos, se recomienda guardarlos en su estuche y ponerlos en un lugar fresco y seco.
- No exponga los prismáticos no estancos a salpicaduras de agua, lluvia fuerte o humedad excesiva. Si se forma
condensación en los oculares y los objetivos, deje que se sequen los prismáticos a temperatura ambiente antes
de guardarlos en su estuche.
- No deje los prismáticos cerca de una fuente de calor excesivo para evitar que se alteren los lubricantes y aislantes
que estos incluyen.
- ¡En caso de fallo, no trate en ningún caso de desmontar los prismáticos! Vaya a la tienda donde los p1-ha comprado
para que esta confíe su eventual reparación a nuestro servicio posventa.
FIJACIÓN DE LA CORREA DE CUELLO
Para jar lidamente la correa para el cuello a los prismáticos, proceda como sigue:
1
Sujetar la parte de la correa de cuello en la que la correa es más larga en los prismáticos, insertando la hebilla na
por el extremo en uno de los pasajes de la correa (por debajo de este) y sacarla después por completo (ver n°1 en
la ilustración 1 en la g. 2).
2
Introducir toda la correa de cuello en la hebilla na (ver 2 en la ilustracn 1 en la pág. 2).
3
Soltar la parte de la correa de cuello sujeta con un anillo de plástico.
4
Insertar la hebilla na de este extremo en el otro pasaje de la correa de los prismáticos (por debajo de este) y
sacarla después por completo (ver n°3 en la ilustracn 2 en la g. 2).
5
Introducir la correa con el anillo de plástico en la hebilla na hasta que pase por la boquilla de plástico de este
extremo (ver 4 en la ilustración 2 en la pág. 2).
6
Coger la punta de la correa por la parte de la correa de cuello que p1-ha estado sujeta primero a los prismáticos
y pasarla luego por el anillo de plástico de la parte corta de la correa de cuello (ver ilustracn 3 en la pág. 2)
7
Tirar de la correa para poder pasarla por la hebilla de plástico que se encuentra s cerca (ver ilustraciones
4 y 5 en la g. 2).
8
Ponerse la correa de cuello y ajustar la posición de los prismáticos a su conveniencia metiendo más o menos
la correa desdoblada en la hebilla.
3
4
5
1
1
2
2
3
4
ADJUSTMENT OF THE INTERPUPILLARY DISTANCE
The interpupillary distance (= the space between the centres of the pupils) varies from one child to the next, it is
therefore essential that your child rst adjust the position of eyepieces to t his or her face. To correctly align the
eyepieces with the eyes, proceed as follows:
1
Hold the binoculars rmly in both hands, and place the eyepieces level with your eyes.
2
Look through the eyepieces and target something in the distance, without turning the central focussing wheel.
3
Move the tubes of the binoculars together or apart, until you see just one image circle when looking through
with both eyes.
4
Adjust the dened position more precisely to obtain a clean image, with no dark areas.
5
Memorise and always reapply this setting before using your binoculars.
FOCUSSING AND DIOPTER ADJUSTMENT
These binoculars are equipped with a central focussing wheel and an eyepiece with a diopter adjustment function,
to allow for minor deviations in the vision in each of your childs eyes. Having correctly adjusted the interpupillary
distance, proceed with the adjustment of the focus and the diopter, by following these steps:
1
Align the diopter adjustment marker with the 0 on the right eyepiece.
2
Close your right eye or cover the right eyepiece with your hand, and look through the left eye cup with your left eye.
3
Select a distant object with a high level of detail (e.g. a ower, the branches of a tree etc.) and turn the central
focussing wheel until the image appears as clean and clear as possible in the left eyepiece.
4
Close your left eye or cover the left eyepiece with your hand, then look at the same object through the right
eyepiece, with your right eye.
5
Turn the right eyepiece to focus the image in the eyepiece, making sure not to rotate too far or to force the
rotation, so as not to cause damage.
Note: if you cannot manage to focus the image in the right eyepiece by adjusting the diopter, then the image in the
left eyepiece has probably been inadvertently misaligned. In this case you will have to repeat steps 2 to 4.
6
You’re done adjusting the binoculars! It is now possible to look through the eyepieces with both eyes. All you will
have to do is turn the central focussing wheel to focus the image of an object at a different distance.
Note: it is recommended that you take note of the adjustment of the position of the diopter adjustment marker on
the binoculars, so that they can be more quickly adjusted if the right eyepiece is accidentally rotated, or if someone
else uses the binoculars.
MAINTENANCE TIPS
Regularly clean the eyepieces and lenses to prevent dirt from obscuring the passage of light and impairing the
image quality.
The steps for optimal cleaning are as follows:
1
Remove dust and other dirt on the eyepieces and lenses using a blower bulb, a soft optical cleaning brush, or a
compressed air cannister.
2
Gently wipe their surface with the microbre cloth provided, using a circular motion.
Note: be sure not to press too heavily and avoid using an absorbent paper towel or a paper tissue so as not to
damage the coating on the lenses or scratch them.
3
You can also apply a cleaning uid for photographic lenses or glasses to the microbre cloth. In this case, gently
wipe the lenses using a circular motion, from the centre to the outside of the lens.
Note: do not apply the uid directly to the lenses, and do not use a household cleaning product, such as window cleaner.
4
Avoid t
ouching the lenses as much as possible, and systematically clean off any ngerprints after contact, as the
acidity of the skin can also damage their coating.
5
To clean the surface of the binoculars, rst blow off any dirt that has accumulated in the recesses, then run a soft
and clean cloth, which has, if necessary, been slightly dampened, over the entire surface to remove any marks.
Note: do not apply benzene, thinners, or other organic solvents.
6
Never disassemble these binoculars to clean the inside!
AJUSTEMENT DE LA DISTANCE INTERPUPILLAIRE
La distance interpupillaire (= espace entre le centre des pupilles) varie dun enfant à l’autre, il est donc tout dabord
cessaire que votre enfant règle la position des oculaires selon la sienne. Pour aligner correctement les oculaires
avec ses yeux, il faut procéder comme suit :
1
Tenir fermement les jumelles avec les deux mains et placer les œilletons au niveau des yeux.
2
Regarder à travers les oculaires et cibler quelque chose d’éloigsans faire tourner la molette de mise au
point centrale.
3
Rapprocher ou écarter les tubes des jumelles jusqu’à voir un seul et même cercle d’image avec les deux yeux.
4
Ajuster plus minutieusement la position dénie an d’obtenir une image nette et sans zone dombre.
5
moriser et toujours reproduire ce réglage avant de se servir des jumelles.
MISE AU POINT ET GLAGE DIOPTRIQUE
Ces jumelles sont équipées d’une molette de mise au point centrale et d’un oculaire avec fonction de réglage dioptrique
pour tenir compte d’une légère différence de vision entre les yeux de votre enfant. Après avoir correctement ajusla
distance interpupillaire, il faut procéder au réglage de la mise au point et de la dioptrie en suivant les étapes suivantes :
1
Aligner le repère du réglage dioptrique avec le 0 gurant sur l’oculaire droit.
2
Fermer l’œil droit ou couvrir l’objectif droit avec sa main droite et regarder avec l’œil gauche à travers l’œilleton gauche.
3
Fixer un objet distant présentant de nombreux détails (ex. : une eur, les branches d’un arbre, etc.) et tourner la molette
de mise au point centrale jusquà ce que l’image apparaisse aussi nette et claire que possible dans l’œilleton gauche.
4
Fermer l’œil gauche ou couvrir l’objectif gauche avec sa main gauche puis observer ce même objet avec l’œil
droit à travers l’œilleton droit.
5
Tourner l’oculaire droit pour effectuer la mise au point de l’image au sein de celui-ci en évitant dexagérer ou de
forcer la rotation pour ne pas l’endommager.
Remarque : si la mise au point de l’image dans l’œilleton droit échoue en réglant la dioptrie, alors celle effectuée
dans l’œilleton gauche a probablement été glée par mégarde. Dans ce cas, il faut reproduire les étapes 2 à 4.
6
Le réglage des jumelles est termi! Il est désormais possible de regarder à travers les œilletons avec les deux
yeux. Il faudra seulement tourner la molette de mise au point centrale pour mettre au point l’image d’un objet
situé à une autre distance.
Remarque : il est recommandé de prendre note de la position du repère du réglage dioptrique des jumelles pour
lesgler plus rapidement si l’oculaire droit a tourné accidentellement ou si quelqu’un d’autre utilise les jumelles.
CONSEILS D’ENTRETIEN
Les oculaires et objectifs doivent être nettos régulrement pour éviter que de la saleté nentrave la transmission
de lumière et altère la qualid’image.
Voici les étapes à suivre pour un nettoyage optimal :
1
Retirer la poussière et autres saletés présentes sur les oculaires et objectifs à l’aide d’une poire soufante,
d’un pinceau de nettoyage optique doux ou d’une bombe d’air pressurisé.
2
Frotter délicatement leur surface avec le tissu en microbres fourni en effectuant un mouvement circulaire.
Remarque :
ne pas appuyer trop fort et se servir d’un chiffon rêche de type papier absorbant ou mouchoir en papier
pour éviter d’endommager le revêtement des lentilles ou les rayer.
3
Un liquide de nettoyage pour objectif photographique ou lunettes peut être appliqué sur le tissu en microbres en
complément. Dans ce cas, il faut frotter les lentilles en effectuant un mouvement circulaire du centre vers l’extérieur.
Remarque
: ne pas en appliquer directement sur les lentilles et utiliser un produit d’entretien ménager tel que du
nettoyant à vitres.
4
Éviter au maximum de toucher les lentilles et nettoyer sysmatiquement toute trace de doigt après contact car
l’acidide la peau peut également endommager leur revêtement.
5
Pour nettoyer la surface des jumelles, il faut d’abord soufer la saleté accumulée dans les recoins puis passer un
chiffon doux et propre, légèrement humidié si besoin, sur toute la surface an d’éliminer déventuelles traces.
Remarque :
ne pas appliquer de benzène, diluant ou autre solvant organique.
6
Ne jamais démonter ces jumelles pour en nettoyer l’intérieur !
ANPASSUNG DES AUGENABSTANDS
Der Augenabstand (= Abstand zwischen den Pupillenmitten) ist von Kind zu Kind unterschiedlich, daher ist es zunächst
notwendig, die Position der Okulare nach dem individuellen Augenabstand auszurichten. Um die Okulare korrekt an den
Augen auszurichten, wie folgt vorgehen:
1
Das Fernglas mit beiden Händen festhalten und die Okulare auf Augenhöhe bringen.
2
Durch die Okulare schauen und etwas Entferntes anvisieren, ohne das zentrale Fokussierrad zu drehen.
3
Die Fernglastuben näher zusammen oder weiter auseinander bewegen, bis mit beiden Augen ein einziger Bildkreis gesehen wird.
4
Die eingestellte Position genauer anpassen, um ein scharfes Bild ohne dunkle Bereiche zu erhalten.
5
Diese Einstellung merken und vor der Benutzung des Fernglases anwenden.
FOKUSSIERUNG UND DIOPTRIENEINSTELLUNG
Dieses Fernglas ist mit einem zentralen Fokussierrad und einem Okular mit Dioptrieneinstellfunktion ausgestattet,
um leichte Unterschiede in der Sehkraft zwischen den Augen Ihres Kindes zu kompensieren. Nachdem der Augenabstand
richtig eingestellt wurde, die Einstellung der Schärfe und der Dioptrien wie folgt vornehmen:
1
Die Markierung für die Dioptrieneinstellung an der 0 auf dem rechten Okular ausrichten.
2
Das rechte Auge schließen oder das rechte Objektiv mit der Hand abdecken und mit dem linken Auge durch die linke
Augenmuschel blicken.
3
Ein entferntes Objekt mit vielen Details anvisieren (z. B. eine Blume, die Äste eines Baumes o.ä.) und das zentrale
Fokussierrad drehen, bis das Bild im linken Okular möglichst scharf und klar erscheint.
4
Das linke Auge schließen oder das linke Objektiv mit der Hand abdecken und dann dasselbe Objekt mit dem rechten
Auge durch die rechte Augenmuschel betrachten.
5
Das rechte Okular drehen, um das Bild innerhalb des Okulars zu fokussieren, wobei die Drehung nicht übertrieben oder
erzwungen werden darf, um es nicht zu beschädigen.
Hinweis:
wenn die Fokussierung des Bildes in der rechten Augenmuschel beim Einstellen der Dioptrie nicht gelingt, dann wurde
die Fokussierung in der linken Augenmuschel wahrscheinlich versehentlich verstellt. In diesem Fall die Schritte 2 bis 4 wiederholen.
6
Die Einstellung des Fernglases ist abgeschlossen! Es ist nun glich, mit beiden Augen durch die Augenmuscheln zu
schauen. Um ein Objekt in einer anderen Entfernung zu fokussieren, muss nur das zentrale Fokussierrad gedreht werden.
Hinweis:
es wird empfohlen, sich die Position der Markierung für die Dioptrieneinstellung zu notieren, um das Fernglas schneller
einstellen zu können, wenn sich das rechte Okular versehentlich gedreht hat oder jemand anderes das Fernglas benutzt.
PFLEGEHINWEISE
Die Okulare und Objektive müssen regelmäßig gereinigt werden, damit kein Schmutz die Lichtdurchlässigkeit behindert
und die Bildqualität beeinträchtigt.
Diese Schritte sollten Sie r eine optimale Reinigung befolgen:
1
Staub und andere Verschmutzungen auf Okularen und Objektiven mithilfe eines Trockenpusters, eines weichen
Reinigungspinsels r optische Geräte oder einer Druckluftdose entfernen.
2
Die Oberächen mit dem mitgelieferten Mikrofasertuch in kreisförmigen Bewegungen sanft abreiben.
Hinweis:
nicht zu fest drücken und ein weiches Tuch wie Küchenpapier oder ein Papiertaschentuch verwenden, um die
Beschichtung der Linsen nicht zu bescdigen oder zu verkratzen.
3
Zusätzlich kann eine Reinigungsüssigkeit für Fotoobjektive oder Brillen auf das Mikrofasertuch aufgetragen werden.
In diesem Fall die Linsen vorsichtig mit einer kreisförmigen Bewegung von der Mitte nach außen abwischen.
Hinweis:
nicht direkt auf die Linsen auftragen und ein Haushaltsmittel wie z. B. Glasreiniger verwenden.
4
Die Linsen glichst nicht berühren und Fingerabdrücke nach Kontakt konsequent reinigen, da die ure der Haut die
Beschichtung beschädigen kann.
5
Um die Oberäche des Fernglases zu reinigen, zuerst den angesammelten Schmutz aus den Ecken pusten und dann
mit einem weichen, sauberen Tuch, das bei Bedarf leicht angefeuchtet wird, über die gesamte Oberäche wischen,
um eventuelle Flecken zu entfernen.
Hinweis:
kein Benzol, Verdünner oder andere organischesungsmittel auftragen.
6
Das Fernglas niemals auseinanderbauen, um das Innere zu reinigen!
AJUSTE DE LA DISTANCIA INTERPUPILAR
La distancia interpupilar (= espacio entre el centro de las pupilas) varía de una persona a otra. Por eso, antes que
nada, hay que regular la posición de los oculares de los prismáticos según su distancia. Para alinear correctamente
los oculares con los ojos, proceda como sigue:
1
Mantenga rmemente los prismáticos con las dos manos y ponga los oculares a la altura de los ojos.
2
Mire por los oculares y ntrese en algo apartado sin girar la rueda de puesta a punto central.
3
Acerque o aleje los tubos de los prismáticos hasta ver un solo rculo de imagen con los ojos.
4
Ajuste de forma más minuciosa la posicn denitiva para obtener una imagen nítida y sin zona de sombra.
5
Memorice y reproduzca siempre esa regulación antes de usar los prismáticos.
PUESTA A PUNTO Y REGULACIÓN DIÓPTRICA
Estos prismáticos están equipados con una rueda de ajuste de puesta a punto central y un ocular con función de regulacn
dióptrica para tener en cuenta si hay una ligera diferencia de visión entre los ojos de su hijo. Después de haber ajustado
correctamente la distancia interpupilar, proceda a regular la puesta a punto y las dioptrías sen las etapas siguientes:
1
Alinee el punto de referencia de la regulación dptrica con el 0 que aparece en el ocular derecho.
2
Cierre el ojo derecho o cubra el objetivo derecho con la mano y mire con el ojo izquierdo a través del ocular izquierdo.
3
jese en un objeto distante que presente numerosos detalles (ej.: una or, las ramas de un árbol, etc.) y gire la
rueda de ajuste de puesta a punto central hasta que la imagen aparezca lo más nítida y clara que sea posible
en el ocular izquierdo.
4
Cierre el ojo izquierdo o cubra el objetivo izquierdo con la mano izquierda y observe el mismo objeto con el ojo
derecho a través del ocular derecho.
5
Girar el ocular derecho para hacer la puesta a punto de la imagen en esta evitando exagerar o forzar el giro
para no dañarla.
Observación: si no consigue poner a punto la imagen en el ocular derecho al regular la dioptría, será porque,
probablemente, la puesta a punto de la imagen en el ocular izquierdo se p1-ha estropeado por descuido. En ese caso,
habrá que repetir las etapas de 2 a 4.
6
¡Los prismáticos p1-ya están regulados! Ya se puede mirar a través del ocular con los dos ojos. Solo habque girar
la rueda de ajuste de puesta en el punto central para poner a punto la imagen de un objeto situado a otra distancia.
Observación: se recomienda tener en cuenta la ubicacn del punto de referencia de la regulacn dióptrica de los prismáticos
para regularlos rápidamente si el ocular derecho se desplaza de manera accidental u otra persona utiliza los prismáticos.
CONSEJOS DE MANTENIMIENTO
Los oculares y objetivos deben limpiarse con regularidad para evitar que la suciedad impida el paso de la luz y altere
la calidad de la imagen.
Estas son las etapas que hay que seguir para que la limpieza sea óptima:
1
Retirar el polvo y otra suciedad que haya en los oculares y los objetivos con una pera de aire, un pincel de
limpieza óptico suave o una bomba de aire presurizado.
2
Frotar delicadamente la supercie con la tela de microbra incluida realizando un movimiento circular.
Observación: procure no apretar mucho y usar un trapo áspero tipo papel absorbente o puelo de papel para no
dañar el revestimiento de las lentes o rayarlas.
3
Puede aplicar un quido de limpieza para objetivos fotográcos o gafas en la tela de microbra como
complemento. En ese caso, hay que frotar las lentes efectuando un movimiento circular del centro al exterior.
Observación: no aplicar directamente en las lentes y usar un producto de limpieza doméstica como el limpiacristales.
4
Evitar al máximo tocar las lentes y limpiar sistemáticamente cualquier huella de dedos después del contacto,
porque la acidez de la piel tambn puede dañar su revestimiento.
5
Para limpiar la supercie de los prismáticos, sople primero la suciedad acumulada en los huecos. Pase desps un
trapo suave y limpio, ligeramente humedecido si es necesario, por toda la supercie para eliminar los posibles restos.
Observación: no aplicar benceno, diluyente ni otro disolvente orgánico.
6
¡No desmontar nunca los prismáticos para limpiar el interior!
Passagens para a alça Bevestigingsogen voor de /
draagriem / Otwory na taś/ nthurok / Otvor pro
průchod popruhu
5 Tubes containing the prisms Tubes comprenant les /
prismes / / Tuben mit enthaltenen Prismen Tubos que
incluyen los prismas Tubi che includono i prismi / /
Tubos com prismas Buizen met prisma’s Tubusy z / /
pryzmatami Prizmatartó csövek / Tubusy s hranoly/
6 Objectives / Objectifs Objektive Objetivos / / /
Obiettivi / Objetivas / Objectieven / Obiektywy /
Objektívlencsék / Čočky
User manual
Manuel d’utilisation
Bedienungsanleitung
Manual de usuario
Manuale d’uso
Manual do usuário
Gebruikershandleiding
Podręcznik użytkownika
Felhasználói kézikönyv
Uživatels íručka
NL
We danken u voor het kiezen van onze verrekijker
KODAK BCS100
voor uw kind en hopen dat hij of zij er plezier
aan beleeft. Neem voor gebruik samen met hem of haar de instructies met betrekking tot het instellen, gebruiken
en onderhouden aandachtig door en bewaar deze handleiding voor toekomstig gebruik.
VEILIGHEIDSINSTRUCTIES
- Kijk met de verrekijker nooit in de zon of naar een felle lichtbron om ernstig oogletsel of blindheid te voorkomen.
- Richt de verrekijker nooit rechtstreeks op de zonnestralen. Het focussen van het licht kan gemakkelijk
ontvlambaar materiaal in brand doen vliegen.
- Gebruik de verrekijker niet tijdens het lopen, anders kun je jezelf verwonden als je valt.
- Draai de verrekijker niet rond aan de draagriem, omdat je iemand die vlakbij is, kunt raken.
- Zorg ervoor dat je vinger niet klem komt te zitten tijdens het instellen van de pupilafstand.
- Bij lang contact met een gevoelige huid kunnen de oogschelpen een huidirritatie veroorzaken. Als er een
ontsteking ontstaat rondom de ogen, moet je het gebruik van de verrekijker onmiddellijk stoppen en een arts
raadplegen.
- Houd de accessoires (draagriem, microvezeldoekje) en verpakkingsmaterialen buiten het bereik van jonge
kinderen en huisdieren om elk risico op verstikking of wurging te voorkomen.
WAARSCHUWING! Niet geschikt voor kinderen beneden de 36 maanden. Kleine onderdelen en lange
lanyard. Gevaar van verstikking en wurging.
VOORZORGSMAATREGELEN VOOR GEBRUIK
- Deze verrekijker blijft een nauwkeurig optisch hulpmiddel dat zo voorzichtig mogelijk gehanteerd en vervoerd moet
worden. Het ruw behandelen, het hard stoten of het per ongeluk laten vallen van de verrekijker kan de optische
uitlijning ontregelen en zorgen voor een dubbel beeld. Je moet er dus op letten dat de meegeleverde draagriem
goed wordt bevestigd aan de twee ogen van de verrekijker en zorg dat je hem om je nek hangt voor elk gebruik.
- De verrekijker moet op een plat oppervlak worden geplaatst voordat je de draagriem afdoet.
- Als je de verrekijker niet meer gebruikt, dan wordt aangeraden om hem in het hoesje te stoppen en hem te bewaren op
een koele en droge plek.
- Deze verrekijker is niet waterdicht. Je moet hem dus niet blootstellen aan waterspetters, een regenbui of een erg hoge
luchtvochtigheid. Als er zich condens heeft gevormd op de oculairs en de objectieven, is het nodig de verrekijker eerst
te laten drogen bij kamertemperatuur voordat je hem in het hoesje stopt.
- Bewaar de verrekijker niet in de buurt van een hittebron, zodat het smeermiddel en het isolatiemateriaal aan de
binnenkant niet worden aangetast.
- Haal je verrekijker nooit uit elkaar in geval van een defect! Neem contact op met de winkel waar jullie hem hebben
gekocht, zodat hij eventueel gerepareerd kan worden via de klantenservice.
BEVESTIGING VAN DE DRAAGRIEM
Doe het volgende om de draagriem stevig vast te maken aan de verrekijker:
1
Bevestig het langste gedeelte van de draagriem aan de verrekijker door de dunne lus aan het uiteinde door een van
de ogen te steken (via de onderkant) en hem er helemaal doorheen te trekken (zie nr. 1 in afbeelding 1 op pagina 2).
2
Trek de draagriem helemaal door de dunne lus heen (zie nr. 2 in afbeelding 1 op pagina 2).
3
Maak het gedeelte van de draagriem los dat vastzit is met een kunststof ring.
4
Steek de dunne lus aan dit uiteinde door het andere oog van de verrekijker (via de onderkant) en trek hem er helemaal
doorheen (zie nr. 3 in afbeelding 2 op pagina 2).
5
Trek de riem met de kunststof ring door de dunne lus tot voorbij het stukje kunststof aan dit uiteinde (zie nr. 4 in
afbeelding 2 op pagina 2).
6
Pak het uiteinde van het gedeelte van de draagriem die je als eerste hebt vastgemaakt aan de verrekijker en haal deze
door de kunststof ring heen aan het korte einde van de draagriem (zie afbeelding 3 op pagina 2).
7
Trek aan de riem zodat je hem vervolgens door de kunststof gesp heen kunt halen die zich verderop bevindt
(zie afbeeldingen 4 en 5 op pagina 2).
8
Hang de verrekijker om je nek en pas de positie naar wens aan door de draagriem losser of vaster te schuiven met
de gesp.
PO
Dzkujemy za zakup lornetki KODAK dla dzieci. Mam nadzieję, że będziecie zadowoleni z tego BCS100
zakupu. Prosimy o dokładne zapoznanie się z instrukcjami ustawienia, użytkowania i konserwacji lornetki
przed jej użyciem. Zachowaj instrukcję, ponieważ może s przydw przyszłci.
ZASADY BEZPIECZEŃSTWA
- Nigdy nie patrz przez lornet na słońce lub inne źródło intensywnego świaa, aby uchron się przed
poważnym uszkodzeniem oczu lub ślepotą.
- Nigdy nie ustawiaj lornetki w taki spob, aby bezpośrednio przechwytywa promienie słoneczne.
Koncentrowanie światła może spowodować zapalenie łatwopalnego materiału, na który te promienie bępadać.
- Nie używaj lornetki w trakcie chodzenia, ponieww razie upadku me spowodować zranienie.
- Nie machaj lornet na pasku, ponieważ możesz uderzyć n oso w pobliżu.
- Uważaj, aby nie przyciąć sobie palców podczas regulacji rozstawu oczu.
- ugotrwałe dociskanie muszli ocznych do wrażliwej skóry może spowodować podrażnienie skóry. W razie
podrażnienia skóry wokół oczu należy natychmiast oożyć lornetkę i zgłosić s do lekarza.
- Akcesoria (pasek, szmatka z mikrobry) i opakowania należy przechowywać z dala od zasięgu małych dzieci i
zwierząt domowych, aby nie dopuścić do ryzyka uduszenia lub zaawienia.
OSTRZEŻENIE! Nie nadaje się dla dzieci poniżej 36 miesięcy. Małe cści i długi pasek na szyję. Zagrożenie
udławieniem i uduszeniem. Ryzyko uawienia i uduszenia.
ŚRODKI OSTROŻNOŚCI
- Lornetka jest precyzyjnym przyrdem optycznym, który wymaga starannego transportu i ostrożnego
ytkowania. Gwtowne ruchy, mocne uderzenia i przypadkowe upadki mogą rozregulować ustawienia
optyczne i spowodowpodwojenie obserwowanych obraw. Zwróć uwagę, aby pasek był zamocowany na
obu otworach taśmy. Przed każdym użyciem lornetki sprawdź mocowanie paska.
- Lornetkę bez paska odłóż na askiej powierzchni.
- Jeśli nie używasz lornetki, schowaj ją do pokrowca i przechowuj w codnym i suchym miejscu.
- Lornetka nie jest wodoszczelna, więc chroń ją przed pryskaniem wody, intensywnym deszczem czy nadmierną
wilgocią. Jeśli na soczewkach i szkłach skrapla się para, zostaw lornetkę w temperaturze pokojowej i dopiero po
wysuszeniu włóż ją do pokrowca.
- Nie zostawiaj lornetki w pobliżu źróa nadmiernego ciepła, aby nie doszło do uszkodzenia znajdujących się w
niej smaw i izolatorów.
- W razie usterki w żadnym razie nie demontuj lornetki! Zwróć się do sprzedającego, aby przekazał nam sprzęt do
ewentualnej naprawy przez nasz serwis obsługi posprzedażowej.
MOCOWANIE PASKA
Aby mocno zamocować pasek do lornetki, należy wykonać następuce czynności:
1
Przymocuj część paska z najdłużs taśmą do lornetki przez enie cienkiego oczka na końcu przez jeden z
otworów na taś (od du), a następnie wyciągnij ją w całości (patrz nr 1 na rys. 1 na str. 2).
2
Przeciągnij cały pasek przez cienkie oczko (patrz nr 2 na rys. 1 na str. 2).
3
Odłącz cść paska przymocowaną za pomo plastikowego pierścienia.
4
Wsuń cienkie oczko tego kca w drugi otwór na taśmę lornetki (od spodu), a następnie wycgnij w całci
(patrz nr 3 na rys. 2 na str. 2).
5
Przeciągnij taśmę z plastikowym pierścieniem przez cienkie oczko do plastikowej końcówki (patrz nr 4 na rys.
2 na str. 2).
6
Weź końcówkę taśmy części paska, która została jako pierwsza zamocowana do lornetki i przeciągnij ją przez
plastikowy pierścień krótkiej części paska (rys. 3 na str. 2).
7
Pociągnij taśmę, aby przeciągnąć ją przez plastikowy otwór taśmy na górze (rys. 4 i 5 na str. 2).
8
Przeciągnij pasek i dopasuj jego długość do siebie, przeciągając taś.
PT
Obrigado por adquirir os binóculos KODAK BCS100 para o seu lho/a. Esperamos que sejam do seu agrado.
Leia atentamente as instruções de ajuste, utilização e manutenção antes de utilizar o produto e guarde este
folheto para refencia futura.
INSTRUÇÕES DE SEGURANÇA
- Nunca olhe para o sol ou para uma fonte de luz intensa através dos binóculos, a m de evitar qualquer risco de
lesões oculares graves ou cegueira.
- Nunca aponte os binóculos de modo que quem sob a luz direta do sol. A focalização da luz pode provocar a
queima do objeto se este for de um material altamente inamável.
- Não utilize os biculos enquanto anda para evitar magoar-se em caso de queda.
- Não balance os binóculos ao redor do pescoço para não atingir alguém que se encontre perto de si.
- Tenha cuidado para não beliscar os dedos ao ajustar a distância interpupilar dos biculos.
- O apoio prolongado da ocular sobre uma pele senvel pode causar irritão cutânea. Em caso de inamação na
zona de contorno dos olhos, pare de utilizar os biculos e consulte imediatamente um médico.
- Mantenha os acessórios (alça do pescoço, pano em microbra) e os materiais da embalagem fora do alcance
de crianças pequenas e de animais de estimação, a m de evitar qualquer risco de asxia ou estrangulamento.
ATEÃO! Contra indicado para crianças com menos de 36 meses. Peças pequenas e correia de pescoço
comprida. Riscos de asxia e estrangulamento.
PRECAUÇÕES DE UTILIZAÇÃO
- Este par de binóculos é um instrumento ótico que deve ser manuseado e transportado com o maior cuidado
possível. Um manuseamento brusco, um choque violento ou uma queda acidental podem perturbar o
alinhamento da ótica e causar uma duplicão da imagem observada. Por isso, certique-se que a alça do
pescoço fornecida está bem presa a ambos os anéis dos binóculos e coloque-a antes de utilizar o produto.
- Os binóculos devem ser pousados sobre uma superfície plana assim que retirar a alça do pescoço.
- Quando terminar de utilizar os biculos, recomenda-se que os coloque no respetivo estojo e guarde num local
fresco e seco.
- Estes binóculos o são impermeáveis, portanto não devem ser expostos a salpicos de água, chuva intensa ou
humidade excessiva. Se se formar condensação nas oculares e nas objetivas, é necesrio deixar os biculos
secarem à temperatura ambiente antes de os guardar no respetivo estojo.
-
Não deixe os binóculos perto de uma fonte de calor excessivo de forma a evitar danicar os lubricantes e isolantes no interior.
- Em caso de defeito o tente, em caso algum, desmontar os seus biculos. Contacte o revendedor ao qual
adquiriu o artigo para que este seja reparado pelo nosso serviço pós-venda.
FIXAÇÃO DA ALÇA PARA O PESCOÇO
Para xar rmemente a alça para o pescoço aos biculos, siga estes passos:
1
Prender a parte da alça para o pescoço cuja correia é mais longa aos binóculos, inserindo completamente
a presilha da respetiva extremidade numa das passagens para a correia (na parte de baixo dos biculos),
puxando-a depois completamente para fora (ver n°1 na imagem 1 na página 2).
2
Deslizar completamente toda a alça através da presilha (ver n°2 na imagem 1 na gina 2).
3
Desapertar um pouco a parte da alça unida por um anel de plástico, criando uma folga.
4
Inserir a presilha desta extremidade na outra passagem para a alça nos binóculos (por baixo) e, em seguida,
puxá-la completamente (ver n°3 na imagem 2 na página 2).
5
Deslizar a alça com o anel de plástico pela presilha até a peça de plástico passar nesta extremidade (ver n°4
na imagem 2 na página 2).
6
Pegar na extremidade da alça da parte que foi presa aos binóculos inicialmente e depois passá-la através do
anel de plástico da parte curta da alça (ver imagem 3 na página 2).
7
Puxar a alça de modo que esta passe através da vela de plástico que se encontra acima (ver imagens 4 e 5
na gina 2).
8
Colocar a alça ao pescoço e ajustar a posão dos biculos conforme pretendido, o que pode ser feito
passando mais ou menos a alça através de cada uma das velas.
HU
szönk, hogy a KODAK BCS100 távcsönket lasztotta gyermeke számára, és reméljük, hogy ömmel
fogja használni. Kérjük, az el használat előtt gyelmesen olvassák el együtt a távcső beáltására, használatára és
karbantartására vonatkozó utasításokat, és őrizze meg ezt az útmutatót későbbi használatra.
BIZTONGI UTATÁSOK
- A szemkárosodás vagy a megvakulás kockázatának elkelése érdeben soha nem szabad a napba vagy erős
fényforsba nézni a távcsön keresztül.
- Soha ne állítsa a távcsövet úgy, hogy az közvetlenül befogja a napsugarakat. A fókuszált fény tüzet okozhat azon
a tárgyon, amelyre irányul, a termék pedig gyúlékony anyagból készült.
- A távcsövet nem szabad rászben használni, mert elesés esetén sérülést okozhat.
- A távcsövet nem szabad lengetni a nyak körül, mertrülést okozhat a közelben léknek.
- Vigyázzon, hogy ne cpje be az ujjait a távcn a pupillatávolság beállításakor.
- A érzékeny bőrön a szemkagyhosszú ideig történő tartása rirritációt okozhat. Ha a szem környéke begyullad,
azonnal abba kell hagyni a távcső használatát, és orvoshoz kell fordulni.
- A tartozékokat (nyakpánt, mikroszálas kendő) és a csomagolóanyagokat tartsa távol kisgyermekektől és a
ziállatokl a fullas kockázatának elkelése érdekében.
FIGYELEM! 36 hónaposnál atalabb gyermekek számára nem alkalmas. Kis szek és és hosszú nyakpánt.
Fulladás és fojtogatás veszélye.
ÓVINTÉZKEDÉSEK
- Ez a távcső egy optikai eszköz, amelyet a lehelegnagyobb gondossággal kell kezelni és szállítani. A durva
mozdulatok, egy ütés vagy véletlen leejtésvetkeztében az optika elállítódhat, ami a kép megkétszereződését
okozhatja. Ezért fontos, hogy a mellékelt nyakpántot biztongosan rögzítse a vc mindkét
hevederhurokjához, és a gyermek minden távcsőhasználat előtt akassza a nyakába.
- A nyakpánt levételét követően a távcsövet sík felületre kell helyezni.
- Haszlaton kívül ajánlott a távcvet a tokjában tárolni egy hűvös és száraz helyen.
- Ez a vcnem vízálló, ezért nem érheti fröccsenő víz, erős eső vagy túlzott ra. Ha pára csapódik le a
szemlencséken és az objektíveken, hagyja a távcsövet szobahőmérsékleten megszáradni, mielőtt a tokjába tenné.
- Nem szabad a távcsövet erős hőforrászelében hagyni a termékben lé anyagok és szigetelők károsodásának
elkerülése érdekében.
- Hiba esetén soha ne próbálja meg szétszerelni a távcsövet! Lépjen kapcsolatba az értékesítő hellyel, és bízza a
javítást a veszolgálatunkra.
A NYAKNT RÖGTÉSE
A nyakpánt biztonságos röghez kövesse az alábbi lépéseket:
1
gzítse a nyakpánt leghosszabb részét a távcsőhöz oly módon, hogy a pánt végén vékony hurkot (alulról)
bevezeti a távcső egyik hevedertartó nyílásába, majd teljesen kihúzza (lásd az 1. számot az 1. ábrán a 2. oldalon).
2
Teljesen vezesse át a nyakntot a vékony hurokban (lásd az 2. számot az 1. ábrán a 2. oldalon).
3
Oldja le a pánt műanyag gyűrűvel összekötött részét.
4
Illessze az ezen a pántvégen lé vékony hurkot a távchevedertartó nlásába (alulról), majd húzza ki teljesen
(lásd az 3. számot az 2. ábrán a 2. oldalon).
5
zza át a műanyag gyűrűs ntot a vékony hurokban, amíg el nem éri ennek a nek műanyag t (lásd az
4. számot az 2. ábrán a 2. oldalon).
6
Fogja meg a pánt végét azon a részen, amelyet először rögzített a távcsőre, majd vezesse át a nyakpánt rövid
szén lévő műanyag gyűrűn (lásd a 3. ábrát a 2. oldalon).
7
zza meg a ntot, hogy át tudja vezetni a felső műanyag hurkon (lásd a 4. és 5. ábrát a 2. oldalon).
8
Vegye fel a nyakpántot, majd tetszés szerint állítsa be a távcső helyzet úgy, hogy a hurkokban előre-hátra
zza a pántot.
IT
Grazie per aver scelto il binocolo KODAK BCS100 per il tuo bambino, ci auguriamo che soddis tutte le sue
aspettative. Ti invitiamo a leggere attentamente, insieme a lui, le istruzioni relative alla regolazione, allutilizzo e alla
manutenzione di questo binocolo prima del suo impiego, e a conservare il presente manuale per consultazioni future.
ISTRUZIONI DI SICUREZZA
- Non guardare mai il sole o una fonte di luce intensa con il binocolo per evitare ogni rischio di lesione oculare
grave o di cecità.
- Non orientare mai il binocolo in modo da captare direttamente i raggi del sole. La focalizzazione della luce può
provocare la combustione di ciò che mira se si tratta di un materiale facilmente inammabile.
- Non utilizzare il binocolo camminando, potrebbe provocare lesioni in caso di caduta.
- Non far oscillare il binocolo tenendolo per il cinturino per non urtare una persona nelle vicinanze.
- Fare attenzione a non schiacciarsi le dita regolando la distanza interpupillare del binocolo.
- Il fatto di mantenere gli oculari per molto tempo sulla pelle sensibile può provocare un’irritazione cutanea. In caso
di inammazione del contorno occhi, interrompere immediatamente l’utilizzo del binocolo e consultare un medico.
- Tenere gli accessori (cinturino, panno in microbra) e i materiali d’imballaggio fuori dalla portata dei bambini
piccoli e degli animali domestici per evitare ogni rischio di soffocamento o di strangolamento.
AVVERTENZA! Non adatto a bambini sotto i 36 mesi. Piccole parti e cordino al collo lungo. Rischi di
soffocamento e strangolamento.
PRECAUZIONI D’USO
- Questo binocolo è uno strumento ottico che richiede la massima precauzione durante la manipolazione e
il trasporto. Una manipolazione brutale, un urto violento o una caduta accidentale potrebbero sregolare
l’allineamento delle lenti e provocare uno sdoppiamento dell’immagine osservata. Di conseguenza,
è necessario controllare che il cinturino in dotazione sia ben attaccato ai due passaggi per cinghia del binocolo
e indossarlo prima di ogni utilizzo.
- Il binocolo deve essere posato su una supercie piana quando viene tolto il cinturino.
-
Quando non si utilizza più il binocolo, si raccomanda di riporlo nell’apposita custodia e sistemarlo in un luogo fresco e asciutto.
- Questo binocolo non è impermeabile, di conseguenza non bisogna esporlo a schizzi dacqua, a una forte pioggia
o ad uneccessiva umidità. In caso di formazione di condensa sulle oculari e gli obiettivi, lasciare asciugare il
binocolo a temperatura ambiente prima di riporlo nella custodia.
- Non esporre il binocolo a una fonte di calore eccessivo per non alterare i lubricanti e gli isolanti che contiene.
- In caso di difetto, non smontare in nessun caso il binocolo! Rivolgersi al negozio in cui è stato acquistato
afnc l’eventuale riparazione sia afdata al nostro servizio post-vendita.
FISSAGGIO DEL CINTURINO
Per attaccare solidamente il cinturino al binocolo, procedere come segue:
1
Attaccare la parte del cinturino con la cinghia più lunga al binocolo inserendo la bbia sottile della sua estremità
in uno dei passaggi per cinghia (da sotto), quindi farla uscire completamente (vedi n. 1 nella gura 1 a pagina 2).
2
Far scorrere integralmente il cinturino nella bbia sottile (vedi n. 2 nella gura 1 a pagina 2).
3
Staccare la parte del cinturino collegata con un anello di plastica.
4
Inserire la bbia sottile di questestremità nellaltro passaggio per cinghia del binocolo (da sotto), quindi farla
uscire completamente (vedi n. 3 nella gura 2 a pagina 2).
5
Far scorrere la cinghia con l’anello di plastica nella bbia sottile no a far passare la punta di plastica di
questestremità (vedi n. 4 nella gura 2 a pagina 2).
6
Prendere la punta della cinghia dalla parte del cinturino che è stata attaccata per prima al binocolo quindi farla
passare nell’anello di plastica dalla parte corta del cinturino (vedi gura 3 a pagina 2).
7
Tirare sulla cinghia per farla passare in seguito nella bbia di plastica ubicata a monte (vedi gure 4 e 5 a
pagina 2).
8
Inlare il cinturino e regolare la posizione del binocolo a piacimento facendo scorrere, po meno, la cinghia
nella bbia.
CZ
kujeme, že jste si pro své vybrali š binokulár dalekohled KODAK BCS100. říme, že s ním budete
spokojeni. Před použim dalekohledu si s dítětem pečli přečte pokyny k jeho nastave, používání a
údržbě a tyto pokyny si uschovejte pro budoucí použi.
BEZPEČNOSTNÍ POKYNY
- Nikdy se dalekohledem nedívejte do slunce nebo na zdroj intenzivního světla, abyste předešli riziku žného
poškození očí nebo oslepnutí.
- Nikdy dalekohled neorientujte tak, aby do něj dopadalo přímé sluneční světlo. V ípadě namíření na vysoce
hořla materiál může zaostření světla způsobit jeho vznícení.
- Dalekohled nepoužívejte za chůze. Mohl by vám způsobit při pádu poranění.
- Nehoupejte dalekohledem na popruhu, aby nedlo k zasaže osoby ve ví blízkosti.
- Při nastavování mezipupilár vzlenosti dalekohledu dávejte pozor, aby nedlo ke skřípnu prstů.
- Při delším ponechání okulárů na citlivé pokožce může dojít k podráž pokky. V případě zátu v oblasti oka
estaňte dalekohled používat a okamžitě vyhledejte lékaře.
- Příslenství (popruh na krk, tkanina z mikrovlákna) a obalové materiály uchovávejte mimo dosah malýcha
domácích zřat, abyste předešli riziku uduše nebo uškrcení.
VAROVÁNÍ! Není vhodproti do 36 měsíců. Malé části a dlouhý řemínek na krk. Nebezpečí uduše a
krcení.
OPATŘE PRO POÍVÁNÍ
- Tento dalekohled představuje optický ístroj, se ktem je třeba manipulovat a přepravovat jej s maxilní
možnou opatrností. Hru zacháze, prudký náraz nebo náhodný pád mohou vést k vychýlenastavení optiky
a zdvojení obrazu při pozoroní. Před použitím dalekohledu se ujistěte, že je dodaný popruh na krk bezpečně
připevněn k oběma otvom pro průchod popruhu dalekohledu.
- Po sejmutí dalekohledu z krku je třeba jej opatrně položit na rovný povrch.
- Pokud se dalekohled j nepoívá, doporučujeme jej uložit do pouzdra a poté na chladné a suché místo.
- Dalekohled ne vodotěsný, proto je nevystavujte stříka vo, silnému dešti ani nadměrné vlhkosti. Pokud se
na okulárech a čočkách tví kondenzát, nechte dalekohled ed uložením do pouzdra vyschnout při pokojo
teplotě.
- Nenechávejte dalekohled v blízkosti zdroje nadměrného tepla, aby nedlo k pkození maziv a izolačních prv
uvni.
- V případě závady dalekohled nerozebírejte! Obraťte se na prodejce, u kterého jste jej zakoupili. Zajispřípadnou
opravu v našem servisním oddělení.
UPEVNĚNÍ POPRUHU NA KRK
Chcete-li k dalekohledu bezpečně připevnit popruh na krk, postupujte sledov:
1
ipevte nejdelší část popruhu k dalekohledu zasunutím tenké smyčky na konci do jednoho z otvopro
průchod popruhu (es spod stranu otvoru) a následji opět zcela vytáhněte (viz č. 1 na obrázku 1 na straně
2).
2
Ce popruh provlékte tenkou smkou (viz č. 2 na obrázku 1 na straně 2).
3
Odepněte část popruhu spojenou s plastovým kroužkem.
4
Zasuňte tenkou smyčku tohoto konce do druhého otvoru pro průchod popruhu dalekohledu (zespodu) a zcela
ji vytáhte (viz č. 3 na obrázku 2 na straně 2).
5
Provlékněte popruh s plastovým kroužkem tenkou smyčkou do dosažení plastového konce (viz č. 4 na
obrázku 2 na stra 2).
6
Vezměte konec popruhu části, kte byla ipevněna k dalekohledu nejíve, a protáhte jej plastovým
krokem na krátké části popruhu (viz obrázek 3 na straně 2).
7
Zatáhte za popruh, abyste jej mohli provléknout plastovou přezkou nahoře (viz obrázek 4 a 5 na straně 2).
8
Nasaďte popruh na krk a nastavte polohu dalekohledu podle potřeby tším či menším posunutím popruhu
es ezku.
REGOLAZIONE DELLA DISTANZA INTERPUPILLARE
La distanza interpupillare (= spazio tra il centro delle pupille) varia da un bambino all’altro, di conseguenza è necessario
innanzitutto che il bambino regoli la posizione degli oculari del binocolo in base alla sua distanza interpupillare.
Per allineare correttamente gli oculari agli occhi, procedere come segue:
1
Tenere saldamente il binocolo con entrambe le mani e posizionare gli oculari a livello degli occhi.
2
Guardare attraverso gli oculari e mirare qualcosa di lontano senza far girare la rotella di messa a fuoco centrale.
3
Avvicinare o allontanare i tubi del binocolo no a vedere un solo ed unico cerchio d’immagine con i due occhi.
4
Regolare in modo più preciso la posizione denita per ottenere unimmagine netta e senza zona dombra.
5
Memorizzare e riprodurre sempre questa regolazione prima di utilizzare il binocolo.
MESSA A FUOCO E REGOLAZIONE DIOTTRICA
Questo binocolo è dotato di una rotella di messa a fuoco centrale e di un oculare con funzione di regolazione diottrica per
tener conto di una leggera differenza di visione tra gli occhi del bambino. Dopo aver regolato adeguatamente la distanza
interpupillare, è necessario procedere alla regolazione della messa a fuoco e della diottria come segue:
1
Allineare il riferimento della regolazione diottrica con lo 0 presente sull’oculare destro.
2
Chiudere l’occhio destro o coprire l’obiettivo destro con la mano destra e guardare con l’occhio sinistro attraverso
l’oculare sinistro.
3
Fissare un oggetto distante con molti dettagli (per es.: un ore, i rami di un albero, ecc...) e girare la rotella di messa a
fuoco centrale no a quando l’immagine non appare chiara e netta nell’oculare sinistro.
4
Chiudere l’occhio sinistro o coprire l’obiettivo sinistro con la mano sinistra, quindi guardare lo stesso oggetto con
l’occhio destro attraverso l’oculare destro.
5
Girare l’oculare destro per effettuare la messa a fuoco dell’immagine all’interno di essa evitando di esagerare o di
forzare la rotazione per non danneggiarla.
Nota:
se non si riesce a mettere a fuoco l’immagine nell’oculare destro regolando la diottria, signica probabilmente
che quella effettuata nell’oculare sinistro è stata sregolata per sbaglio. In tal caso, è necessario ripetere i passi da 2 a 4.
6
La regolazione del binocolo è terminata! Adesso è possibile guardare negli oculari con entrambi gli occhi. Bisognerà
solo girare la rotella di messa a fuoco centrale per mettere a fuoco l’immagine di un oggetto ubicato ad un’altra distanza.
Nota: si raccomanda di appuntare la posizione del riferimento della regolazione diottrica del binocolo per regolarlo più
rapidamente qualora l’oculare destro sia stata girata accidentalmente o qualora un’altra persona avesse utilizzato il binocolo.
CONSIGLI DI MANUTENZIONE
Gli oculari e gli obiettivi devono essere puliti regolarmente per evitare che la sporcizia ostacoli la trasmissione della luce
e alteri la qualità dell’immagine.
Ecco i passi da seguire per una pulizia ottimale:
1
Rimuovere la polvere e la sporcizia presente sulle oculari e sugli obiettivi con un sofatore, un pennello morbido per
pulizia lenti o uno spray di aria compressa.
2
Stronare delicatamente sulla supercie con il panno in microbra in dotazione effettuando movimenti circolari.
Nota:
non premere troppo forte e non utilizzare un panno ruvido tipo carta assorbente o fazzoletto di carta per evitare di
danneggiare il rivestimento delle lenti o rigarle.
3
È possibile applicare in aggiunta un liquido detergente per obiettivo fotograco o per occhiali sul panno in microbra.
In questo caso, è necessario stronare delicatamente le lenti effettuando un movimento circolare dal centro verso l’esterno.
Nota: non applicare direttamente sulle lenti e non utilizzare un prodotto per le pulizie domestiche come il detergente per i vetri.
4
Evitare al massimo di toccare le lenti e pulire sistematicamente ogni traccia di dita dopo il contatto poiché l’acidi
della pelle può danneggiare il loro rivestimento.
5
Per pulire la supercie del binocolo bisogna innanzitutto utilizzare il sofatore per rimuovere la sporcizia accumulata
negli angoli, quindi applicare un panno morbido e pulito, leggermente umido se necessario, su tutta la supercie per
eliminare eventuali tracce.
Nota:
non applicare benzene, diluente o qualsiasi altro solvente organico.
6
Non smontare mai il binocolo per pulire l’interno!
AJUSTE DA DISTÂNCIA INTERPUPILAR
A distância interpupilar (= espaço entre o centro das pupilas) varia de criança para criança, pelo que primeiro
é necessário que o seu lho/a ajuste a posição das oculares dos binóculos em conformidade. Para alinhar
corretamente as oculares com os olhos, siga estes passos:
1
Segurar rmemente os binóculos com ambas as mãos e colocar as oculares ao vel dos olhos.
2
Olhar atras das oculares e apontar para algo distante sem girar a roda de focagem central.
3
Aproximar ou afastar os tubos dos biculos até ver um único círculo de imagem com ambos os olhos.
4
Ajustar mais minuciosamente a posição denida para obter uma imagem nítida e sem sombras.
5
Memorizar e reproduzir sempre esta conguração antes de utilizar os binóculos.
FOCALIZAÇÃO E AJUSTE DIÓPTRICO
Estes biculos estão equipados com uma roda de focagem central e uma ocular com função de ajuste dióptrico
para permitir uma ligeira diferença de visão entre os olhos da criança. Depois de ajustar corretamente a distância
interpupilar, deve ajustar o foco e a dioptria da seguinte forma:
1
Alinhar a marca de ajuste dióptrico com o 0 na ocular direita.
2
Fechar o olho direito ou cobrir a objectiva direita com a mão e olhar através da ocular esquerda com o olho
esquerdo.
3
Fixar um objeto distante com muito detalhe (por exemplo, uma or, os ramos de uma árvore, etc.) e girar a roda
central de focagem até que a imagem apareça o mais nítida e clara possível na ocular esquerda.
4
Fechar o olho esquerdo ou cobrir a objectiva esquerda com a mão e, em seguida, observar o mesmo objeto
com o olho direito através da ocular direita.
5
Girar a ocular direita para focalizar a imagem no seu interior, com cuidado para não exagerar ou forçar a rotação
para evitar danicá-la.
Nota: se a focalização da imagem na ocular direita falhar o ajuste dptrico, então a imagem na ocular esquerda
provavelmente tecado desregulada inadvertidamente. Se for o caso, deve repetir os passos 2 a 4.
6
O ajuste dos biculos está concldo! A partir de agora pode olhar através das oculares com ambos os olhos.
Apenas deve girar a roda de focagem central para focar um objeto a uma distância diferente.
Nota: recomenda-se que tome nota do posicionamento da marca de ajuste dióptrico dos seus binóculos para que
possa ajustá-los rapidamente se a regulação for alterada acidentalmente ou se outra pessoa utilizar os seus biculos.
INSTRUÇÕES DE MANUTENÇÃO
As oculares e as objetivas devem ser limpas regularmente para evitar que a sujidade prejudique a transmissão da
luz e afete a qualidade da imagem.
Aqui estão os passos a seguir para uma limpeza ótima:
1
Retirar o e outra sujidade das oculares e das objetivas com a ajuda de um soprador, uma escova de limpeza
ótica macia ou uma bomba de ar pressurizada.
2
Esfregar suavemente a superfície das lentes com o pano de microbra fornecido num movimento circular.
Nota: não pressionar demasiado e não usar um pano áspero, como toalhas de papel ou tecido, para o danicar
ou riscar o revestimento das lentes.
3
Pode ser aplicado um líquido de limpeza para lentes fotográcas ou óculos no pano de microbras como
medida adicional. Neste caso, esfregar suavemente as lentes num movimento circular de dentro para fora.
Nota: não aplicar diretamente nas lentes e utilizar um produto de limpeza doméstico, como um limpa-vidros.
4
Evitar tocar nas lentes e limpar quaisquer impressões digitais imediatamente após o contacto, uma vez que a
acidez da pele também pode danicar o revestimento das lentes.
5
Para limpar a supercie dos biculos, soprar primeiro a sujidade acumulada nos recantos. Em seguida, passar
com um pano macio e limpo por toda a superfície, ligeiramente humedecido se necessário, para remover
quaisquer marcas.
Nota: não aplicar benzeno, diluente ou outros solventes orgânicos.
6
Nunca desmonte os biculos para limpar o interior!
INSTELLEN VAN DE PUPILAFSTAND
De pupilafstand (de afstand tussen het midden van beide pupillen) verschilt van kind tot kind. Eerst is het dus noodzakelijk
dat uw kind de positie van de oculairs afstelt op basis van zijn of haar eigen pupilafstand. Ga als volgt te werk om de
oculairs correct af te stemmen op zijn of haar ogen:
1
Houd de verrekijker stevig vast met beide handen en breng de oculairs naar de ogen.
2
Kijk door de oculairs en richt op iets in de verte zonder aan het centrale scherpstelwiel te draaien.
3
Beweeg de buizen van de verrekijker naar elkaar toe of van elkaar af totdat je één beeldcirkel ziet met beide ogen.
4
Stel de positie nog nauwkeuriger af om een scherp beeld te krijgen zonder schaduwzijde.
5
Onthoud deze afstelling voor de volgende keren dat je de verrekijker gebruikt.
SCHERPSTELLING EN DIOPTRIE-INSTELLING
Deze verrekijker is voorzien van een centraal scherpstelwiel en van een oculair met dioptrie-instelling in geval van een
klein verschil in gezichtsvermogen tussen de beide ogen van uw kind. Nadat u de juiste pupilafstand heeft ingesteld,
gaat u als volgt verder met de scherpstelling en het instellen van de dioptrie:
1
Lijn de dioptriemarkering uit met de 0 op het rechteroculair.
2
Sluit je rechteroog of bedek het rechterobjectief met je rechterhand en kijk met je linkeroog door de linkeroogschelp.
3
Kijk naar een object in de verte met veel details (bijv.: een bloem, de takken van een boom, etc.) en draai het centrale
scherpstelwiel totdat het beeld in het linkeroculair zo scherp en duidelijk mogelijk is.
4
Sluit je linkeroog of bedek het linkerobjectief met je linkerhand en kijk met je rechteroog naar datzelfde object door
de rechteroogschelp.
5
Draai het rechteroculair om het beeld hierin scherp te stellen en doe dit zonder te overdrijven of te forceren om
schade tijdens het draaien te voorkomen.
Opmerking:
als het je niet lukt om de dioptrie in te stellen en het beeld scherp te krijgen in het rechteroculair, kan het zijn
dat het beeld in het linkeroculair per ongeluk niet meer scherp is. Herhaal in dit geval de stappen 2 t/m 4.
6
De verrekijker is afgesteld! Het is vanaf nu mogelijk om met beide ogen door de oogschelpen te kijken. Je hoeft alleen
nog maar aan het centrale scherpstelwiel te draaien om het beeld scherp te stellen van een object dat zich op een
andere afstand bevindt.
Opmerking:
het wordt aanbevolen om de positie van de dioptriemarkering van de verrekijker op te schrijven, zodat je
deze snel weer kunt afstellen als het rechteroculair per ongeluk is verdraaid of iemand anders je verrekijker heeft gebruikt.
ONDERHOUDSTIPS
De oculairs en objectieven moeten regelmatig gereinigd worden om te voorkomen dat het vuil het doorlaten van het licht
belemmert en de beeldkwaliteit aantast.
Volg deze stappen voor een optimale reiniging:
1
Haal stof en ander vuil van de oculairs en objectieven af met behulp van een blaasbalg, een zachte reinigingsborstel
of een spuitbus met perslucht.
2
Wrijf met een ronddraaiende beweging voorzichtig over het oppervlak met het meegeleverde microvezeldoekje.
Opmerking:
duw niet te hard en maak geen gebruik van een ruw reinigingsdoekje zoals keukenpapier of een papieren
zakdoekje om de coating van de lenzen niet te beschadigen of te bekrassen.
3
Je kan op het microvezeldoekje ook een reinigingsvloeistof gebruiken dat geschikt is voor cameralenzen of brillen.
Wrijf in dit geval voorzichtig met een ronddraaiende beweging over de lenzen, vanuit het midden naar de randen toe.
Opmerking:
giet de vloeistof niet direct op de lenzen en gebruik geen huishoudelijk schoonmaakmiddel zoals
glasreiniger.
4
Voorkom zoveel mogelijk dat je de lenzen aanraakt en reinig altijd alle vingerafdrukken na contact, want ook de
zuurgraad van de huid kan de coating aantasten.
5
Blaas eerst het opgehoopte vuil in de hoekjes weg om het oppervlak van de verrekijker te reinigen. Ga vervolgens met
een zachte, schone en zo nodig een licht vochtige doek over het hele oppervlak om eventuele sporen te verwijderen.
Opmerking:
gebruik geen benzeen, verdunner of ander organisch oplosmiddel.
6
Haal de verrekijker nooit uit elkaar om de binnenkant schoon te maken!
DOPASOWANIE ROZSTAWU OKULARÓW
Rozstaw oczu, czyli odległość między źrenicami, jest inny u każdego, dlatego trzeba go ustawić indywidualnie.
Aby prawiowo dopasować rozstaw do swoich oczu, należy wykonać naspujące czynności:
1
Chwyć mocno lornet w obie ce i ustaw muszle na poziomie oczu.
2
Popatrz przez okulary i obierz sobie odległy cel, ale nie reguluj ostrości środkowym pierścieniem.
3
Przybliżaj lub oddalaj tubusy lornetki do momentu, aż w obu oczach uzyskasz obraz w jednym okręgu.
4
Dopasuj pożenie jak najdoadniej, aby obraz był ostry i bez zacienienia.
5
Zapamiętaj te ustawienia i przywracaj je przed yciem lornetki.
REGULACJA OSTROŚCI I DIOPTRII
Lornetka jest wyposażona w środkowy pierścień regulacji ostrości oraz okular z funkcję regulacji dioptrycznej,
aby uwzględnilekką żniostrości wzroku w oczach dziecka. Po dopasowaniu rozstawu należy przejść do
ustawienia ostrości oraz dioptrii w naspujący sposób:
1
Wywnaj znacznik regulacji dioptrii z 0 przedstawionym na prawym okularze.
2
Zamknij prawe oko lub zakryj prawąprawy obiektyw i popatrz lewym okiem przez lewą musz oczną.
3
Skoncentruj się na odległym obiekcie z wieloma szczegółami (np. kwiatek, gęzie drzewa). Kręć pierścieniem
regulacji ostrci, aż obraz w lewym okularze dzie możliwie najbardziej wyraźny i jasny.
4
Zamknij lewe oko lub zakryj lewąką lewy obiektyw, a następnie popatrz prawym okiem przez prawą muszlę
na ten sam obiekt.
5
Obć prawy okular, aby dopasować w nim ostrć obrazu. Nie przesadzaj z kręceniem, aby nie doszło do
uszkodzenia.
Uwaga: jeśli nie udaje się ustawić ostrości obrazu w prawym okularze przez ustawienie dioptrii, to prawdopodobnie
oznacza, że przez przypadek zmieniono ustawienie w lewym okularze. W takim przypadku należy powtórzyć
czynności od 2 do 4.
6
Lornetka jest prawiowo ustawiona! Teraz można patrzeć przez oba okulary. Trzeba jeszcze tylko pokręcić
środkowy pierścień regulacji ostrości obiektu znajdującego się w innej odległości.
Uwaga: warto zapisać lub zapamiętać ustawienie skali regulacji dioptrii lornetki, aby uzyskać szybciej odpowiednie
ustawienia, kiedy przypadkowo przekręcono prawy okular lub zmieniono ustawienia dla innego użytkownika.
SPOSÓB KONSERWACJI
Okulary i obiektywy mus być regularnie czyszczone, aby zabrudzenia nie zakłócały przeywu światła i jakości
obrazu.
Aby zapewnić optymalne czyszczenie, należy wykonać następuce czynności:
1
Uskurz i inne zanieczyszczenia widoczne na okularach i obiektywach za pomo gruszki, miękkiego dzelka
do czyszczenia optyki czy sprężonego powietrza.
2
Delikatnie przetrzyj okrężnymi ruchami ich powierzchn zączoną szmatz mikrobry.
Uwaga: nie naciskaj za mocno i nie używaj szorstkich ściereczek (np.czniki papierowe, chusteczki higieniczne),
aby nie uszkodz powłoki pokrywającej soczewki i ich nie porysować.
3
Do czyszczenia szmatką z mikrobry można dod yn do czyszczenie obiektywów fotogracznych lub
okularów. Wtedy należy delikatnie pocierać soczewki ruchem kolistym od środka na zewnątrz.
Uwaga: nie nakładynów bezpośrednio na soczewki. Nie stosować domowych środków czyszccych, takich jak
yny do mycia okien.
4
Unikaj dotykania soczewek. Kiedy tylko zobaczysz jakikolwiek ślad palca na soczewce, usuwaj go natychmiast:
poziom pH skóry może uszkodzpowło.
5
Aby wyczyśc powierzchn lornetki, najpierw zdmuchnij zabrudzenia zgromadzone w zakamarkach.
Następnie przetrzyj całą powierzchn delikatną, czysi lekko wilgotną szmat, aby usunąć ewentualne ślady.
Uwaga: nie można stosować benzyny, rozcieńczalników ani innych rozpuszczalników organicznych.
6
Nigdy nie rozkładaj lornetki na części, aby wyczyścić ją od wewnątrz!
A PUPILLATÁVOLG BEÁLLÍTÁSA
A pupillatávolság (= a pupillák ppontja tti távolság) gyermekenként változik, ezért először a gyermeknek
kell beállítania az okulárok helyzet a saját pupillatávolságának megfelelően. Az okulárok saját szemhez rténő
megfelelő beállításához kövesse az alábbi lépéseket:
1
Tartsa erősen a távcsövet mindkét kezével, és vigye az okulárokat szemmagasságba.
2
Nézzen át az okulárokon, majd lasszon ki egy távoli tereprgyat a fókuszkerék elforgatása lkül.
3
Tolja össze vagy távolítsa egymástól a távcső csöveit, amíg a két szemmel ugyanazt a képet nem látja.
4
Finotsa a beállított pociót, hogy tiszta, árnkok nélküli képet kapjon.
5
Jegyezze meg ezt a beállítást, hogy a távcső használata előtt szükség esetén mindig visszaállíthassa.
ÉLESSÉG- ÉS DIOPTRIABEÁLLÍTÁS
Ez a vcső központi élességállíkerékkel és dioptriabeállító funkcióval rendelkező okulárral késlt, hogy lehető tegye
a gyermekszemek közötti enyhe látáskülönbségek kiegyentését. A pupillatávolság megfelelő beállítását követően áltsa
be az élességet és a dioptrt az alábbisek szerint:
1
Igatsa a dioptria beállítási jelet a jobb oldali okulárontható 0-hoz.
2
Csukja be a jobb szemét, vagy fedje le a jobb lencsét a kezével, majd a bal szemével nézzen a bal okulárba.
3
kuszáljon egy távoli, sok részletet tartalmazó tárgyra (pl. virág, faágak stb.), és forgassa el a középső élesgállí
kereket, amíg a kép a lehető legélesebb és legtisztább nem lesz a bal okulárban.
4
Csukja be a bal szemét, vagy fedje le a bal lencsét a kezével, majdzze ugyanazt a tárgyat a jobb szemével a jobb
okuláron keresztül.
5
Forgassa el a jobb okulárt a kép élesítéséhez, de ne forgassa l, és ne erőltesse az elforgatást, nehogy a távc
megsérüljön.
Megjegyzés:
ha a jobb oldali okulárban tható kép nem élesedik a dioptria beállítása zben, akkor a bal okulár
valószínűleg véletlenül eláltódott. Ebben az esetben meg kell ismételni 2-4.seket.
6
Ezután a távcső haszlatra kész! A gyermek most már mindkét szemével átnézhet a szemkagylókon. Innentől csak a
zponti élességállító kereket kell majd elforgatnia, ha egy más távolságban lévő tárgyra akar kuszálni.
Megjegyzés:
javasoljuk, hogy jegyezze meg a távcső beállított dioptriajelének helyzetét, hogy gyorsabban visszaállíthassa
azt, ha a jobb oldali okulár véletlenül eláltódik, vagy ha valaki más is használja ezt a távcsövet.
KARBANTARTÁS
Az okulárokat és a lencséket rendszeresen meg kell tisztítani, hogy a szennyeződések ne rontsák a fényáteresztést és ne
befolyásolják a képmiget.
Az optimális eredményt biztotisztításhozvesse az alábbipéseket:
1
Távolítsa el a port és egyéb szennyeződéseket az okulárokról és az objektívekről egy fúvócsővel, egy puha optikai
tisztítókefével vagy sűrített levegővel.
2
Finoman, körkörös mozdulatokkal rzsölje át a felüleket a mellékelt mikroszálas kendővel.
Megjegyzés:
vigyázzon, hogy ne nyomja túl erősen, és ne használjon durva textúrájú anyagot, pélul papírtörlőt vagy
zsebkendőt, hogy a lencsebevonat ne sérüljön vagy karcodjon meg.
3
Kiegéstésként lencse- vagy szemüvegtisztító folyadékot is felvihet a mikroslas kendőre. Ebben az esetben csak
óvatosan, körs mozdulatokkal szabad dörzsölni a lencsét a közepétől kifelé haladva.
Megjegyzés:
kérjük, ne hordja fel a szert közvetlenül a lencsékre, és ne használjon ztartási tisztítószert, ldául
ablaktisztítót.
4
Lehetőleg kerülni kell a lencsék megérintését, de ha ez történik, azonnal meg kell tisztítani az ujjlenyomatoktól, mert a
r savassága szintén károthatja a lencse bevonatát.
5
A távcső felülenek tisztításához először ki kell fújni a mélyedésekben felgyülemlett szennyeződéseket, majd puha,
tiszta, enyhén megnedvesített kendővel át kell rölni a teljes felületet, és szükség esetén egy hason, de száraz
rlőkenvel meg kell szárítani.
Megjegyzés:
a tisztításhoz ne használjon benzint,t vagy más szerves oldószert.
6
Soha ne szerelje szét a távcsövet a belsejének megtisztításához!
NASTAVENÍ MEZIPUPILÁRVZDÁLENOSTI
Mezipupilár vzdálenost (= vzdálenost mezi středy zornic) se u každého dítěte liší, proto je nutné nejprve izsobit
polohu okuláru dalekohledu těti. Chcete-li správ nastavit okuláry podle očí svého te, postupujte následov:
1
Dalekohled jeeba det pev oma rukama a ustit očnice do úrovně očí.
2
Je eba se vat es okuláry a zaměřit se na jaký vzdálený objekt bez ostřením středom zaostřovacím
kolečkem.
3
Posouvejte tubusy binokulárního dalekohledu k so nebo od sebe, dokud oběma očima neuvite jeden
obrazový kruh.
4
Pečliji upravte nastavenou polohu, abyste dosáhli ostrého obrazu bez stínových oblas.
5
ed použim dalekohledu si toto nastavení vždy zapamatujte a zopakujte.
OSENÍ A NASTAVENÍ DIOPTRIÍ
Dalekohled je vybaven centrálním zaostřovacím kolečkem a okulárem s funkcí nastavení dioptrií, kteumožňuje
zohlednit mírný rozl ve vi očí vašeho te. Po správm nastavení mezipupilární vzdálenosti je třeba nastavit
zaostření a dioptrie v následujích kroch:
1
Zarovnejte značku pro nastavení dioptrií s číslem 0 na pram okuláru.
2
Zaete pravé oko nebo zakryjte pravou čočku rukou a vejte se levým okulárem.
3
Zaostřete na vzlený objekt s velkým množstvím detailů (např. květinu, tve stromu atd.) a otáčejte centrálním
zaostřovacím kolečkem, dokud se obraz v levé očnici nezobrazí co nejoseji a nejjasněji.
4
Zaete le oko nebo zakryjte levou čočku rukou a pak se na stejný objekt povejte pravým okulárem.
5
Otáčejte pravým okulárem pro zaostře obrazu, ale neotáčejtem nadměrně nebo násilím, abyste jej
nepoškodili.
Poznámka: pokud se i nastavedioptrií nepodaří zaostřit obraz v pravém okuláru, pravpodobně došlo k
neúmyslnému rozostře obrazu v levém okuláru. V tomto ípadě je třeba zopakovat kroky 2 4.
6
Seříze dalekohledu je hotovo! Nyní se lze dívat es nice oma očima. Pro zaostřeobrazu objektu v ji
vzdálenosti stačí otočit středom zaostřovacím kolečkem.
Poznámka: doporučuje se poznamenat si polohu značky pro nastavení dioptrií na dalekohledu z důvodu rychlejšího
nastave v přípahodného otočení pravého okuláru nebo v případě, že dalekohled použíkdo ji.
RADY K ÚDRŽBĚ
Okuláry a čočky je třeba pravidelně čistit, aby nečistoty nezhoršovalyenos stla a neovlivňovaly kvalitu obrazu.
Zde jsou uvedeny kroky, které je eba dodržet pro optimální čtění:
1
Odstraňte prach a další nečistoty z okulárů a čoček pomocí foukače, měkkého kartáčku na čiště optiky nebo
bombičky se stlačem vzduchem.
2
Povrch jemně otírejte přiloženou utěrkou z mikrovlákna kroivými pohyby.
Poznámka: dbejte na to, abyste netlačili příliš silně, a nepoívejte drs hadřík, například parovou urku nebo
kapesník, abyste nepoškodili nebo nepoškrábali povrchovou úpravu čoček.
3
Na utěrku z mikrovlákna lze jako doplněk nanést čisti ípravek na fotogracké objektivy či brýle. V tomto
ípadě čočky otřete kroivými pohyby od středu směrem ven.
Poznámka: nenanášejte jej ímo na čočky a nepoužívejte čisticí prostředky pro domácnost, naíklad čisti
prostředky na sklo.
4
Nedotýkejte se čoček a bezprostřed po kontaktu s nimi vždy systematicky očistěte otisky prstů, protože
kyselost pokky může poškodit i povrchovou úpravu čoček.
5
Chcete-li vistit povrch dalekohledu, nejprve vyfoukejte nečistoty, které se nahromadily v rozích, a poté otřete
ce povrchkkým, čism hadříkem, v ípadě poeby mírně navlhčem, abyste odstranili případ stopy.
Poznámka: nepoívejte benzen, ředidla ani jiná organická rozpouštědla.
6
Nikdy dalekohled nerozerejte kvůli čištění vniku.


Product specificaties

Merk: Kodak
Categorie: Verrekijker
Model: BCS100

Heb je hulp nodig?

Als je hulp nodig hebt met Kodak BCS100 stel dan hieronder een vraag en andere gebruikers zullen je antwoorden


Handleiding Verrekijker Kodak

Handleiding Verrekijker

Nieuwste handleidingen voor Verrekijker