Kichler Midi 52649CPZ Handleiding
Kichler Verlichting Midi 52649CPZ
Bekijk gratis de handleiding van Kichler Midi 52649CPZ (3 pagina’s), behorend tot de categorie Verlichting. Deze gids werd als nuttig beoordeeld door 14 mensen en kreeg gemiddeld 4.0 sterren uit 7 reviews. Heb je een vraag over Kichler Midi 52649CPZ of wil je andere gebruikers van dit product iets vragen? Stel een vraag
Pagina 1/3
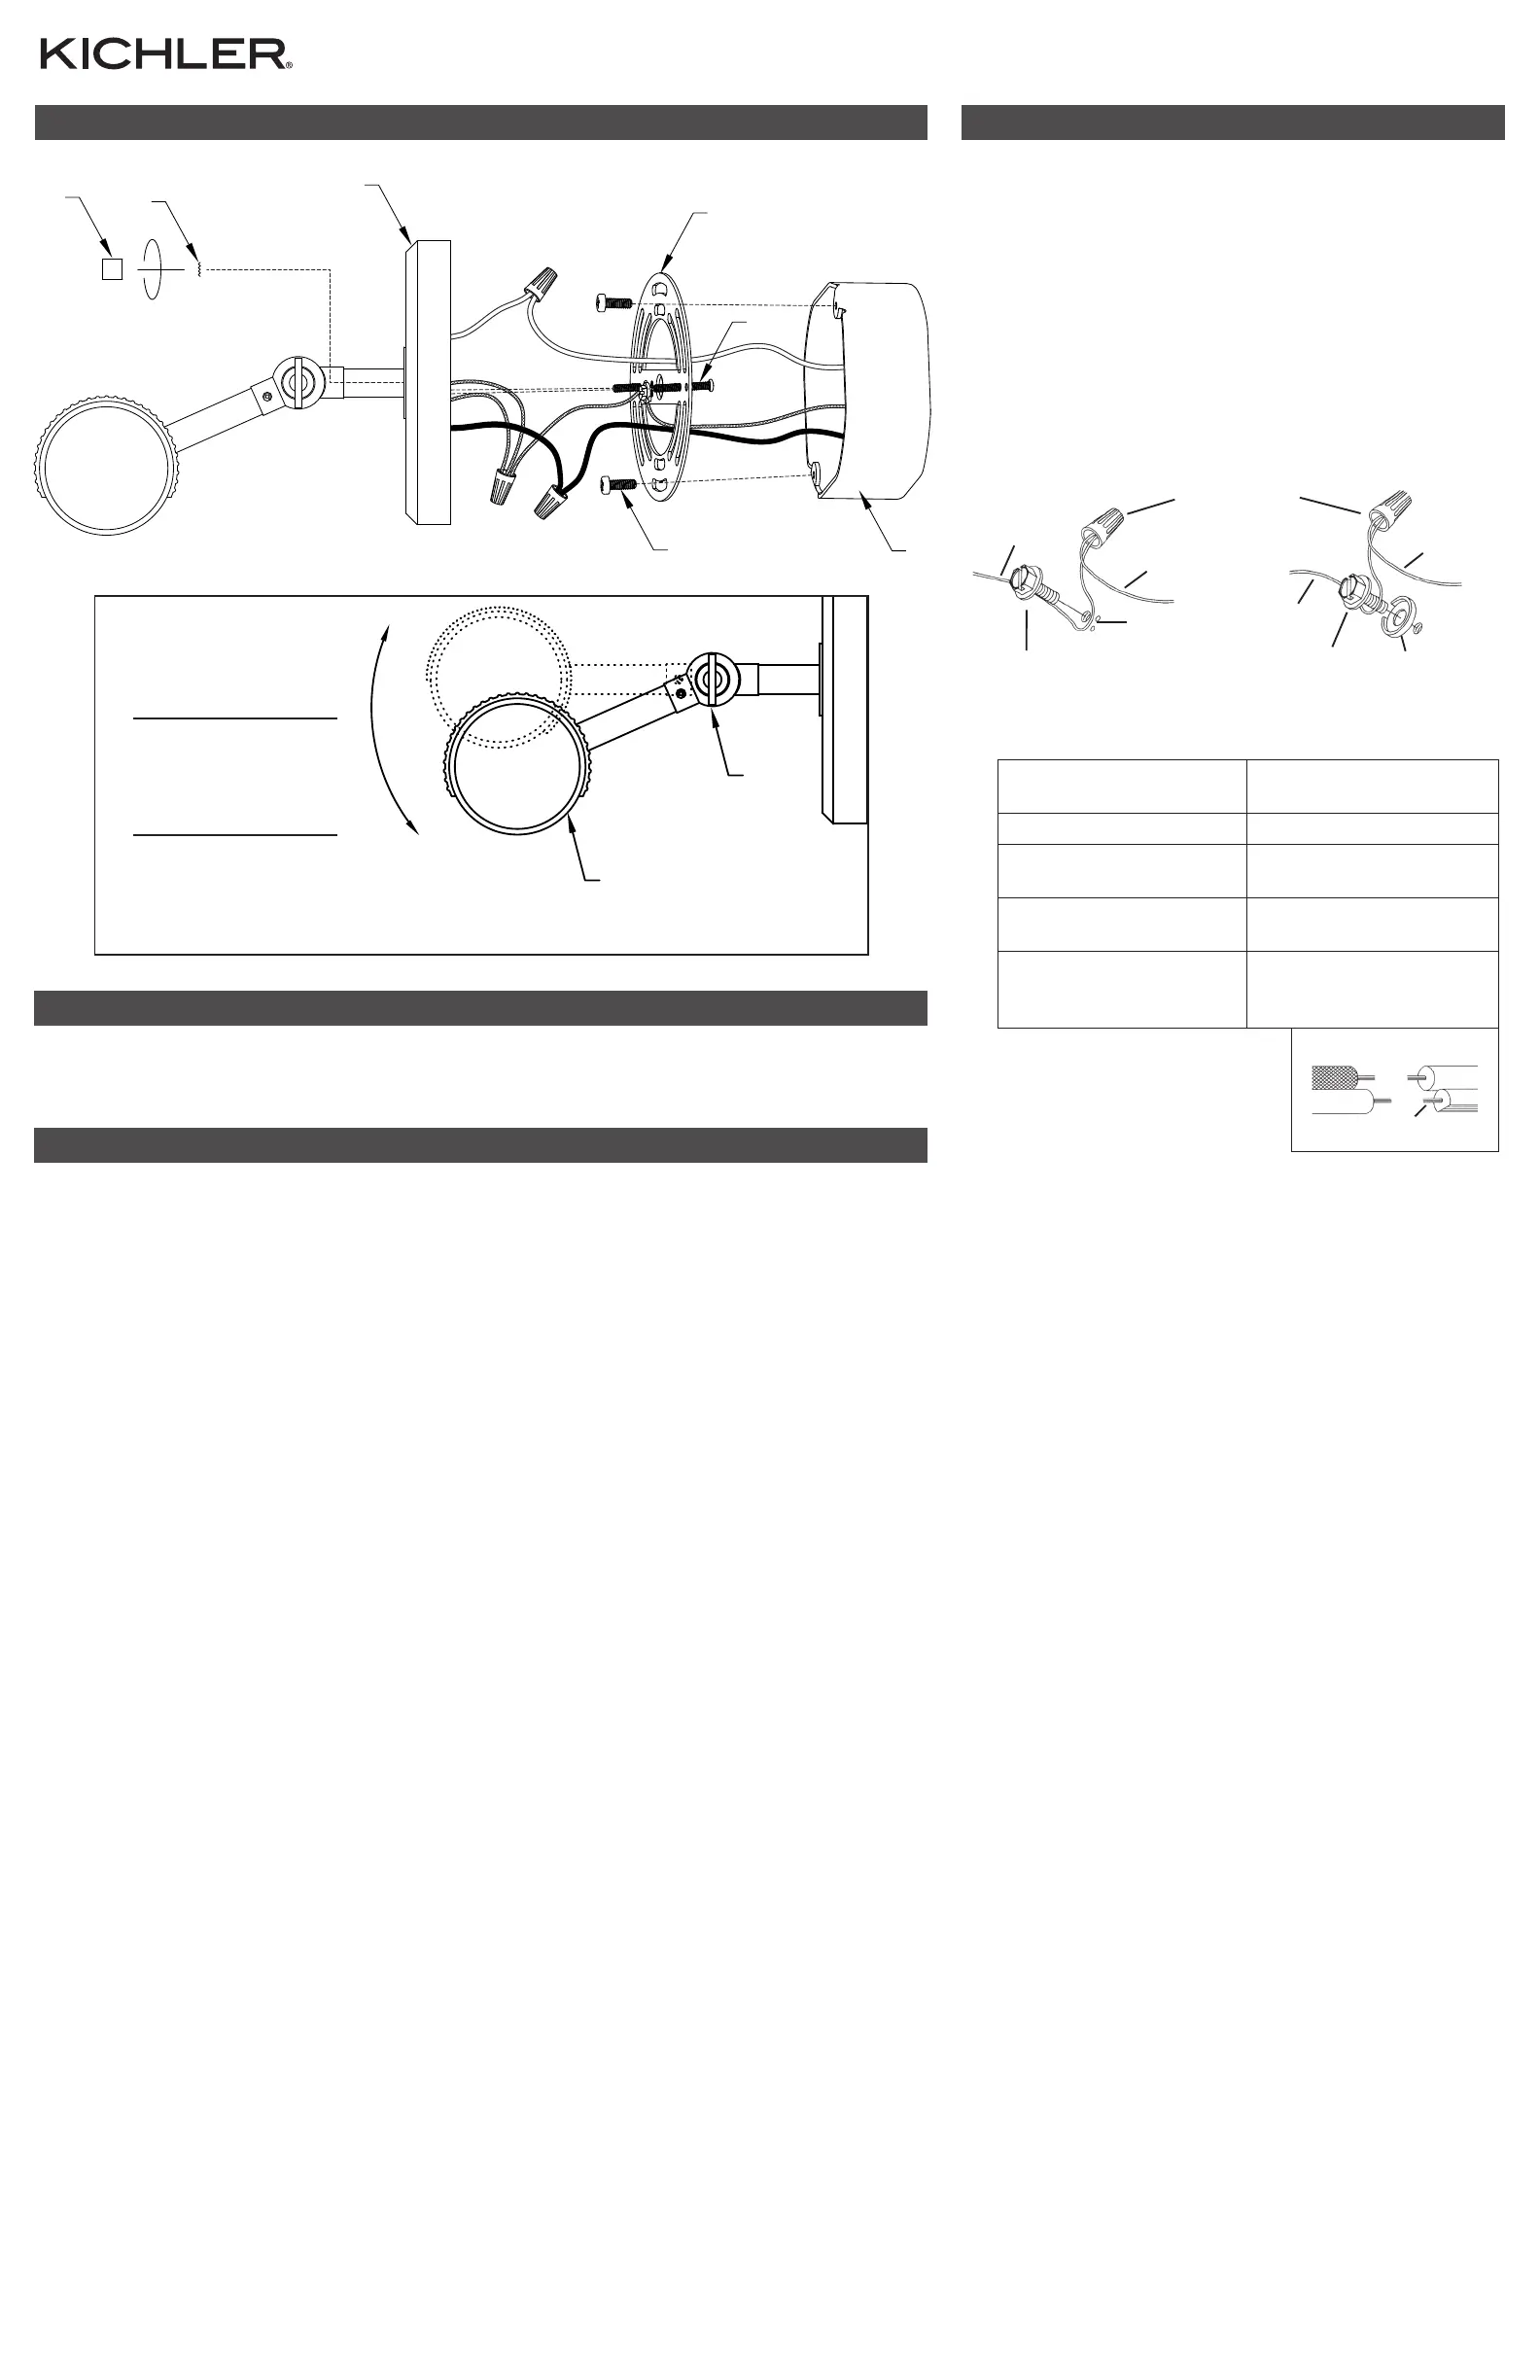
1. Remove knobs[C] and lock washers[D] from the mounting screws that
are preinstalled to mounting strap[G]. Retain knobs and lock washers.
2. Attach mounting strap[G] to outlet box[I] using the strap mounting
screws[H]. Mounting strap can be adjusted to suit position of fixture.
3. Grounding instructions: (See Illus. a or b).
a. On fixtures where mounting strap is provided with a hole and two
raised dimples, wrap ground wire from outlet box around green
ground screw, and thread into hole.
b. On fixtures where a cupped washer is provided, attach ground wire
from outlet box under cupped washer and green ground screw, and
thread into mounting strap.
Fixture is provided with two (2) ground wires. Connect fixture ground
wires to outlet box ground wire with wire connector after following the
above steps. Never connect ground wire to black or white power supply
wires.
4. Make wire connections. Reference chart below for correct connections
and wire accordingly.
Connect Black or Red
Supply Wire to:
Connect White Supply
Wire to:
BlackWhite
*Parallel cord (round &
smooth)
*Parallel cord (square &
ridged)
Clear, Brown, Gold or Black
without Tracer
Clear, Brown, Gold or Black
with Tracer
Insulated wire (other
than green) with copper
conductor
Insulated wire (other
than green) with silver
conductor
*Note: When parallel wire (SPT
1 & SPT 2) are used. The neutral
wire is square shaped or ridged
and the other wire will be round
in shape or smooth (See illus.)Neutral Wire
5. NOTE: Fixture should be installed in the down position
(light shines downward) ONLY.
Push fixture to wall, carefully aligning the mounting screws protruding
from the mounting strap with holes in canopy.
NOTE: Make sure all wires are inside canopy and do not get pinched
between mounting strap and canopy, or wall and canopy of fixture.
6. Slip lock washers[D] over threads protruding through holes in canopy (2
places).
7. Screw knobs[C] onto threads protruding through holes in canopy (2
places) and tighten to secure fixture to wall.
8. Adjust shade[A] (Fig. 1) by loosening adjustment screw[B] at the fixture
joint (turn slightly counterclockwise), adjusting shade to desired position,
then re-tightening adjustment screw (turn slightly clockwise). DO NOT
COMPLETELY REMOVE THE ADJUSTMENT SCREW FROM THE
FIXTURE JOINT.
9. Insert recommended bulb(s) (not included).
GREEN GROUND
SCREW
CUPPED
WASHER
OUTLETBOX
GROUND
FIXTURE
GROUND
DIMPLES
WIRE CONNECTOR
OUTLETBOX
GROUND
GREEN GROUND
SCREW
FIXTURE
GROUND
a
b
For warranty information please visit: kichler.com/warranty
REV 2-AUG-2023
We’re here to help 866-558-5706
Hrs: M-F 9am to 5pm EST
CAUTIONS
CAUTION – RISK OF SHOCK:
Disconnect Power at the main circuit breaker panel or main fusebox before starting and during the
installation.
CAUTION:
• This fixture is intended for use with LED Bulb(s) ONLY.
WARNING:
1. This fixture is intended for installation in accordance with the National Electrical Code (NEC)
and all local code specifications. If you are not familiar with code requirements, installation by a
certified electrician is recommended. Failure to adhere to these codes and instructions may result
in serious injury and/or property damage and will void the warranty.
CLEANING:
• Always be certain that electric current is turned o before cleaning.
• Only a soft damp cloth should be used. Harsh cleaning products may damage the finish.
FIXTURE DIAGRAM
SPACER
IS-52649-US
PARTS LIST
[A] Shade
[B] Adjustment Screw
[C] Knob (2)
[D] Lock Washer (2)
[E] Canopy
[F] Mounting Screw (2)
[G] Mounting Strap
[H] Strap Mounting Screw (2)
[I] Outlet Box (not supplied)
SPACER
INSTALLATION INSTRUCTIONS
I
E
C
D
A
B
H
G
F
I
E
C
D
A
B
H
G
F
SPACER
Fig. 1
NOTE:
BULB(S) NOT INCLUDED
USE 13 WATT MAX
T10 LED BULBS ONLY
Product specificaties
| Merk: | Kichler |
| Categorie: | Verlichting |
| Model: | Midi 52649CPZ |
Heb je hulp nodig?
Als je hulp nodig hebt met Kichler Midi 52649CPZ stel dan hieronder een vraag en andere gebruikers zullen je antwoorden
Handleiding Verlichting Kichler

26 Maart 2026
17 Maart 2026
17 Maart 2026
16 Maart 2026
16 Maart 2026
11 Maart 2026
9 Maart 2026
9 Februari 2026
28 Januari 2026
27 Januari 2026
Handleiding Verlichting
Nieuwste handleidingen voor Verlichting
7 Mei 2026
7 Mei 2026
7 Mei 2026
7 Mei 2026
6 Mei 2026
6 Mei 2026
5 Mei 2026
4 Mei 2026
4 Mei 2026