Kichler 16260 Handleiding
Kichler Verlichting 16260
Bekijk gratis de handleiding van Kichler 16260 (4 pagina’s), behorend tot de categorie Verlichting. Deze gids werd als nuttig beoordeeld door 9 mensen en kreeg gemiddeld 5.0 sterren uit 3 reviews. Heb je een vraag over Kichler 16260 of wil je andere gebruikers van dit product iets vragen? Stel een vraag
Pagina 1/4
For warranty information please visit: kichler.com/warranty
IS-16260-USREV 26-SEP-2024
We’re here to help 866-558-5706
Hrs: M-F 9am to 5pm EST
CAUTIONS
SAFETY INSTRUCTIONS
READ THIS FIRST
KEEP THESE INSTRUCTIONS
CAUTION – RISK OF SHOCK:
Disconnect Power at the main circuit breaker panel or main fusebox before
starting and during the installation.
WARNING:
This fixture is intended for installation in accordance with the National Electrical
Code (NEC) and all local code specifications. If you are not familiar with code
requirements, installation by a certified electrician is recommended. Failure
to adhere to these codes and instructions may result in serious injury and/or
property damage and will void the warranty.
CLEANING:
• Always be certain that electric current is turned o before cleaning.
• Only a soft damp cloth should be used. Harsh cleaning products may damage
the finish.
1. WARNING – RISK OF ELECTRICAL SHOCK: This fixture is not to be
installed within 10 feet (3M) of a pool, spa or fountain.
2. This fixture is to be used only with a power unit (transformer) rated a
maximum of 300 W (25 AMPS) 15 volts.
3. The unit low voltage cable shall:
a) be protected by routing in close proximity to the luminaire or fitting, or
next to a building structure such as a house or deck;
b) not be buried except for a maximum 6 inches (15.2 cm) in order to
connect to the main low voltage cable; and
c) have the length cut o so that it is connected to a connector within 6
inches (15.2 cm) from a building structure, a luminaire, or fitting.
4. Direct burial rated wire is to be buried a minimum of 6” (152mm) beneath
the surface of the ground.
NOTE: If additional Direct Burial wire is needed, contact your local Kichler
®
landscape distributor.
• 10 GA wire can be purchased in length of 250’ (76 M), 15504-BK.
• 12 GA wire can be purchased in lengths of 100’ (30 M), 15501-BK; 250’ (76
M), 15502-BK; 500’ (152M), 15505-BK; and 1000’ (304 M), 15506-BK.
5. Wiring connections must be made with approved/listed wire connection
device(s) suitable for the application. Do not exceed manufacturers’ wiring
combination specifications for size and quantity of conductors.
CAUTION
WHEN INSTALLING KICHLER LANDSCAPE LIGHTING
(LINE VOLTAGE OR LOW VOLTAGE), CARE SHOULD BE TAKEN TO KEEP
CLEAR OF POTENTIALLY COMBUSTIBLE MATERIALS.
WHEN MAINTAINING THE FIXTURES, BE SURE TO REMOVE LEAVES,
PINE NEEDLES, GRASS CLIPPINGS, MULCH, OR ANY DEBRIS THAT HAS
ACCUMULATED ON THE LIGHT BULB, LENS,
OR BODY OF THE FIXTURE.
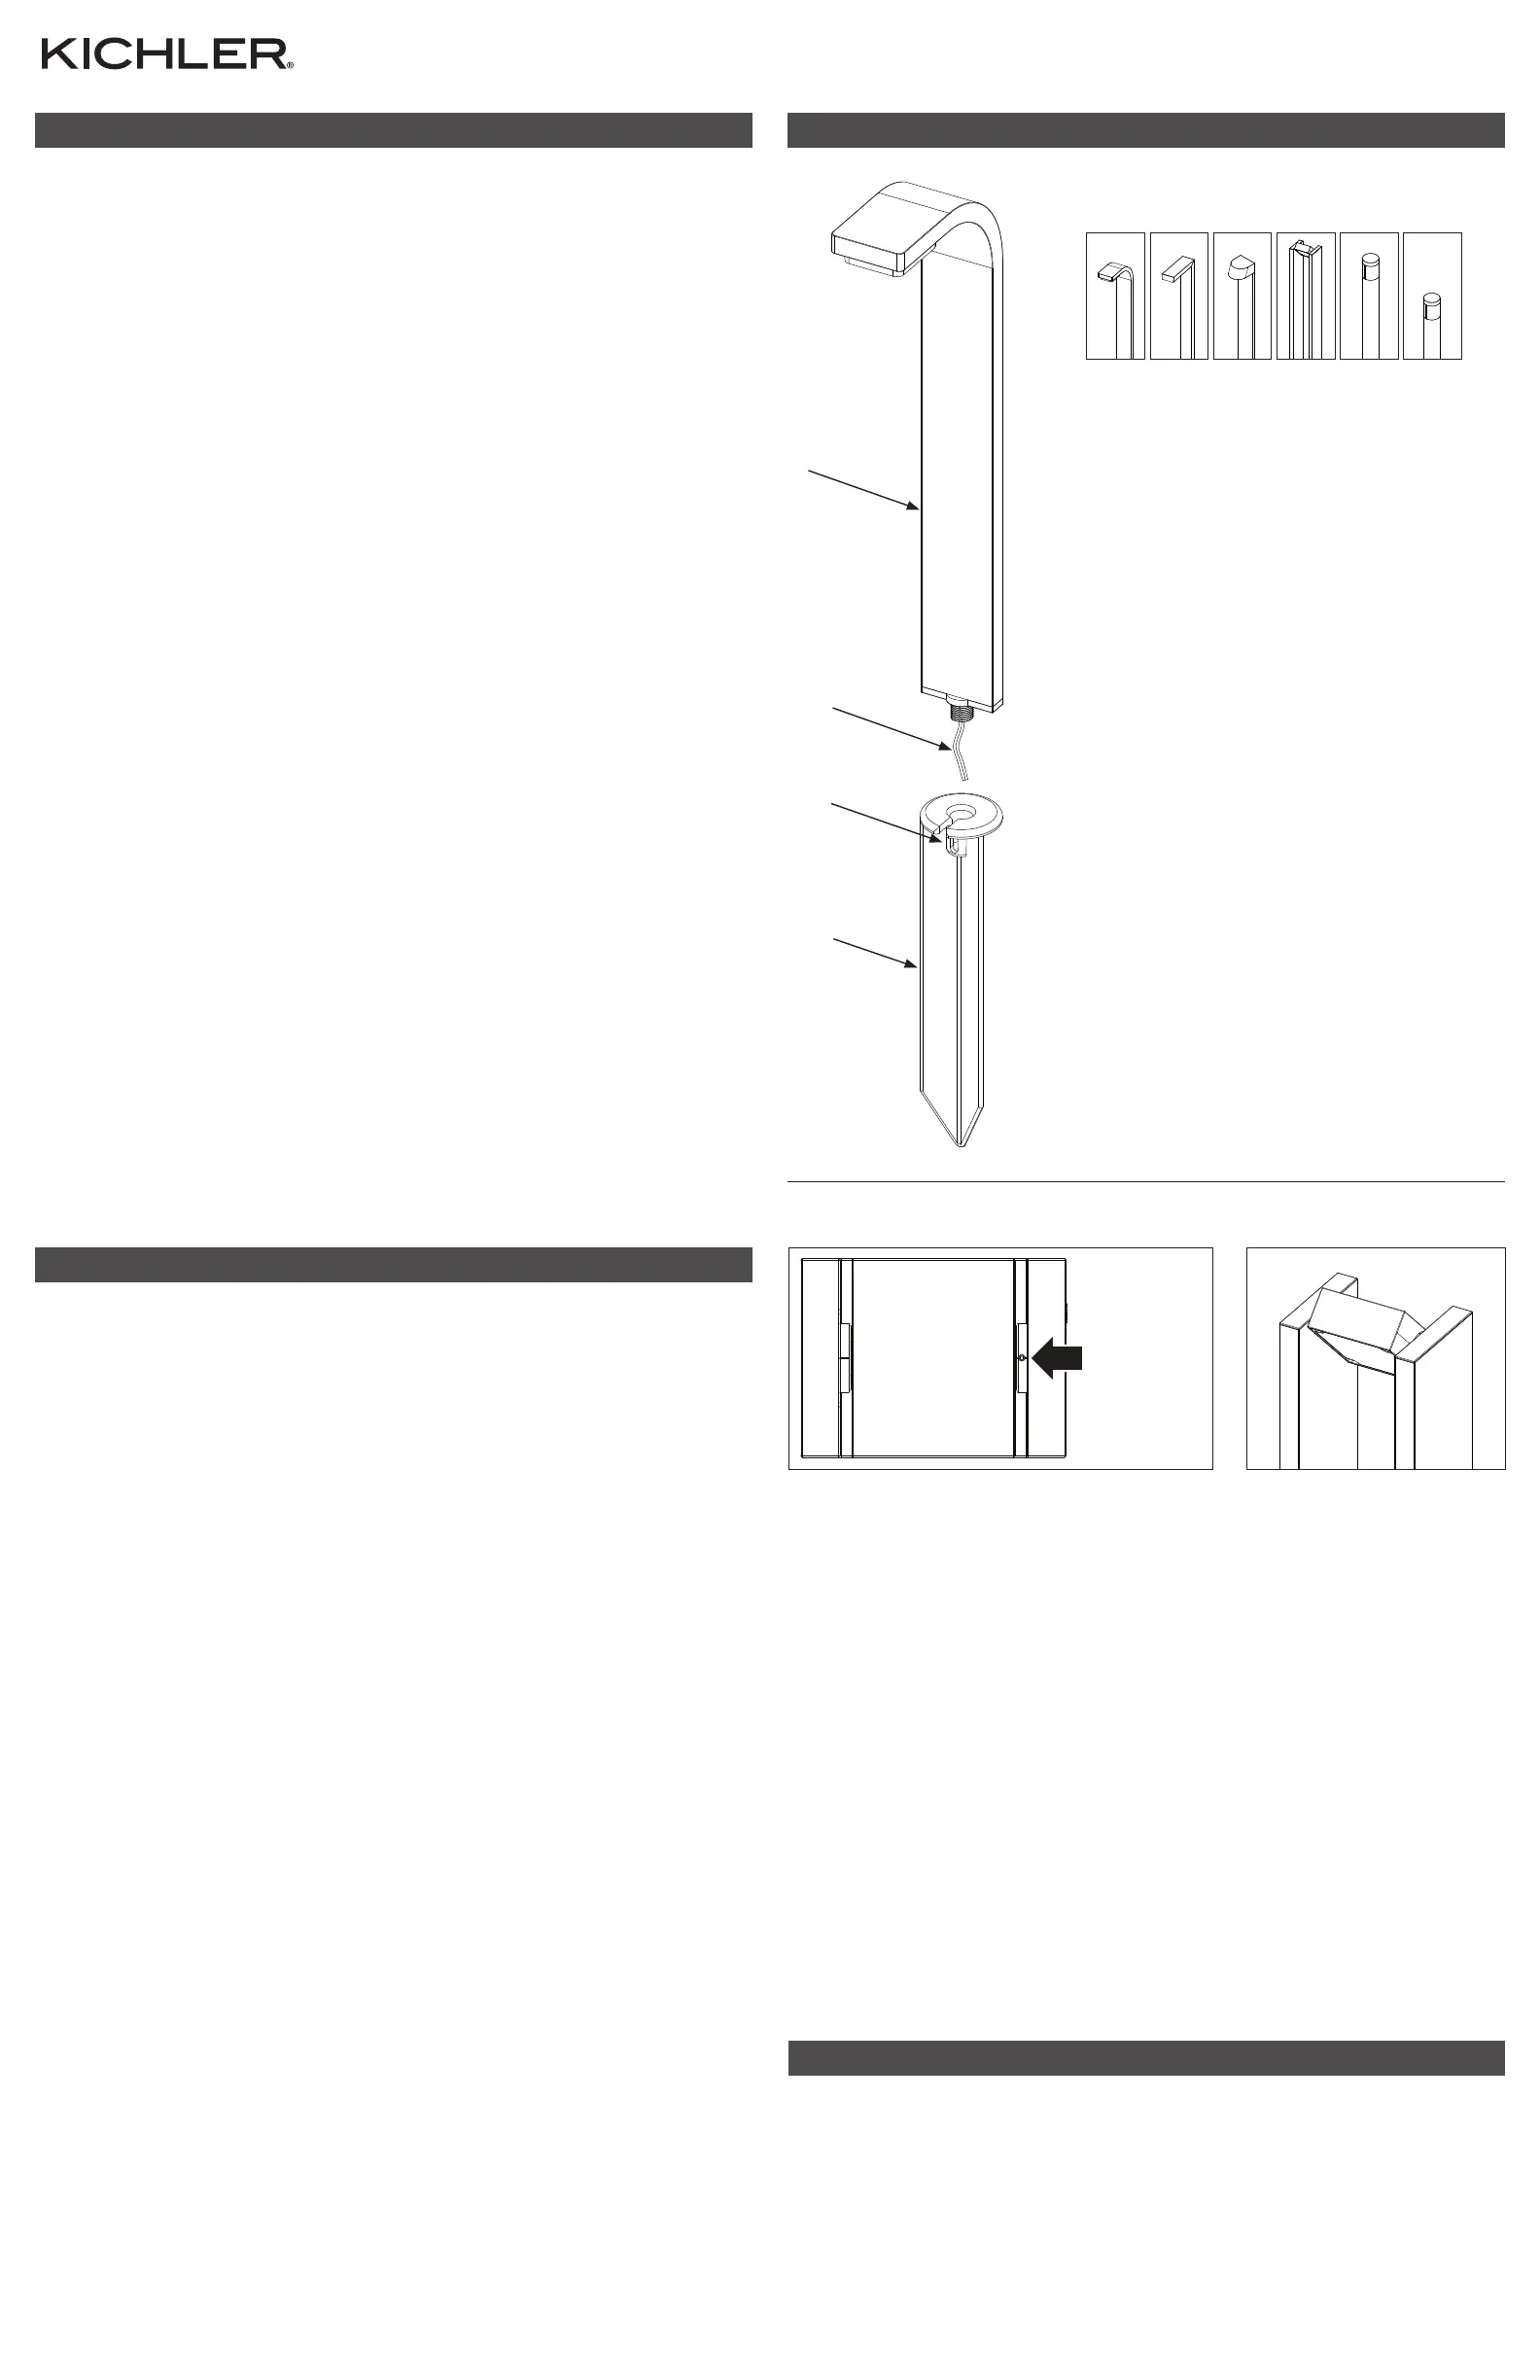
1. TURN OFF POWER.
2. Determine desired location for mounting fixture. At desired location, hammer stake[A] into
ground. To avoid damage to stake, place a board on top of stake while hammering or use a rubber
mallet. If ground is hard and stake is dicult to install, make a crosscut in ground using a flat shovel.
3. Clear away area in ground at wireway opening[B] in stake.
4. Route fixture cable[C] through wireway opening and screw stem[D] into stake. Care should be
taken to ensure wire is not twisted. If assembly does not look straight, adjust by pushing or pulling
on stake only.
5. Make wire connections to main low voltage supply wire using gel filled wire nuts (supplied)
following instructions on bag.
6. ADJUSTING LIGHT DIRECTION (MODEL #16263 ONLY)
Locate the set screw on the top of the fixture (see Fig. 1).
Use a hex key (supplied) to loosen the set screw (half-turn counterclockwise).
Adjust light direction, then retighten the set screw (half-turn clockwise).
NOTE: Do not completely remove the set screw.
NOTE: Light direction can be adjusted as needed up to 45º from the factory setting (see Fig. 2).
INSTALLATION INSTRUCTIONS
FIXTURE DIAGRAM
© 2024 Kichler Lighting LLC. All rights reserved.
A
B
C
D
This device complies with part 15 of the FCC Rules. Operation is subject to the following two conditions:
1. This device may not cause harmful interference, and
2. This device must accept any interference received, including interference that may cause undesired operation.
Note: This equipment has been tested and found to comply with the limits for a Class B digital device, pursuant to part 15 of the
FCC Rules. These limits are designed to provide reasonable protection against harmful interference in a residential installation.
This equipment generates, uses and can radiate radio frequency energy and, if not installed and used in accordance with the
instructions, may cause harmful interference to radio communications. However, there is no guarantee that interference will
not occur in a particular installation. If this equipment does cause harmful interference to radio or television reception, which can
be determined by turning the equipment o and on, the user is encouraged to try to correct the interference by one or more of
the following measures:
• Reorient or relocate the receiving antenna.
• Increase the separation between the equipment and receiver.
• Connect the equipment into an outlet on a circuit dierent from that to which the receiver is connected.
• Consult the dealer or an experienced radio/TV technician for help.
FCC INFORMATION
NOTE: THESE INSTALLATION INSTRUCTIONS
APPLY TO MODEL NUMBERS:
162601626116262162631626416265
Fig. 1Fig. 2
SET SCREW
ADJUSTING MODEL #16263
Product specificaties
| Merk: | Kichler |
| Categorie: | Verlichting |
| Model: | 16260 |
Heb je hulp nodig?
Als je hulp nodig hebt met Kichler 16260 stel dan hieronder een vraag en andere gebruikers zullen je antwoorden
Handleiding Verlichting Kichler

26 Maart 2026
17 Maart 2026
17 Maart 2026
16 Maart 2026
16 Maart 2026
11 Maart 2026
9 Maart 2026
9 Februari 2026
28 Januari 2026
27 Januari 2026
Handleiding Verlichting
Nieuwste handleidingen voor Verlichting
7 Mei 2026
7 Mei 2026
7 Mei 2026
7 Mei 2026
6 Mei 2026
6 Mei 2026
5 Mei 2026
4 Mei 2026
4 Mei 2026