Kichler 15295AZ Handleiding
Kichler Verlichting 15295AZ
Bekijk gratis de handleiding van Kichler 15295AZ (1 pagina’s), behorend tot de categorie Verlichting. Deze gids werd als nuttig beoordeeld door 5 mensen en kreeg gemiddeld 4.4 sterren uit 6 reviews. Heb je een vraag over Kichler 15295AZ of wil je andere gebruikers van dit product iets vragen? Stel een vraag
Pagina 1/1
CAUTION
WHEN INSTALLING KICHLER
®
LANDSCAPE LIGHTING
(LINE VOLTAGE OR LOW VOLTAGE), CARE SHOULD BE
TAKEN TO KEEP CLEAR OF POTENTIALLY COMBUS-
TIBLE MATERIALS.
WHEN MAINTAINING THE FIXTURES, BE SURE TO RE-
MOVE LEAVES, PINE NEEDLES, GRASS CLIPPINGS,
MULCH, OR ANY DEBRIS THAT HAS ACCUMULATED ON
THE LIGHT BULB, LENS, OR BODY OF THE FIXTURE.
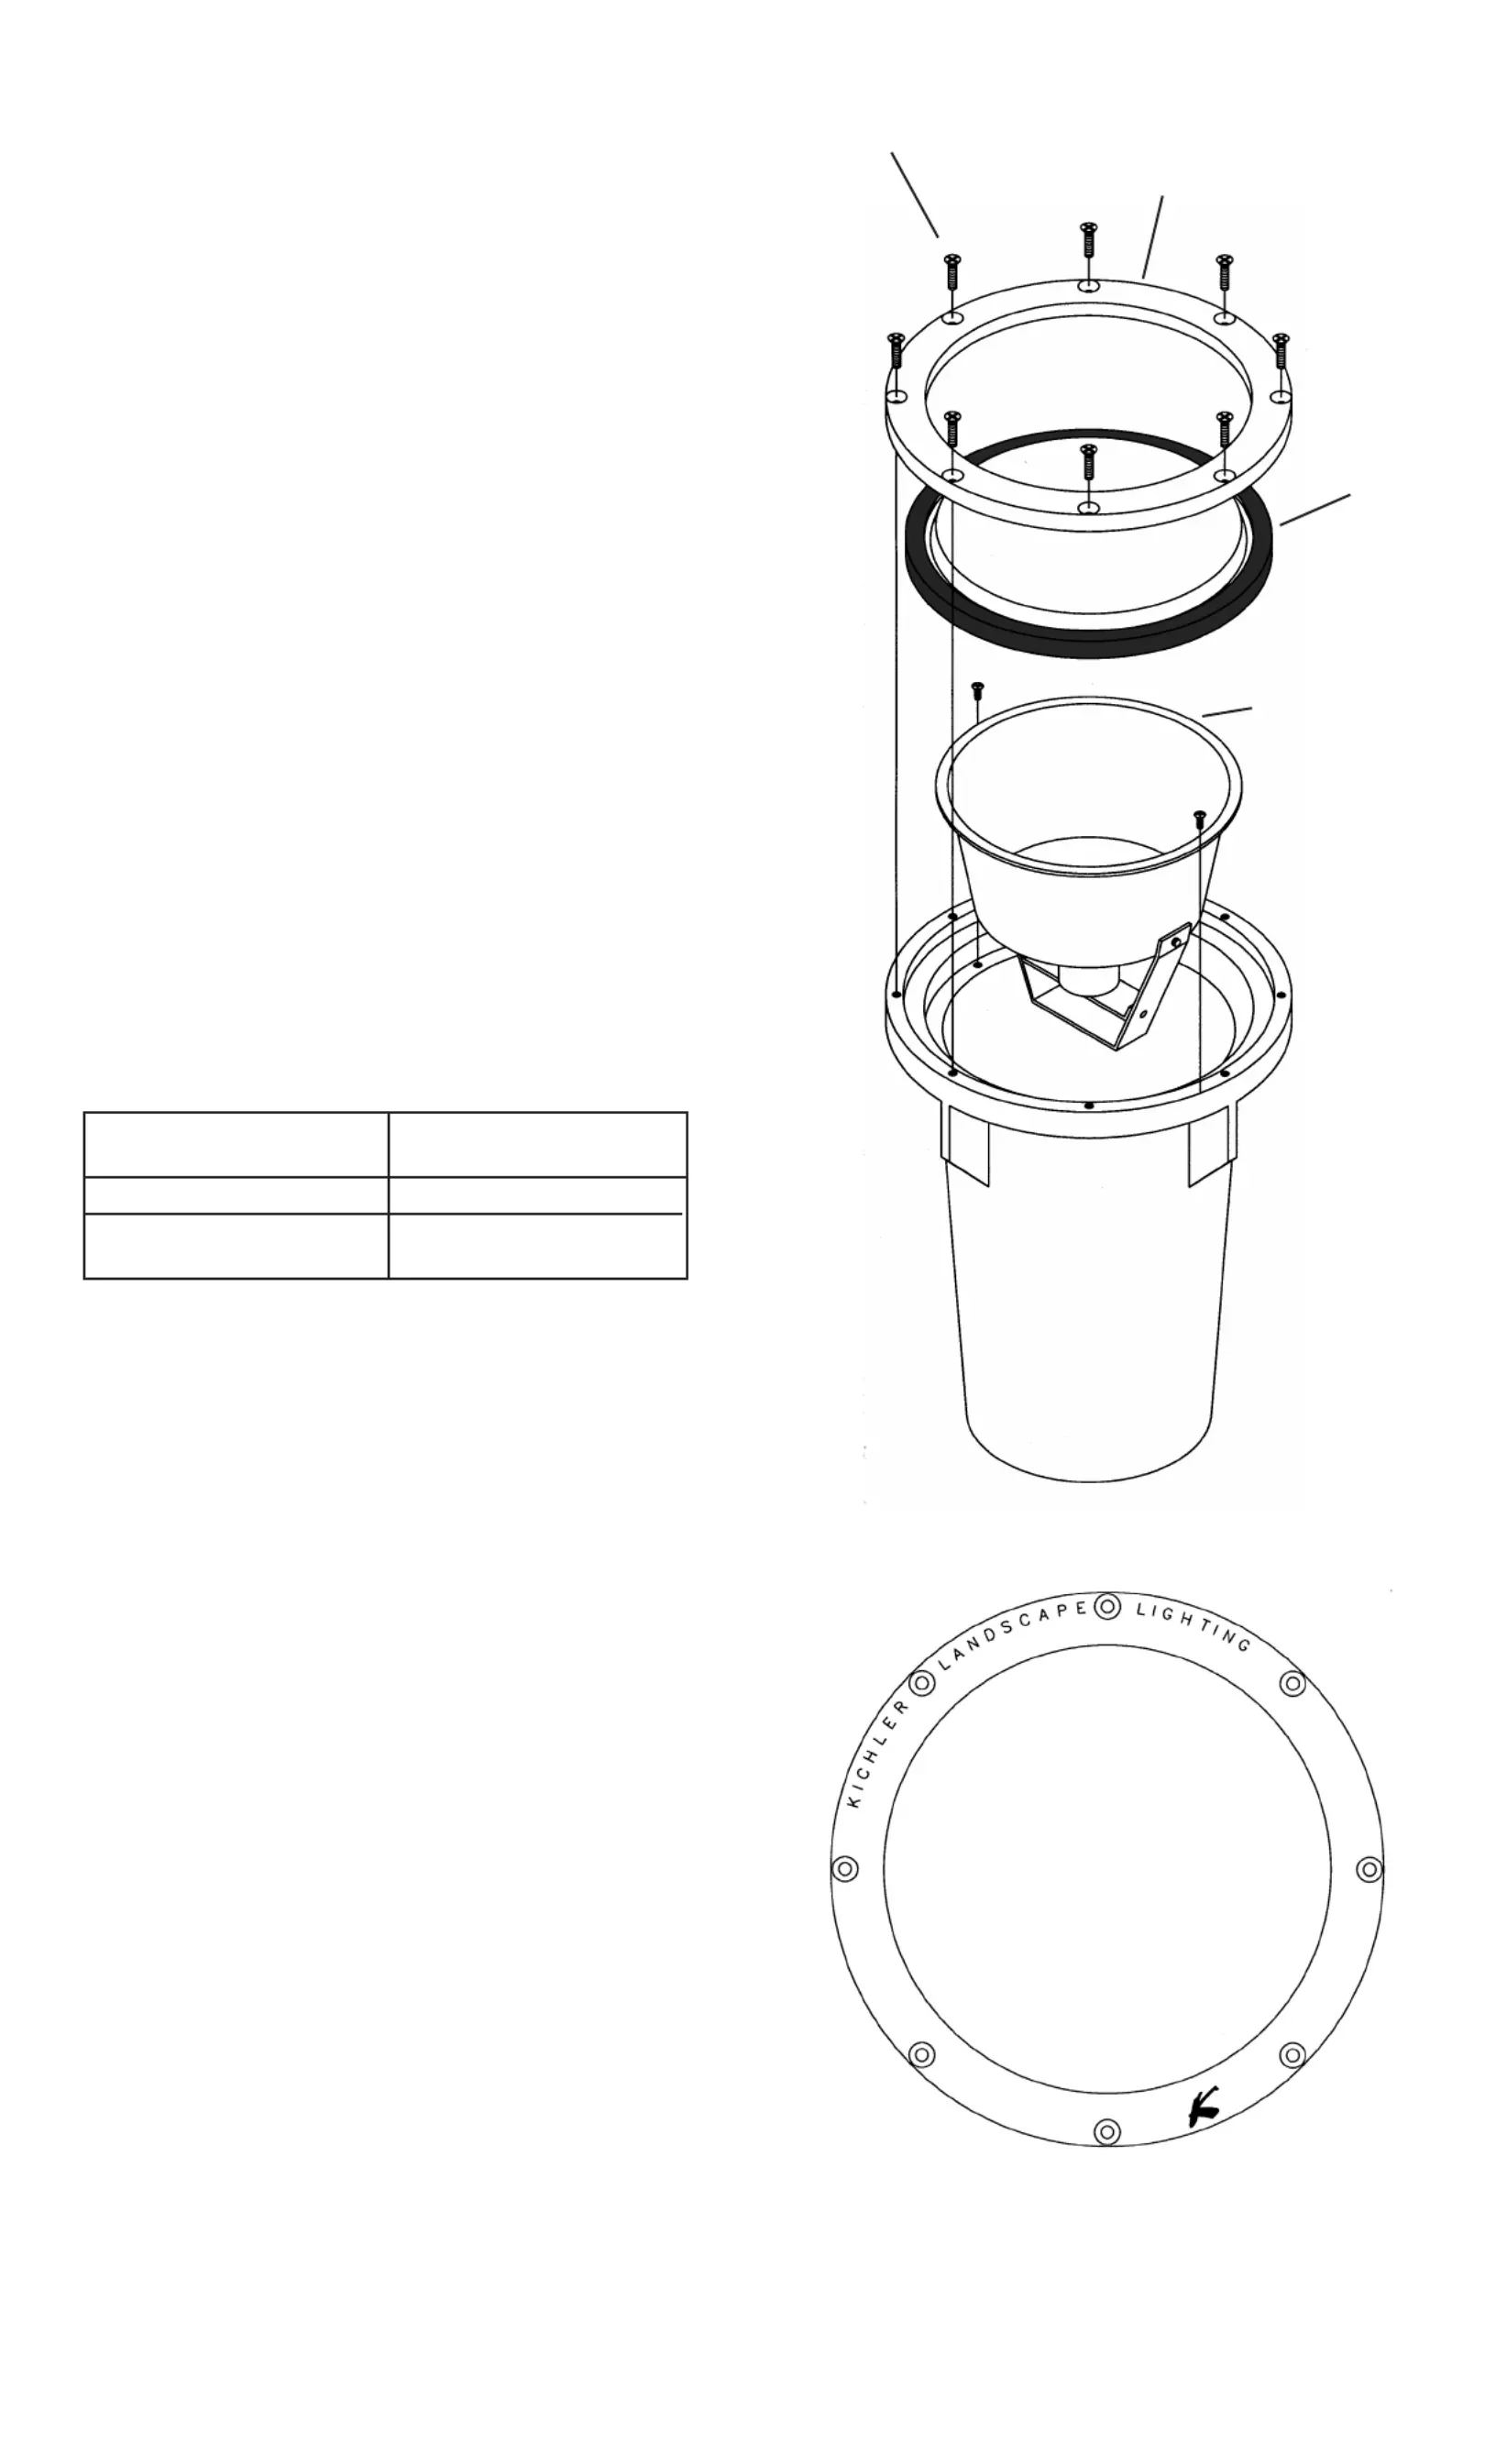
ASSEMBLY AND INSTALLATION
• Installation should be done by a qualied electrician in accordance with
local, state and national electric codes.
• Excavation for conduit and conduit runs should be completed before proceeding.
• If installing xture in concrete using Kichler pour kit 15608AZ (sold separately)
follow directions included with pour kit and skip steps 3,5 and 6.
1) Turn off power.
2) Remove retaining ring, glass and yoke assembly.
3) At desired location, dig hole approximately 3” larger in diameter and
depth then well light.
4) Attach conduit to bottom of well light. To avoid water from entering well
light, thread sealant should be used. NOTE: Bottom of well light has two
holes for connection of conduit. Hole not being used should be plugged
using plug provided.
5) Fill bottom of hole with approximately 3” of pea gravel or equivalent
granular material. Top edge of well light should be at or slightly above
nish grade. Adjust by adding or removing material.
6) Back ll area between well light and hole with pea gravel or equivalent
granular material.
7) Completely seal conduit connections inside well light using provided gel
encapsulate.
8) Connect supply wires to socket wires (connectors not provided).
Reference chart for correct connections and wire accordingly.
9) Adjust angle for bulb by loosening wing nuts inside yoke assembly and
adjust bottom end of yoke. Once at desired angle tighten wing nuts.
10) Slip yoke assembly into well light and secure in place with screws.
11) Insert recommended lamp. Keep bare hands from touching glass of
lamp. Oil from skin create excessive heating of lamp resulting in shorter
lamp life.
12) Insure that all gasket seating surfaces and screw holes are free and
clear of debris. If screw holes are not clear blow debris out or clear with
#10-32 tap.
13) Slip glass with gasket into well light.
14) Slip screws previously removed in step 2 through holes in retaining ring.
15) Align screws with holes in well light and tighten using an alternating
torque sequence at 20-30 inch-lbs. (SEE ILLUST. – Numbers indicate
order in which to tighten screws.)
For warranty information please visit: http://www.landscapelighting.com/portal/warranty_page
Pour de plus amples informations sur la garantie, cliquez sur le lien ci-dessous : http://www.landscapelighting.com/portal/warranty_page
SCREW
RETAINING RING
GLASS
YOKE ASSEMBLY
1
8
4
5
3
7
2
6
Date Issued: 12/2/11
IS-15295-CB
INSTRUCTIONS
For Assembling and Installing Fixtures in Canada
Pour L’assemblage et L’installation Au Canada
OUTDOOR USE ONLY
DOM ETRE INSTALLE A L’EXTERIEUR
Connect Black or
Red Supply Wire to:
Connect
White Supply Wire to:
BlackWhite
Insulated wire (other than green)
with copper conductor
Insulated wire (other than green)
with silver conductor
Product specificaties
| Merk: | Kichler |
| Categorie: | Verlichting |
| Model: | 15295AZ |
Heb je hulp nodig?
Als je hulp nodig hebt met Kichler 15295AZ stel dan hieronder een vraag en andere gebruikers zullen je antwoorden
Handleiding Verlichting Kichler

26 Maart 2026
17 Maart 2026
17 Maart 2026
16 Maart 2026
16 Maart 2026
11 Maart 2026
9 Maart 2026
9 Februari 2026
28 Januari 2026
27 Januari 2026
Handleiding Verlichting
Nieuwste handleidingen voor Verlichting
7 Mei 2026
7 Mei 2026
7 Mei 2026
7 Mei 2026
6 Mei 2026
6 Mei 2026
5 Mei 2026
4 Mei 2026
4 Mei 2026