Intellinet 525299 Handleiding
Intellinet
Router
525299
Bekijk gratis de handleiding van Intellinet 525299 (2 pagina’s), behorend tot de categorie Router. Deze gids werd als nuttig beoordeeld door 49 mensen en kreeg gemiddeld 4.6 sterren uit 25 reviews. Heb je een vraag over Intellinet 525299 of wil je andere gebruikers van dit product iets vragen? Stel een vraag
Pagina 1/2

WARRANTY INFORMATION
English
:
For warranty information, go to www.intellinet-network.com/warranty.
Deutsch:
Garantieinformationen finden Sie unter www.intellinet-network.com/warranty.
Español:
Si desea obtener información sobre la garantía, visite www.intellinet-network.com/warranty.
Français:
Pour consulter les informations sur la garantie, visitez www.intellinet-network.com/warranty.
Polski:
Informacje dotyczące gwarancji znajdują się na stronie www.intellinet-network.com/warranty.
Italiano:
Per informazioni sulla garanzia, accedere a www.intellinet-network.com/warranty.
Português: Para informações sobre garantia, ir para www.intellinet-network.com/warranty.
En México:
Póliza de Garantía INTELLINET — Datos del importador y responsable ante el consumidor IC Intracom México,
S.A. de C.V. • Av. Interceptor Poniente # 73, Col. Parque Industrial La Joya, Cuautitlán Izcalli, Estado de México, C.P.
54730, México. • Tel. (55)1500-4500
La presente garantía cubre este producto por 3 años contra cualquier defecto de fabricación en sus materiales y
mano de obra, bajo las siguientes condiciones:
1. Todos los productos a que se reere esta garantía, ampara su cambio físico, sin ningún cargo para el
consumidor.
2. El comercializador no tiene talleres de servicio, debido a que los productos que se garantizan no cuentan con
reparaciones, ni refacciones, p1-ya que su garantía es de cambio físico.
3. La garantía cubre exclusivamente aquellas partes, equipos o sub-ensambles que hayan sido instaladas de
fábrica y no incluye en ningún caso el equipo adicional o cualesquiera que hayan sido adicionados al mismo
por el usuario o distribuidor.
Para hacer efectiva esta garantía bastará con presentar el producto al distribuidor en el domicilio donde fue
adquirido o en el domicilio de IC Intracom México, S.A. de C.V., junto con los accesorios contenidos en su
empaque, acompañado de su póliza debidamente llenada y sellada por la casa vendedora (indispensable el
sello y fecha de compra) donde lo adquirió, o bien, la factura o ticket de compra original donde se mencione
claramente el modelo, número de serie (cuando aplique) y fecha de adquisición. Esta garantía no es válida en
los siguientes casos: Si el producto se hubiese utilizado en condiciones distintas a las normales; si el producto
no ha sido operado conforme a los instructivos de uso; o si el producto ha sido alterado o tratado de ser reparado
por el consumidor o terceras personas.
REGULATORY STATEMENTS
Federal Communications Commission (FCC) Class B
This equipment has been tested and found to comply with the limits for a Class B digital device, pursuant to Part 15
of Federal Communications Commission (FCC) Rules. These limits are designed to provide reasonable protection
against harmful interference in a residential installation. This equipment generates, uses and can radiate
radio
frequency energy, and if not installed and used in accordance with the instructions may cause harmful
interference to radio communications. However, there is no guarantee that interference will not occur in a
particular installation. If this equipment does cause harmful interference to radio or television reception,
which can be determined by turning the equipment o and on, the user is encouraged to try to correct the
interference by one or more of the following measures:
• Reorient or relocate the receiving antenna.
• Increase the separation between the equipment and the receiver.
• Connect the equipment to an outlet on a circuit dierent from the receiver.
• Consult the dealer or an experienced radio/TV technician for help.
European Commission (CE / R&TTE)
English: This device complies with the requirements of the R&TTE Directive 1999/5/EC.
Deutsch: Dieses Gerät enspricht der Direktive R&TTE Direktive 1999/5/EC.
Español: Este dispositivo cumple con los requerimientos de la Directiva R&TTE 1999/5/EC.
Français: Cet appareil satisfait aux exigences de la directive R&TTE 1999/5/CE.
Polski: Urządzenie spełnia wymagania dyrektywy R&TTE 1999/5/EC.
Italiano: Questo dispositivo è conforme alla Direttiva 1999/5/EC R&TTE.
Português: Este dispositivo está em conformidade com a Directiva R&TTE 1999/5/EC.
WIRELESS N ADSL2+
MODEM ROUTER
Quick Install Guide
WASTE ELECTRICAL & ELECTRONIC EQUIPMENT
Disposal of Electric and Electronic Equipment
(applicable in the European Union and other European countries with separate collection systems)
English: This symbol on the product or its packaging indicates that this product shall not be treated as household
waste. Instead, it should be taken to an applicable collection point for the recycling of electrical and electronic
equipment. By ensuring this product is disposed of correctly, you will help prevent potential negative
consequences to the environment and human health, which could otherwise be caused by inappropriate
waste handling of this product. If your equipment contains easily removable batteries or accumulators,
dispose of these separately according to your local requirements. The recycling of materials will help to
conserve natural resources. For details about recycling this product, contact your local city oce, your
household waste disposal service or the shop where you purchased this product. In countries outside of the EU: If you
wish to discard this product, contact your local authorities and ask for the correct manner of disposal.
Deutsch: Dieses auf dem Produkt oder der Verpackung angebrachte Symbol zeigt an, dass dieses Produkt nicht
mit dem Hausmüll entsorgt werden darf. In Übereinstimmung mit der Richtlinie 2002/96/EG des Europäischen
Parlaments und des Rates über Elektro- und Elektronik-Altgeräte (WEEE) darf dieses Elektrogerät nicht im normalen
Hausmüll oder dem Gelben Sack entsorgt werden. Wenn Sie dieses Produkt entsorgen möchten, bringen Sie es bitte
zur Verkaufsstelle zurück oder zum Recycling-Sammelpunkt Ihrer Gemeinde.
Español: Este símbolo en el producto o su embalaje indica que el producto no debe tratarse como residuo
doméstico.
De conformidad con la Directiva 2002/96/CE de la UE sobre residuos de aparatos eléctricos y
electrónicos (RAEE),
este producto eléctrico no puede desecha se con el resto de residuos no clasicados.
Deshágase de este producto
devolviéndolo a su punto de venta o a un punto de recolección municipal para su reciclaje.
Français: Ce symbole sur Ie produit ou son emballage signie que ce produit ne doit pas être traité comme un
déchet ménager. Conformément à la Directive 2002/96/EC sur les déchets d’équipements électriques et électroniques
(DEEE), ce produit électrique ne doit en aucun cas être mis au rebut sous forme de déchet municipal non trié. Veuillez
vous débarrasser de ce produit en Ie renvoyant à son point de vente ou au point de ramassage local dans votre
municipalité, à des ns de recyclage.
Polski: Jeśli na produkcie lub jego opakowaniu umieszczono ten symbol, wówczas w czasie utylizacji nie wolno
wyrzucać tego produktu wraz z odpadami komunalnymi. Zgodnie z Dyrektywą Nr 2002/96/WE w sprawie zużytego
sprzętu elektrycznego i elektronicznego (WEEE), niniejszego produktu elektrycznego nie
wolno usuwać jako nie
posortowanego odpadu komunalnego. Prosimy o usuniecie niniejszego produktu
poprzez jego zwrot do punktu
zakupu lub oddanie do miejscowego komunalnego punktu zbiórki odpadów przeznaczonych do recyklingu.
Italiano: Questo simbolo sui prodotto o sulla relativa confezione indica che il prodotto non va trattato come un
riuto domestico. In ottemperanza alla Direttiva UE 2002/96/EC sui riuti di apparecchiature elettriche ed elettroniche
(RAEE), questa prodotto elettrico non deve essere smaltito come riuto municipale misto. Si prega di smaltire il prodotto
riportandolo al punto vendita o al punto di raccolta municipale locale per un opportuno riciclaggio.
Português
:
Este símbolo no produto ou na embalagem indica que este produto não deve ser tratado como lixo
doméstico. Em vez disso, deve ser levado para um ponto de recolha adequado à reciclagem de equipamento
eléctrico ou electrónico. Ao garantir a eliminação correcta deste produto, ajuda a evitar potenciais consequências
negativas para o ambiente e a saúde humana, que poderiam resultar do manuseamento inadequado de resíduos
deste produto Caso o seu equipamento inclua baterias ou acumuladores facilmente removíveis, elimine-os
separadamente de acordo com os requisitos locais. A reciclagem de materiais ajuda a conservar os recursos
naturais. Para informações mais detalhadas sobre reciclagem deste produto, contacte as autoridades locais, o
serviço de recolha de lixo doméstico ou a loja onde adquiriu o produto. Nos países fora da UE: se quiser eliminar
este produto, contacte as autoridades locais e informe-se sobre o procedimento a adoptar.
INT-525299/525312-QIG-ML-0512-02
525299
150N
North & South America
IC INTRACOM AMERICAS
550 Commerce Blvd.
Oldsmar, FL 34677
USA
Asia & Africa
IC INTRACOM ASIA
Far Eastern Technology Center
7-F No. 125, Section 2, Da Tong Rd.
Shijr, Taipei
Taiwan, ROC
Europe
IC INTRACOM EUROPE
Löhbacher Str. 7
D-58553 Halver
Germany
INTELLINET NETWORK SOLUTIONS
™
oers a complete line of active and passive networking products.
Ask your local computer dealer for more information or visit www.intellinet-network.com.
All trademarks and trade names are the property of their respective owners.
INTELLINET NETWORK SOLUTIONS
™
bietet ein vollständiges Sortiment aktiver und passiver
Netzwerkkomponenten. Für weitere Informationen wenden Sie sich bitte an Ihren Händler oder nutzen Sie die
Webseite www.intellinet-network.com.
Alle Marken und Markennamen sind Eigentum Ihrer jeweiligen Inhaber.
INTELLINET NETWORK SOLUTIONS
™
ofrece una línea completa de productos de red activa y pasiva.
Pregunte a su distribuidor para obtener mayor informacion o visite: www.intellinet-network.com.
Todas las marcas y nombres comerciales son propiedad de sus respectivos dueños.
INTELLINET NETWORK SOLUTIONS
™
ore un assortiment complet de produits de réseau actifs et passifs. Pour plus
d’informations veuillez contacter votre revendeur ou utiliser la page d’accueil www.intellinet-network.com.
Toutes les marques et noms commerciaux sont la propriété de leurs propriétaires respectifs.
INTELLINET NETWORK SOLUTIONS
™
to kompletna linia aktywnych oraz pasywnych komponentów sieciowych.
Poproś lokalnego dealera o więcej informacji lub odwiedź stronę www.intellinet-network.com.
Wszystkie znaki towarowe i nazwy handlowe należą do ich właścicieli.
INTELLINET NETWORK SOLUTIONS
™
oferece uma linha completa de produtos de rede activos e passivos. Peça mais
informações ao fabricante do seu computador ou visite www.intellinet-network.com.
Todos as marcas comerciais e nomes comerciais são de propriedade dos seus respectivos proprietários.
INTELLINET NETWORK SOLUTIONS
™
ore una linea completa di prodotti di rete attivi e passivi. Chiedi
maggiori informazioni al tuo rivenditore di computer o visita il sito www.intellinet-network.com.
Tutti i marchi registrati e le dominazioni commerciali sono di proprietà dei loro rispettivi proprietari.
© IC INTRACOM. All rights reserved.
INTELLINET is a trademark of IC INTRACOM, registered in the U.S. and other countries.
525312
300N

Ce guide décrit les bases pour configurer et opérer cet appareil. Pour des instructions et
spécifications détailées, veuillez lire le manuel de l’utilisation sur le CD inclus ou sur
www.intellinet-network.com.
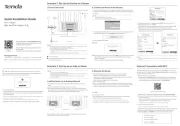
Étape 1 - Connexions matérielles
• Connectez votre DSL au port ADSL du routeur en utilisant le câble RJ11 fourni avec ce
produit.
• Connectez tous vos ordinateurs et dispositifs réseau (des composants comme consoles de
jeux vidéo, lecteurs média de réseau, stockage en réseau ou commutateurs) aux ports
LAN (1-4) du routeur.
• Branchez l’adaptateur secteur à la prise de courant, puis connectez-le au routeur.
Étape 2 - Connexion DSL
2.1 Démarrez votre navigateur Web et entrez “http://192.168.2.1” afin d’afficher une fenêtre
de connexion. Saisissez “admin” comme nom d’utilisateur et “1234” comme mot de
passe.
2.2 Cliquez sur Quick Setup; puis sur ; sélectionnez votre fournisseur Internet de la Next
liste. Cliquez sur Next.
2.3 Entrez le nom d’utilisateur DSL et le mot de passe que vous avez reçus de votre
fournisseur Internet. Cliquez sur Finish.
Étape 3 - Sécurité sans fil
• Pour sécuriser votre réseau, veuillez consulter le manuel utilisateur.
Questa guida fornisce i passaggi basilari per settare e far funzionare l’apparecchio. Per
istruzioni dettagliate e ulteriori specifiche, fare riferimento al manuale d’istruzione
contenuto nel CD incluso al prodotto o su www.intellinet-network.com.
Passo 1 - Connesioni dell’Hardware
• Collegate il vostro DSL alla porta ASDL del router utilizzando il cavo RJ11 incluso.
• Collegare i computer e le periferiche di rete (componenti gestibili tramite rete come
console di gioco, media player, unità di memoria o LAN switch) alle porte LAN (1-4) del
router.
• Collegare l’alimentatore A/C alla presa di corrente, e quindi collegare lo spinotto di
alimentazione al router.
Passo 2 - Connessione DSL
2.1 Far avviare il Web browser e aprire il seguente collegamento http://192.168.2.1 per
visualizzare la finestra di registrazione. Inserire “admin” come nome utente e “1234”
come password.
2.2 Cliccate su installazione rapida, fate click su Avanti, selezionate il vostro Internet
service provider dall’elenco a tendina.
2.3 Inserite username a password fornite dal vostro internet service provider. Fate click su
Fine.
Passo 3 - Sicurezza Wireless
• Per rendere sicura la vostra rete wireless, consultate il manuale di istruzioni.
Este guia apresenta os passos básicos para configuração e operação deste dispositivo. Para
instruções e especificações detalhadas, consulte o manual do utilizador no CD fornecido com
este produto ou em www.intellinet-network.com.
Passo 1 - Ligações de Hardware
• Ligue o DSL à porta ADSL do router utilizando o cabo RJ11 incluído.
• Ligue todos os computadores e dispositivos de rede (componentes ligados à rede, tais
como consolas de jogos, leitores de multimédia em rede, unidades de armazenamento em
rede ou comutadores LAN) às portas LAN (1-4) do router.
• Ligue o transformador à tomada da parede e, em seguida, ligue-o ao conector de
alimentação do router.
Passo 2 - Ligação DSL
2.1 Abra o Web browser e escreva http://192.168.2.1 para aceder a uma janela de início de
sessão. Escreva “admin” como nome de utilizador e “1234” como palavra-passe.
2.2 Clique em Quick Setup; clique em ; selecione seu provedor de acesso à internet da Next
lista de opções. Clique em . Next
2.3 Introduza o nome de utilizador e a palavra-passe DSL fornecidos pelo prestador de
serviços Internet. Clique em Finish.
Passo 3 - Segurança Sem Fio
• Para segurar sua rede sem fio, refira ao manual de operador para instuções.
ENGLISH
FRANÇAIS
DEUTSCH ESPAÑOL
ITALIANO
www.intellinet-network.com
PORTUGUÊS
POLSKI
This guide presents the basic steps to set up and operate this device. For detailed instructions
and specifications, refer to the user manual on the CD enclosed with this product or at
www.intellinet-network.com.
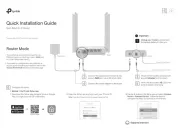
Step 1 - Hardware Connections
• Connect your DSL to the ADSL port of the router using the provided RJ11 cable.
• Connect all your computers and network devices (network-enabled components like game
consoles, network media players, network storage units or LAN switches) to the LAN ports
(1-4) of the router.
• Connect the A/C power adapter to the wall socket, and then connect it to the power jack of
the router.
Step 2 - DSL Connection
2.1 Open your Web browser and enter http://192.168.2.1 to display a login window. Enter
“admin” as the username and “1234” as the password.
2.2 Click ; click ; select your Internet service provider from the drop-down Quick Setup Next
list. Click . Next
2.3 Enter the DSL username and password provided by your Internet service provider. Click
Finish.
Step 3 - Wireless Security
• To make your wireless network secure, refer to the user manual for instructions.
Diese Kurzanleitung zeigt die grundlegenden Schritte zur Einrichtung und Inbetriebnahme
dieses Geräts. Für genauere Anweisungen nutzen Sie bitte das beiliegende Handbuch auf CD
oder auf www.intellinet-network.com.
Schritt 1 - Hardwareanschlüsse
• Schließen Sie Ihr DSL mit dem beiliegenden RJ11-Kabel an den ADSL-Port des Routers an.
• Schließen Sie alle Computer und Netzwerkgeräte (netzwerkfähige Komponenten wie
Netzwerk-Mediaplayer, Netzwerkspeichergeräte oder LAN-Switche) an die LAN-Ports
(1-4) des Routers an.
• Schließen Sie das Netzteil an eine Steckdose an und verbinden Sie es dann mit der
Strombuchse des Routers.
Schritt 2 - DSL Verbindung
2.1 Öffnen Sie Ihren Internetbrowser und geben Sie in der Adressezeile ein:
“http://192.168.2.1”. Ein Login-Fenster öffnet sich. Geben Sie als Benutzernamen
“admin” und als Passwort “1234” ein.
2.2 Klicken Sie auf ; dann auf ; wählen Sie Ihren Internetprovider aus der Quick Setup Next
Drop-Down-Liste aus. Klicken Sie auf Next.
2.3 Geben Sie den DSL-Benutzernamen und das Passwort ein. Speichern Sie die
Einstellungen, indem Sie auf Finish klicken.
Schritt 3 - WLAN-Sicherheit
• Informationen zu den Sicherheitseinstellungen Ihres Netzwerks finden Sie im Handbuch.
Esta guía presenta los pasos básicos para instalar y operar este dispositivo. Para obtener
instrucciones detalladas y especificaciones, consulte el manual de usuario en el CD adjunto o
en www.intellinet-network.com.
Paso 1 - Conexiónes de Hardware
• Conecte su DSL al puerto ADSL del ruteador usando el cable RJ11 incluido.
• Conecte todos sus equipos y dispositivos de red (componentes con red habilitada tal como
consolas de juegos, reproductores multimedia de red, unidades de almacenamiento o
switches LAN) a los puertos LAN (1-4) del ruteador.
• Conecte el adaptador a una toma de corriente de pared y conéctelo al jack de corriente
del ruteador.
Paso 2 - Conexión de DSL
2.1 Inicie su explorador Web y abra la dirección http://192.168.2.1 para mostrar un cuadro
de dialogo. Escriba como datos “admin” para el usuario y “1234” para la contraseña.
2.2 Haga clic en “Quick Setup”; después haga clic en ; seleccione su proveedor Siguiente
de servicio de internet de la lista desplegable. Haga clic en Siguiente.
2.3 Escriba el nombre de usuario del DSL y la contraseña proporcionados por su proveedor
de servicio de Internet. Haga clic en .Finalizar
Paso 3 - Seguridad Inalámbrica
• Para hacer una red inalámbrica segura, consulte el manual de usuario con las
instrucciones.
Ta instrukcja prezentuje podstawowe kroki podłączenia i instalacji urządzenia. Aby uzyskać
szczegółowe informacje techniczne oraz instrukcję użytkownika zapoznaj się zawartością
płyty CD dołączonej do opakowania lub odwiedź stronę www.intellinet-network.com.
Krok 1 - Podłączenie urządzenia
•
Używając dołączonego kable RJ11 podłącz port
ADSL
routera do portu RJ11 DSL.
• Podłącz komputery oraz inne urządzenia sieciowe (takie jak konsole do gier, sieciowe
odtwarzacze multimedialne, sieciowe pamięci masowe, przełączniki ... Ethernet) do
portów LAN (1-4) routera.
• Podłącz zasilanie do routera używając znajdującego się w zestawie adaptera zasilania.
Krok 2 - Konfiguracja połączenia
2.1
Na komputerze podłączonym do routera otwórz przeglądarkę internetową i w pasek
adresu wpisz: http://192.168.2.1, aby wyświetlić okno logowania. W oknie logowania, w
pole nazwa użytkownika wpisz „admin”, w pole hasło wpisz „1234”.
2.2 Wciśnij Quick Setup; następnie Next; z rozwijanej listy wybierz Twojego dostawcę usług
internetowych. Wciśnij Next.
2.3 Wprowadź nazwę użytkownika oraz hasło podane przez dostawcę usług inter-
netowych. Dwukrotnie wybierz Finish.
Krok 3 - Bezpieczeństwo sieci bezprzewodowej
• Aby zabezpieczyć sieć bezprzewodową, zapoznaj się z podręcznikiem użytkownika w celu
uzyskania informacji.
STEP
2
2.1
2.2
2.3
STEP
1
Reset/WPS
12VDC
4 3 2 1 ADSL
Radio
ON/OFF
DSL
Product specificaties
| Merk: | Intellinet |
| Categorie: | Router |
| Model: | 525299 |
| Kleur van het product: | Wit |
| Gewicht: | 800 g |
| Breedte: | 187 mm |
| Diepte: | 100 mm |
| Hoogte: | 30 mm |
| Gebruikershandleiding: | Ja |
| LED-indicatoren: | Ja |
| Processormodel: | TrendChip TC3162U + TrendChip TC3086 |
| Wi-Fi-standaarden: | 802.11b, 802.11g, Wi-Fi 4 (802.11n) |
| Ethernet LAN: | Ja |
| Frequentieband: | 2.4 GHz |
| Meegeleverde kabels: | LAN (RJ-45), Phone (RJ-11) |
| Snelstartgids: | Ja |
| Inclusief AC-adapter: | Ja |
| Aantal Ethernet LAN (RJ-45)-poorten: | 4 |
| Certificering: | FCC Class B, CE, RoHS |
| Aansluiting voor netstroomadapter: | Ja |
| Intern geheugen: | 32 MB |
| Type processor: | Ja |
| Modulatie: | 16-QAM, 64-QAM, CCK, DBPSK, DSSS, OFDM, QPSK |
| Wifi-standaard: | Wi-Fi 4 (802.11n) |
| WLAN gegevensoverdrachtsnelheid (max): | 150 Mbit/s |
| Interfacetype Ethernet LAN: | Fast Ethernet |
| Ethernet LAN, data-overdrachtsnelheden: | 10, 100 Mbit/s |
| Bekabelingstechnologie: | 10/100Base-T(X) |
| Netwerkstandaard: | IEEE 802.11b, IEEE 802.11g, IEEE 802.11n, IEEE 802.3, IEEE 802.3u |
| Ondersteunde beveiligingsalgoritmen: | 128-bit WEP, 64-bit WEP, WPA-TKIP, WPA2-AES, WPS |
| Antennas quantity: | 1 |
| Antenne versterkingsniveau (max): | 3 dBi |
| 3G: | Nee |
| 4G: | Nee |
| Temperatuur bij opslag: | 0 - 60 °C |
| Upgraden van firmware mogelijk: | Ja |
| Mobiele netwerkverbinding: | Nee |
| Web-gebaseerd management: | Ja |
| Ondersteunde WLAN data-overdrachtsnelheden: | 1, 2,5.5, 6,9, 11, 12, 18, 24, 36, 48, 54, 150 Mbit/s |
| Rack-montage: | Nee |
| Frequentiebereik: | 2.4 - 2.4835 GHz |
| xDSL-verbinding: | Ja |
| MAC adres filtering: | Ja |
| Filtratie: | Ja |
| Firewall: | Ja |
| Flash memory: | 4 MB |
| DHCP server: | Ja |
| Universal Plug and Play ( UPnP ): | Ja |
| Quality of Service (QoS): | Ja |
| DHCP client: | Ja |
| Upstream data snelheid: | 1 Mbit/s |
| Downstream data snelheid: | 24 Mbit/s |
| Network address translation (NAT): | Ja |
| DMZ support: | Ja |
| DSL WAN: | Ja |
| URL- filtering: | Ja |
| Beheerprotocollen: | SNMP |
| Bedrijfstemperatuur (T-T): | 0 - 40 °C |
| Relatieve vochtigheid in bedrijf (V-V): | 10 - 90 procent |
| VPN eigenschappen: | PPTP, L2TP, IPsec |
| Antenne-ontwerp: | Extern |
| Stateful Packet Inspection (SPI): | Ja |
| ADSL2+: | Ja |
Heb je hulp nodig?
Als je hulp nodig hebt met Intellinet 525299 stel dan hieronder een vraag en andere gebruikers zullen je antwoorden
Handleiding Router Intellinet


5 Juli 2023


4 Juli 2023


4 Juli 2023


1 Juli 2023
Handleiding Router
- Envivo
- RAVPower
- Mercusys
- Nec
- Siemens
- Tenda
- BenQ
- IOGEAR
- GL.iNet
- Ubiquiti Networks
- Proximus
- Samsung
- Cisco
- Zurn
- A-NeuVideo
Nieuwste handleidingen voor Router
1 September 2025
31 Augustus 2025
26 Augustus 2025
26 Augustus 2025

25 Augustus 2025
25 Augustus 2025

25 Augustus 2025
25 Augustus 2025

25 Augustus 2025

25 Augustus 2025