IMG Stageline ECMS-50 Handleiding
IMG Stageline Microfoon ECMS-50
Bekijk gratis de handleiding van IMG Stageline ECMS-50 (2 pagina’s), behorend tot de categorie Microfoon. Deze gids werd als nuttig beoordeeld door 156 mensen en kreeg gemiddeld 4.6 sterren uit 9 reviews. Heb je een vraag over IMG Stageline ECMS-50 of wil je andere gebruikers van dit product iets vragen? Stel een vraag
Pagina 1/2
ELECTRONICS FOR SPECIALISTS ELECTRONICS FOR SPECIALISTS ELECTRONICS FOR SPECIALISTS ELECTRONICS FOR SPECIALISTS ELECTRONICS FOR SPECIALISTS ELECTRONICS FOR SPECIALISTS ELECTRONICS FOR
ECMS-50 USB
Bestell-Nr. • Order No. 23.6940
MONACOR INTERNATIONAL GmbH & Co. KG • Zum Falsch 36 • 28307 Bremen • Germany Copyright
©
by MONACOR INTERNATIONAL. All rights reserved. A-1874.99.01.10.2017
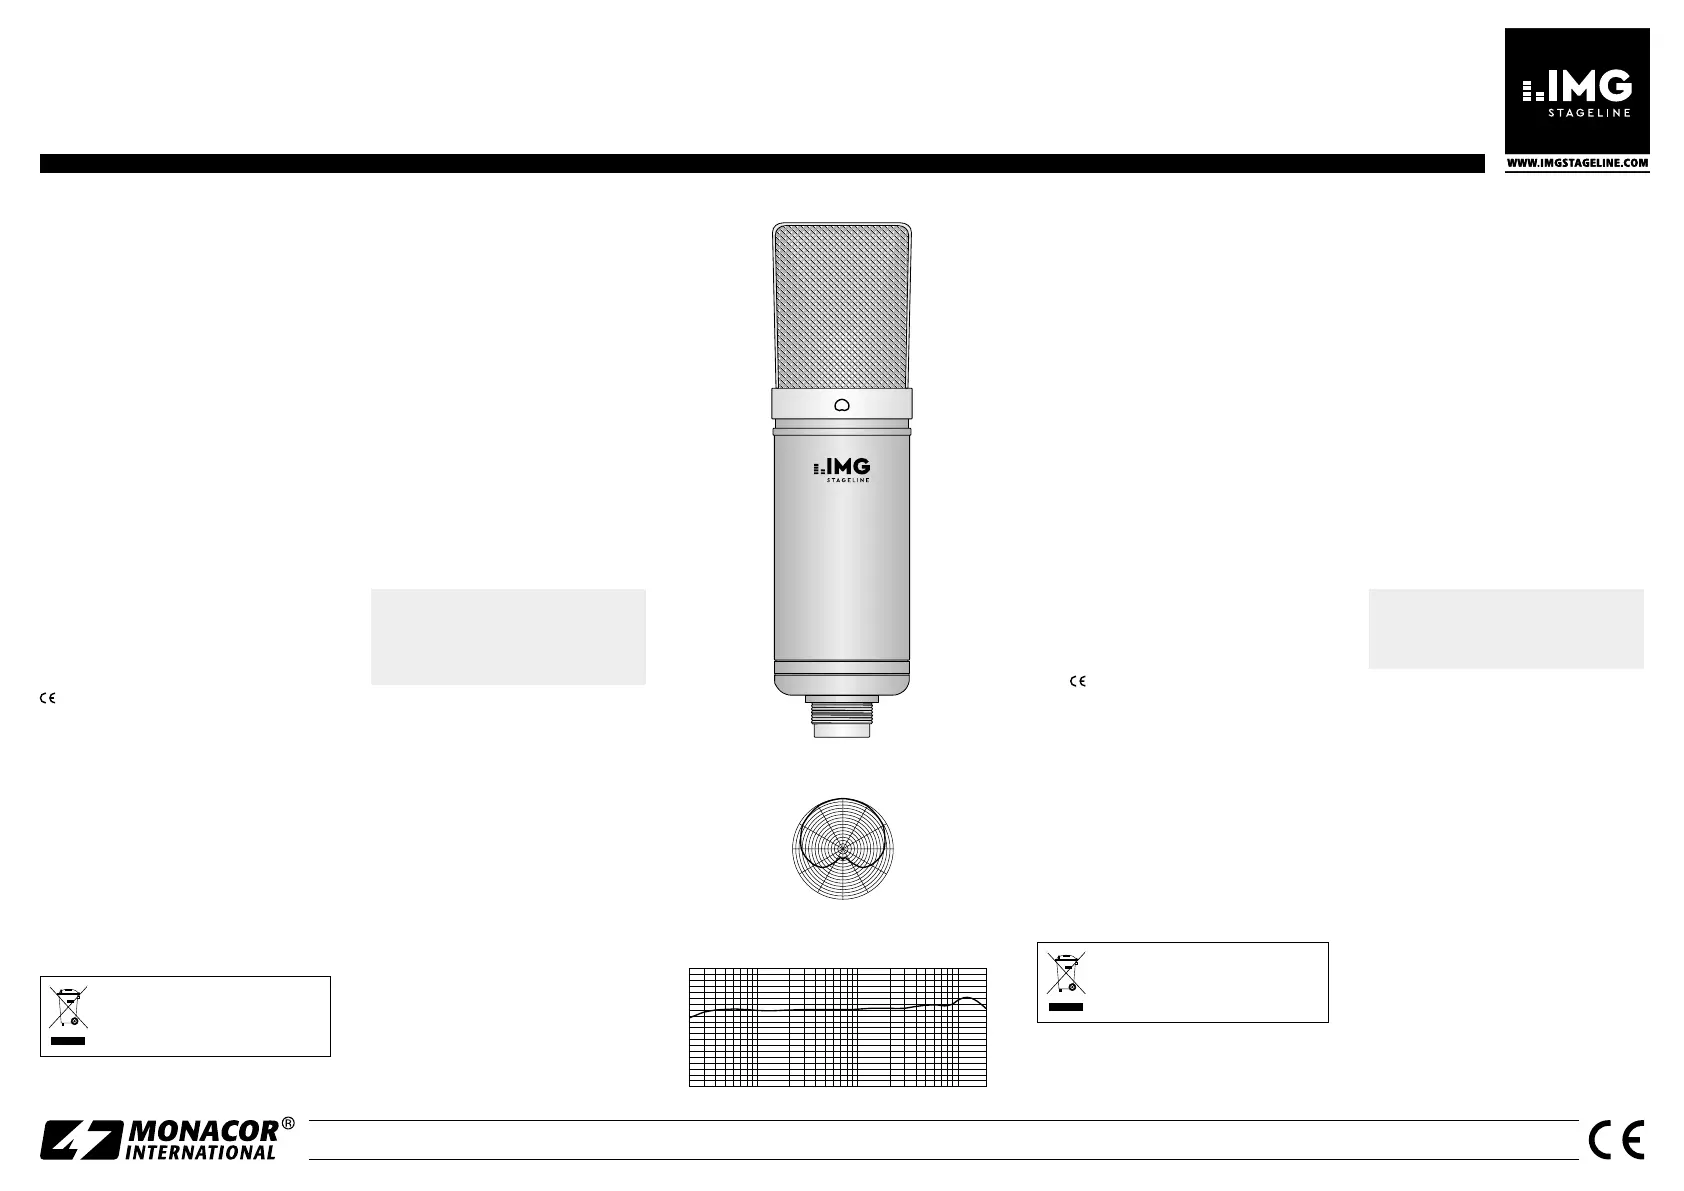
➂
Frequenzgang • Frequency response
➁
Polardiagramm • Polar pattern
50201002005001k2k5k10k20k(Hz)
−60
−20
−30
−40
−50
(dB)
30°
330°
300°60°
90°
120°
270°
240°
210°
180°
150°
0°
➀
Vorderseite • Front
USB Condenser Microphone
with Large Diaphragm
These instructions are intended for users
with basic knowledge in audio technol-
ogy. Please read the instructions carefully
prior to operation and keep them for
later reference.
1 Applications
This USB condenser microphone with large
diaphragm (25.4 mm / 1”) is designed for re-
cording instruments or voices / vocals directly
on the computer. It is ideally suited for studio
applications and home recording. For making
recordings, either use an audio software sup-
plied with the operating system (e. g. “Garage-
Band” from Apple Inc.) or install an additional
software (e. g. “Audacity”, available as free-
ware on the Internet).
The microphone is supplied with a shock
mount (spider), a 1.8 m USB cable and a
leather bag.
2 Important Notes
The microphone corresponds to all relevant
directives of the EU and is therefore marked
with .
•
The microphone is suitable for indoor use
only. Protect it against dripping water, splash
water and high air humidity. The admissible
ambient temperature range is 0 – 40 °C.
•
For cleaning only use a dry, soft cloth; never
use water or chemicals.
•
No guarantee claims for the microphone
and no liability for any resulting personal
damage or material damage will be ac-
cepted if the microphone is used for other
purposes than originally intended, if it is not
correctly connected, or if it is not repaired in
an expert way.
If the microphone is to be put out of
operation definitively, take it to a local
recycling plant for a disposal which is not
harmful to the environment.
3 Operation
1) Screw the microphone holder (spider) onto
a stand with 15.9 mm thread (5/8”). Press
together the two wire clips to open the
clamp of the holder. Insert the microphone
into the holder; the clamp will secure the
microphone.
2) Loosen the screw on the joint of the holder.
Positon the microphone so that its front is
directed towards the sound source, then
fasten the screw.
3) Start the computer.
4) Use the cable provided to connect the
microphone to a USB port on the computer.
The internal blue LED of the microphone
will light up. The required drivers (standard
drivers of the operating system) will be in-
stalled automatically.
5) Call up the recording program used: Select
the microphone as input device for audio
recording and start recording.
In case of problems: Check the sound settings of the
operating system (Microphone not selected as input
device? Input level setting too low? Sound switched
off?) and readjust them, as required. It may be neces-
sary to restart the recording program or the computer.
6) After operation, disconnect the USB cable
of the microphone from the computer.
4 Specifications
Type / polar pattern: . . . electret /cardioid
Frequency range: . . . . .
☞
figure 3
Sensitivity:
. . . . . . . . . . 25 mV/ Pa at 1 kHz
A / D converter:. . . . . . . 16 bits, 48 kHz max.
Max. SPL: . . . . . . . . . . 138 dB
S / N ratio: . . . . . . . . . . > 78 dB
Power supply: . . . . . . .
⎓
5 V via USB port
Dimensions, weight:
. . . ⌀ 50 mm × 185 mm, 250 g
Connection at the
microphone:
. . . . . . . . USB port, type B
Suitable operating systems:
Windows 2000 / XP / Vista / 7/ 8 / 10 or Mac OS X
Subject to technical modification.
Windows is a registered trademark of Microsoft Corporation in
the USA and other countries. Mac OS is a registered trademark of
AppleInc. in the USA and other countries.
USB-Großmembran-
Kondensatormikrofon
Diese Anleitung richtet sich an Benutzer
mit Grundkenntnissen in der Audio-
technik. Bitte lesen Sie die An leitung vor
dem Betrieb gründlich durch und heben
Sie sie für ein späteres Nachlesen auf.
1 Einsatzmöglichkeiten
Dieses USB-Kondensatormikrofon mit Groß-
membran (25,4 mm / 1”) ist für die Aufnahme
von Instrumenten oder Sprache /Gesang direkt
am Computer konzipiert. Es eignet sich damit
ideal für Studio- und Homerecording-Anwen-
dungen. Für die Aufnahme kann eine mit dem
Betriebssystem mitgelieferte Audio-Software
verwendet werden (z. B. „GarageBand“ von
AppleInc.) oder eine zusätzlich installierte
(z. B. „Audacity“, als Freeware im Internet er-
hältlich).
Zum Lieferumfang gehören ein vibrations-
dämpfender Halter (Spinne), ein 1,8-m- USB-
Kabel sowie eine Ledertasche.
2 Wichtige Hinweise
Das Mikrofon entspricht allen relevanten
Richt linien der EU und trägt deshalb das
-Zeichen.
•
Das Mikrofon ist nur zur Verwendung im
Innenbereich geeignet. Schützen Sie es vor
Tropf- und Spritzwasser sowie vor hoher
Luftfeuchtigkeit. Der zulässige Einsatztem-
peraturbereich beträgt 0 – 40 °C.
•
Verwenden Sie zum Reinigen nur ein trocke-
nes, weiches Tuch, auf keinen Fall Chemika-
lien oder Wasser.
•
Wird das Mikrofon zweckentfremdet, falsch
angeschlossen oder nicht fachgerecht repa-
riert, kann keine Haftung für daraus resul-
tierende Sach- oder Personenschäden und
keine Garantie für das Mikrofon übernom-
men werden.
Soll das Mikrofon endgültig aus dem
Betrieb genommen werden, übergeben
Sie es zur umweltgerechten Entsorgung
einem örtlichen Recyclingbetrieb.
3 Inbetriebnahme
1) Den Mikrofonhalter (Spinne) auf ein Stativ
mit 15,9-mm-Gewinde (5/8”) schrauben. Da-
mit sich das Mikrofon in den Halter schie-
ben lässt, die beiden Drahtbügel am Halter
zusammendrücken.
2) Die Schraube am Gelenk des Halters lösen,
das Mikrofon so positionieren, dass die
Vorderseite auf die Schallquelle gerichtet ist
und die Schraube wieder festziehen.
3) Den Computer hochfahren.
4) Das Mikrofon über das beiliegende Kabel
mit einem USB-Port am Computer verbin-
den: Die interne blaue LED des Mikrofons
leuchtet. Die erforderlichen Treiber (Stan-
dardtreiber des Betriebssystems) werden
automatisch installiert.
5) Das verwendete Aufnahmeprogramm auf-
rufen, dort das Mikrofon als Eingabegerät
für die Tonaufnahme auswählen und die
Aufnahme durchführen.
Bei Problemen: Die Toneinstellungen des Betriebs-
systems überprüfen (Mikrofon nicht als Eingabegerät
ausgewählt? Eingabepegel zu niedrig eingestellt? Ton
ausgestellt?) und entsprechend korrigieren. Gegebe-
nenfalls das Aufnahmeprogramm bzw. den Computer
neu starten.
6) Nach dem Betrieb das USB-Kabel des Mik-
rofons vom Computer abziehen.
4 Technische Daten
Typ / Richtcharakteristik:Elektret / Niere
Frequenzbereich: . . . . .
☞
Abbildung 3
Empfindlichkeit:
. . . . . . 25 mV/ Pa bei 1 kHz
A / D-Wandler: . . . . . . . 16 Bit, max. 48 kHz
Max. Schalldruck:. . . . . 138 dB
Signal -Rausch-Abstand:> 78 dB
Stromversorgung: . . . .
⎓
5 V über USB-Port
Maße, Gewicht:
. . . . . . ⌀ 50 mm × 185 mm, 250 g
Anschluss am Mikrofon:USB-Buchse, Typ B
geeignete Betriebssysteme:
Windows 2000 / XP / Vista / 7/ 8 / 10 oder Mac OS X
Änderungen vorbehalten.
Windows ist ein registriertes Warenzeichen der Microsoft Corpora-
tion in den USA und anderen Ländern. MacOS ist ein registriertes
Warenzeichen von Apple Inc. in den USA und anderen Ländern.
Deutsch
English
Product specificaties
| Merk: | IMG Stageline |
| Categorie: | Microfoon |
| Model: | ECMS-50 |
Heb je hulp nodig?
Als je hulp nodig hebt met IMG Stageline ECMS-50 stel dan hieronder een vraag en andere gebruikers zullen je antwoorden
Handleiding Microfoon IMG Stageline

8 Maart 2026
7 Maart 2026
7 Maart 2026
6 Maart 2026
6 Maart 2026
21 Februari 2024
21 Februari 2024
21 Februari 2024
21 Februari 2024
20 Februari 2024
Handleiding Microfoon
Nieuwste handleidingen voor Microfoon
23 Juli 2026
21 Juli 2026
20 Juli 2026
14 Juli 2026
13 Juli 2026
10 Juli 2026
10 Juli 2026
9 Juli 2026
9 Juli 2026
9 Juli 2026