Illuminex L2811-2542 Handleiding
Illuminex
Verlichting
L2811-2542
Bekijk gratis de handleiding van Illuminex L2811-2542 (2 pagina’s), behorend tot de categorie Verlichting. Deze gids werd als nuttig beoordeeld door 44 mensen en kreeg gemiddeld 5.0 sterren uit 22.5 reviews. Heb je een vraag over Illuminex L2811-2542 of wil je andere gebruikers van dit product iets vragen? Stel een vraag
Pagina 1/2

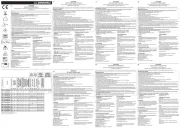
Step 1 : Bend hang buckle by 90° making it vertical to the rear cover
of panel light (Figure 1A). Bend hang buckles top part by 90° (Figure
1B), Same to the other hang buckles.
Step 2 : Turn off power, remove the ceiling panel, then place the
Panel into the T-bar, ensure the Panel is attached to the ceiling
(Figure 2) (This clip is only for positioning nor for securement.)
Step 3 : Open up the driver box. (Figure 3)
Step 4 : Connect AC Wires: Input L connects to the black wire of the
luminaire, N connects to the white wire, the ground connects to the
green wire.
Connect Dimmer: Compatible with 0-10V dimmer. The driver PUR
(D+) to the dimmer +(PUR), and the driver GRY(D-) to the
dimmer-(GRY).
Connect the wires with terminal cap as shown in wiring diagram.
(Figure3).
Incoming insulated dimming conductors shall have voltage rated at
least equal to the branch voltage.
Step 5 : Close the driver box and screw in. (Figure 4A and Figure 4B)
Figure 1A Figure 1B
Figure 2
Applicable Models
L2811-XXXX, L2812-XXXX, L2813-XXXX
Important
Read all instructions at least once prior to beginning installation.
Warning
Installation Instructions
Wiring Diagram
This luminaire must be installed in accordance with the National Electric Code, Canadian Electrical
Code, State, provincial, and local regulations by a licensed electrician.
Risk of electric shock. Before installing this fixture or doing any maintenance, make sure to turn off
the power supply at the circuit breaker or fuse box.
Check to make sure that all fixture connections have been properly made and the fixture is
grounded to avoid potential electrical shocks.
Use in AC100-277 and AC120-347 (select models), 50/60Hz, protected circuit. Apply class 2 power supply.
Installation Instructions
1x4, 2x2, 2x4FT LED FLAT PANEL
2x4FT
1x4FT
2x2FT
Figure 4A Figure 4B
Figure 3
DIMMING
DRIVER LED
PANEL
+
-
0-10V
DIMMER
D
D+
-
PUR
GREY
PUR
RED
BLACK
GROUND
WHITE
BLACK
GREY
L
N
G
!CAUTION : Risk of Electric Shock Suitable for Damp location. Access above ceiling required.
Suitable for suspended ceilings.
Étape 1 : Inclinez le crochet à de 90° à la verticale sur la partie arrière du
panneau lumineux (Figure 1A). Inclinez les crochets de la partie supérieure
à 90° (Figure 1B), Procédez de la même manière pour les autres crochets.
Étape 2 : Coupez l'alimentation, retirez le panneau du plafond, puis placez
le panneau dans la barre en T. Assurez-vous que le panneau est bien fixé au
plafond (Figure 2) (Cette attache ne sert qu'à positionner et non à fixer).
Étape 3 : Ouvrez la boîte de commande. (Figure 3)
Étape 4 : Raccordez les fils c.a. l'entrée L doit être raccordée au fil noir
du luminaire, N doit être raccordée au fil blanc, la mise à la terre doit
être raccordée au fil vert.
Raccordement du gradateur : Compatible avec le gradateur 0-10V. Le
conducteur PUR (D +) au gradateur + (PUR) et le conducteur GRY (D-) au
gradateur - (GRY).
Raccordez les fils aux embouts comme indiqué dans le schéma de
câblage. (Figure 3).
Les conducteurs de gradation isolés entrants doivent avoir une tension
nominale qui est au moins égale à la tension de branchement.
Étape 5: Fermez la boîte du circuit et vissez. (Figure 4A et Figure 4B)
Figure 1A Figure 1B
Figure 2
Modèles applicables
L2811-XXXX, L2812-XXXX, L2813-XXXX
Important
Veuillez lire toutes les instructions au moins une fois avant de commencer l'installation.
Attention
Instructions d'installation
Diagramme de câblage
Ce luminaire doit être installé conformément au Code national de l'électricité, au Code canadien de
l'électricité, aux règlements provinciaux et locaux par un électricien autorisé.
Risque d'électrocution. Avant d'installer ce luminaire ou de procéder à la maintenance, assurez-vous
de couper l'alimentation du disjoncteur ou de la boîte à fusibles.
Assurez-vous que toutes les connexions du luminaire ont été faites correctement et que l'appareil est
mis à la terre pour éviter les chocs électriques potentiels.
Utilisez Remettez AC100-277 et AC120-347 ( modèles sélectionnés), 50/60Hz, circuit protégé.
Remettez l'alimentation de classe 2 sous tension.
Instructions d'installation
PANNEAU PLAT DEL 1x4, 2x2, 2x4
2x4FT
1x4FT
2x2FT
Figure 4A Figure 4B
Figure 3
CONDUCTEUR
DE GRADATION
PANNEAU
DEL
+
-
0-10V
GRADATEUR
D
D+
-
PUR
GREY
PUR
RED
BLACK
GROUND
WHITE
BLACK
GREY
L
N
G
!ATTENTION : Risque de choc électrique Convient pour un emplacement humide. Accès requis à l'espace
au-dessus du plafond. Convient aux plafonds suspendus.

Product specificaties
| Merk: | Illuminex |
| Categorie: | Verlichting |
| Model: | L2811-2542 |
| Kleur van het product: | Wit |
| Gewicht: | 900 g |
| Breedte: | 1211.58 mm |
| Diepte: | 297.18 mm |
| Hoogte: | 9.39 mm |
| Materiaal behuizing: | Aluminium, Polycarbonate (PC) |
| Stroombron: | AC |
| Internationale veiligheidscode (IP): | IP20 |
| Montagewijze: | Ingebouwd |
| Vermogensverbruik (max): | 40 W |
| Certificering: | DLC 4.2, cULus |
| Vorm: | Rechthoekig |
| Dimbaar: | Ja |
| Lichtrendement: | 100 lm/W |
| Color Rendering Index (CRI): | 80 |
| Gemiddelde levensduur L70B50: | 50000 uur |
| Stralingshoek: | 180 ° |
| Inclusief driver: | Ja |
| Licht kleurtype: | Wit |
| Kleurtemperatuur (max): | 5000 K |
| Lichtopbrengst (max): | 4000 lm |
| Type montageoppervlak: | Plafond/muur |
| Bedrijfstemperatuur (T-T): | -20 - 50 °C |
| Materiaal lichtkap/lens: | Polycarbonaat |
Heb je hulp nodig?
Als je hulp nodig hebt met Illuminex L2811-2542 stel dan hieronder een vraag en andere gebruikers zullen je antwoorden
Handleiding Verlichting Illuminex

23 December 2023

23 December 2023
Handleiding Verlichting
- Litegear
- Blumill
- Shada
- Gumax
- Panzeri
- IDX
- OttLite
- Mr. Beams
- Golden Lighting
- Ape Labs
- KonstSmide
- Astro
- Handson
- Megatron
- Currey & Company
Nieuwste handleidingen voor Verlichting
16 September 2025
12 September 2025
10 September 2025

9 September 2025
8 September 2025
8 September 2025

8 September 2025

2 September 2025
2 September 2025

2 September 2025