Heidenfeld DT100 Handleiding
Heidenfeld
Thermostaat
DT100
Bekijk gratis de handleiding van Heidenfeld DT100 (2 pagina’s), behorend tot de categorie Thermostaat. Deze gids werd als nuttig beoordeeld door 25 mensen en kreeg gemiddeld 4.7 sterren uit 13 reviews. Heb je een vraag over Heidenfeld DT100 of wil je andere gebruikers van dit product iets vragen? Stel een vraag
Pagina 1/2

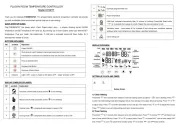
PLUG-IN ROOM TEMPERATURE CONTROLLER
Model HY02TP
Thank you for choosing THERMOSTAT. This programmable electronic temperature controller will provide
you with comfortable home environment and will help you to save energy.
QUICK START-UP GUID E:
Plug THERMOSTAT into power point. Press Power button once a display showing current ROOM –
temperature and SET temperature will come up. By pressing Up or Down buttons select your desired SET
temperature. Plug your heater into Heatermate. If child lock is activated press/hold Down button for 3
seconds then release to unlock.
BUTTONS EXPLAINED:
NO.
symbols
Represent
1
Power ON/OFF
2
Short press to switch between manual and automatic control
Press/hold for 3 seconds then release to enter into set clock and timer mode.
3
Press to Enter/Conrm
4
Increase (Up) Button
5
Decrease (Down) Button
6
Indicator
Light is ON -- power to heater is ON; light is OFF power to heater is OFF. --
DISPLAY SYMBLES EXPLAINED:
NO.
symbols
Explanation
1
Automatic control mode (manual control is not showing) “ ”
2
Manual control mode (automatic control is not showing) “ ”
3
Heating mode; “ ” is displayed when power to heater is ON
4
Cooling mode; “ ” is displayed when power to air conditioner or fan is ON
5
6 periods programmable icon
8
Room temperature
9
Child lock: activated automatically after 10 minutes of inactivity. Press/hold Down button
“ ”for 3 seconds then release to unlock. Repeat the same procedure to lock.
10
Ventilation mode turns heater o for a period of time during room ventilation (opening –
windows) when room temperature drops below a specied temperature.
11
Clock setting icon
DISPLAY OVERVIEW:
SETTING UP CLOCK AND TIMER:
Setting Screen
1) Clock Setting
Press/hold “ ” for 3 seconds then release to enter into setting screen (as above) - ashing. P“ ” icon is ress “ ”
to enter into clock setting mode which displays minute, hour and day of the week. Minute is ashing. P ress “ ” or “ ”
to adjust value. Press “ ” to conrm and switch to hour and day of the week. Press “ ” or “ ” to adjust their values.
Press “ ” button to save all clock settings and return to previous screen.
2) Timer Setting
Press/hold “ ” for 3 seconds then release to enter into setting screen. Press“ ”to choose“ ”( will ash) to set
time of timer switch ON time. P to adjust value. Press to choose and set tim switch OFF ress “ ” or “ ” “ ” “ ” er
time Press to save. cancel tim function press to set both and times . “ ” To er ” ” to 00:00.

3) Weekly Programming
Mode
Explanation
Screen
Programmable
Mode
Press/hold for 3 seconds then release - “ ”
screen will display (6
periods for every week day) and week days:
“ ”. First period will be ashing -
press “ ” “ ”to adjust or temperature setting
temperature then press “ ” to adjust time
setting. Press “ ”to go to the next period and so
on for all 6 periods for week days. Now press
“ ” to go to weekend programming with 2
periods for and set temperatures and “ ”
times in the same way as for week days. . Press
“ ” when finished. Please refer to the table
below for default values for different periods.
4) Factory programmed periods and settings
Period
Icon
Default Time
Default Temperature
Working Day
1
06:00
20ºC
2
08:00
15ºC
3
11:30
15ºC
4
12:30
15ºC
5
17:30
20ºC
6
22:00
15ºC
Weekend
1
08:00
20ºC
2
23:00
15ºC
NB: Temporary Manual Mode
When in programmable mode, you can still adjust the temperature for the current period, if required. For example, for
the period 4 on weekday (12:30-17:3 if you return from work 1 hour earlier (16: ) than usual (17:30), you can 0), 30
press Up/Down buttons to temporarily change the temperature (e.g. to 20ºC). The thermostat will then keep the room
temperature at 20ºC until the next period (17:30- 00) when it will revert to the usual programmed values. 22:
7. Other Functions and Factory Settings
This section shows how to customize the thermostat settings for your specic application. This includes changing
from Heating to Cooling mode, adjusting the temperature sensor (to make it consistent with your other thermometer or
baby monitor), changing the temperature dierential to activate your heater (i.e. adjust how frequently your heater ing
comes ON and OFF) and some others please refer to the table below. –
Press/hold for 3 seconds then release to ter into advanced settings mode, to choose the “ ” en then press“ ”
required option. Press“ ” “ ”to adjust value. “ ” or Press to save and move to the next option.
No.
Display
Setting Option
Data Setting Function
Factory Default
Setting
1
A1
Room Ventilation Function
5-25ºC; 5-60min
Disabled (- - ) ºC
2
A2
Temperature Dierential to Activate
Heater
1-9 ºC
2 ºC
3
A3
Temperature Setting - Highest Limit
20 70- ºC
35ºC
4
A4
Temperature Setting - Lowest Limit
1- 10ºC
5 ºC
5
A5
Temperature Sensor Calibration
±5 ºC
0.5 ctory ºC Fa
Calibration
6
A6
Anti-freezing Function turns heater –
ON when temperature is below 5 ºC
00:Anti-freezing function OFF
01:Anti-freezing function ON
00:Anti-freezing
function OFF
7
A7
Resume operation after power
disconnection
1:Resume operation after
power disconnection
0:Stay turned OFF after
power disconnection
1:Resume operation
after power
disconnection
8
A8
Operational Mode
00:Cooling Mode
01:Heating Mode
01:Heating Mode
9
A9
Programmable Non-programmable or
00:Programmable
01:Non-programmable
00:Programmable
10
A0
Return to Factory Setti s ng
88:Don’t return to Factory
Settings
00:Return to Factory Settings
N/A
TECHNICAL SPECIFICATIONS:
Operating Voltage: 240V , 50HZ
Max Load:
16A, 3500W (resistive)
Temperature Measurement Precision:±1ºC
Temperature Setting Range:1ºC - 70ºC
Self-consumption Power:<0.3W
Temperature Sensor: NTC
NB: Suitable for use with heaters and air conditioners which automatically restart after power reconnection
WARRANTY: This product comes with 2 years manufacturer warranty please contact your place of purchase for –
warranty replacement. .
Product specificaties
| Merk: | Heidenfeld |
| Categorie: | Thermostaat |
| Model: | DT100 |
Heb je hulp nodig?
Als je hulp nodig hebt met Heidenfeld DT100 stel dan hieronder een vraag en andere gebruikers zullen je antwoorden
Handleiding Thermostaat Heidenfeld
1 April 2025
Handleiding Thermostaat
- Pro1
- Veria
- Techno Line
- Ambiano
- Eliwell
- Fibaro
- Konyks
- Heatit
- Thermy
- Delta Dore
- Alecto
- Nobo
- Hoffman
- Go Green
- IR-V
Nieuwste handleidingen voor Thermostaat
2 September 2025
1 September 2025
30 Augustus 2025
30 Augustus 2025
26 Augustus 2025
26 Augustus 2025
26 Augustus 2025
26 Augustus 2025
26 Augustus 2025
26 Augustus 2025