GETT CK5 Handleiding
GETT Toetsenbord CK5
Bekijk gratis de handleiding van GETT CK5 (2 pagina’s), behorend tot de categorie Toetsenbord. Deze gids werd als nuttig beoordeeld door 42 mensen en kreeg gemiddeld 4.4 sterren uit 6 reviews. Heb je een vraag over GETT CK5 of wil je andere gebruikers van dit product iets vragen? Stel een vraag
Pagina 1/2
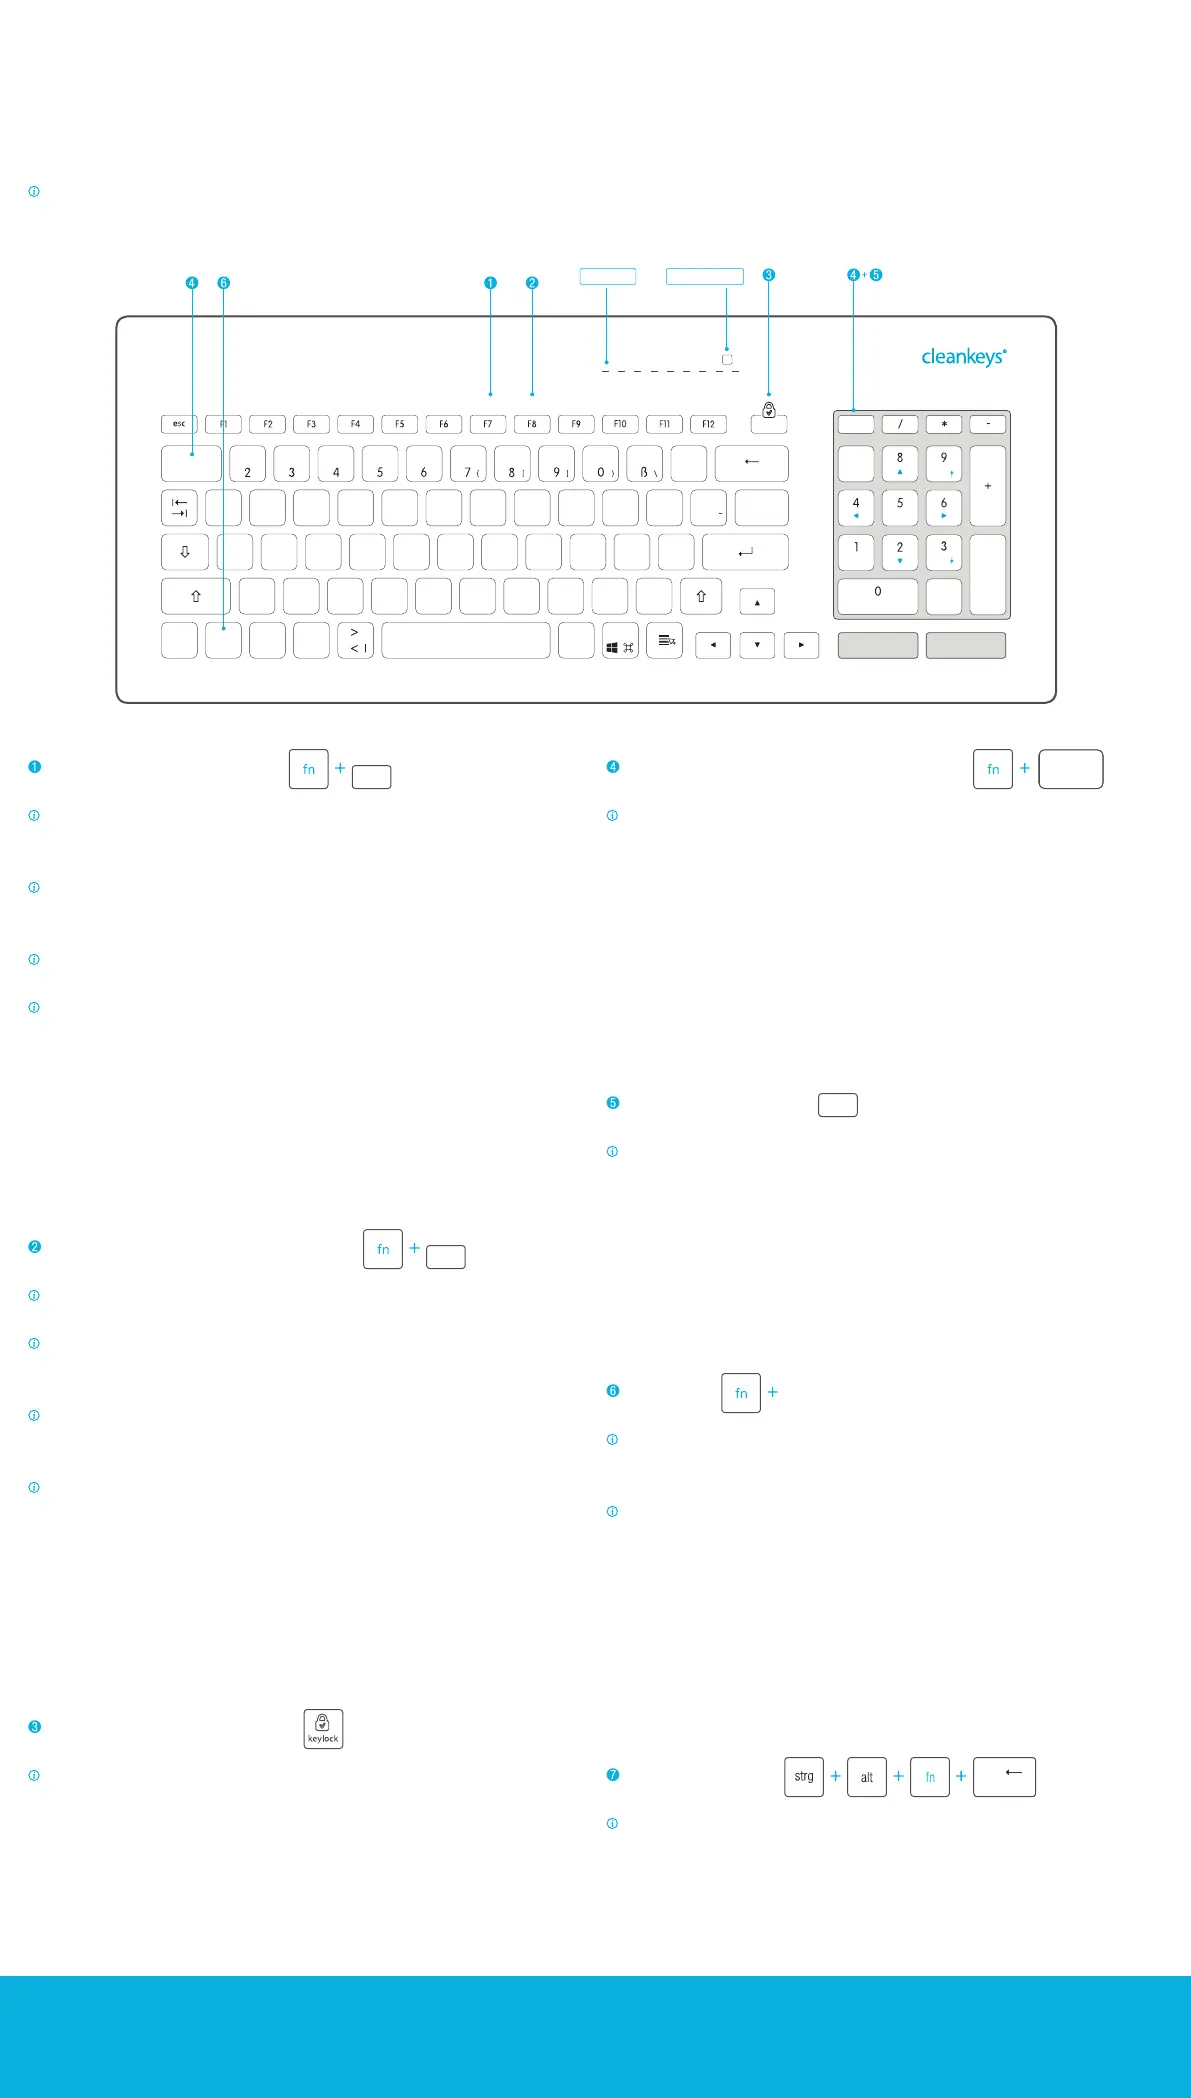
HINWEISE ZUR INBETRIEBNAHME CK5
EINSTELLUNG DER SENSITIVITÄT
Die Berührungsempndlichkeit von kapazitiven Tastaturen kann bei
unterschiedlichen Nutzern abweichen. Daher empehlt sich, die Sensitivität der
Tastatur individuell einzustellen.
Die aktuelle Sensitivitätsstufe wird während der Einstellung optisch über
die LED-Leiste angezeigt. Je mehr LEDs leuchten, desto höher ist die
Berührungsempndlichkeit der Tastatur.
Die Einstellung funktioniert rollierend und beginnt nach Erreichen des Maximums
von vorn.
Sie sollten unterschiedliche Einstellungen testen, um die für Sie optimale
Einstellung zu wählen.
Gehen Sie dabei wie folgt vor:
1. Bei dauerhaft gedrückter Fn-Taste die F7/sense-Taste betätigen, bis die
gewünschte Einstellung erreicht ist.
2. Die Einstellung wird dauerhaft übernommen, nachdem beide Tasten losgelassen
wurden. Dieser Vorgang dauert ca. zwei Sekunden, was durch das Erlöschen der
LEDs angezeigt wird.
EINSTELLUNG DER TASTATUR-LAUTSTÄRKE
Die Lautstärke der akustischen Rückmeldung bei Tastenberührung unterliegt
subjektiven Empndungen. Daher empehlt sich eine individuelle Einstellung.
Die aktuelle Lautstärkestufe wird während der Einstellung optisch über die
LED-Leiste angezeigt. Je mehr LEDs leuchten, desto lauter ist die akustische
Rückmeldung.
Die Einstellung funktioniert rollierend und beginnt nach Erreichen des Maximums
von vorn. Die akustische Rückmeldung kann auch komplett ausgeschaltet werden
(zwei rote LEDs leuchten).
Sie sollten unterschiedliche Einstellungen testen, um die für Sie optimale
Einstellung zu wählen.
Gehen Sie dabei wie folgt vor:
1. Bei dauerhaft gedrückter Fn-Taste die F8/volume-Taste betätigen, bis die
gewünschte Einstellung erreicht ist.
2. Die Einstellung wird dauerhaft übernommen, nachdem beide Tasten losgelassen
wurden. Dieser Vorgang dauert ca. zwei Sekunden, was durch das Erlöschen der
LEDs angezeigt wird.
TASTEN SPERREN / ENTSPERREN
Zur Reinigung der Tastatur kann die Tastenfunktion gesperrt werden.
Gehen Sie dabei wie folgt vor:
1. Betätigen Sie die Keylock-Taste so lange, bis die grüne LED in der Taste
durchgehend leuchtet. Dieser Vorgang dauert ca. zwei Sekunden
2. Zur Entsperrung drücken Sie wiederum die Keylock-Taste, bis die grüne LED
erlischt.
UMSCHALTEN ZWISCHEN NUMPAD & TOUCHPAD
Das vorhandene Numpad kann ebenfalls als Touchpad verwendet werden. Der
große graue Bereich stellt dabei das Touchpad dar, während die zwei grauen Tasten
unterhalb als Touchpad-Maustasten fungieren.
Gehen Sie dabei wie folgt vor:
1. Betätigen Sie die Fn-Taste und die Touchpad-Taste gleichzeitig, bis die grüne LED
in der Taste durchgehend leuchtet, der Touchpadmodus ist aktiviert. Dieser Vorgang
dauert ca. zwei Sekunden
2. Zur Entsperrung drücken Sie wiederum die Fn-Taste und die Touchpad-Taste, bis
die grüne LED erlischt, der Numpadmodus ist aktiviert.
NUMLOCK-EINSTELLUNG
Die Num-Lock-Funktion des Numpads entspricht der Standardfunktion gängiger
Tastaturen. Sie ist im Numpadmodus verfügbar und wird durch die Num-LED
angezeigt.
Gehen Sie dabei wie folgt vor:
1. Betätigen Sie im Numpadmodus die Num-Lock-Taste, um auf die Ziffernebene des
Numpads zu gelangen. Die Num-Lock-LED leuchtet durchgehend.
2. Zur Entsperrung drücken Sie im Numpadmodus wiederum die Num-Lock-Taste. Die
Num-Lock-LED erlischt.
FN-EBENE
Wenn die fn-Taste gedrückt wird, wird eine weitere Tasten-Ebene aktiv.
Funktionstasten, die in dieser Ebene aktiviert werden können, sind an der blauen
Kennzeichnung der entsprechenden Funktion ersichtlich.
Auf dem Numpad ist diese Umstellung in beiden Ebenen gleichermaßen möglich.
Während die Ziffernebene des Numpads eingeschalten ist (Num-Lock-LED
leuchtet), kann so über die Fn-Taste ein Schnellzugriff auf die Funktionstasten des
Numpads (blau gekennzeichnete Funktionen) erfolgen.
Gehen Sie dabei wie folgt vor:
1. Betätigen Sie die Fn-Taste und die entsprechende blaue Funktionstaste gleichzeitig.
Beim Loslassen der Fn-Taste schaltet das Numpad automatisch wieder auf den
ursprünglich gewählten Modus. Solange die Fn-Taste gedrückt wird, erlischt die
Num-Lock-LED, um den geänderten Modus anzuzeigen.
STRG + ALT + ENTF
Auf Grund der kompakten Tastenbelegung empehlt es sich, bei dieser Standard-
Tastenkombination die o.g. Variante für eine einfachere Bedienung zu wählen.
VERBINDUNG MIT DEM PC HERSTELLEN
1. Verbinden Sie die Tastatur mit dem USB-Anschluss des PCs oder Endgerätes.
2. Warten Sie, bis die Tastatur vom Rechner erkannt wurde. Dies ist erkennbar am Erlöschen des LED-Balkens.
Als Plug-and-Play-Gerät wird kein Tastatur-Treiber benötigt.
SONDERFUNKTIONEN UND BESONDERHEITEN DER CK5
GETT Gerätetechnik GmbH
Mittlerer Ring 1
08233 Treuen
Telefon: +49 37468 - 660-0
Telefax: +49 37468 - 660-66
E-Mail: [email protected]
gett.de
gett-group.com
1
1
2
2
3
3
4
4
5
5
6
6
AA
BB
CC
DD
1 /1
Gezeichnet
Geprüft
DatumName
A2
Freimaßtoleranz
DIN ISO 2768
T1-
T2-
Oberfläche
Rohmaterial: Gorillaglas
Materialdicke: 0,8mm
Maßstab: (bei A2)Masse:
Maßeinheit
mm
http://www.gett.de
CAD-Zeichnung darf nicht manuell geändert werden.
Weitergabe sowie Vervielfältigung, Verbreitung und/oder Bearbeitung dieses Dokumentes, Verwertung und Mitteilung seines Inhaltes sind verboten, soweit nicht ausdrücklich gestattet.
Zuwiderhandlungen verpflichten zu Schadensersatz. Alle Rechte für den Fall der Patenterteilung, Gebrauchsmuster- oder Geschmacksmustereintragung vorbehalten.
CK5
LED`s 100% weiss
C-Mix 2000 schwarz Schrift
Pantone 312 C Logo + Schrift (alt gr-Ebene)
Pantone Cool GrayTastenrahmen
Cleankeys Weiss Hintergrund
Pantone Cool Gray 2C Numblockhintergrund
D2106
1
entf
,
DE-Layout
16.05.2019
A.Gläser
GD26212.cdr
16.05.2019
A.Gläser
pausedruck
sense
einfg
volume
„
alt
strg
alt gr
enter
entf
einfg
ende
bild
bild
pos1
num
lock
§
$
%
&
/
(
)
=
?
`
`
7
Q
WE
R
T
Z
U
IO
P
Ü
‚
#
*
+
³
keylock
²
@
,
;
:
.
-
_
A
S
D
F
€
G
H
J
K
L
Ö
Ä
^
°
Y
X
C
V
B
N
M
µ
fn
touchpad
on/off
1
!
F7
F8
num
lock
Num-Lock-LED
LED-Leiste
sense
1
1
2
2
3
3
4
4
5
5
6
6
AA
BB
CC
DD
1 /1
Gezeichnet
Geprüft
DatumName
A2
Freimaßtoleranz
DIN ISO 2768
T1-
T2-
Oberfläche
Rohmaterial: Gorillaglas
Materialdicke: 0,8mm
Maßstab: (bei A2)Masse:
Maßeinheit
mm
http://www.gett.de
CAD-Zeichnung darf nicht manuell geändert werden.
Weitergabe sowie Vervielfältigung, Verbreitung und/oder Bearbeitung dieses Dokumentes, Verwertung und Mitteilung seines Inhaltes sind verboten, soweit nicht ausdrücklich gestattet.
Zuwiderhandlungen verpflichten zu Schadensersatz. Alle Rechte für den Fall der Patenterteilung, Gebrauchsmuster- oder Geschmacksmustereintragung vorbehalten.
CK5
LED`s 100% weiss
C-Mix 2000 schwarz Schrift
Pantone 312 C Logo + Schrift (alt gr-Ebene)
Pantone Cool GrayTastenrahmen
Cleankeys Weiss Hintergrund
Pantone Cool Gray 2C Numblockhintergrund
D2106
1
entf
,
DE-Layout
16.05.2019
A.Gläser
GD26212.cdr
16.05.2019
A.Gläser
pausedruck
sense
einfg
volume
„
alt
strg
alt gr
enter
entf
einfg
ende
bild
bild
pos1
num
lock
§
$
%
&
/
(
)
=
?
`
`
7
Q
WE
R
T
Z
U
IO
P
Ü
‚
#
*
+
³
keylock
²
@
,
;
:
.
-
_
A
S
D
F
€
G
H
J
K
L
Ö
Ä
^
°
Y
X
C
V
B
N
M
µ
fn
touchpad
on/off
1
!
volume
Funktionstasten mit Fn-Ebene
1
1
2
2
3
3
4
4
5
5
6
6
AA
BB
CC
DD
1 /1
Gezeichnet
Geprüft
DatumName
A2
Freimaßtoleranz
DIN ISO 2768
T1-
T2-
Oberfläche
Rohmaterial: Gorillaglas
Materialdicke: 0,8mm
Maßstab: (bei A2)Masse:
Maßeinheit
mm
http://www.gett.de
CAD-Zeichnung darf nicht manuell geändert werden.
Weitergabe sowie Vervielfältigung, Verbreitung und/oder Bearbeitung dieses Dokumentes, Verwertung und Mitteilung seines Inhaltes sind verboten, soweit nicht ausdrücklich gestattet.
Zuwiderhandlungen verpflichten zu Schadensersatz. Alle Rechte für den Fall der Patenterteilung, Gebrauchsmuster- oder Geschmacksmustereintragung vorbehalten.
CK5
LED`s 100% weiss
C-Mix 2000 schwarz Schrift
Pantone 312 C Logo + Schrift (alt gr-Ebene)
Pantone Cool GrayTastenrahmen
Cleankeys Weiss Hintergrund
Pantone Cool Gray 2C Numblockhintergrund
D2106
1
keylock
prtscr
volume
insert
pause
caps
lock
sense
US/EU-Layout
16.05.2019
A.Gläser
GD26203.cdr
16.05.2019
A.Gläser
„
alt gr
alt
enter
ctrl
esc
`
~
del
pdn
ins
end
pup
hm
num
lock
?
2
,
C
V
B
N
M
X
Q
A
W
S
E
D
R
F
T
G
H
U
J
I
K
O
L
P
fn
del
touchpad
on/off
1
!
Product specificaties
| Merk: | GETT |
| Categorie: | Toetsenbord |
| Model: | CK5 |
Heb je hulp nodig?
Als je hulp nodig hebt met GETT CK5 stel dan hieronder een vraag en andere gebruikers zullen je antwoorden
Handleiding Toetsenbord GETT

20 Februari 2024
20 Februari 2024
Handleiding Toetsenbord
Nieuwste handleidingen voor Toetsenbord
14 Juli 2026
14 Juli 2026
13 Juli 2026
11 Juli 2026
11 Juli 2026
10 Juli 2026
9 Juli 2026
8 Juli 2026
8 Juli 2026
8 Juli 2026