Dormakaba FSW Handleiding


Lees hieronder de đź“– handleiding in het Nederlandse voor Dormakaba FSW (7 pagina's) in de categorie Niet gecategoriseerd. Deze handleiding was nuttig voor 32 personen en werd door 2 gebruikers gemiddeld met 4.5 sterren beoordeeld

Pagina 1/7
DORMA-Glas 800.52.055.6.32 Stand/Issue 02/03 Seite/Page 1/7
FSW Installation instructions
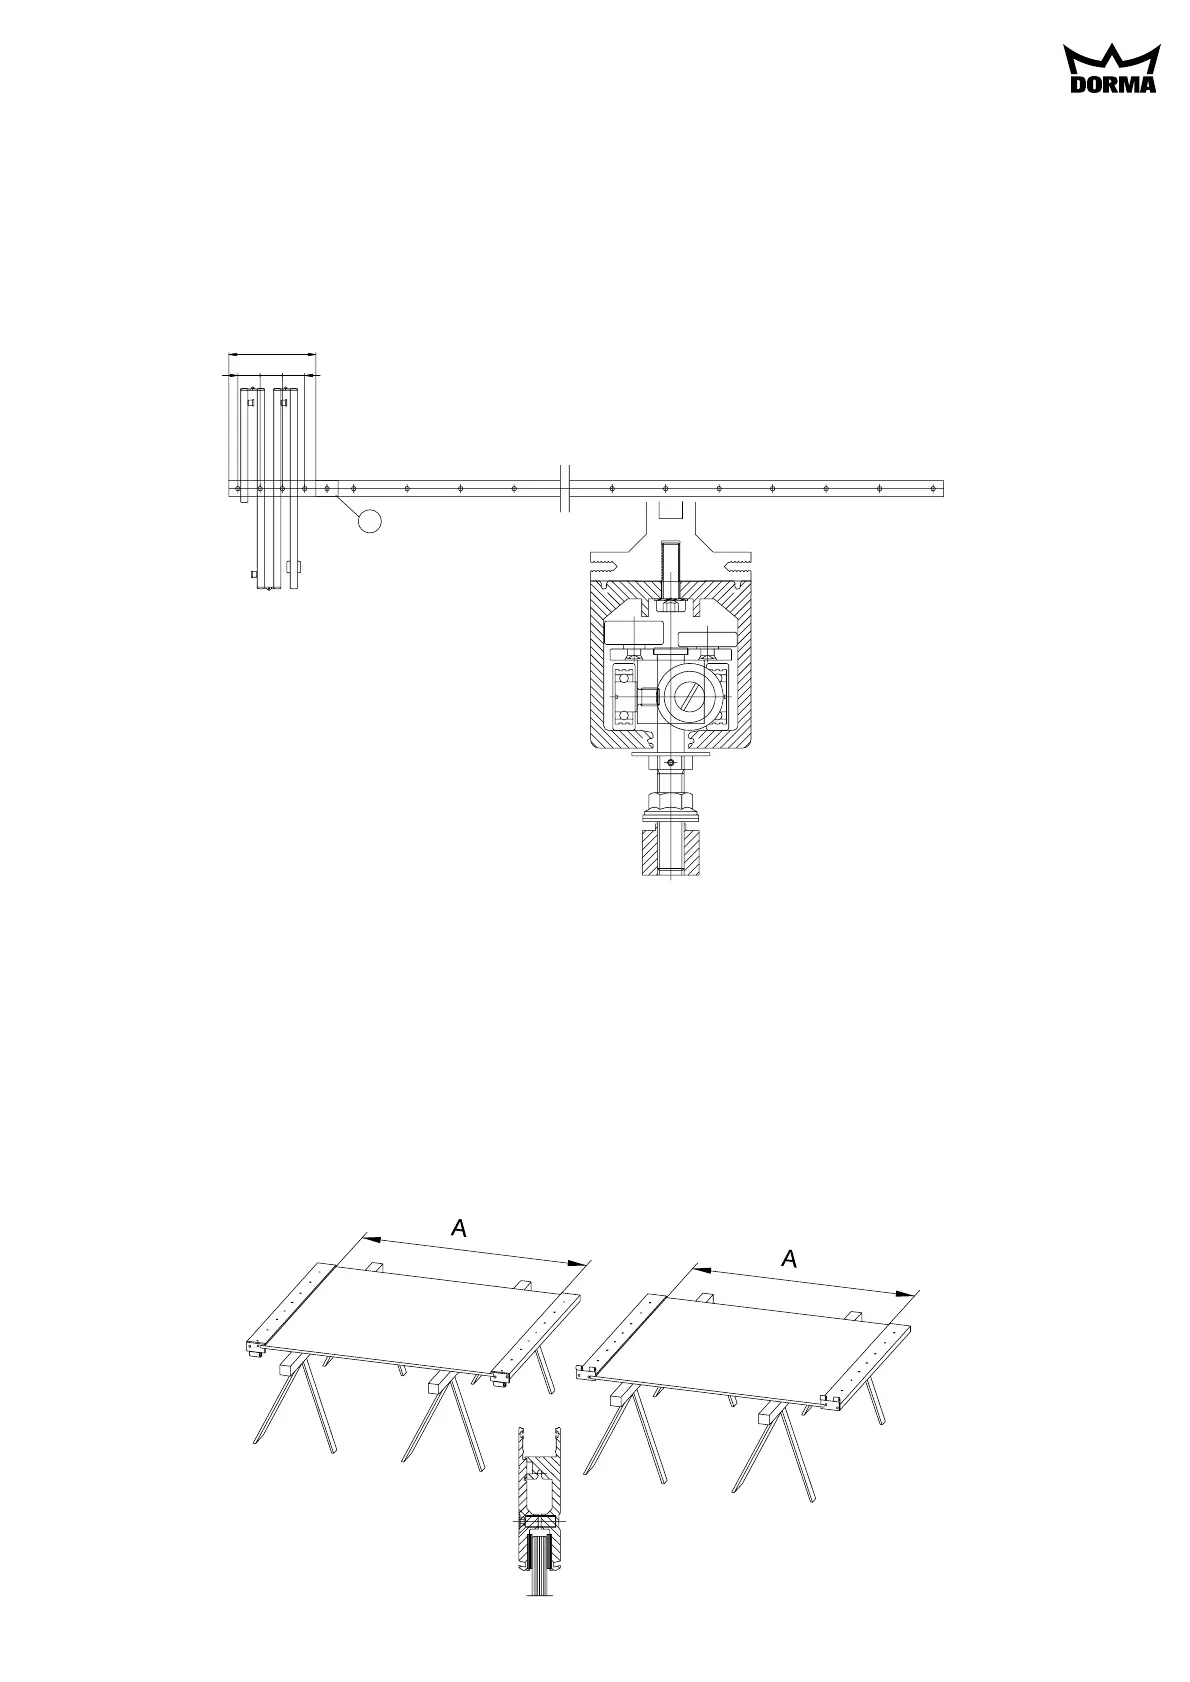
Track rail 75 x 72 mm
1. Ceiling substructure and installation of the track rail (Fig. 1):
The track rail must be bolted over its entire length (including the stacking track area) to a correctly
aligned ceiling substructure of steel. The steel substructure should be designed to accommodate the
total weight of all the panels. The substructure fixing point intervals for the track rail should be approx.
100 mm in the stacking area and approx. 300 mm along the remaining track sections. The maintenance
end piece (a) can be detached for panel installation, removal and servicing.
a
400
100100 100
Fig. 1
2. Fitting the hinged door rails to the glass panel (Fig. 2):
The door rail with either a panel hinge section or a frame hinge section consists of two profile sections
which are bolted together. (In order to avoid scratching, the cover profiles are clipped on only after the
system has been completely installed.) Slightly loosen the screws on the hinges and the door rails. Slide
the upper door rail onto the glass and clamp tightly. Glass insertion length: 25 mm. It is particularly
important to clamp the upper door rail correctly due to its bearing function. If the system is likely to be
subjected to vibration, silicone must be applied to the glass panels at the upper door rail for added
adhesion at the clamped connection.
Slide the lower door rail onto the glass and align it with the upper door rail. When aligning the door
rails, ensure that measurement A is the same for each folding panel.
A = total height of the system –353 mm.
After aligning the door rails, firmly tighten the M8 hex socket screws on both sides so that the rails
clamp the glass securely. (5 mm Allan key, tightening torque 20 Nm)
Fig. 2
DORMA-Glas 800.52.055.6.32 Stand/Issue 02/03 Seite/Page 2/7
3. Lower floor pivot assembly for the pivoting end panel (Fig. 3):
The distance from the pivot point to the wall (67 mm) can be corrected by adjusting the floor pivot (a)
as follows:
Loosen both fixing screws (b).
Adjust the position of the floor pivot and re-tighten the screws. Adjust the height using the shims
provided (c) (3 shims of 1 mm thick each).
Fig. 3
4. Installing the folding end panel (Fig. 4):
Slide the upper pivot assembly (a) of the end panel into the end of the track rail.
Securely clamp the pivot assembly (using a 6 mm Allan key) in position at a distance of 67 mm from
the wall. Install the floor pivot directly underneath the upper pivot assembly with a distance of 67 mm
between the pivot point and the wall (Fig. 3.1). Wind down the bolt (b). Insert the end panel with bolt
(b) in the upper pivot assembly (Fig. 4.2), align vertically and set down on the floor pivot (Fig. 4.3).
Turn bolt (b) until it comes into contact with rollpin (f), then turn it back one revolution (1 mm
clearance); tighten nut (d) using a 17 mm spanner.
Next firmly tighten the set screw in the suspension block (c) using a 5 mm Allan key.
Fix securing plate (e) with bolt (g) onto the upper pivot assembly.
Fig. 4.1 Fig. 4.2 Fig. 4.3
Fig. 4
DORMA-Glas 800.52.055.6.32 Stand/Issue 02/03 Seite/Page 3/7
5. Threading the panels onto the track (Fig. 5):
The second and fourth panels are provided with a roller (a) (Fig. 5.1). Detach the maintenance end
piece. Slide the track rollers into the track rail and re-connect the maintenance end piece.
If a folding end panel has already been installed, loosen the set screws (b) in the top and bottom hinges
and remove pins (c) (Fig. 5.2).
Connecting the next folding panel:
Insert a 10 mm spacer block (d) underneath the lower door rail (Fig. 5.3). Slide the suspension block
(e) 65 mm from the panel edge into the adapter profile. The set screw (f) must point outwards. Loosely
tighten the 17 mm M12 nut (g) (Fig. 5.4). Slide together the frame hinge section (h) and the panel
hinge section (i) at both the top and the bottom of the panel and secure with pin (c). Ensure that the
folding panels are positioned at the same height and secure pin (c) with set screw (b) (Fig. 5.2).
Before mounting the next folding panel, support the system from below, e.g. using wooden wedges, and
then proceed as described above. (Tip: the third panel must be supported with particular care, as it is
installed without a track roller for suspension.)
Aligning the panel height:
The height of the panels must be aligned to create a 10 mm clearance between the floor and the lower
door rail. Ensure that the distance between the top surface of the adapter profile and the bottom surface
of track rail is 33.5 mm. To adjust the height of the panels, loosen nut (l) using a 17 mm spanner.
Adjustments are made at nut (k) using a 17 mm spanner (Fig. 5.3):
Counter-clockwise rotation = more floor clearance
Clockwise rotation = less floor clearance
Next firmly tighten nut (l).
Note: If the height adjustment as described is not sufficient, the distance that the glass inserted into
the lower door rail can be decreased in order to achieve an extra 5 mm.
Afterwards fold up the FSW system and align the position of the rolls by an adjusting device so that all
panels stand rectangular to the track rail axis and the panels do not come in contact with the floor. After
aligning adjust the track rolls with nut (l) firmly at bearing profile.
Now the system can be closed again. Clip on the cover profiles and mount the control buttons of the
lower front door bolt.
Screw the glass knob (m) onto the folding end panel. In the case of a 4-panel system, screw an
additional glass knob onto the third folding panel (Fig. 5.1).


Product specificaties

Merk: Dormakaba
Categorie: Niet gecategoriseerd
Model: FSW

Heb je hulp nodig?

Als je hulp nodig hebt met Dormakaba FSW stel dan hieronder een vraag en andere gebruikers zullen je antwoorden


Handleiding Niet gecategoriseerd Dormakaba

Handleiding Niet gecategoriseerd

Nieuwste handleidingen voor Niet gecategoriseerd