Dahua Technology DH-EAP5212-C Handleiding
Dahua Technology Spiegel DH-EAP5212-C
Bekijk gratis de handleiding van Dahua Technology DH-EAP5212-C (2 pagina’s), behorend tot de categorie Spiegel. Deze gids werd als nuttig beoordeeld door 133 mensen en kreeg gemiddeld 4.5 sterren uit 9 reviews. Heb je een vraag over Dahua Technology DH-EAP5212-C of wil je andere gebruikers van dit product iets vragen? Stel een vraag
Pagina 1/2
Website: www.dahuasecurity.com
Address: No. 1399, Binxing Road, Binjiang District, Hangzhou, P. R. China Postcode: 310053
Tel: +86-571-87688888 28933188
Email: [email protected]
ZHEJIANG DAHUA VISION TECHNOLOGY CO., LTD.
In-ceiling Mount Access Point
User's Manual
V1.0.0
Foreword
General
This manual introduces the installation, functions and operations of the In-
ceiling Mount Access Point (hereinafter referred to as "the AP"). Read
carefully before using the device, and keep the manual safe for future
reference.
Safety Instructions
The following signal words might appear in the manual.
Signal
Words
Meaning
Indicates a high potential hazard which, if not avoided, will result in
death or serious injury.
Indicates a medium or low potential hazard which, if not avoided,
could result in slight or moderate injury.
Indicates a potential risk which, if not avoided, could result in
property damage, data loss, reductions in performance, or
unpredictable results.
Provides methods to help you solve a problem or save time.
Provides additional information as a supplement to the text.
About the Manual
●
The manual is for reference only. Slight might be found
between the manual and the product.
●
We are not liable for losses incurred due to operating the product in
ways that are not in compliance with the manual.
●
The manual will be updated according to the latest laws and
regulations of related jurisdictions. For detailed information, see the
paper user’s manual, use our CD-ROM, scan the QR code or visit our
website. The manual is for reference only. Slight
might be found between the electronic version and the paper version.
●
All designs and software are subject to change without prior written
notice. Product updates might result in some
appearing
between the actual product and the manual. Please contact customer
service for the latest program and supplementary documentation.
●
There might be errors in the print or deviations in the description of the
functions, operations and technical data. If there is any doubt or
dispute, we reserve the right of explanation.
●
Upgrade the reader software or try other mainstream reader software if
the manual (in PDF format) cannot be opened.
●
All trademarks, registered trademarks and company names in the
manual are properties of their respective owners.
●
Please visit our website, contact the supplier or customer service if any
problems occur while using the device.
●
If there is any uncertainty or controversy, we reserve the right of
explanation.
Important Safeguards and Warnings
This section introduces content covering the proper handling of the device,
hazard prevention, and prevention of property damage. Read carefully
before using the device, and comply with the guidelines when using it.
Transportation Requirements
Transport the device under allowed humidity and temperature conditions.
Storage Requirements
Store the device under allowed humidity and temperature conditions.
Installation Requirements
●
Do not connect the power adapter to the device while the adapter is
powered on.
●
Strictly comply with the local electrical safety code and standards.
●
Personnel working at heights must take all necessary measures to
ensure personal safety including wearing a helmet and safety belts.
●
Do not leave outdoor models of the device hanging in the air or facing
outwards when installing onto poles that are on top of buildings.
●
Do not place the device in a place exposed to sunlight or near heat
sources.
●
Put the device in a well-ventilated place, and do not block its
ventilation.
●
Use an adapter or cabinet power supply provided by the manufacturer.
●
Do not connect the device to two or more kinds of power supplies, to
avoid damage to the device.
●
The device is a class I electrical appliance. Make sure that the power
supply of the device is connected to a power socket with protective
earthing.
●
The device must be grounded by a copper wire with a cross-sectional
area of 2.5 mm
2
and a ground resistance no more than 4 Ω.
●
Voltage stabilizer and lightning surge protector are optional depending
on the actual power supply on site and the ambient environment.
●
To ensure heat dissipation, the gap between the device and the
surrounding area should not be less than 10 cm on the sides and 10 cm
on top of the device.
●
When installing the device, make sure that the power plug and
appliance coupler can be easily reached to cut
power.
●
Outdoor models of the device must be securely installed on poles or
brackets that are perpendicular to the ground. Make sure the entire
surface of the device and all its related components are covered with
anti-oxidation coating (such as rust preventive paint), and that the
installation site and height of the device meet the requirements of the
plan.
●
Install outdoor models of the device on top of buildings where there is
little to no direct sunlight to avoid the device becoming overheated.
Make sure to take all necessary measures to protect the device.
●
Face the side with the Ethernet port downwards, and arrange the wires
in a downward direction when installing outdoor models of the device.
Operation Requirements
●
Do not disassemble the device without professional instruction.
●
Operate the device within the rated range of power input and output.
●
Make sure that the power supply is correct before running the device.
●
When removing the cable device to avoid personal injury.
●
Do not unplug the power cord on the side of the device when the
adapter is powered on.
●
Use the device under allowed humidity and temperature conditions.
●
This is a class B product. In a domestic environment this may cause
radio interference in which case you may be required to take adequate
measures.
Maintenance Requirements
●
Do not disassemble it unless necessary.
●
Power
the device before maintenance.
●
Mark key components on the maintenance circuit diagram with
warning signs.
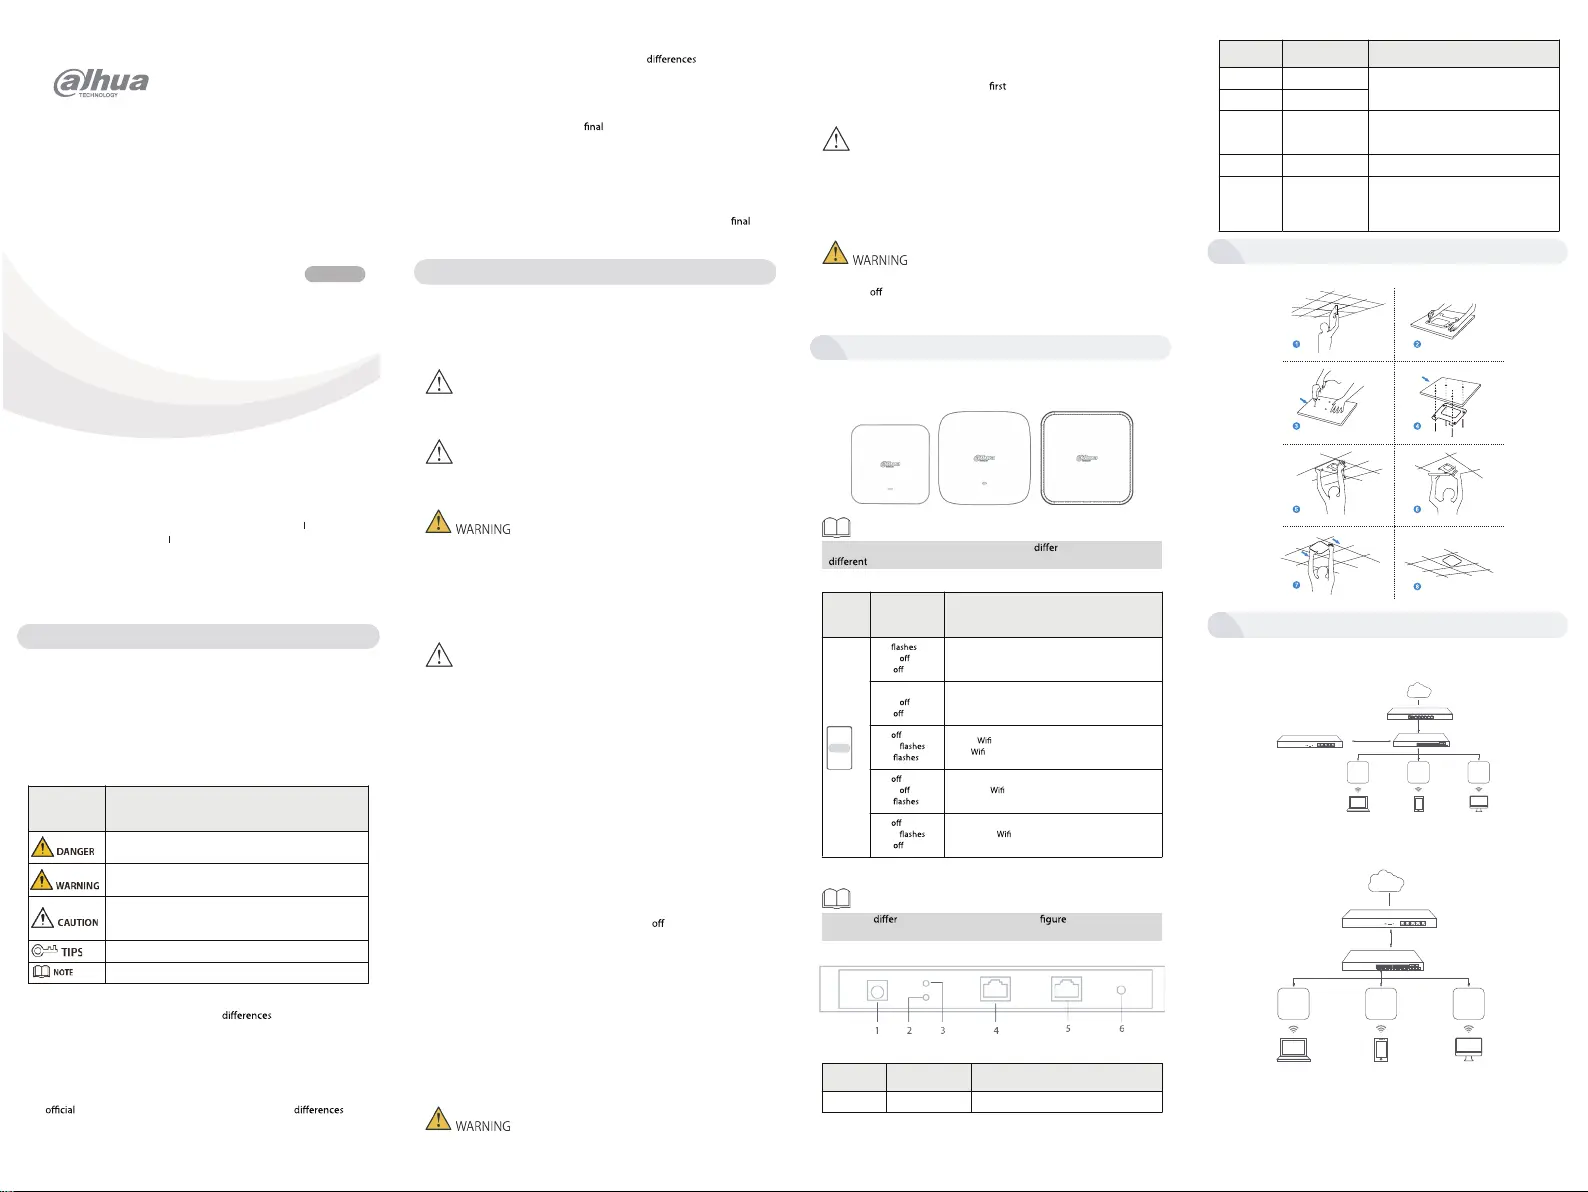
1 Overview
1.1 Indicator Description
Figure 1-1 Product overview
The number of indicators of the device might depending on
models. Refer to actual devices.
Table 1-1 Indicator status
Indic
ator
Normal
status
Description
Red
Green
Blue
System normally starts.
Red solid on
Green
Blue
System fails.
Red
Green
Blue
2.4GHz normally starts.
5GHz normally starts.
Red
Green
Blue
Only 5GHz normally starts.
Red
Green
Blue
Only 2.4GHz normally starts.
1.2 Port Description
The ports depending on the models. The is for reference only,
refer to the actual products.
Figure 1-2 Port disgram
Table 1-2 Port description
No.Name
1DCPower port.
No.Name
2LAN indicator
LED indicator. The light is on when connecting
network cable.
3WAN indicator
4WAN/PoE port
Connects to Extranet. You can connect to ADSL
modem or broadband. Under the AP and
repeater mode, you can switch WAN to LAN.
5LAN port/ConsoleConnects to LAN devices/debug equipment.
6Reset
Reset button. Restore to the device to default
settings. Press and hold the button for over 10 s
after the device powers on, and then the device
can restart.
2 Installation
3 Connection
ByPass Mode
Figure 3-1 Bypass mode
PoE switchAC
LaptopPhoneMonitor
AP1AP2
AP3
Router
Cloud Server
INTERNET
AC Gateway Mode
Figure 3-2 AC gateway mode
Phone
AP1AP2AP3
LaptopMonitor
Cloud Server
INTERNET
AC
PoE switch
Description
Figure 2-1 Installation procedure
Description
Product specificaties
| Merk: | Dahua Technology |
| Categorie: | Spiegel |
| Model: | DH-EAP5212-C |
| Kleur van het product: | Wit |
| Gewicht: | 360 g |
| Breedte: | 168 mm |
| Diepte: | 168 mm |
| Hoogte: | 32 mm |
| Gewicht verpakking: | 710 g |
| Breedte verpakking: | 235 mm |
| Diepte verpakking: | 243 mm |
| Hoogte verpakking: | 76 mm |
| LED-indicatoren: | Ja |
| Bedrijfsmodi: | FIT AP, FAT AP |
| Stroom: | 1 A |
| Plaatsing: | Plafond |
| Frequentieband: | 2.4 - 5.85 GHz |
| Aantal Ethernet LAN (RJ-45)-poorten: | 2 |
| Vermogensverbruik (max): | 10 W |
| MIMO: | Ja |
| Aansluiting voor netstroomadapter: | Ja |
| Intern geheugen: | 128 MB |
| Duurzaamheidscertificaten: | CE, Federal Communications Commission (FCC), RoHS |
| Ethernet LAN, data-overdrachtsnelheden: | 10,100,1000 Mbit/s |
| Bekabelingstechnologie: | 10/100/1000Base-T(X) |
| Netwerkstandaard: | IEEE 802.11a, IEEE 802.11ac, IEEE 802.11b, IEEE 802.11g, IEEE 802.11n, IEEE 802.3af |
| Ondersteunde beveiligingsalgoritmen: | WPA-PSK, WPA2-AES, WPA2-PSK, WPA2-TKIP |
| Soort antenne: | Intern |
| Antenne versterkingsniveau (max): | 4.6 dBi |
| Aantal gebruikers: | 80 gebruiker(s) |
| Temperatuur bij opslag: | -40 - 70 °C |
| Upgraden van firmware mogelijk: | Ja |
| Ondersteunde netwerkprotocollen: | HTTP; TCP/IP; IPv4; UDP; NTP; DHCP; DNS; DDNS; Qos; UPnP; ICMP; PPPoE; IP Filter |
| Reset button: | Ja |
| MAC adres filtering: | Ja |
| Naleving van duurzaamheid: | Ja |
| IP-adresfilter: | Ja |
| Flash memory: | 8 MB |
| MIMO-type: | Multi User MIMO |
| Maximale overdrachtssnelheid van gegevens: | 1200 Mbit/s |
| 2,4 GHz: | Ja |
| 5 GHz: | Ja |
| Kanaalbandbreedte: | 80 MHz |
| Quality of Service (QoS): | Ja |
| Service Set Identifier (SSID) functies: | Hidden SSID |
| Power over Ethernet (PoE): | Ja |
| Maximale overdrachtssnelheid van gegevens (2.4 GHz): | 300 Mbit/s |
| Maximale overdrachtssnelheid van gegevens (5 GHz): | 867 Mbit/s |
| DC voltage bereik: | 12 V |
| Maximum indoorbereik: | 15 m |
| WAN-poort: | Ethernet (RJ-45) |
| Dynamic Frequency Selection (DFS): | Ja |
| Bedrijfstemperatuur (T-T): | -20 - 45 °C |
| Relatieve vochtigheid in bedrijf (V-V): | 5 - 95 procent |
| Aantal producten inbegrepen: | 1 stuk(s) |
| Syslog: | Ja |
| 6 GHz: | Nee |
| Zendvermogen (CE): | 20 dBm |
Heb je hulp nodig?
Als je hulp nodig hebt met Dahua Technology DH-EAP5212-C stel dan hieronder een vraag en andere gebruikers zullen je antwoorden
Handleiding Spiegel Dahua Technology

19 December 2023
19 December 2023
19 December 2023
19 December 2023
19 December 2023
19 December 2023
4 Mei 2023
20 Maart 2023
Handleiding Spiegel
Nieuwste handleidingen voor Spiegel
8 Juli 2026
22 Juni 2026
19 Juni 2026
15 Juni 2026
14 Juni 2026
14 Juni 2026
14 Juni 2026
14 Juni 2026
14 Juni 2026
14 Juni 2026