Cuggl Partridge Handleiding
Cuggl
Niet gecategoriseerd
Partridge
Bekijk gratis de handleiding van Cuggl Partridge (2 pagina’s), behorend tot de categorie Niet gecategoriseerd. Deze gids werd als nuttig beoordeeld door 24 mensen en kreeg gemiddeld 4.9 sterren uit 12.5 reviews. Heb je een vraag over Cuggl Partridge of wil je andere gebruikers van dit product iets vragen? Stel een vraag
Pagina 1/2

FC86GB
1
Type L18
8
4 5 6 7 10 11
12 14
Click
13 15 16 17 18 19 20 21
2625 2723 24
Click
29 3028 31 32
3736 3833 34 35 39 41 42 43
44
40
22
45
9
A
B
D
H
I
N
E
M
G
F
C
L
K
J
O
46
Thank you for purchasing this Group 1-2-3 car seat. If you
require assistance with this product, please contact our cus-
tomer service department.
TEAMTEX
Rue du Claret
38230 Charvieu
France
SAFETY INSTRUCTIONS
Please read these instructions carefully before use and keep
them for future reference. If you do not follow these instruc-
tions, your child safety may be at risk.
• The hard items and plastic parts of the car seat must be
placed and installed so as they may not, in normal use, be-
come trapped under a movable seat or in the vehicle door.
• Keep all the straps that x the car seat to the vehicle fully
tightened and adjust the straps used to hold the child. Make
sure the straps are not twisted.
• Ensure that the harness lap straps are positioned as low as
possible, to support your child’s pelvis.
• Replace the car seat if it has been subject to severe impact
in an accident.
• It is dangerous to modify or add to the car seat in any way
without approval from the appropriate authority, or not to
carefully follow the instructions for installation provided by
the child seat manufacturer.
• Keep the car seat out of direct sunlight so that the child does
not get burned.
• Do not leave a child unattended in a car seat.
• Ensure that luggage and other items that may injure the
child in the event of an accident are correctly stowed away.
• Do not use the car seat without its cover.
• Do not replace the car cover with a cover that has not been
recommended by the manufacturer, as it plays a direct role in
ensuring that the restraint system works eciently.
• If in doubt over the installation and correct use of your car
seat, please contact the manufacturer.
• Do not use weight-bearing anchorage points other than
those specied in the instruction manual or indicated on the
car seat.
• Always use the rear seat if possible, even if the Highway
Code allows the car seat to be placed on the front seat.
• Always ensure that the car seatbelt is properly fastened.
• Always check that there are no scraps of food or other debris
in either the harness buckle or the seatbelt buckle.
• In winter, make sure that the child is not wearing over-bulky
clothes.
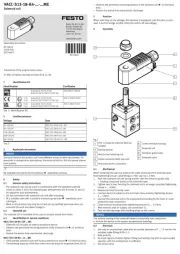
Your Group 1-2-3 car seat (1)
This is a Group 1-2-3 car seat that is designed for children
weighing between 9 and 36 kg (approx. 9 months to 12
years).
A. Adjustable headrest + cover
B. Diagonal belt guide (used only for Group 2/3)
C. Harness strap (x2 - used only for Group 1)
D. Reducer cushion (if tted on this model)
E. Harness buckle + crotch strap (used only for Group 1)
F. Harness adjustment strap (x2 - used only for Group 1)
G. ISOFIX/EASYFIX adjustment handle
H. Armrest (x2)
I. ISOFIX/EASYFIX connector (x2)
J. Adjuster (x2 - used only for Group 1)
K. Safety pads (x2 - used only for Group 1)
L. Shell + cover
M. Top Tether strap (used only for Group 1)
N. ISOFIX/EASYFIX connector release button (x2)
O. Tilt hatch
Installing the car seat with the harness
Group 1, 9 to 18 kg (approx. 9 months to 4 years)
WARNING
• This is an SAFETY RESTRAINT DEVICE FOR CHILDREN. ISOFIX
It is compliant with Regulation 44/04 for use in a vehicle tted
with an anchoring system.ISOFIX
• It may be used in vehicles tted with seats approved as uni-
versal ISOFIX positions (refer to your car manual), according
to the category and size of the child safety restraint.
• The mass group and the size class for which this ISOFIX
product is suitable are: / .B1 9-18 kg
If in doubt, please contact the car seat manufacturer or
the retailer.
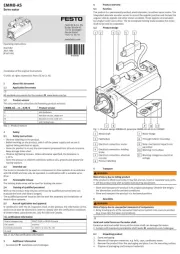
Assembling the booster seat
(2) (3)
Adjusting the harness
Make sure that the harness of your car seat is adjusted to the
height of your child before installing it in your vehicle. The
shoulder harnesses can be adjusted to 3 dierent heights and
must pass through the holes closest to your child’s shoulders.
If your child’s shoulders are between two levels always use
the higher of the two. To adjust the height of the harnesses,
remove the upper section of one of the straps by pivoting the
metal anchor located behind the headrest , and then pull(4) -
ing the end of the strap through the slots of the shell and the
cover (5). Feed the end of the harness strap through the same
slots at the desired height, both in the cover and the shell (6)
and reattach it behind the backrest . Make sure that the (7)
metal anchor is correctly positioned and that the end of the
strap is not twisted. Repeat the procedure with the second
strap.
Installing the car seat and placing the child in
the vehicle
This car seat must only be tted on the rear seat of a vehi-
cle equipped with ISOFIX fastenings and a Top Tether an-
chor (universal ISOFIX). Please refer to your car manual.
WARNING! Your ISOFIX Group 1 car seat MUST be tted using
the Top Tether strap provided! Your child’s safety cannot be
guaranteed if you install your ISOFIX Group 1 car seat without
the Top Tether strap.
Put the headrest of the car seat at its lowest position. Fold the
Top Tether strap over the back of the car seat so that it does
not get trapped during installation . Extend the ISOFIX/(8)
EASYFIX connectors from the car seat as far as possible .(9)
Position the car seat on the rear seat of the vehicle bring the
ISOFIX/EASYFIX connectors in line with the seat’s ISOFIX an-
chor points . Click the ISOFIX/EASYFIX connectors into (10)
the anchor points; the indicators on each connector should
turn from red to green . Release the safety catch of the (11)
ISOFIX / EASYFIX system by pulling the red handle of the base
and then simultaneously push the car seat by exerting a uni-
form pressure on the seat backrest until the rear of the car
seat is pressed against the vehicle seat .(12)
Bring the Top Tether strap over the vehicle seat and attach the
clasp to the vehicle’s Top Tether anchor point .(13)
Depending on the make of your car, the additional Top Tether
anchor point may be located:
• Behind the rear seat of the vehicle.
• On the oor to the rear of the vehicle.
• On the ceiling to the rear of the vehicle.
Please refer to your car user manual to locate the addition-
al Top Tether anchor point. Never attach the Top Tether to a
point that is not recommended by the vehicle manufacturer.
Never alter the vehicle yourself in order to try and fasten the
Top Tether (for example by piercing, screwing or attaching an
anchor point yourself ).
Push the car seat against the back of the vehicle seat and pull
on the loose end of the Top Tether strap. When the belt is fully
tightened, the indicator on the Top Tether strap will turn from
red to green .(14)
Open the buckle of the harness by pressing on the red button
in the centre of the buckle . Sit your child in the car seat. (15)
To close the harness, join together both ends of the shoul-
der straps and slide them into the buckle harness. You should
hear it click .(16)
• -Tightening the harness: Pull on the adjusting straps locat
ed on the harness. You do not need to press on the adjuster
buttons . (17) IMPORTANT: A poorly tting harness can be
dangerous. You should not be able to slide more than two n-
gers between the shoulder strap and the child’s chest.
• -Loosening the harness: Press on the adjuster buttons lo
cated on the upper part of the harness, while pulling at the
same time on the lower harness sections . Press on the (18)
red harness buckle button to free your child completely.
Some ISOFIX car seat models are tted with a buckle that sets
o an audible alarm (available as an option). This alarm warns
the parents if the child opens the buckle at an inopportune
moment during the journey.
IMPORTANT: A properly adjusted harness is essential to en-
sure maximum protection for your child. There should not be
more than two ngers width between the harness and the
child.
Installing the car seat without the har-
ness
Group 2-3, 15 to 36kg (approx. 3 to 12 years)
WARNING
• This is a ‘SEMI-UNIVERSAL’ SAFETY RESTRAINT DEVICE FOR
CHILDREN. It is compliant with Regulation 44/04 and may
only be used in vehicles specied in the adjoining list of ap-
proved vehicles.
• It can only be tted on vehicles with 3-point safety belts,
whether xed or inertia-reel, compliant with UN/ECE N°16 or
an equivalent standard.
If in doubt, please contact the car seat manufacturer or
the retailer.
Ensure that the harness and the Top Tether strap of your
car seat are removed before beginning installation in
your vehicle.
Removing the harness and the Top Tether strap
Remove the Top Tether strap (19) and store it carefully for fu-
ture use. Press on the red harness button to undo the harness
if necessary. Repeat steps and on each upper section (4) (5)
of the harness. Take one section of the harness and feed it to
the back , attach the metal anchor of the harness to the (20)
back of the seat . The metal anchor must be positioned (21)
between the shell and the car seat cover. Repeat the proce-
dure on the second section of the harness. Check that the har-
ness connectors have also been passed behind the back rest.
Remove the crotch strap by twisting the metal keeper and by
passing it through the slots in the base and the cover . (22)
Installing the car seat and placing the child in
the vehicle
Your car seat is tted with an adjustable headrest that has
been designed to support your child throughout growth by
providing maximum lateral protection.
IMPORTANT: When using the car seat without the harness, it
must only be installed with a 3-point safety belt . Never (23)
install the car seat within 2-point safety belt !(24)
Raise the adjustable headrest to its highest position. Extend
the ISOFIX/EASYFIX connectors from the car seat as far as
possible -(9). Position the car seat on the rear seat of the ve
hicle bringing the ISOFIX connectors in line with the seat’s
ISOFIX anchor points . Click the ISOFIX connectors into (25)
the anchor points; the indicators on each connector should
turn from red to green . Ensure that the vehicle seat belt (26)
buckle remains accessible and that it has not been placed un-
der the car seat.
Release the safety catch of the ISOFIX/EASYFIX system by
pulling the red handle attached to the base and gently push-
ing the car seat . With the safety catch released, push (27)
the car seat by exerting equal pressure on both sides until
the rear of the car seat is pressed rmly against the vehicle
seat and then feed the diagonal strap of the belt through the
headrest guide . (28)
Sit your child in the car seat. Make sure that the child’s back
is fully in contact with the back of the car seat. Pull and fas-
ten the vehicle seat belt. Pass the diagonal strap of the belt
under the armrest opposite the belt guide used. The waist
strap of the belt passes under both armrests . Lower the (29)
adjustable headrest and adjust it to the height of your child
(30). It should be positioned so that it surrounds your child’s
head, providing maximum lateral protection, whilst guiding
the diagonal belt over the child’s shoulder so that there is no
contact with the child’s neck . Tighten the vehicle (31) (32)
seat belt.
Ensure that the belt is properly tightened, that it is not twisted
and that it is not at the level of your child’s neck.
To remove your child from the car seat, simply unbuckle the
seatbelt and place it at the side of the car seat. The belt will
remain suspended from the headrest belt guide.
Removing the car seat
Step 1 (Group 1): Loosen the Top Tether strap , then re(33) -
lease the strap from its anchor point and bring it towards you
(34).
Step 1 (Group 2/3): Remove the diagonal strap of the seat-
belt from the belt guide of the adjustable headrest .(35)
Step 2 (all groups): Pull the car seat using the red handle on
the ISOFIX base . On either side of the seat, release the (36)
ISOFIX connectors from their anchor points by pulling the re-
lease buttons towards you. The indicators will turn from green
to red . The car seat can now be removed .(37) (38) (39)
Returning to the original configuration
of the car seat
Follow the instructions below if you wish to return to the har-
ness conguration.
Re-install the crotch strap, making sure that the metal keeper
is correctly in place under the seat Via the front of the (40).
backrest, between the cover and the shell, grasp and twist the
metal anchor of one of the two other sections of the harness,
simultaneously pulling the section through from the back
(41). Re-install it via the front of the backrest at the desired
height -(42). Make sure the metal anchor of the harness sec
tion is correctly in place behind the backrest . Repeat the (43)
procedure with the second section of the harness. Make sure
the harnesses are not twisted.
Re-install the Top Tether strap, passing it between the back-
rest and the car seat cover. Make sure that the metal anchor is
correctly in place behind the backrest . (44)
Storing the instruction manual
(45)
Reclining your child seat with the tilt
hatch
Please engage the tilt panel of your car seat before con-
necting it to the Isox anchorage points of your vehicle.
Pull the tilt panel down and push the locking ap at the
center of the panel until both ends of the locking ap (46)
are housed in the notches of the seat base above . Ensure (47)
that the tilt hatch is locked and secure.
Simply reverse this procedure to return to the non-re-
clined conguration.
CAUTION: Use the tilt panel in group 1 only. In groups 2
and 3, your car seat must be installed without the recline.
Cleaning
All the fabric parts are removable. Minor stains can be re-
moved using a sponge and soapy water or hand-washed at
30°C in soapy water. Do not use bleach, do not iron, do not
machine wash or tumble dry.
2 3
47

Product specificaties
| Merk: | Cuggl |
| Categorie: | Niet gecategoriseerd |
| Model: | Partridge |
Heb je hulp nodig?
Als je hulp nodig hebt met Cuggl Partridge stel dan hieronder een vraag en andere gebruikers zullen je antwoorden
Handleiding Niet gecategoriseerd Cuggl

28 Februari 2024

28 Februari 2024

28 Februari 2024

28 Februari 2024

28 Februari 2024

28 Februari 2024
Handleiding Niet gecategoriseerd
- Hapro
- Apricorn
- Primedic
- Segway
- Delta
- TranzX
- Sortimo
- Vigor
- Algo
- Burg-Wachter
- Avteq
- Technaxx
- City Theatrical
- Gima
- AMZ Pilot
Nieuwste handleidingen voor Niet gecategoriseerd

2 Augustus 2025
2 Augustus 2025
2 Augustus 2025
2 Augustus 2025
2 Augustus 2025

1 Augustus 2025

1 Augustus 2025

1 Augustus 2025
1 Augustus 2025
1 Augustus 2025