Conair LWD500CS Handleiding
Conair
Scheerapparat
LWD500CS
Bekijk gratis de handleiding van Conair LWD500CS (2 pagina’s), behorend tot de categorie Scheerapparat. Deze gids werd als nuttig beoordeeld door 21 mensen en kreeg gemiddeld 3.8 sterren uit 11 reviews. Heb je een vraag over Conair LWD500CS of wil je andere gebruikers van dit product iets vragen? Stel een vraag
Pagina 1/2

2. Encienda el aparato (ON).
3. Levante el brazo para que la piel quede lig-
eramente estirada.
4. Primero, acorte los vellos largos con la corta -
dora integrada, moviendo el aparato en la direc-
ción opuesta a la del crecimiento del vello.
5. Mantenga el aparato en contacto con la piel y
rasure los vellos suavemente.
6. No presione mucho para no inflamar la piel.
7. Después de terminar, apague el aparato
(OFF).
Importante: Varios intentos serán necesarios
para encontrar la mejor forma de rasurar sus
axilas.
INSTRUCCIONES DE
MANTENIMIENTO
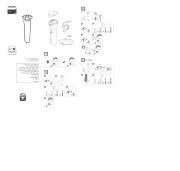
PASO 1: SACAR EL CABEZAL Y LAS HOJAS
1. Asegúrese que el aparato esté apagado antes
de remover el cabezal.
2. Coja el aparato y oprima los botones de
despejo ubicados en ambos lados del cabezal.
Jale el cabezal hacia arriba (Fig.1).
Congratulations on the purchase of your new
Woman's Infiniti™ by Conair® Razor. For maximum
satisfaction when using this quality product,
please take a minute to read the following
operating and care instructions. Thank you for
choosing Conair, the #1 brand in personal care
appliances.
IMPORTANT SAFETY
INSTRUCTIONS
When using an electrical appliance, basic pre-
cautions should always be taken, including the
following:
READ ALL INSTRUCTIONS
BEFORE USING
DANGER– To reduce the risk of death
or serious injury from electrical shock:
1. Do not place or store shaver where the stand
can fall or be pulled into a tub or sink. Do not
place or drop charging stand into water or other
liquid.
2. Except when charging, always unplug this
appliance from the electrical outlet immediately
after using.
3. Always turn this shaver off before cleaning.
4. Do not reach for an appliance that has fallen
into water.
WARNING– To reduce the risk of
burns, fire, electrical shock, or injury to per-
sons:
1. This appliance should not be used by, on, or
near children or individuals with certain dis-
abilities.
2. Use this appliance only for its intended use
as described in this manual. Do not use attach-
ments not recommended by the manufacturer.
3. Never operate this appliance if it has a dam-
aged cord or plug, if it is not working properly,
if it has been dropped or damaged, or if the
stand has been dropped into water. Return the
appliance to a service center for examination
and repair.
4. Keep the cord away from heated surfaces.
5. Never drop or insert any object into any
opening.
6. Do not use outdoors or operate where aerosol
(spray) products are being used or where oxy-
gen is being administered.
7. Do not use this appliance with damaged or
broken foils, as injury may occur.
8. Always attach plug to appliance first, then to
outlet. To disconnect turn all controls to off posi-
tion before removing plug from outlet.
Shaver voltage: This appliance comes with an
adapter which can be used on alternating
current (120v AC 60HZ) only.
SAVE THESE
INSTRUCTIONS
WARNING
1. Women whose skin is sensitive to cosmetics
or easily irritated by shaving, or who suffer from
a skin allergy, should test one section of the leg
or arm before using the shaver.
2. The foils are thin and precisely finished piec-
es. Do not press hard against the foils, or drop
foils. A warped or distorted foil will produce poor
shaving results. Also a damaged foil may cause
skin injury. A damaged foil should be replaced
immediately.
3. When cleaning, use cold or warm water. Do
not use hot water, sea water, or cleaners, as they
can cause damage to the waterproof seals.
4. Do not leave the entire unit submerged in
water for a long period of time.
5. To prevent possible damage to the foils and
the cutter, women who use underarm deodorant
must thoroughly clean and air-dry the foil and
cutter after each use. Failure to do this may
result in corrosion of the inner blades.
OPERATING
INSTRUCTIONS
IMPORTANT
This shaver has been engineered to give you a
clean, close, and smooth shave. If you are not
currently using a rechargeable shaver, it may
take some time to adapt to this new method.
Give yourself some time to determine the best
motion for the best shave.
Use your shaver exclusively for three to four
weeks so that your legs and underarms
adjust to the shaver. At first, your shave might
not be as close as you expect. However, this is
normal. It takes time for your skin and hair to
adjust to the new procedure. Please be patient;
use your shaver 10 to 12 times before you judge
its performance.
CHARGING: THE LWD500CS
Before your first shave, or after six months of
non-use, charge the shaver for 15 hours to
use for up to 25 minutes. After initial charge,
recharge the shaver as needed.
To charge the LWD500CS, plug the power cord
in an AC outlet (120V) and make sure the charg-
ing stand is placed on a firm, level surface at all
times. The foils are extremely thin and precisely
crafted. Do not push on the foils when inserting
the shaver into the charging stand. For extra
protection, keep the blade guard on while han-
dling the unit in the charging stand as well as
when not in use.
1. Turn the shaver switch off. If the switch is not
in the off position, the shaver will not charge.
2. While holding the charging stand with one
hand, plug the shaver firmly into the charging
stand with the other hand. Make sure the shaver
is completely inserted.
3. Keep the shaver switch in the off position
while charging.
4. The charging indicator light will stay on
while the shaver is in the charging stand and
is charging.
5. A fully charged shaver will give approximately
25 minutes of shaving time.
Rechargeable Model LWD500CS
Congratulations! Silky, smooth legs are just
a shave away with your new Conair wet/dry
rechargeable women’s shaver. This shaver can
be used with shaving cream, which provides
a smoother, closer shave, or it can be used dry
as a regular shaver. Because the shaver is fully
submersible, you can conveniently shave in the
shower or in the tub. And the shaver is easy to
clean; simply rinse the cutting heads under a
faucet, using warm or cold water (DO NOT USE
HOT WATER. IT CAN DESTROY THE SHAVER’S
SEALS.)
CAUTION
Do not immerse any part of the charging stand
or cord in water.
Do not try to plug the charging stand into an AC
outlet while your hands are wet.
The outer foils and inner blades are delicate and
must be handled very carefully.
BEFORE SHAVING
1. Before wet shaving, you may wish to prepare
your legs and underarms with shaving cream or
soap. If a soapy lather is applied to the skin, the
shaver will glide smoothly over the skin and clean
away oil residue while at the same time removing
hair. Caution: DO NOT use shaving gels, as these
products can clog your shaver foils.
2. When dry shaving, be certain that your skin is
clean. If you have sensitive skin, you may want to
apply talcum powder before and after you shave.
3. Clean your shaver after each use. This will
insure the best performance. (Please refer to
How to Clean Your Shaver section for further
instructions.)
4. Although the shaver is washable, do not
immerse in water for extended periods of time.
Exclusive 360˚ Swivel
Your new Infiniti™ by Conair® women’s razor
features a Conair exclusive 360˚ swiveling head.
It will automatically adjust to your different body
contours for the ultimate silky smooth shave.
A locking switch on the back of the trimmer
allows you to position the head in a stable, non-
swiveling mode. You should select the desired
mode before following the Instructions for
Use section.
INSTRUCTIONS FOR USE
1. Remove the plastic blade guard.
2. Slide the main switch up to the on position.
3. After each shave, switch the unit off, clean,
and replace the blade guard.
4. Put the unit back on the charging stand for
storage and/or recharging.
SHAVING YOUR LEGS/BIKINI AREA
NOTE: Pushing the shaver against the skin too
hard will prevent the hairs from entering the foils
to be cut. Experience will show just the right
pressing to use to maximize performance.
1. Prepare your legs for wet or dry shaving.
2. Turn shaver on.
3. Shave with smooth, steady strokes up and
down your leg.
3. Lift your arm until the skin under the arm
stretches slightly.
4. Use the trimmer first to cut any long hair,
stroking trimmer against the direction of hair
growth.
5. Hold the shaver so that it is in full contact with
your skin, and shave with gentle strokes.
6. It is important to press lightly. Pressing too
hard may lead to skin irritation.
7. When finished shaving, turn the shaver off.
Important: After several uses, you will be able
to determine the optimum shaving method for
your underarms.
HOW TO CLEAN YOUR SHAVER
DETACH SHAVER HEAD AND FOIL FRAME
1. Make sure the unit is in the off position before
detaching the shaver head.
2. Hold the shaver body and press the release
buttons on both sides of the shaver head, then
remove the shaver head by pulling it straight up
from the body (see Fig. 1).
4. Keep the full shaving head in contact with
your skin.
5. For best results, shave against the direction
of hair growth.
6. Your shaver has an integral cutter feature
which is ideal for shaving longer hairs. The
shaver also has a bikini pop-up trimmer for your
complete shaving needs. To use pop-up trimmer,
push button upward with thumb.
For best results, use the bikini pop-up
trimmer for really long hairs.
7. When you finish shaving, turn the shaver off.
Important: After several uses, you will be able to
determine the optimum shaving method for your
legs and bikini area.
SHAVING YOUR UNDERARMS
1. Prepare your underarms for wet or dry shav-
ing. (Be sure that your skin is clean).
2. Turn the shaver on.
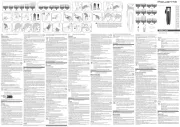
Press Here
Fig. 1
Press Here
Gracias por escoger la rasuradora recargable
Infiniti™ de Conair®. Para lograr resultados
óptimos, siempre lea las instrucciones de uso y de
mantenimiento que se encuentran a continuación.
Nuevamente, gracias por escoger a Conair, el No.
1 en aparatos de cuidado personal.
MEDIDAS DE
SEGURIDAD
IMPORTANTES
Cuando se usan aparatos eléctricos, siempre se
deben tomar precauciones básicas de seguri-
dad, entre las cuales las siguientes:
LEA TODAS LAS
INSTRUCCIONES ANTES DE
USARLO
MANTENGA EL APARATO
ALEJADO DEL AGUA
DANGER– Para reducir el riesgo de
muerte o herida por descarga:
1. No coloque ni guarde la base donde pueda
caer o ser empujada a una bañera o un lavabo.
No coloque la base ni la deje caer al agua u
otro líquido.
2. Siempre desconecte la base inmediatamente
después de usarla, excepto cuando desea car-
gar el aparato.
3. Siempre apague el aparato antes de limpi-
arlo.
4. No trate de alcanzar la base en el agua.
ADVERTENCIA–
Para reducir
el riesgo de quemaduras, electrocución, incendio
o lesiones personales:
1. Este aparato no debería ser usado por, en o
cerca de niños o personas con alguna discapa-
cidad.
2. Use este aparato únicamente con el propósi-
to para el cual fue diseñado y tal como se
describe en este manual. Sólo use accesorios
recomendados por el fabricante.
3. Nunca utilice el aparato si el cable o la
clavija están dañados, si no funciona correcta-
mente, si ha caído, si está dañado o si ha caído
al agua. Llévelo a un centro de servicio autor-
izado para que lo examinen y lo reparen.
4. Mantenga el cable alejado de superficies
calientes.
5. Nunca deje caer ni inserte un objeto en nin-
guna de las aberturas.
6. No lo utilice al aire libre, ni donde se están
usando productos en aerosol (spray) o donde
se esté administrando oxígeno.
7. No use este aparato con una hoja lastimada
o rota. Esto podría provocar una herida.
8. Siempre conecte el aparato al cable antes de
enchufarlo. Para desconectarlo, coloque todos
los ajustes en la posición “Apagado” (“OFF”),
luego desenchufe el cable.
Voltaje: La base de carga funciona con un
adaptador que puede conectarse a un toma-
corriente de corriente alterna (120V CA 60Hz)
solamente.
GUARDE ESTAS
INSTRUCCIONES
PRECAUCIÓN
1. Si su piel es sensitiva a los productos cosmé-
ticos o se inflama fácilmente cuando se rasura, o
si usted sufre de alguna alergia cutánea, debería
hacer una prueba sobre una parte pequeña de la
pierna o del brazo antes de usar el aparato.
2. Las hojas de afeitar son muy finas y precisas.
No las apriete mucho sobre la piel ni las deje
caer. Una hoja lastimada o deformada podría
provocar una herida e impedirá el buen func-
ionamiento del aparato. Reemplace las hojas
defectuosas inmediatamente.
3. Use agua fría o tibia para limpiar el cabezal.
No use agua caliente, agua salina o limpiadores.
Esto podría dañar los sellos impermeables del
aparato.
4. No mantenga el aparato bajo el agua durante
un tiempo prolongado.
5. Si usa desodorante en las axilas, lave bien
las hojas y las cuchillas y permite que sequen
al aire después de cada uso para evitar que los
filos internos se oxiden.
INSTRUCCIONES
DE USO
IMPORTANTE
Este aparato fue diseñado para lograr un rasu-
rado suave y preciso. Si usted no está acostum-
brada a usar una rasuradora eléctrica, puede
demorarse un poco hasta familiarizarse a este
nuevo método y encontrar los mejores gestos
para lograr un rasurado óptimo.
Use el aparato exclusivamente durante tres
a cuatro semanas hasta habituar sus pier-
nas y sus axilas. Su piel y su vello necesitan
tiempo para familiarizarse a una nueva técnica
de rasurado. Por lo tanto, puede ser que su
primer intento no sea perfecto. Sea paciente y
use el aparato 10 a 12 veces antes de juzgar
su rendimiento.
CÓMO CARGAR EL APARATO
Necesitará cargar el aparato durante 15 horas
antes de usarlo por primera vez. Después de la
carga inicial, sólo necesitará recargarlo cuando
pierda poder.
Para cargar el aparato, enchufe el cable de la
base en un tomacorriente de corriente alterna
(120V). Asegúrese que la base esté en un lugar
plano y seguro. Las hojas de la rasuradora
son muy frágiles y finas. Por lo tanto, no las
presione cuando ensarte el aparato en la base
de recarga. Para más seguridad, mantenga la
cubierta protectora sobre las hojas al cargar el
aparato o cuando no esté en uso.
1. Apague el aparato (OFF). Si el aparato no está
apagado, no se cargará.
2. Mantenga la base firmemente con una mano
e inserta el aparato seguramente en la misma.
Asegúrese que el aparato esté bien posicionado.
3. El indicador luminoso de recarga se encend-
erá y quedará encendido hasta que el aparato
esté completamente cargado.
4. Una vez cargado, el aparato tendrá una
autonomía de aproximadamente 25 minutos.
Modelo Recargable LWD500CS
¡Felicitaciones! Usted está a punto de conseguir
la piel sedosa y suave que siempre deseó,
gracias a la rasuradora recargable Infiniti™ de
Conair®. Puede usar su nueva rasuradora en
seco, o con crema de afeitar para un rasurado
más suave y preciso. Si lo desea, puede usarla
mientras está tomando una ducha o un baño,
puesto que es completamente sumergible. Para
limpiarla, enjuague simplemente el conjunto de
hojas y cuchillas bajo agua corriente, usando
agua tibia o fría NO USE AGUA CALIENTE. ESTO
PODRÍA DAÑAR LOS SELLOS IMPERMEABLES
DEL APARATO.
PRECAUCIÓN
No coloque ninguna parte de la base de carga o
del cable eléctrico en el agua.
No enchufe la base en el tomacorriente con las
manos mojadas.
Las hojas y las cuchillas son muy frágiles.
Manipúlelas con mucho cuidado.
ANTES DE RASURARSE
1. Para usar la rasuradora en mojado, aplique
crema de afeitar o jabón sobre sus piernas o sus
axilas. Esto facilitará el rasurado y removerá los
residuos de aceite al mismo tiempo que los vel-
los. Importante: NO use gel de afeitar, ya que los
geles pueden obstruir la hoja de la rasuradora.
2. Para usar su rasuradora en seco, asegúrese
que su piel esté limpia y seca. Si su piel es
sensible, puede aplicar talco antes y después
del rasurado.
3. Para resultados óptimos, limpie el apara-
to después de cada uso (véase la sección
“Instrucciones de Mantenimiento”).
4. Aunque la rasuradora se puede enjuagar en agua,
no la sumerja en agua durante un tiempo prolongado.
Exclusivo cabezal basculante 360°
Su nueva rasuradora Infiniti™ de Conair ®
está
dotada de un exclusivo cabezal basculante que
gira sobre 360 grados, el cual sigue las curvas
y los contornos de su cuerpo para proporcionar
afeitadas excepcionales. Un mecanismo de cierre
en la parte trasera del cabezal permite escoger la
posición deseada y bloquear el cabezal en esta
posición. Usted debería elegir la posición deseada
antes de seguir las “instrucciones de uso”.
INSTRUCCIONES DE USO
1. Remueva la cubierta protectora.
2. Ponga el botón de encendido/apagado en la
posición ON.
3. Después de terminar, apague el aparato
(OFF), límpielo y regrese la cubierta protectora
sobre las hojas.
4. Mantenga el aparato en la base para cargarlo
o guardarlo.
RASURADO DE LAS PIERNAS O
DEL BIKINI
IMPORTANTE: Ejercer demasiada fuerza en la piel
impedirá el buen funcionamiento del aparato. Con
práctica, usted encontrará la fuerza ideal para
lograr un rasurado óptimo.
1. Prepare sus piernas para rasurado en seco
o en mojado.
2. Encienda el aparato.
3. Mueva el aparato a lo largo de su pierna con
movimientos suaves y parejos.
4. Siempre mantenga el cabezal en contacto
con la piel.
5. Para resultados óptimos, rasure la pierna en la
dirección opuesta a la del crecimiento del vello.
6. El aparato está dotado de una cortadora
integrada, la cual permite acortar el vello largo
antes de rasurarlo. Para usar la cortadora,
deslice el botón de control de la cortadora hacia
arriba.
Para lograr resultados óptimos, acorte el
vello largo usando la cortadora integrada
antes de rasurar el área del bikini.
7. Apague el aparato (OFF) después de
terminar.
Importante: Varios intentos serán necesarios
para encontrar la mejor forma de rasurar sus
piernas o el área del bikini.
RASURAR SUS AXILAS
1. Prepare sus axilas para rasurado en seco o en
mojado. Asegúrese que la piel esté limpia.
Oprima aquí
Oprima aquí
Fig. 1
LWD500 new IB.indd 1 7/18/07 6:32:42 PM

CAUTION
1. When shaking off excess water, hold the main
unit firmly to prevent releasing the head assem-
bly or dropping the unit.
2. Do not use a dryer or heater to dry the shaver.
This may result in malfunction or damage to the
shaver.
NOTE: Never pull on the charging stand cord.
Never twist or wrap the cord around the charg-
ing stand. Lay it flat in the storage pouch pro-
vided with the cord coiled up when not in use.
REPLACE SHAVER HEAD
Once the shaving head is dry, hold and press
the shaver head release buttons and attach
back to the shaver body (see Fig. 3).
Note: if the body of the shaver becomes dirty,
wipe off with a damp cloth and mild detergent
or soap. Never use thinner, other solvents, or
any harsh cleaners.
REPLACING THE FOILS FRAME
1. It is time to replace the foils when you find
you have to push harder on the shaver to get
a close shave, or if you have to go over your
leg area more often to get a smooth result, or
if you experience skin irritation. Replacement
time will depend on how often use your
Fig. 3
Press Here
las hojas. La vida útil de las hojas depende
de la frecuencia de uso y de la rapidez de
crecimiento del vello.
2. Oprima los botones de despejo ubicados
en ambos lados del cabezal para sacar el
juego de hojas usado. Instale un nuevo juego
de hojas.
CÓMO CAMBIAR LAS CUCHILLAS
INTERNAS
IMPORTANTE: SIEMPRE CAMBIE LAS HOJAS Y
LAS CUCHILLAS AL MISMO TIEMPO.
1. Oprima los botones de despejo ubicados
en ambos lados del cabezal. Jale el juego
de hojas hacia arriba con mucho cuidado
(Fig. 4).
PRECAUCIÓN
1. Mantenga el aparato firmemente al sacudirlo
para remover el exceso de agua. Esto evitará
desarmar el conjunto de cuchillas o soltar el
aparato.
2. No seque el aparato con secador o calentador.
Esto podría dañarlo o causar un mal funciona-
miento.
NOTA: Nunca jale, tuerce o enrolle el cable eléc -
trico alrededor de la base. Enrolle el cable sin
apretar al lado de la base en el bolso provisto.
PASO 3: INSTALAR EL CABEZAL
1. Una vez que las hojas están secas, man-
tenga los botones de despejo oprimidos e
inserta el cabezal sobre el cuerpo del aparato
(Fig.3).
Nota: Para limpiar el cuerpo del aparato,
use un paño húmedo con detergente suave
o jabón. Nunca use disolventes, solventes o
limpiadores fuertes.
CÓMO CAMBIAR LAS HOJAS
1. Si usted se da cuenta que debe ejercer más
presión o rasurar la misma zona varias veces
para lograr resultados suaves, o si su piel se
irrita al rasurarse, es tiempo para cambiar
For shaving tips and information on Conair appli-
ances call: 1-800-3-CONAIR or visit us on the
web at www.conair.com
REPLACEMENT PARTS
These shavers use the following replacement
parts, which can be found either at your local
retailer or by ordering directly from Conair.
Replacement Foil and Cutters-CSP50
Cleaning Brush
Blade Guard
Made in China
©2007 CONAIR CORPORATION
7475 N. Glen Harbor Blvd.
Glendale, AZ 85307
LIMITED FIVE-YEAR WARRANTY
Conair will repair or replace (at our option) your unit
free of charge for 60 months from the date of pur-
chase if the appliance is defective in workmanship
or materials.
To obtain service under this warranty, return the defec-
tive product to the service center listed below, together
with your purchase receipt and $3.00 for postage and
handling. California residents need only provide proof
of purchase and should call 1-800-366-0937 for ship-
ping instructions. In the absence of a purchase receipt,
the warranty period shall be 60 months from the date
of manufacture.
ANY IMPLIED WARRANTIES, OBLIGATIONS, OR
LIABILITIES, INCLUDING BUT NOT LIMITED TO THE
IMPLIED WARRANTY OF MERCHANTABILITY AND
FITNESS FOR A PARTICULAR PURPOSE, SHALL
BE LIMITED IN DURATION TO THE 60-MONTH
DURATION OF THIS WRITTEN, LIMITED WARRANTY.
Some states do not allow limitations on how long an
implied warranty lasts, so the above limitations may
not apply to you.
IN NO EVENT SHALL CONAIR BE LIABLE FOR
ANY SPECIAL, INCIDENTAL, OR CONSEQUENTIAL
DAMAGES FOR BREACH OF THIS OR ANY OTHER
WARRANTY, EXPRESS OR IMPLIED, WHATSOEVER.
Some states do not allow the exclusion or limitation of
special, incidental, or consequential damages, so the
above limitation may not apply to you.
This warranty gives you specific legal rights, and you
may also have other rights, which vary from state to
state.
Service Center
Conair Corporation
Service Department
7475 N. Glen Harbor Blvd.
Glendale, AZ 85307
2. Hold both sides of the inner blades and pull
straight up (see Fig. 5).
3. Firmly hold the new inner blade and gently
guide it into the inner blade mount.
Caution: MAKE SURE YOU DO NOT LOSE THE
SMALL SPRING UNDER THE CUTTERS.
4. Firmly press the inner blades until they snap
into place.
5. Replace the foil frame.
POP-UP TRIMMER ASSEMBLY
NOTE: WE DO NOT RECOMMEND REPLACING
THE TRIMMER ASSEMBLY YOURSELF.
THIS REQUIRES A SPECIAL TOOL FOR
REPLACEMENT – TAKE OR SEND THE
SHAVER TO A CONAIR SERVICE CENTER
FOR SERVICE.
shaver and how quickly your hair grows.
2. When replacing the foils, press the foil
frame release buttons on the both sides of the
shaver head, remove and then gently insert
the new foil frame into position, being careful
not to push on the foils.
REPLACE THE CUTTER
(INNER BLADES)
CAUTION: NEVER REPLACE THE CUTTERS
WITHOUT REPLACING THE FOILS AS WELL.
1. Press the release buttons on both sides
of the shaver head, then remove the shaver
head by pulling it straight up from the body
and gently remove the foil frame (see Fig. 4).
Press Here Press Here
IB-7461
07NG9012
™
®
Instructions for Care and Use
Model LWD500CS
RECHARGEABLE
EXCLUSIVE!
Swivel 360°
Head!
Fig. 4
Press Here
Press Here
Fig. 5
Note: The product you have purchased contains
rechargeable batteries.
The batteries are recy-
clable. At the end of their
useful life, under various
state and local laws, it
may be illegal to dis-
pose of these batteries
into the municipal waste
stream. Check with your local solid waste offi-
cials for details in your area for recycling option
or proper disposal.
Fig. 3
Oprima aquí Oprima aquí
IB-7461
07NG9012
™
®
Manual de Instrucciones
Modelo LWD500CS
¡EXCLUSIVO!
Cabezal
basculante
360°
Fig. 4
Oprima aquí
Oprima aquí
Fig. 5
Importante: Este aparato contiene baterías
recargables, las cuales
deben ser recicladas,
recogidas o tiradas de
manera adecuada al
final de su vida útil.
Según donde viva,
puede ser ilegal tirar
las baterías con el resto
de la basura. Comuníquese con las autoridades
de la ciudad donde vive para averiguar cual
son las opciones de reciclaje en su área.
de
2. Coja las cuchillas por los lados y jálelas
hacia arriba (Fig.5).
3. Mantenga las nuevas cuchillas firmemente e
insértalas en el cabezal.
IMPORTANTE: NO PIERDA EL PEQUEÑO
RESORTE QUE SE ENCUENTRA BAJO LAS
CUCHILLAS.
4. Presione las cuchillas para encajarlas.
5. Vuelva a instalar las hojas.
CORTADORA INTEGRADA
NOTA: SI NECESITA CAMBIAR LA
CORTADORA INTEGRADA, POR FAVOR MANDE
SU CORTADORA A UN CENTRO DE SERVICIO
AUTORIZADO. NO LE ACONSEJAMOS QUE
INTENTE CAMBIARLA, PUESTO QUE ESTO
REQUIERE HERRAMIENTAS ESPECIALES.
GARANTÍA LIMITADA POR CINCO
AÑOS
Conair reparará o remplazará (a su opción) su
aparato sin cargo por un período de 60 meses a
partir de la fecha de compra si presenta defectos de
mano de obra o en los materiales.
Para obtener servicio técnico bajo esta garantía, lleve
o mande su aparato al Centro de Servicio indicado
a continuación, junto con su recibo de compra y un
cheque de $3,00US por gastos de envío y manejo.
Los residentes de California sólo necesitan dar una
prueba de compra y deben llamar al 1-800-366-
0937 para recibir instrucciones de envío. En ausen-
cia del recibo de compra, el período de garantía será
de 60 meses a partir de la fecha de fabricación.
CUALQUIERA GARANTÍA, OBLIGACIÓN O
RESPONSABILIDAD IMPLÍCITAS, INCLUYENDO
PERO NO LIMITADAS A LA GARANTÍA IMPLÍCITA
DE COMERCIABILIDAD Y APTITUD PARA UN
PROPÓSITO ESPECÍFICO, ESTARÁN LIMITADAS
POR LOS 60 MESES DE LA PRESENTE GARANTÍA
ESCRITA. Algunos Estados no permiten limitaciones
sobre la duración de una garantía implícita, de modo
que las limitaciones mencionadas pueden no regir
para usted.
CONAIR NO SERÁ RESPONSABLE EN NINGÚN
CASO POR ALGÚN DAÑO ESPECIAL, INCIDENTAL O
CONSECUENTE DEBIDO AL INCUMPLIMIENTO DE
ESTA O DE CUALQUIER OTRA GARANTÍA, EXPRESA
O IMPLÍCITA. Algunos Estados no permiten la exclu-
sión o limitación de daños especiales, incidentales o
consecuentes, de modo que las limitaciones mencio-
nadas pueden no regir para usted.
Esta garantía le otorga derechos legales específicos
y usted puede tener otros derechos que varían de un
Estado a otro.
Centro de Servicio
Conair Corporation
Service Department
7475 N. Glen Harbor Blvd.
Glendale, AZ 85307
Para consejos o información sobre los aparatos de
Conair, llame al 1-800-3-CONAIR o visítenos en la
Web en www.conair.com
PARTES DE REPUESTO
Puede comprar las partes de repuesto siguien-
tes en las tiendas que venden este producto,
llamando al servicio de asistencia al consumidor
de Conair al 1-800-3-CONAIR, o visitándonos en
la Web en www.conair.com
Hojas y cuchillas de repuesto CSP50
Cepillo de limpieza
Cubierta protectora
Hecho en la China
©2007 CONAIR CORPORATION
7475 N. Glen Harbor Blvd.
Glendale, AZ 85307
3. Para sacar las hojas, oprima los botones de
despejo ubicados en ambos lados del cabezal y
jale el juego de hojas hacia arriba (Fig.2).
El conjunto de cuchillas estará expuesto. Tenga
cuidado de no presionar las hojas, puesto que son
muy frágiles y podrían dañarse.
PASO 2: LIMPIAR EL JUEGO
DE CUCHILLAS
1. Enjuague el cabezal, las cuchillas y las
hojas bajo agua corriente, usando agua fría o
agua tibia únicamente. También puede usar el
cepillo de limpieza provisto.
2. Permita que el cabezal, las hojas y las
cuchillas sequen al aire antes de volver a
instalar el cabezal.
Oprima aquí
Fig. 2
Oprima aquí
3. Gently press the foil frame release buttons
on both sides of the shaver head and lift the foil
frame straight up from shaver head (see Fig. 2).
The cutter will now be in view; be careful not to
push on the foils as they are delicate and can be
easily damaged.
RINSE THE SHAVER HEAD
1. Rinse the shaver cutter and foil frame
under warm or cold running water only; do
not use hot water (you can also use the clean-
ing brush which is included).
2. Allow the shaver head and foil frame and
cutters to air-dry before replacing foil frame.
Press Here
Fig. 2
Press Here
curvations
ultimate silky, smooth shave
™
RECARGABLE
curvations
rasurado suave, piel sedosa
™
LWD500 new IB.indd 2 7/18/07 6:32:52 PM
Product specificaties
| Merk: | Conair |
| Categorie: | Scheerapparat |
| Model: | LWD500CS |
| Soort: | Elektrisch scheerapparaat |
| Stroombron: | Batterij/Accu |
| Zelfreinigend: | Nee |
| Connectiviteitstechnologie: | Bedraad |
| Precisietrimmer: | Nee |
| Oplaadbaar: | Ja |
| Aantal scheerkoppen: | - hoofd(en) |
| Gezichts trimmer: | Nee |
| Ijs epileren: | Nee |
| Aantal scheerbladen: | 4 |
Heb je hulp nodig?
Als je hulp nodig hebt met Conair LWD500CS stel dan hieronder een vraag en andere gebruikers zullen je antwoorden
Handleiding Scheerapparat Conair

30 September 2024

4 September 2024

4 September 2024

9 Juli 2023
Handleiding Scheerapparat
- Solac
- G3 Ferrari
- Teesa
- Beurer
- Xiaomi
- Concept
- Mesko
- Essentiel B
- King
- Garett
- Taurus
- Valera
- DCG
- Ufesa
- Zelmer
Nieuwste handleidingen voor Scheerapparat

12 Augustus 2025

12 Augustus 2025

11 Augustus 2025
11 Augustus 2025

8 Augustus 2025
5 Augustus 2025
5 Augustus 2025
5 Augustus 2025
4 Augustus 2025
15 Juli 2025