Axxess AX-TOYCAM3 Handleiding
Axxess Niet gecategoriseerd AX-TOYCAM3
Bekijk gratis de handleiding van Axxess AX-TOYCAM3 (2 pagina’s), behorend tot de categorie Niet gecategoriseerd. Deze gids werd als nuttig beoordeeld door 196 mensen en kreeg gemiddeld 4.7 sterren uit 7 reviews. Heb je een vraag over Axxess AX-TOYCAM3 of wil je andere gebruikers van dit product iets vragen? Stel een vraag
Pagina 1/2
© COPYRIGHT 2004-2016 METRA ELECTRONICS CORPORATION
© COPYRIGHT 2004-2016 METRA ELECTRONICS CORPORATION
© COPYRIGHT 2004-2016 METRA ELECTRONICS CORPORATION
© COPYRIGHT 2004-2016 METRA ELECTRONICS CORPORATION
axxessinterfaces.com • metraonline.com
axxessinterfaces.com • metraonline.com
axxessinterfaces.com • metraonline.com
axxessinterfaces.com • metraonline.com
Axxess Integrate
Axxess Integrate
Axxess Integrate
Axxess Integrate
Installation Instructions for AX-TOYCAM3
REV. 1/25/16
REV. 1/25/16
REV. 1/25/16
REV. 1/25/16
Installation Instructions for AX-TOYCAM3
Instrucciones de instalación para AX-TOYCAM3Instrucciones de instalación para AX-TOYCAM3
FEATURES
• Retains the factory back-up camera to an aftermarket radio
• Allows an aftermarket camera to be added to the factory radio screen*
* Display and navigation model radios only
INTERFACE COMPONENTS
• AX-TOYCAM3 harness
AX-TOYCAM3
Toyota Back-Up Camera Retain/Add-On
2013-2016
SCION
FRS 2016
iM 2016
tC 2016
TOYOTA
4-Runner 2014-2016
4-Runner (without NAV) 2013
Avalon 2015-2016
Camry 2014-2016
Corolla 2014-2016
Highlander 2014-2016
Prius C 2015
Prius V 2015
Rav-4 2015-2016
Rav-4 (after build
date Nov. 2013) 2014
Sienna 2015
Sequoia 2014-2016
Tacoma 2014-2016
Tundra 2014-2016
Venza 2015-2016
• Cutting tool • Tape • Crimping tool
• Connectors (example: butt connectors, bell caps, etc.)
APPLICATIONS
TOOLS REQUIRED
KNOWLEDGE IS POWER
Enhance your installation and fabrication skills by
enrolling in the most recognized and respected
mobile electronics school in our industry.
Log onto www.installerinstitute.com or call
800-354-6782 for more information and take steps
toward a better tomorrow.
Metra recommends MECP
certified technicians
Connections to be made
The AX-TOYCAM3 can be connected two different ways
To retain the factory back-up camera to an aftermarket radio:
• Connect the Black wire to chassis ground.
• Connect the Yellow wire to accessory power.
• Connect the maleYellow RCA jack to the rear camera input of the aftermarket radio.
•
Connect the reverse wire from the aftermarket radio, to the reverse signal in the vehicle.
• Disregard the loose
Green/Purple
wire, it will not be used in this application.
To allow an aftermarket camera to be added to the OEM screen:
• Connect the Black wire to the ground wire of the aftermarket camera.
• Connect the Yellow wire to battery wire of the aftermarket camera.
• Connect the femaleYellow RCA jack to the aftermarket camera.
The following (2) steps are only required if
a wire is not present in the factory harness
.
*Except Avalon 2013-2014 and Venza 2013-2014
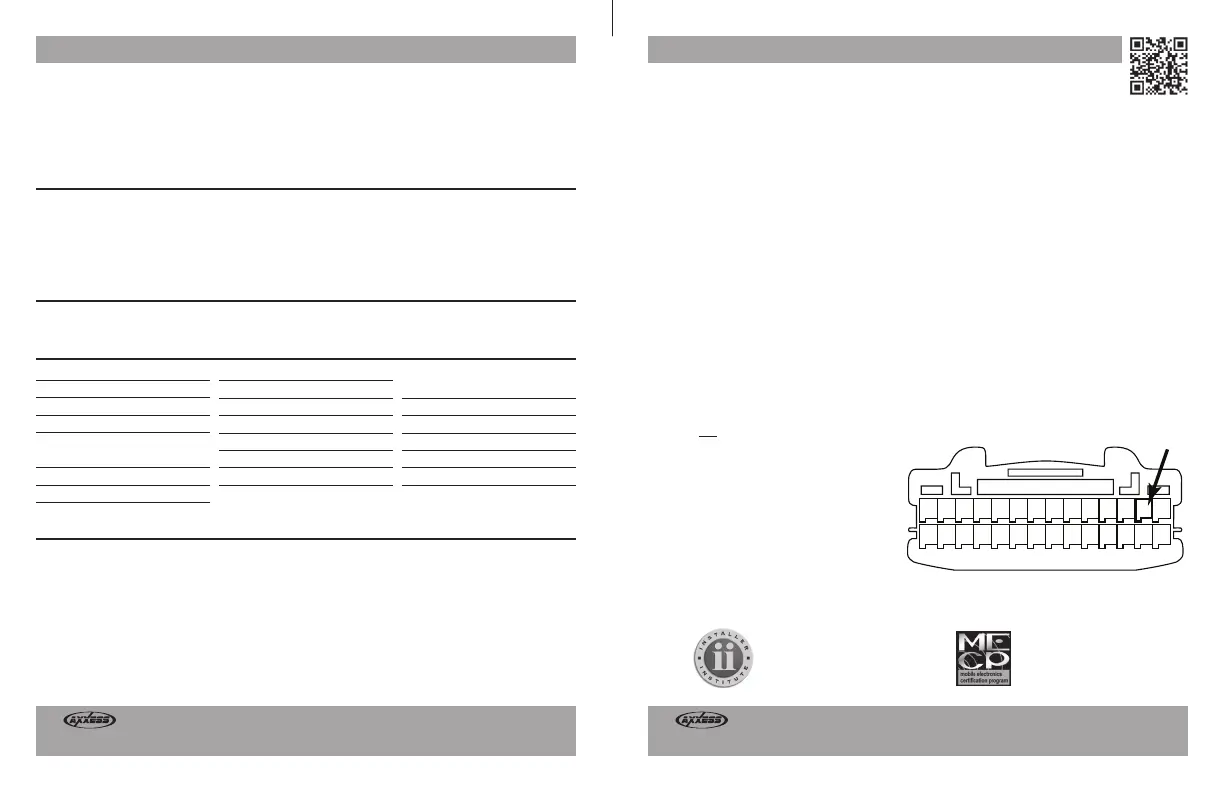
•
If a wire is not present in pin-2 of the 28-
pin connector of the factory radio, unplug
the connector, then insert the metal pin
of the loose Green/Purple wire into it.
Connect the harness back into the radio
.
• Connect the other end of the loose
Green/Purple wire to the reverse
wire of the vehicle.
Conexiones que se deben hacer
El AX-TOYCAM3 puede conectarse de dos maneras distintas
Para retener la cámara de reversa de fábrica para un radio de mercado secundario:
• Conecte el cable negro a la tierra del chasís.
• Conecte el cable amarillo a la alimentación de accesorios.
• Conecte el conector RCA machoamarillo RCA en la entrada de la cámara
de reversa del radio de mercado secundario.
• Conecte el cable de marcha atrás del radio de mercado secundario, a la señal
de marcha atrás en el vehículo.
•
Ignore el cable suelto
verde/púrpura
, no se utilizará en esta aplicación
Para permitir que se añada una cámara de mercado secundario
a la pantalla de equipo original:
• Conecte el cable negro al cable de tierra de la cámara de mercado secundario.
•
Conecte el cable amarillo al cable de la batería de la cámara de mercado secundario.
• Conecte el conector RCA hembra
amarillo
a la cámara de mercado secundario.
Los siguientes (2) pasos sólo son
necesarios si el cable no está presente
en el arnés de la fábrica
.
*Excepto Avalon 2013-2014 y Venza 2013-2014
•
Si un cable no está presente en pin-2 del
conector de 28 pines del radio de fábrica,
desenchufe el conector, luego inserte el pasador
metálico del cable verde/púrpura suelta en
ella. Conecte el arnés de nuevo en la radio
.
• Conecte el otro extremo del cable
suelto
verde/púrpura al cable
inversa del vehículo.
CAUTION!
Metra recommends disconnecting the negative battery terminal before beginning any instal
-
lation, unless the vehicle manufacturer recommends against so. Please check with your local Dealership
for more information. All accessories, switches, climate controls panels, and especially air bag indicator
lights must be connected before reconnecting the battery or cycling the ignition. Also, do not remove the
factory radio with the key in the on position, or the vehicle running. It would be best to remove the key
from the ignition and then wait a few seconds before removing the factory radio.
CARACTERÍSTICAS
• Retiene la cámara de reversa de fábrica para un radio de mercado secundario
• Permite que se añada una cámara de mercado secundario a la pantalla de fábrica*
* Sólo Pantalla y modelo de navegación radios
COMPONENTES DE LA INTERFASE
• Arnés AX-TOYCAM3
AX-TOYCAM3
Retener/Añadir cámara de reversa de Toyota
2013-2016
• Herramienta de corte • Cinta • Ponchadora
• Conectores (ejemplo: conectores de extremo, de campana, etc.)
APLICACIONES
HERRAMIENTAS REQUERIDAS
KNOWLEDGE IS POWER
Enhance your installation and fabrication skills by
enrolling in the most recognized and respected
mobile electronics school in our industry.
Log onto www.installerinstitute.com or call
800-354-6782 for more information and take steps
toward a better tomorrow.
Metra recomienda técnicos
con certificación del Programa
de Certificación en Electrónica
Móvil (Mobile Electronics
Certification Program, MECP).
EL CONOCIMIENTO ES PODER
Mejore sus habilidades de instalación y
fabricación inscribiéndose en la escuela de
dispositivos electrónicos móviles más reconocida
y respetada de nuestra industria. Regístrese en
www.installerinstitute.com o llame al
800-354-6782 para obtener más información y
avance hacia un futuro mejor.
¡PRECAUCIÓN!
Meta recomienda desconectar la terminal negativa de la batería antes de iniciar
cualquier instalación, a menos que el fabricante del vehículo recomiende lo contrario.Verifique con su
concesionario local si existe más información.Todos los accesorios, interruptores, paneles de controles
de clima y especialmente las luces del indicador de las bolsas de aire deben estar conectados antes de
reconectar la batería o ciclar la ignición.Además, no quite el radio de fábrica con la llave en la posición
de encendido ni con el vehículo funcionando. Sería mejor retirar la llave de la ignición y esperar unos
cuantos segundos antes de quitar el radio de fábrica.
14 13 12 11 10 9 8 7 6 5 4 3 2 1
28 27 26 25 24 23 22 21 20 19 18 17 16 15
This is the wire view of the connector in the vehicle
28 Pin Harness
14 13 12 11 10 9 8 7 6 5 4 3 2 1
28 27 26 25 24 23 22 21 20 19 18 17 16 15
Esta es la vista de cable del conector en el vehículo
28 Pin Arnés
SCION
FRS 2016
iM 2016
tC 2016
TOYOTA
4-Runner 2014-2016
4-Runner (sin NAV) 2013
Avalon 2015-2016
Camry 2014-2016
Corolla 2014-2016
Highlander 2014-2016
Prius C 2015
Prius V 2015
Rav-4 2015-2016
Rav-4 (después la fecha de
construcción Nov 2013)
2014
Sienna 2015
Sequoia 2014-2016
Tacoma 2014-2016
Tundra 2014-2016
Venza 2015-2016
Product specificaties
| Merk: | Axxess |
| Categorie: | Niet gecategoriseerd |
| Model: | AX-TOYCAM3 |
Heb je hulp nodig?
Als je hulp nodig hebt met Axxess AX-TOYCAM3 stel dan hieronder een vraag en andere gebruikers zullen je antwoorden
Handleiding Niet gecategoriseerd Axxess

2 Maart 2026
2 Maart 2026
2 Maart 2026
2 Maart 2026
8 December 2025
8 December 2025
10 Oktober 2025
9 Oktober 2025
8 Oktober 2025
8 Oktober 2025
Handleiding Niet gecategoriseerd
Nieuwste handleidingen voor Niet gecategoriseerd
2 Maart 2026
2 Maart 2026
2 Maart 2026
2 Maart 2026
2 Maart 2026
2 Maart 2026
2 Maart 2026
2 Maart 2026
2 Maart 2026
2 Maart 2026