Wiha 41246 Handleiding
Wiha Spiegelreflexcamera 41246
Bekijk gratis de handleiding van Wiha 41246 (1 pagina’s), behorend tot de categorie Spiegelreflexcamera. Deze gids werd als nuttig beoordeeld door 32 mensen en kreeg gemiddeld 4.2 sterren uit 9 reviews. Heb je een vraag over Wiha 41246 of wil je andere gebruikers van dit product iets vragen? Stel een vraag
Pagina 1/1
Wiha Werkzeuge GmbH
Obertalstraße 3–7
78136 Schonach/Germany
Tel. +49 77 22 959-0
info.de@wiha.com
www.wiha.com
Technical modifications reserved! Printed in Germany
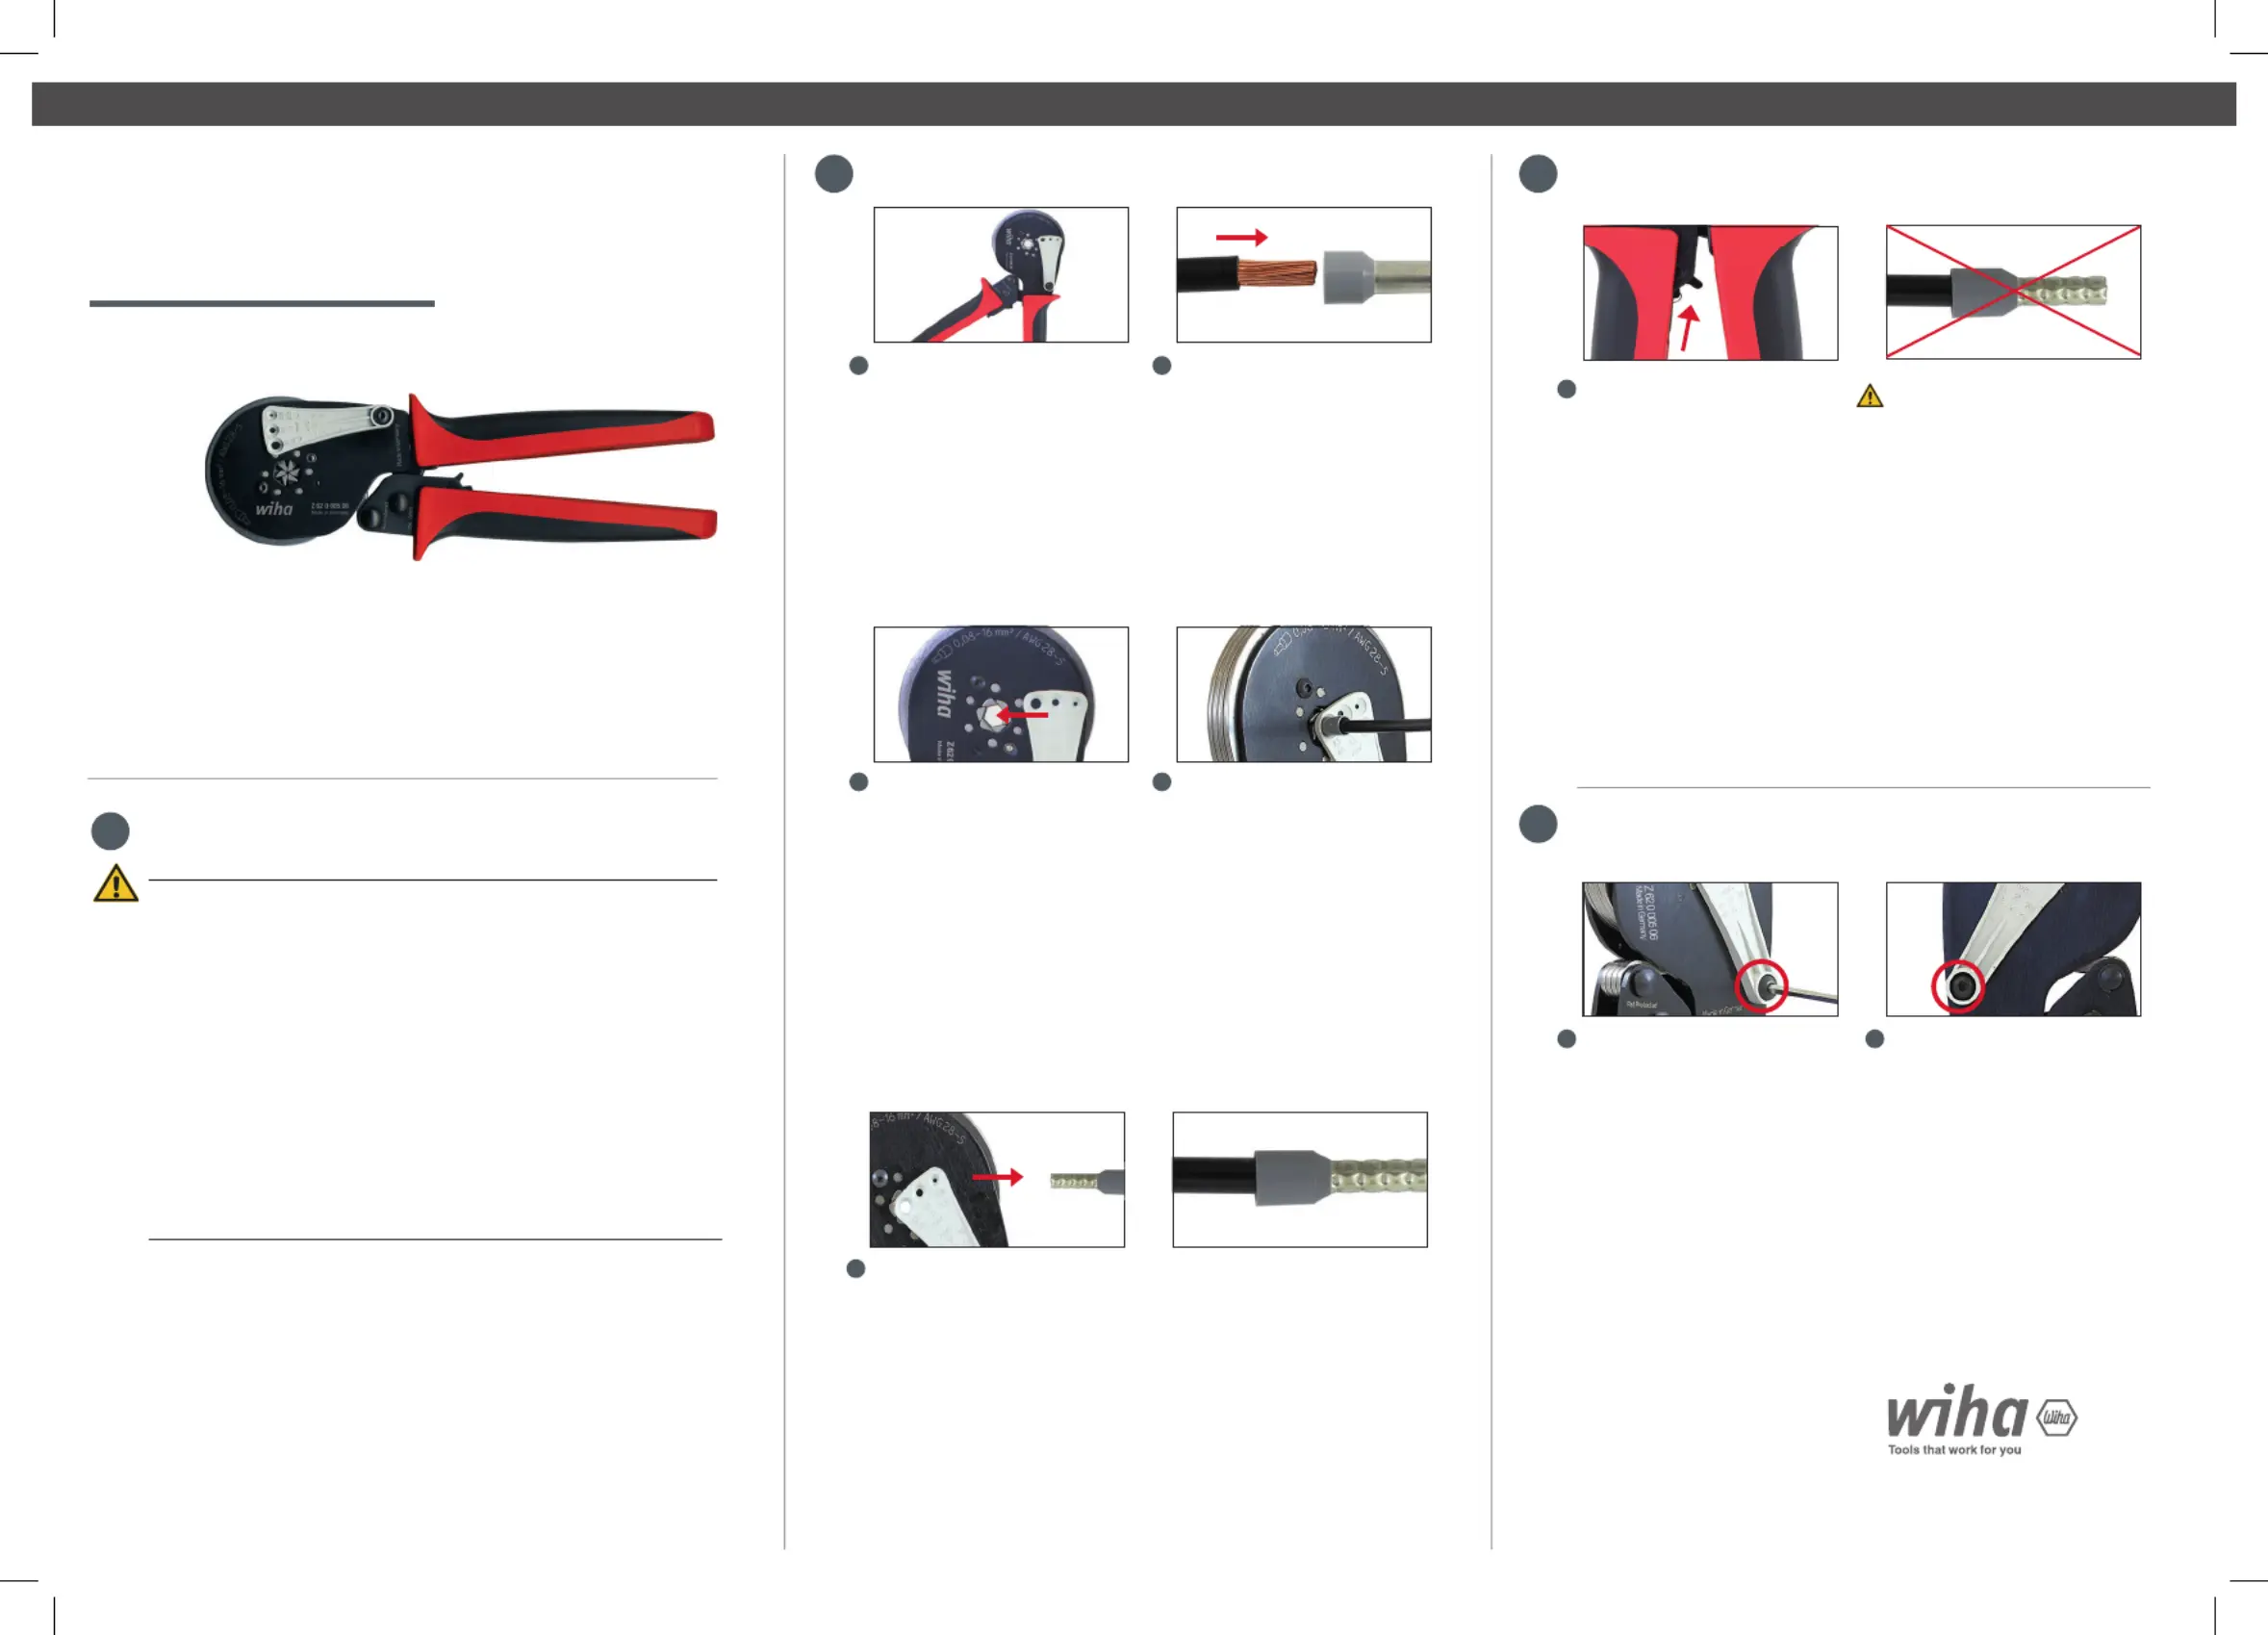
Crimpwerkzeug automatisch 0,08 - 16 mm²
Crimpingtools 0,08 - 16 mm²
Outils de dénudage 0,03 – 16 mm²
MADE IN GERMANY
Z62 0 005 06 SB
BEDIENUNGSANLEITUNG
INSTRUCTION MANUAL
MODE D‘EMPLOI
DE Bedienungsanleitung / EN Instruction manual / FR Mode d‘emploi
Allgemeine Hinweise / General Information /
Remarques générales
Crimpen / Crimping / Sertir
Das Werkzeug ist nur für den beschriebenen zweck zu ver-
wenden. Es darf nur in technisch einwandfreiem Zustand, sowie
sicherheits- und gefahrenbewusst eingesetzt und betrieben
werden.
Eine eigenmächtige Veränderung oder eine nicht bestimmungs-
gemäße Verwendung schließt die Haftung des Herstellers und
daraus resultierende Schäden aus.
Use this tool only for the described purpose. This tools is only to
be used in technically perfect condition, in a safety-conscious and
risk-aware way. An unauthorized modification or mishandling exclu-
des the liability of the manufacturer and the resulting damages.
L‘outil doit être utilisé uniquement dans le but décrit. L‘outil ne peut
être utilisé que dans un état technique irréprochable en prêtant
attention aux risques encourus ainsi qu‘à la sécurité. Toute modifi-
cation de l‘outil non autorisée ou utilisation non conforme exclut la
responsabilité du fabricant et les dommages en résultant.
Um eine lange Lebensdauer und optimale Anwendung zu ge-
währleisten, empfehlen wir, das Werkzeug sauber zu halten und
so zu behandeln, wie andere Präzisionswerkzeuge auch. Wir
empfehlen weiterhin, die beweglichen Teile von Zeit zu Zeit ein-
zuölen.
To guarantee a long life cycle time please the hand tool clean and
take care of the hard tool in the same way, like you do with high
precisions tools. The movable parts of the hand tool should be oiled
from time to time.
Afin d‘assurer une longue durée de vie et une utilisation optimale,
nous recommandons de maintenir l‘outil dans un état propre, tout
comme les autres outils de précision. Nous recommandons
également de graisser les parties mobiles de temps à autre.
Werkzeug schließen, bis es
selbstständig öffnet.
Close the tool until it opens
automatically.
Fermer l‘outil jusqu‘à ce qu‘il
s‘ouvre de lui-même.
1
Korrekt gecrimpten
Kontakt entnehmen.
Remove correct crimped
contact out of the tool.
Retirer le connecteur
correctement serti.
5
Je nach Verarbeitung
den Positionierer auf die
entsprechende Position
schieben.
Push the locator to the
respective position according
your application needs.
Pousser le positionneur dans
la position correspondant à
la longueur souhaitée.
3
Kabel auf die dem Kontakt ange-
passte Länge abisolieren und bis
zum Anschlag in die Aderendhülse
einschieben.
Strip the wire to the correct length
and insert it into the wire end sleeve
until stop.
Dénuder le câble à la longueur
adaptée au contact et l‘insérer dans
la cosse de conducteurs jusqu‘en
butée.
2
Korrekt abisoliertes Kabel mit
aufgeschobenen Aderendhülse
in das Profil einlegen. Werkzeug
schließen, bis es automatisch
wieder öffnet!
Insert precisely stripped wire
with the wire end sleeve into the
profile. Close the tool until it opens
automatically.
Placer le câble correctement
dénudé avec la cosse de conduc-
teurs dans le profil. Fermer l‘outil
jusqu‘à ce qu‘il s‘ouvre à nouveau
automatiquement !
4
Positioniererwechsel / Locator change /
Changement de positionneur
Vorzeitiges Entriegeln / Stripping /
Déverrouillage prématuré
Schraube des Positionierers
herausdrehen. Positionierer
entnehmen. Darauf achten,
dass der schwarze Gummi-
ring nicht verloren geht!
Loosen the screw of the loca-
tor. Remove the locator. Pay
attention that the black rubber
loop doesn‘t get lost.
Dévisser la vis du positionneur.
Retirer le positionneur. Veiller
à ne pas perdre l‘anneau de
caoutchouc noir !
1
Griffe leicht zusammen-
drücken, damit Sperrhebel
entlastet wird. Hebel der
Zwangssperre nach oben
drücken. Werkzeug öffnet
sich selbstständig.
Push the handles slightly
together to release the
locking lever. Push the
release lever of the ratchet
upwards. Tool opens
automatically.
Presser légèrement la
poignée pour libérer le
levier de verrouillage. Pous-
ser le levier de verrouillage
forcé vers le haut. L‘outil
s‘ouvre de lui-même.
1
Positionierer auf der
Rückseite montieren,
Schraube bis zum
Anschlag festziehen.
Insert the locator on the
backside of the tool and
bring up the screw until
stop.
Monter le positionneur
sur la face arrière, serrer
fermement la vis jusqu‘en
butée.
2
Crimp im Fall des
vorzeitigen Entriegelns
nicht verwenden!!!
Do not use the crimp
in case of a premature
release!!!
En cas de déverrouillage
prématuré, ne pas sertir !!!
√
1
23
4
STAND15112018
Product specificaties
| Merk: | Wiha |
| Categorie: | Spiegelreflexcamera |
| Model: | 41246 |
| Kleur van het product: | Black, Red |
| Gewicht: | 545 g |
| Soort: | Krimptang |
| Lengte: | 210 mm |
| Afmeting AWG-draad (min): | 5 |
| AWG-draadafmeting (max): | 28 |
Heb je hulp nodig?
Als je hulp nodig hebt met Wiha 41246 stel dan hieronder een vraag en andere gebruikers zullen je antwoorden
Handleiding Spiegelreflexcamera Wiha

30 Januari 2024
29 Januari 2024
12 Januari 2024
12 Januari 2024
12 Januari 2024
12 Januari 2024
Handleiding Spiegelreflexcamera
Nieuwste handleidingen voor Spiegelreflexcamera
14 Juli 2026
13 Juli 2026
12 Juli 2026
7 Juli 2026
6 Juli 2026
6 Juli 2026
25 Mei 2026
28 April 2026
27 April 2026
11 April 2026