Westinghouse 77873 Handleiding
Bekijk gratis de handleiding van Westinghouse 77873 (1 pagina’s), behorend tot de categorie Niet gecategoriseerd. Deze gids werd als nuttig beoordeeld door 13 mensen en kreeg gemiddeld 4.9 sterren uit 3 reviews. Heb je een vraag over Westinghouse 77873 of wil je andere gebruikers van dit product iets vragen? Stel een vraag
Pagina 1/1
SAFETY PRECAUTIONS:
WARNINGS:
•
To avoid fire, shock, and serious personal injury, follow all instructions
carefully. Read and save these instructions for future reference.
•Donotinstallorusethisunitifanypartisdamagedormissing.
NOTICE:
1.
Thiscontrolisdesignedtooperateonlyoneceilingfanandaccessorylightkit.
2.
Thiswallcontrolisratedforamaximum(ceilingfanonly)of1.0motorampat
120volts,andtotal(incandescentbulbonly)wattageequaling250Wattmaximum.
3.Makesurenobarewiresareexposedoutsideoftheconnectors.
4.
AllwiringmustconformtoNationalandLocalElectricalCodes.Ifyoufeel
thatyoudonothaveenoughelectricalwiringknowledgeorexperience,have
yourfancontrolinstalledbyalicensedelectrician.
Any electrical work not
described in this manual should be performed by a licensed electrician.
5.Useofthiscontrolwithsomeceilingfanscouldresultinfire,shock,and
seriouspersonalinjury.Usethisfancontrolonlywithcapacitorspeed
controlledceilingfansonly.
BLACK/WHITE
NEGRO/BLANCO
NOIR/BLANC
RED OR BLUE
ROJO O AZUL
ROUGE OU BLEU
BLUE
AZUL
BLEU
AC 120V INPUT
BLACK
NEGRO
NOIR
BLACK
NEGRO
NOIR
WHITE
BLANCO
BLANC
GREEN GROUNDTO
VERDE TIERRAA
VEDE MISE À LA TERRERT
GREEN GROUNDTO
VERDE TIERRAA
VEDE MISE À LA TERRERT
6-32 x 3 SCREWSb4"
TORNILLOS DE 6-32 x 3b4"
VIS 6-32 x 3b4"
FAN
VENTILADOR
VENTILATEUR
6-32 x 1 SCREWSb4"
TORNILLOS DE 6-32 x 1b4"
VIS 6-32 x 1b4"
77873
BLACK/WHITE
NEGRO/BLANCO
NOIR/BLANC
RED OR BLUE
ROJO O AZUL
ROUGE OU BLEU
BLACK
NEGRO
NOIR
PRECAUCIONES DE SEGURIDAD:
ADVERTENCIAS:
•Sigalasinstruccionesalpiedelaletraparaevitarincendios,choques
eléctricosylesionespersonalesgraves.Leaestasinstruccionesy
consérvelas para futura referencia.
•Sifaltanpiezasohaypiezasdañadas,noinstaleelventilador.
AVISO:
1.Estecontrolestáprevistoparaoperarunsoloventiladordetechoyno
unjuegodelucesaccesorio.
2.
Estecontroltieneunacapacidadnominalmáximadeamperajedemotor
(únicamenteelventiladordetecho)de1.0a120voltios,conunvatajetotal
(únicamentelalámparaincandescente)iguala240vatiosmáximo.
3.
Cercióresedequeningúncablesinaislaciónquedefueradelosconectores.
4.
Todoelcableadodebecumplirconloscódigoseléctricosnacionalesy
locales.Sipiensaquenotienesuficientesconocimientosoexperienciaen
cableadoeléctrico,acudaaunelectricistacertificadoparaqueleinstaleel
control del ventilador.
Todo trabajo eléctrico que no se describe en
este manual deberá ser realizado por un electricista certificado.
5.Elempleodeestecontrolpodríacausarincendio,choqueeléctricoy
lesionespersonalesgravescuandoseutilizaparacontrolaralgunos
ventiladoresdetecho.Useestecontroldeventiladorúnicamentecon
ventiladores de techo de velocidad controlada por condensador.
EXPLICACIÓN PARA HACER LAS
CONEXIONES ELÉCTRICAS:
NOTA: Para instalar este control se debe tender un cable de tres con-
ductores con cable de tierra entre la caja de embutir del control y la
caja de embutir del ventilador de techo.
1.
Sielventiladordetechoestáequipadoconcontrolesdeencendido/apagado
decadenilladetiroyvelocidadvariable,pongaelcontroldevelocidadenla
velocidadMÁSALTAylalámparaenlaposicióndeENCENDIDOantesde
instalarelcontroldepared.Deestamaneraevitarálasvelocidadeserráticas
ylaposibleaveríadesuventiladordetecho.
2.Verifiqueelfuncionamientoadecuadodelcontroldepareddelventilador
detechoantesdelainstalación.Elcableadoinadecuadopuedeaveriarel
controlyanularálagarantía.
3.
Desconecteelsuministroeléctricoalventiladordetechoenelpanelprincipal.
QuiteelfusibleopongaelcortacircuitoenlaposicióndeAPAGADO.
4.Saquelaplacadeparedparaqueloscablesquedenexpuestosydesco-
necteelinterruptorexistente.Instaleelcontrolenunacajadeembutirde
metaloplástico.
5.Hagalasconexioneseléctricasdelasiguientemanera:
•ConecteelcableNEGROSÓLIDOdelcontroldeparedalcableNEGRO
del ventilador.
•
ConecteelcableAZULdelcontroldeparedalcableROJOoAZULdelventilador.
•ConecteelcableNEGROCONRAYASBLANCASdelcontroldepared
alcableVIVOde120vCA.
•
Uselosconectoresparacablesincluidosparaasegurarlasconexiones.
•Conectaelcableamarillo/verdedelcontroldeparedalcabledetierra
delacajadeembutir.
NOTA: Consulte el diagrama en la parte posterior del control de
pared.
1.Asegureelcontroldeparedalacajadeembutirusandolosdostornillos
de6-32”x3/4”incluidos.
2.Asegurelaplacadelanterasobreelcontroldeparedconlosdostornillos
de6-32”x1/4”incluidos.
3.Conecteelsuministroeléctricoenelpanelprincipal.
4.
Hagafuncionarelventiladordetechodeslizandoeldialalavelocidaddeseada.
Paraunfuncionamientoóptimo,seleccionelavelocidadALTAhastaqueelmotor
comienceafuncionar;seleccioneluegolavelocidaddeseada.
¡ADVERTENCIA! ¡CONECTE SÓLO EN SERIE!
No lo conecte al cable vivo y común del circuito eléctrico o se dañará
el interruptor. Consulte el siguiente diagrama.
GUÍA PARA SOLUCIONAR PROBLEMAS
PROBLEMA: EL CONTROL CON DOS CONMUTADORES DE TIPO DESLI-
ZANTE NO FUNCIONA
Revise:
•¿Leestállegandoelectricidadalaunidaddecontrol?
•¿Escorrectoelcableadodelaunidaddecontrol?
•
¿Estánenlaposiciónmásaltalosinterruptoresdelventiladorydelalámpara?
GARANTIA LIMITADA
Elcontrolcondosconmutadoresdetipodeslizanteparaventiladoresdetecho/
lucesdeWestinghouseleofrecealpropietariooriginalunagarantíalimitadadeun
año,apartirdelafechadecompra,contramaterialesymanodeobradefectuosos.
Todaslaspiezasderepuestoestáncubiertaspornoventadíassolamente.Estagarantía
reemplazaatodaslasotrasgarantíasexpresasoimplícitas.
Westinghouserepararáoreemplazaráestecontrolcondosconmutadoresdetipo
deslizanteparaventiladordetecho/lucesencasodedefectosocasionadospormateriales
omanodeobradefectuosos.Estagarantíanocubrelosgastosdereparación,defectos
resultantesdeaccidentes,averíasocasionadasporusoindebidooalteracionesoporla
instalacióndecualquieraccesorioquenoseasuministradoconelproducto,instalación
omantenimientoincorrectos,falladedispositivosdesoportenosuministradosconlos
herrajesdemontajeoriginales,exposiciónacambiosbruscosdetemperaturaohumedad,
voltajeincorrecto,cambiosdetensión,reparacionesnoautorizadasofallascausadaspor
modificacionesalproductoointervencionesdeterceros.Consulteelmanualparasu
instalacióncorrecta.
Sihaceunreclamodegarantíadentrodelprimeraño,simplementeenvíeelcontrol
condosconmutadoresdetipodeslizanteparaventiladordetecho/lucesconuna
copiadelrecibooriginaldecompra,confranqueoprepagoaWestinghouseLighting
Corporation,queasudiscreciónrepararáoreemplazaráelcontroloreintegraráel
preciodecompra.
Sírvase embalar el producto adecuadamente para evitar daños
durante el transporte.
Envíetodosloscontrolesydirijasuspreguntasa:
Westinghouse Lighting., 12401 McNulty Rd., Philadelphia, PA 19154-1099
Attn: Customer Service
Sitienedudasacercadelainstalacióndeesteartículoodelacobertura
delagarantía,llameanuestroCentrodeatenciónalconsumidoral
1-888-
417-6222
dondeleayudaráunrepresentantecapacitado.
MESURES DE PRÉCAUTION:
AVERTISSEMENTS :
•Afind’éviterlesincendies,leschocsélectriquesetlesblessurescorpo-
relles,suivezattentivementtouteslesinstructions.Lisezetconservez
cesinstructionsauxfinsderéférenceultérieure.
•N’installezpasoun’utilisezpascetappareils’ilmanqueunepièceou
qu’unepièceestdéfectueuse.
AVIS-:
1.Cettecommandeestconçuepourfairefonctionnerunseulventilateurde
plafondetunélémentd’éclairage.
2.
Lapuissancenominaledecettecommandemurale(seulementle
ventilateurdeplafond)estde1.0A,à120V,etlewattagedel’ampoule
(seulementuneampouleincandescente)nedoitpasexcéder240W.
3.
Assurez-vousqu’aucunfilnun’estexposéàl’extérieurdesconnecteurs.
4.
Lescâblesélectriquesdoiventêtreconformesauxcodesnationaletlocal
d’électricité.Sivouscroyeznepasavoirsuffisammentdeconnaissances
oud’expérienceenmatièred’électricité,faitesinstallercettecommandede
ventilateurparunélectricienagréé.
Tout travail d’électricité qui n’est pas
décrit dans ce manuel doit être réalisé par un électricien agréé.
5.
L’utilisationdecetappareildecommandeaveccertainsventilateursdeplafond
pourraitcauserunincendie,unchocélectriqueetdegravesblessuresperson-
nelles.Utilisezcettetélécommandedeventilateuruniquementaveclesventila-
teursdeplafonddontlavitesseestcommandéeparuncondensateur.
RACCORDEMENT DES FILS
ÉLECTRIQUES-:
NOTE : L’installation de cette commande exige que les trois fils con-
ducteurs et le fil de mise à la terre passent entre la boîte murale de la
commande et la boîte de sortie de courant du ventilateur.
1.
Sivotreventilateurdeplafondestdotéd’unechaînepermettantdecontrôlerlesvitesseset
d’allumeroud’éteindrel’élémentd’éclairage,assurez-vousderéglerlavitesseauniveauleplus
élevéetlalumièreenpositionON,avantd’installerlacommandemurale.Ceciéviterad’obtenir
vitessesirrégulièresetpeut-êtred’endommagervotreventilateurdeplafond.
2.Assurez-vousquelacommandemuraleduventilateurdeplafondfonc-
tionnecorrectementavantdel’installer.Unraccordementincorrectpeut
endommagerlacommandeetannulerlagarantie.
3.
Coupezl’alimentationauventilateurdeplafonddanslaboîtededisjoncteursprincipale.
RetirezlefusibleoumettezlecommutateurdelaboîtededisjoncteursenpositionOFF.
4.
Retirezlaplaquemuralepouraccéderaufilsetdébranchezl’interrupteurexistant.
Installezl’appareildecommandedansuneboîtemuraleenmétalouenplastique.
5.Effectuezlesraccordementsélectriquescommesuit:
•
RaccordezlefildelacommandemuraleNOIRINTENSEaufilduventilateurNOIR.
•
RaccordezlefildelacommandemuraleaufilduventilateurBLEUouROUGE.
•RaccordezlefildelacommandemuraleNOIRAVECUNEBANDE
BLANCHEaufilchargéde120VCA.
•
Effectuezlesraccordsélectriquesàl'aidedesconnecteursdefilfournis.
•Connecterlefiljaune/vertmurcontrôlesurlamiseàlaterreduboîtier.
NOTE: Reportez-vous au diagramme situé à l’arrière de la commande
murale.
1.Fixezlacommandemuraleàlaboîtedesortiedecourantàl’aidededeux
vis6-32x3/4"fournies.
2.Fixezlaplaqueavantsurlacommandemuraleàl’aidededeuxvis
6-32x1/4"fournies.
3.Rétablissezl’alimentationdanslaboîtededisjoncteurs.
4.
Faitesfonctionnerleventilateurdeplafondensélectionnantlavitessevouluesurlacom-
mandeàcadran.Pourassurerunfonctionnementoptimal,sélectionnezlavitesselaplus
ÉLEVÉEjusqu’àcequelemoteurdémarreetsélectionnezparlasuitelavitessevoulue.
MISE EN GARDE ! RACCORDEZ «-EN SÉRIE-» SEULEMENT!
Ne pas brancher au fils chargé et neutre du circuit électrique car ceci pour-
rait endommager l’interrupteur. Reportez-vous au diagramme ci-dessous.
GUIDE DE DÉPANNAGE
PROBLÈME-: LA COMMANDE À DOUBLE CURSEUR NE FONCTIONNE PAS
Vérifiez les éléments suivants :
•L’appareildecommandeest-ilalimentéenénergie?
•
Lesraccordementsdel’appareildecommandeont-ilsétéeffectuéscorrectement?
•Lescommutateursduventilateuretdel’élémentd’éclairagesont-ilsréglés
auniveauleplusélevé?
GARANTIE LIMITÉE
Unegarantielimitéed’unanàpartirdeladated’achatestoffertesurlacommandeà
doublecurseurpourleventilateurdeplafond/élémentd’éclairagedeWestinghouse.Cette
garantieestofferteàl’acheteurinitialetcouvretoutdéfautdepiècesoudefabrication.
Touteslespiècesderechangesontcouvertespendantquatre-vingt-dixjoursseulement.
Laprésentegarantiesesubstitueàtouteautregarantieexpresseoutacite.
Westinghouserépareraouauremplaceracettecommandeàdoublecurseurpourle
ventilateurdeplafond/élémentd’éclairagesielleestsujetteàdesdéfautsdematériauxou
defabrication.Cettegarantienecouvrepaslesfraisdeservice,lespilesoulesdéfauts
résultantd’accidents,dedommagescausésparuneutilisationabusivedel’appareil
oudesmodificationsapportéesàcedernier,ouenraisondel’ajoutdetoutélément
nonfourniavecleproduit,d’uneinstallationoud’unentretienincorrect,enraisondu
mauvaisfonctionnementdesdispositifsdesoutiennonfournis,commedelaquincaillerie
originaledemontage,enraisondel’expositionàdeschaleursextrêmesouàl’humidité,
enraisond’unetensionincorrecte,despointesdecourant,desréparationseffectuéespar
desréparateursnonautorisés,ouenraisondespannesattribuablesàlamodificationdu
produitourésultantdesactesd’unetiercepartie.Reportez-vousaumanuelpourconnaître
l’installationappropriéedelatélécommande.
Lorsquelaréclamationestfaitependantlapremièreannéed’utilisation,toutsimplement
renvoyezlacommandeàdoublecurseurpourleventilateurdeplafond/élémentd’éclairage
avecunecopieduticketdecaisseoriginal,fraisdetransportprépayés,àWestinghouse
LightingCorporationqui,àsonproprechoix,répareraouremplaceralacommandeà
doublecurseurpourleventilateurdeplafond/élémentd’éclairageourembourseralemon-
tantduprixd’achat.
Merci d’emballer le produit correctement pour éviter le dommage
pendant le transport.
Mercid’envoyertouteslescommandesetvosquestionsà-:
Westinghouse Lighting Corp., 12401 McNulty Rd., Philadelphia, PA 19154-1099
Attn: Customer Service
Sivousavezdesquestionsausujetdel’installationdecetappareiloudela
garantie,veuillezcommuniqueravecnotreserviceàlaclientèle,encomposant
le
1-888-417-6222
etunreprésentantcompétentvousaidera.
Installation & Operating Instructions for the
Westinghouse Dual-Slide Ceiling Fan/Light Control
WARNING: SHUT POWER OFF
AT FUSE OR CIRCUIT BREAKER
Instrucciones para la instalación y modo de empleo del control con dos
conmutadores de tipo deslizante para ventilador de techo/luces Westinghouse
ADVERTENCIA: DESCONECTE EL
SUMINISTRO DE ENERGÍA QUITANDO
EL FUSIBLE
O APAGANDO EL
CORTACIRCUITO
Notice d’installation et d’utilisation de la commande à double curseur
pour le ventilateur de plafond / l’élément d’éclairage de Westinghouse
MISE EN GARDE : COUPER
L’ALIMENTATION AUX FUSIBLES
OU
À LA BOÎTE DE
DISJONCTEURS
77873
Westinghouse Lighting, Philadelphia, PA 19154-1029, U.S.A.
www.westinghouseceilingfans.com
,
WESTINGHOUSE, and INNOVATION YOU CAN BE SURE OF are trademarks of
Westinghouse Electric Corporation
Used under license by Westinghouse Lighting. All rights reserved Made in China
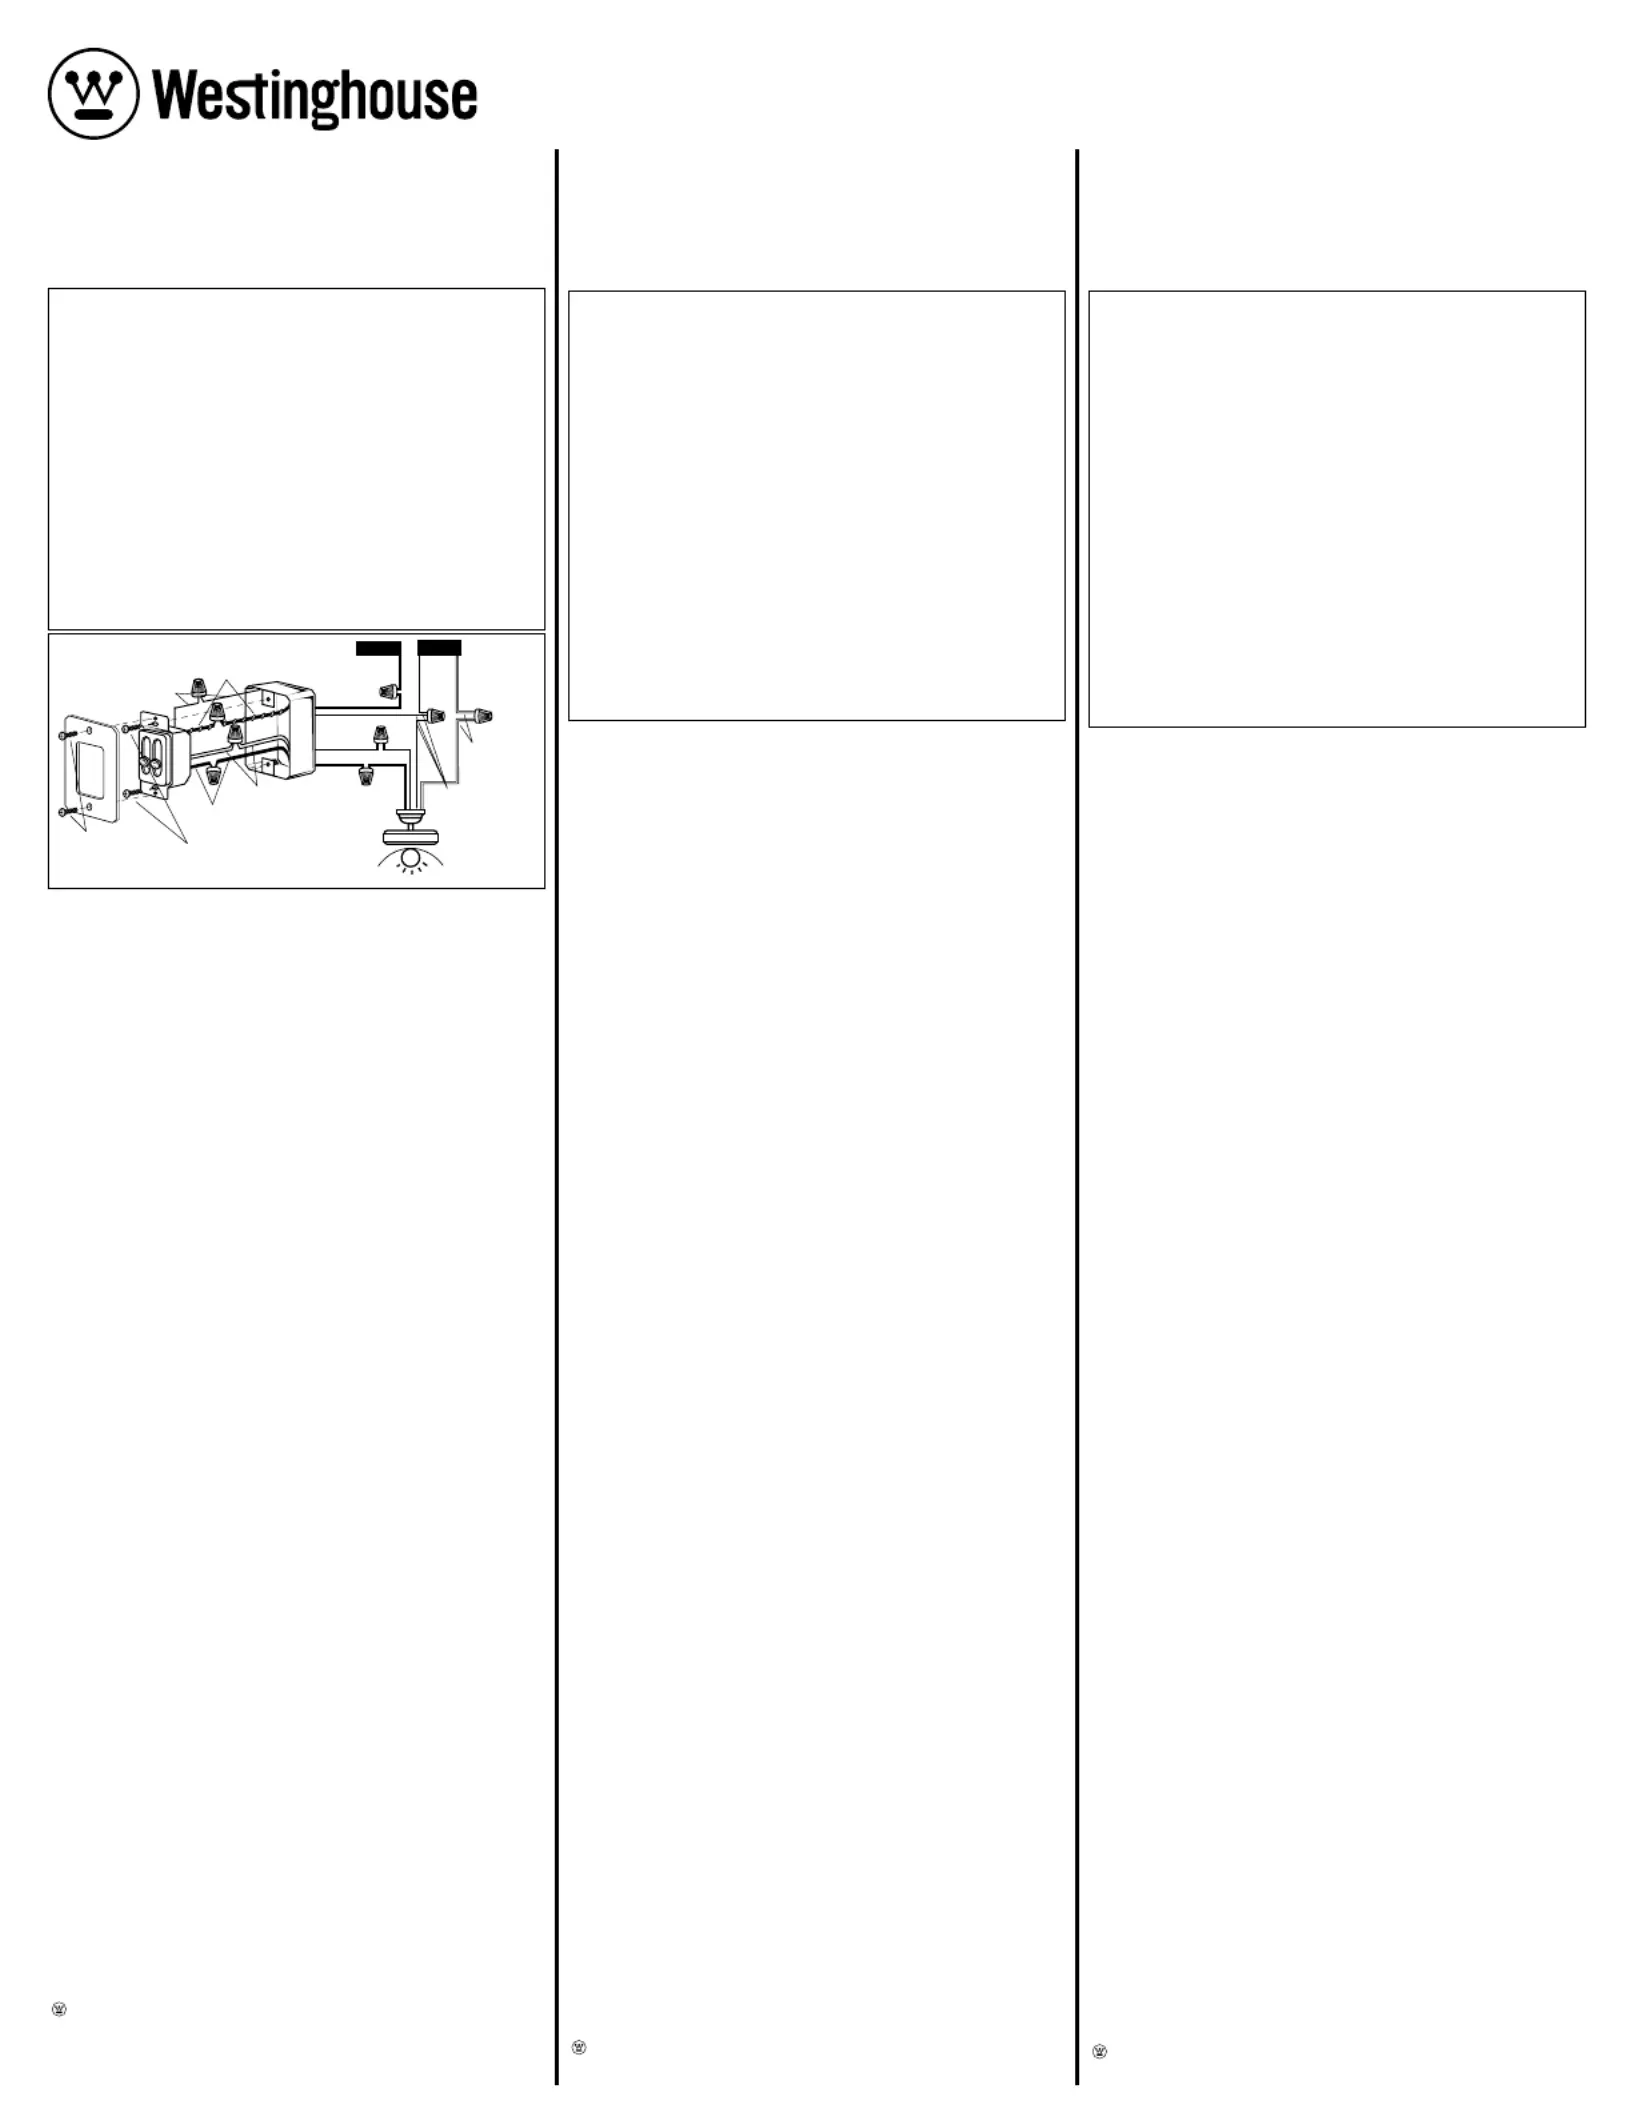
MAKING THE ELECTRICAL CONNECTIONS:
NOTE: Installation of this control requires that the three-conductor cable with
ground wire be run between the control wall box and the ceiling fan outlet.
1.
IfyourceilingfanisequippedwithvariablespeedandlightON/OFFpull
chainswitchcontrols,makesuretosetthespeedcontrolatthehighest
speedandthelighttotheONpositionbeforeinstallingthewallcontrol.This
willavoiderraticspeedsandpossibledamagetoyourceilingfan.
2.
Verifyproperoperationoftheceilingfanwallcontrolbeforeinstallation.
Improperwiringcandamagethecontrolandwillvoidthewarranty.
3.Disconnectpowertotheceilingfanatthemainelectricpanel.Removethe
fuseorswitchthecircuitbreakertotheOFFposition.
4.Removethewallplatetoexposethewiringanddisconnecttheexisting
switch.Installthecontrolinametalorplasticwallbox.
5.Makeelectricalconnectionsasfollows:
•ConnecttheSOLIDBLACKwirefromthewallcontroltotheBLACK
wirefromthefan.
•ConnecttheBLUEwirefromthewallcontroltotheREDorBLUEwire
fromthefan.
•ConnecttheBLACKWITHWHITESTRIPEwirefromthewallcontrolto
the120vACHOTwire.
•Usethewireconnectorsprovidedtosecuretheconnections.
•Connecttheyellow/greenwirefromwallcontroltothegroundingwire
fromoutletbox.
NOTE: Refer to the diagram on the back of the wall control.
1.
Securethewallcontroltotheoutletboxusingthetwo6-32”x3/4”screwsprovided.
2.
Securethefaceplateoverthewallcontrolwiththetwo6-32”x1/4”screwsprovided.
3.Restorepoweratmainelectricalpanel.
4.
Operateceilingfanbymovingtheslidetothedesiredspeed.Forbestoperation,
selectHIGHspeeduntilthemotorstarts,thenselectthedesiredspeed.
WARNING! HOOK UP “IN SERIES” ONLY!
Do not connect to hot and neutral wire of electric circuit or switch will
be damaged. Refer to diagram above.
TROUBLESHOOTING GUIDE
PROBLEM: DUAL-SLIDE CONTROL FAILS TO OPERATE
Check:
•Istherepowertothecontrolunit?
•Isthecontrolunitwiredcorrectly?
•Arethefanandlightswitchessetonthehighestposition?
LIMITED WARRANTY
TheWestinghousedual-slideceilingfan/lightcontroloffersalimitedwarranty
ofoneyearfromthedateofpurchasetotheoriginalowneragainstdefectsin
materialandworkmanship.Allsparepartsarecoveredforninetydaysonly.This
warrantyisinlieuofallotherwarrantiesexpressedorimplied.
Westinghousewillrepairorreplacethisdual-slideceilingfan/lightcontrolifit
isdefectiveduetofaultymaterialsorworkmanship.Thiswarrantydoesnotcover
servicecharges,defectsresultingfromaccidents,damagescausedthroughabuse
oralterationsorbyaffixinganyattachmentnotprovidedwiththeproduct,improper
installationormaintenance,failureofsupportingdevicesnotsuppliedasoriginal
mountinghardware,exposurestoextremesofheatorhumidity,incorrectvoltage,
surgesincurrent,unauthorizedrepair,orfailurescausedbymodificationsofthe
productortheactsofthirdparties.Seeremotemanualforproperinstallation.
Ifawarrantyclaimismadeinthefirstyear,simplyreturnthedual-slideceil-
ingfan/lightcontrolwithacopyoftheoriginalsalesreceipt,freightprepaidto
WestinghouseLightingCorporation,who,atitsoption,shallrepairorreplace
theremoteorrefundthepurchaseprice.
Please pack product correctly to
eliminate shipping damage.
Sendallcontrolsandinquiriesto:
Westinghouse Lighting., 12401 McNulty Rd., Philadelphia, PA 19154-1099
Attn: Customer Service
Ifyouhaveanyquestionsregardingtheinstallationofthisitemorthe
warrantycoverage,pleasecallourconsumerlineat
1-888-417-6222
and a
trained representative will assist you.
Westinghouse Lighting, Philadelphia, PA 19154-1029, U.S.A.
www.westinghouseceilingfans.com
,
WESTINGHOUSE, and INNOVATION YOU CAN BE SURE OF are trademarks of
Westinghouse Electric Corporation
Used under license by Westinghouse Lighting. All rights reserved Made in China
Westinghouse Lighting, Philadelphia, PA 19154-1029, U.S.A.
www.westinghouseceilingfans.com
,
WESTINGHOUSE, and INNOVATION YOU CAN BE SURE OF are trademarks of
Westinghouse Electric Corporation
Used under license by Westinghouse Lighting. All rights reserved Made in China
Product specificaties
| Merk: | Westinghouse |
| Categorie: | Niet gecategoriseerd |
| Model: | 77873 |
Heb je hulp nodig?
Als je hulp nodig hebt met Westinghouse 77873 stel dan hieronder een vraag en andere gebruikers zullen je antwoorden
Handleiding Niet gecategoriseerd Westinghouse

24 Juni 2026
23 Juni 2026
23 Juni 2026
23 Juni 2026
23 Juni 2026
5 Mei 2026
25 Maart 2026
24 Maart 2026
23 Maart 2026
1 Februari 2026
Handleiding Niet gecategoriseerd
Nieuwste handleidingen voor Niet gecategoriseerd
24 Juli 2026
24 Juli 2026
23 Juli 2026
23 Juli 2026
23 Juli 2026
23 Juli 2026
23 Juli 2026
23 Juli 2026
23 Juli 2026
23 Juli 2026