VDO Dayton M3.1 WL Handleiding
VDO Dayton Fietscomputer M3.1 WL
Bekijk gratis de handleiding van VDO Dayton M3.1 WL (2 pagina’s), behorend tot de categorie Fietscomputer. Deze gids werd als nuttig beoordeeld door 35 mensen en kreeg gemiddeld 4.7 sterren uit 6 reviews. Heb je een vraag over VDO Dayton M3.1 WL of wil je andere gebruikers van dit product iets vragen? Stel een vraag
Pagina 1/2
nur M3.1 WL
only M3.1 WL
seulement
M3.1 WL
nur M3.1 WL
only M3.1 WL
seulement M3.1 WL
1x
1–5 mm
Cycle Parts GmbH
Le Quartier Hornbach 13
67433 Neustadt/Weinstraße (Germany)
www.vdocyclecomputing.com
www.vdocyclecomputing.com/service
Tire sizeETRO
KMH
WS in mm
MPH
WS in inch
16 x 1,7547-305127250,1
20 x 1,7547-406159062,6
24 x 1,7547-507190775,1
26 x 1,540-559202679,8
26 x 1,7547-559207081,5
26 x 1,9208982,2
26 x 2,0050-559211483,2
26 x 2,1054-559212583,7
26 x 2,2557-559214584,4
26 x 2,3560-559216085,0
26 x 2,4062-559217085,4
28 x 1,540-622222487,6
28 x 1,642-622223588,0
Tire sizeETRO
KMH
WS in mm
MPH
WS in inch
28 x 1,7547-622226889,3
29 x 2,1054-622229590,4
29 x 2,2557-622228890,1
29 x 2,4062-622230090,6
650 B210082,7
700 x 18C18-622210282,8
700 x 20C20-622211483,2
700 x 23C23-622209582,5
700 x 25C25-622214684,5
700 x 30C30-622214984,6
700 x 32C32-622217485,6
700 x 38C38-622222487,6
MAGNET
90° – 45°
✔
✘
Taste BIKE
BIKE button
BIKE Touche
+ 1
+ 1
+ 1
+ 1
+ 1
+ 1
+ 1
+ 1
+ 1
+ 1
+ 1
+ 1
+ 1
+ 1
+ 1
+ 1
+ 1
+ 1
+ 1
+ 1
+ 1
+ 1
+ 1
+ 1
+ 1
+ 1
+ 1
+ 1
+ 1
90°90°
– Stellen Sie din den Einstellungen den
Licht-Modus auf ON
– Stellen Sie die Startzeit ein
– Stellen Sie die Stoppzeit ein
Wenn die aktuelle Uhrzeit mit der eingestellten
Startzeit übereinstimmt, ist der Licht-Modus aktiv.
Bei jedem Tastendruck wird das Display beleuchtet.
Mit einem weiteren Tastendruck holen Sie die
gewünschte Funktion ins Display.
– Display backlight
– In the settings, change the Light mode to ON
– Set the start time
– Set the stop time
If the start time is the current time, Light mode
is active.The display lights up whenever a button
is pressed.Press the button again to show the
desired function on the display.
– Dans les réglages, régler le mode d‘éclairage sur ON.
– Définir l‘heure de début.
– Définir l‘heure de fin.
Lorsque l‘heure actuelle coïncide avec l‘heure de
début, le mode d‘éclairage s‘active.
L‘écran s‘allume alors à chaque pression sur une
touche.Une autre pression sur la touche permet
alors d‘afficher la fonction souhaitée à l‘écran.
Display-Beleuchtung
Display backlight
Éclairage de l‘écran
Vitesse actuelle
Valeur de la
fonction sélectionnée
Fonction
sélectionnée
M3.1 WR / WL
CP830030
Montage des Geschwindigkeits-Senders + Magnet / Attaching the speed transmitter and magnet
Installation video
Operating video
Settings video
Verpackungsinhalt /ContentReifengrößen-Tabelle / Wheelsize Chart
WS in mm / inch
Lenkermontage /
Handlebar Mounting
Vorbaumontage /
Stem mounting
Batterie eingebaut
Battery built in
M3.1 WRM3.1 WL
Lenkermontage /
Handlebar Mounting
Vorbaumontage /
Stem mounting
SENSOR
Montage Sensor + Magnet / Mounting sensor and magnet
DE – Garantiebedingungen
VDO Cycle Parts gewährt für Ihren VDO-Computer eine Garantie von
2 Jahren ab Kaufdatum. Die Garantie erstreckt sich auf Material- und
Verarbeitungsfehler am Computer selbst, am Sensor/Sender und an der
Lenkerhalterung. Kabel und Batterien sowie Montagematerialien sind von
der Garantie ausgeschlossen.
Die Garantie ist nur dann gültig, wenn die betroffenen Teile nicht geöffnet
wurden (Ausnahme: Batteriefach des Computers), keine Gewalt angewen-
det wurde und keine mutwillige Beschädigung vorliegt.
Bitte bewahren Sie den Kaufbeleg sorgfältig auf, da er im Reklamationsfall
vorgelegt werden muss. Bei einer berechtigten Reklamation erhalten
Sie von uns ein vergleichbares Austauschgerät. Ein Anspruch auf Ersatz
des identischen Modells besteht nicht, wenn durch Modellwechsel die
Produktion des reklamierten Modells eingestellt wurde.
Bitte wenden Sie sich mit allen Reklamationen und Garantieansprüchen an
Ihren Fachhändler, bei dem Sie das Gerät gekauft haben. Oder senden Sie
Ihre Reklamation direkt an:
Cycle Parts GmbH
Le Quartier Hornbach 13
67433 Neustadt/Weinstrasse
Für technische Fragen stehen wir Ihnen unter folgender Hotline
zur Verfügung:
+49 (0) 63 21- 95 82 7 - 10
+49 (0) 63 21- 95 82 7 - 18
Unsere Telefon- Hotline ist für Sie da von 9:00-12:00 Uhr,
Montags bis Freitags
Weitere technischen Informationen erhalten Sie unter:
www.vdocyclecomputing.com
Im Zuge der Weiterentwicklung behalten wir uns technische
Änderungen vor.
EN – Terms of guarantee
VDO Cycle Parts offers a 2-year guarantee on your VDO computer, starting
from date of purchase. This guarantee covers material and processing
defects on the computer itself, the sensor/transmitter and the handlebar
bracket. Cables, batteries and mounting materials are not covered by the
guarantee.
The guarantee is only valid if the affected components have not been
opened (exception: computer’s battery compartment), no force has been
used and there is no sign of wilful damage.
Please store the purchase receipt in a safe place as it must be submitted
in the event of a complaint. If your complaint is legitimate, you will receive
a comparable replacement device. You are not entitled to a replacement of
the identical model if the model in question is no longer in production due
to a model change.
Please contact the dealer from whom you purchased the device for all
complaints and guarantee claims.
Alternatively, send your complaint directly to:
Cycle Parts GmbH
Le Quartier Hornbach 13
67433 Neustadt/Weinstrasse
If you have any technical questions, please do not hesitate to call
our hotline on:
+49 (0) 63 21- 95 82 7 - 10
+49 (0) 63 21- 95 82 7 - 18
Our telephone hotline is available to assist you 9:00-12:00,
Monday to Friday
Additional technical information is available at:
www.vdocyclecomputing.com
We reserve the right to make technical changes in the course of
further development.
FR – Conditions de garantie
VDO Cycle Part offre une garantie de 2 ans à compter de la date d‘achat
pour votre compteur VDO. La garantie porte sur les défaillances du
matériel ou les erreurs de traitement sur le compteur lui-même, sur le
capteur/l’émetteur ou sur le support pour guidon. Les câbles et piles,
ainsi que les matériaux de montage ne sont pas couverts par la garantie.
La droit à garantie n‘est valable que lorsque les pièces concernées n‘ont
pas été ouvertes (exceptions : compartiment à pile du compteur),
lorsqu‘il n‘a pas été fait usage de la force et lorsqu‘aucun dégât
intentionnel n‘a été causé.
Veuillez conserver soigneusement la preuve d‘achat ; celle-ci doit être
présentée en cas de réclamation. En cas de réclamation fondée, vous
recevrez un appareil de rechange comparable. Le remplacement par un
modèle identique ne peut être exigé lorsque la production du modèle
faisant l‘objet de la réclamation a été stoppée par un changement de
modèle. Veuillez vous adresser à votre revendeur pour toute réclamation
ou exercice du droit à la garantie.
Ou envoyez votre réclamation directement à :
Cycle Parts GmbH
Le Quartier Hornbach 13
67433 Neustadt/Weinstrasse
Notre hotline est à votre disposition pour toute questions technique :
+49 (0) 63 21- 95 82 7 - 10
+49 (0) 63 21- 95 82 7 - 18
Notre ligne d’assistance téléphonique est là pour vous de
9 à 12 heures, du lundi au vendredi.
Vous trouverez de plus amples informations techniques à l’adresse :
www.vdocyclecomputing.com.
Sous réserve de modifications techniques occasionnées par
l’amélioration du produit.
IT – Condizioni di garanzia
Per il vostro computer VDO, VDO Cycle Parts offre una garanzia di 2 anni
dalla data d‘acquisto. La garanzia si estende ai difetti di materiali e di
fabbricazione del computer, del sensore e del supporto per manubrio. I
cavi e le batterie, nonché il materiale per il montaggio, sono esclusi dalla
garanzia.
La garanzia è valida soltanto quando le parti interessate non sono state
aperte (eccezione: vano batteria del computer), non è stata esercitata forza
e non è presente alcun danno intenzionale.
Conservare con cura la ricevuta d‘acquisto, in quanto è necessario esibirla
in caso di reclamo. Se il reclamo viene accettato, riceverete un dispositivo
simile in sostituzione. Non è possibile rivendicare la sostituzione con un
modello identico, se la produzione del modello oggetto del reclamo è stata
interrotta per un cambio del modello.
Per qualsiasi reclamo o richiesta di intervento in garanzia rivolgersi al
rivenditore specializzato presso il quale è stato effettuato l‘acquisto.
In alternativa inviare il proprio reclamo direttamente a:
Cycle Parts GmbH
Le Quartier Hornbach 13
67433 Neustadt/Weinstrasse
Per questioni tecniche è a vostra disposizione la nostra hotline ai numeri:
+49 (0) 63 21- 95 82 7 - 10
+49 (0) 63 21- 95 82 7 - 18
Questo servizio è disponibile
dalle 10:00 alle 12:00, da lunedì a venerdì
Ulteriori informazioni tecniche sono disponibili all'indirizzo:
www.vdocyclecomputing.com
Con riserva di apportare modifiche tecniche in caso di ulteriore sviluppo.
ES – Condiciones de la garantía
VDO Cycle Parts le brinda una garantía de 2 años a partir de la fecha
de compra por su ordenador VDO. La garantía se refiere a los fallos de
material y de procesos en el ordenador mismo, en el sensor/transmisor
y en el soporte del manillar. Los cables, las baterías y demás materiales
de montaje están excluidos de la garantía.
La garantía tendrá validez siempre que las piezas afectadas no hayan sido
abiertas (excepción: compartimiento de la batería del ordenador), no se
hayan forzado, ni exista daño intencional.
Le rogamos conservar el comprobante de compra, dado que deberá
presentarse en caso de reclamos. Si el reclamo es fundado,
le proveeremos un equipo similar para su recambio. No se podrá restituir
un modelo idéntico si se p1-ha discontinuado la producción del modelo
reclamado debido a un cambio de modelo.
En caso de dificultades o reclamos de garantía, le rogamos dirigirse al
comercio especializado en el que p1-ha adquirido el equipo.
O envíe su reclamo directamente a:
Cycle Parts GmbH
Le Quartier Hornbach 13
67433 Neustadt/Weinstrasse (Alemania)
Para consultas técnicas, estamos a su disposición en la siguiente
línea de atención:
+49 (0) 63 21- 95 82 7 - 10
+49 (0) 63 21- 95 82 7 - 18
El horario de atención telefónica es de 9:00 a 12:00 h
de lunes a viernes
Puede acceder a mayor información técnica en:
www.vdocyclecomputing.com
Nos reservamos el derecho de implementar modificaciones
técnicas motivadas por perfeccionamientos posteriores.
NL – Garantiebepalingen
VDO Cycle Parts geeft gedurende 2 jaar vanaf de koopdatum garantie op
uw VDO computer. De garantie geldt voor materiaal- en fabricagefouten
aan de computer zelf, aan de sensor/zender en aan de stuurhouder.
Kabels, batterijen en montagematerialen zijn uitgesloten van garantie.
De garantie geldt alleen wanneer de betroffen onderdelen niet zijn
geopend (uitzondering: batterijvak van de computer), geen geweld is
gebruikt en geen moedwillige schade aanwezig is.
Bewaar de kassabon a.u.b. zorgvuldig, want in geval van een klacht
moet deze getoond worden. Bij een terechte klacht krijgt u van ons een
vergelijkbaar omruilapparaat. Een aanspraak op vervanging door een
identiek model bestaat niet, als door verandering van model de productie
van het gereclameerde model stopgezet werd. Neem voor alle klachten
en aanspraken op garantie contact op met uw detailhandel waar u het
apparaat gekocht heeft.
Of stuur uw klacht direct aan:
Cycle Parts GmbH
Le Quartier Hornbach 13
67433 Neustadt/Weinstrasse (Duitsland)
Voor technische vragen zijn wij beschikbaar via onze hotline:
+49 (0) 63 21- 95 82 7 - 10
+49 (0) 63 21- 95 82 7 - 18
Onze telefonische hotline is er voor u van 9:00-12:00 uur,
maandag t/m vrijdag
Nadere technische gegevens vindt u op
www.vdocyclecomputing.com
In het kader van verdere ontwikkelingen behouden wij ons
technische wijzigingen voor.
PL – Warunki gwarancji
VDO Cycle Parts zapewnia 2-letnią gwarancję na komputer VDO
liczoną od daty kupna Gwarancja obejmuje wady materiału oraz wady
produkcji komputera, czujników/nadajników i uchwytu na kierownicę.
Kabel i baterie, a także materiały służące do montażu, nie są objęte
gwarancją.
Gwarancja jest ważna jedynie wtedy, gdy części, których ona dotyczy,
nie były otwierane (wyjątek: komora na baterie komputera), nie użyto
siły ani nie doszło do celowego uszkodzenia.
Należy zachować dowód zakupu, aby w razie reklamacji móc go
przedłożyć. W razie uprawnionej reklamacji firma udostępnia
porównywalne urządzenie zastępcze. Prawo do zastąpienia komputera
modelem identycznym nie przysługuje, jeśli w wyniku zmiany modeli
produkcja reklamowanego modelu została wstrzymana. Z wszelkimi
reklamacjami należy zwracać się do punktu handlowego, w którym
urządzenie zostało kupione.
Reklamację można także przesłać bezpośrednio do producenta:
Cycle Parts GmbH
Le Quartier Hornbach 13
67433 Neustadt/Weinstrasse
W zakresie pytań technicznych jesteśmy zawsze do dyspozycji
pod numerem infolinii:
+49 (0) 63 21- 95 82 7 - 10
+49 (0) 63 21- 95 82 7 - 18
Nasza infolinia jest dostępna w godzinach 9:00-12:00,
od poniedziałku do piątku
Dalsze informacje techniczne można otrzymać na stronie:
www.vdocyclecomputing.com
W ramach dalszego rozwoju firma zastrzega sobie prawo do
zmian technicznych.
EN – Technical specifications
Computer:
Approx. 45 H x 35 B x 16 D mm
Computer weight:
Approx. 25 g
Handlebar bracket weight:
Approx. 10 g
Speed transmitter weight:
Approx. 20 g
Computer battery:
3V, type 2032
Computer battery service life:
Approx. 1 year (approx. 10,000 km (6,000 mi)
Speed transmitter battery:
3V, type 2032
Speed transmitter battery life:
Approx. 1.5 year (approx. 15,000 km/9,000 mi)
Wireless transmission ranges:
Speed transmitter: 75 cm
Temperature indicator range on the display:
-20 to +70 °C or -4 to +158 °F
Speed range for wheel size 2,155 mm:
Min 2.5 km/h, Max 199 km/h, min. 2.4 mph, max. 124 mph
Ride time measurement range:
Up to 99:59:59 HH:MM:SS.
Trip distance odometer measurement range:
Up to value 9,999.99 km or mi
NAVIGATOR measurement range:
From -99.99 to +999.99 km or mi
Total km measurement range:
Up to value 99,999 km or mi
Total ride time measurement range:
9999:59 HHHH:MM
Wheel circumference setting range:
From 100 mm to 3,999 mm (3.9 to 157.4 inches)
Cadence measurement range: (only M3.1 WL):
20 to 180 rpm
Taste BIKE
BIKE button
BIKE Touche
Taste BIKE
BIKE button
BIKE Touche
Taste BIKE
BIKE button
BIKE Touche
Taste BIKE
BIKE button
BIKE Touche
Taste BIKE
BIKE button
BIKE Touche
Taste BIKE
BIKE button
BIKE Touche
Taste BIKE
BIKE button
BIKE Touche
Taste BIKE
BIKE button
BIKE Touche
Taste SET
SET button
SET Touche
Taste SET
SET button
SET Touche
Taste SET
SET button
SET Touche
Taste SET
SET button
SET Touche
Taste SET
SET button
SET Touche
Taste SET
SET button
SET Touche
+ 1
+ 1
+ 1
+ 1
+ 1
+ 1
+ 1
+ 1
+ 1
+ 1
+ 1
+ 1
+ 1
+ 1
+ 1
+ 1
+ 1
+ 1
+ 1
+ 1
+ 1
+ 1
+ 1
+ 1
+ 1
+ 1
+ 1
+ 1
+ 1
+ 1
+ 1
+ 1
+ 1
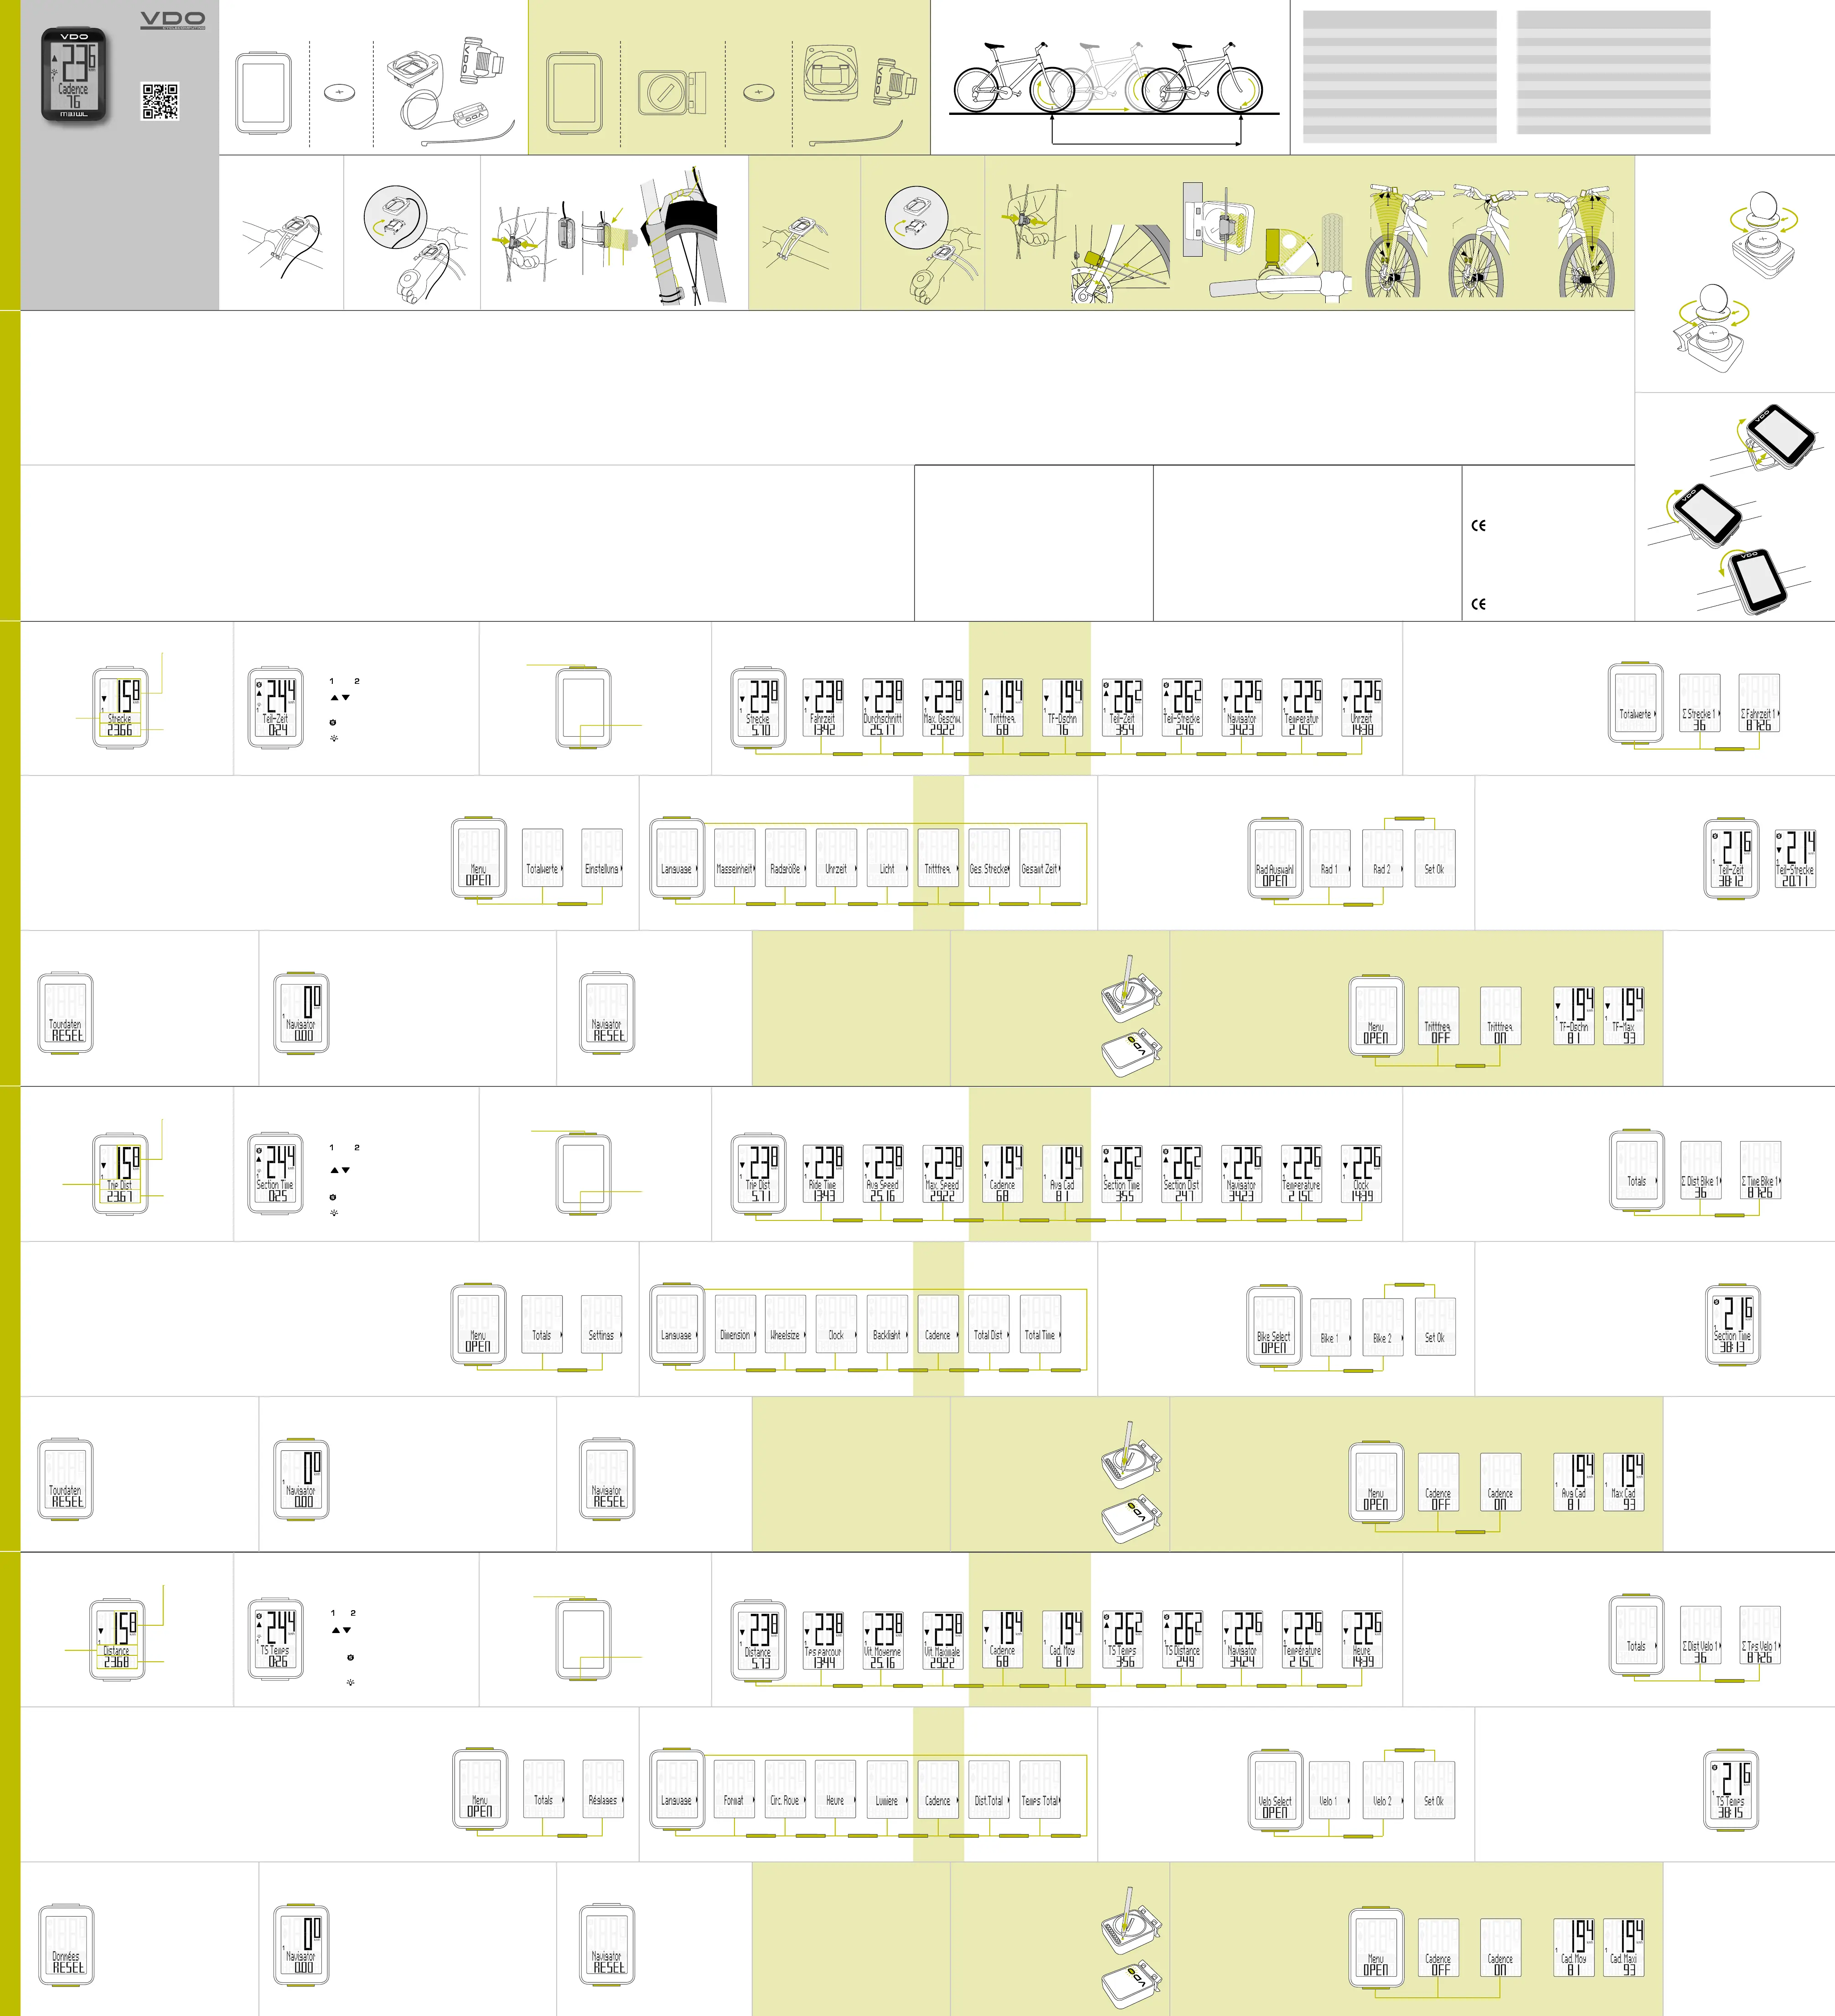
Abruf der Gesamtwerte
Accessing the total values
Consultation des valeurs totales
Einstellungen mit der SET-Taste
Settings involving the SET button
Réglages touche SET
Einstell-Menüs
Setting menus
Menus “Réglages”
Display
Display
Ecran
Icons
Icons
Icônes
Tasten
Buttons
Touches
Funktionen auf der BIKE-Taste
(kurz drücken)
BIKE button functions
(Press)
Fonctions de la touche BIKE
(pression courte)
– Einstell-Menü öffnen:
SET-Taste gedrückt halten, bis sich das Menü öffnet
– Totalwerte öffnen:
Mit der SET-Taste
– Blättern in den Totalwerten:
Mit der BIKE-Taste
– Totalwerte verlassen zurück zum Funktionsmenü:
SET-Taste gedrückt halten
Wenn Sie auch mit Rad 2 unterwegs waren, werden hier auch die
Werte für Rad 2 und Rad 1+2 angezeigt.
– Open the settings menu:
Press and hold the SET button until the menu opens
– Open the total values:
Press the SET button
– Scroll in the total values:
Press the BIKE button
– Exit the total values/back to the function menu:
Press and hold the SET button
If you have also used bike 2, the values for bike 2 and bikes 1+2
are also displayed here.
– Ouverture du menu:
maintenir la touche SET enfoncée jusqu’à ce que le menu
s’ouvre.
– Ouverture des Totals:
touche SET.
– Consultation des Totals:
touche BIKE.
– Fermeture des Totals / Retour au menu “Fonctions”:
maintenir la touche SET enfoncée.
Si vous avez également utilisé le vélo 2, les valeurs pour le vélo 2
et pour les vélos 1 et 2 s’affichent également ici.
– Einstell-Menü öffnen:
SET-Taste gedrückt halten, bis sich das Menü öffnet
– Blättern von Totalwerte zu Einstellung:
Mit der BIKE-Taste
– Einstell-Menü öffnen:
Mit der SET-Taste
– Blättern im Einstell-Menü bis zur gewünschten Einstellung:
Mit der BIKE-Taste
– Einstellung öffnen:
Mit der SET-Taste
– Daten verändern:
Mit der BIKE-Taste (kurz drücken, lang drücken für schnelle Veränderung)
– Open the settings menu:
Press and hold the SET button until the menu opens
– Scroll from Total values to Settings:
Press the BIKE button
– Open the settings menu:
Press the SET button
– Scroll in the settings menu:
Press the BIKE button
– Open the setting:
Press the SET button
– Change the data:
Press the BIKE button (press and hold to change quickly)
– Ouverture du menu:
maintenir la touche SET enfoncée jusqu’à ce que le menu s’ouvre.
– Passage de “Totals” à “Réglages”:
touches BIKE.
– Ouverture du menu “Réglages”:
touche SET.
– Consultation du menu “Réglages”:
touche BIKE.
– Ouverture d’un réglage :
touche SET.
– Modification des données:
touche BIKE (défilement rapide : pression longue).
– Halten Sie die BIKE-Taste +
SET-Taste gleichzeitig für
ein paar Sekunden gedrückt.
– Das zuletzt ausgewählte Rad wird
angezeigt.
– Mit der Bike-Taste wechseln Sie jetzt
zu Rad 2 (oder Rad 1,
wenn vorher Rad 2 ausgewählt war).
– Die Radauswahl bestätigen Sie mit der
SET-Taste.
– Der M3.1 WR kehrt automatisch zum
Funktions-Modus zurück.
– Press and hold the BIKE and SET buttons
simultaneously for a few seconds.
– The most recently selected bike is
displayed.
– Press the BIKE button to change to bike 2
(or bike 1 if bike 2 was previously selected).
– Press the SET button to confirm
the bike selection.
– The M3.1 WR automatically returns
to function mode.
– Maintenez les touches BIKE et SET
enfoncées simultanément pendant
quelques secondes.
– Le dernier vélo sélectionné s’affiche.
– Passez alors au vélo 2 (ou au vélo 1
si le vélo 2 était sélectionné) au moyen
des touche BIKE.
– Confirmez le choix du vélo
avec la touche SET.
– Le M3.1 WR revient automatiquement
au mode “Fonctions”.
– Einstell-Menü öffnen: SET-Taste gedrückt halten,
bis sich das Menü öffnet
– Blättern zu Einstellung: Mit der BIKE-Taste
– Einstellung öffnen: mit der SET-Taste
– Blättern in den Einstellungen zu Trittfrequenz:
Mit der BIKE-Taste
– Trittfrequenz öffnen: Mit der SET-Taste
– Trittfrequenz von OFF auf ON stellen:
Mit der BIKE-Taste
– Trittfrequenz ON bestätigen: Mit der SET-Taste
– Einstellung verlassen zurück zum Funktionsmenü:
SET-Taste gedrückt halten
– Open Settings menu: Hold down SET button
until the menu opens
– Page through to the setting: with the BIKE button
– Open setting: with the SET button
– Page through the settings to Cadence:
with the BIKE button
– Open Cadence: with the SET button
– Change cadence from OFF to ON: with the BIKE button
– Confirm Cadence ON: with the SET button
– Leave setting and go back to Functions menu:
Hold down SET button
– Ouverture de menu de réglage : maintenir la touche
SET enfoncée jusqu‘à ce que le menu s‘ouvre.
– Accès aux réglages : avec la touche BIKE.
– Ouverture des réglages : avec la touche SET.
– Accès aux réglages pour la cadence : avec la touche BIKE.
– Ouverture des réglages pour la cadence :
avec la touche SET.
– Modification du réglage pour la cadence de OFF à ON :
avec la touche BIKE.
– Confirmation du réglage ON pour la cadence :
avec la touche SET.
– Passage des réglages au menu “Fonctions” :
maintenir la touche SET enfoncée.“
– Einstellung bestätigen:
Mit der SET-Taste
– Einstell-Menü schließen/eine Ebene zurück:
Bike-Taste gedrückt halten
– Einstell-Menü schließen/zurück zum Funktions-Menu:
SET-Taste gedrückt halten
– Confi rm the setting:
Press the SET button
– Close the settings menu/go back one level:
Press and hold the BIKE button
– Close the settings menu/back to the function menu:
Press and hold the SET button
– Confirmation d’un réglage:
touche SET.
– Fermeture du menu “Réglages” / Retour d’un niveau en arrière:
maintenir la touche BIKE enfoncée.
– Fermeture du menu “Réglages” / Retour au menu “Fonctions”:
maintenir la touche SET enfoncée.
– „KMH/MPH“: zeigt gewählte Geschwindigkeitseinheit
– „ “ oder „ “: zeigt gewähltes Rad 1 oder Rad 2
– „ “: Vergleich der aktuellen Geschwindigkeit
mit der Durchschnitts-Geschwindigkeit
– „ “-Icon: Zeigt, dass der Trip-Section-Zähler aktiv ist
– „ “-Icon: zeigt, dass der Lichtmodus aktiv ist
– “KMH/MPH”: shows the selected speed unit
– „ “ oder „ “: shows whether bike 1 or bike 2
has been selected
– „ ”: comparison of current speed with the
average speed
– „ “-icon: indicates that the trip section counter is active
– „ “icon: shows that Light mode is enabled
– “KMH / MPH” : affichage de l’unité de vitesse choisie
– “ ” ou “ ”: affichage du vélo sélectionné (1 ou 2)
– “ ”: comparaison de la vitesse actuelle
avec la vitesse moyenne
– Icône “ ”: indique lorsque le compteur partiel
est actif
– Icône “ ” indique que l‘éclairage est actif
Rad-Auswahl Rad 1 oder Rad 2 (nur für M3.1 WR)
Bike selection: bike 1 or bike 2 (only M3.1 WR)
Choix du vélo – Vélo 1 ou Vélo 2 (seulement für M3.1 WR)
Aktivieren der Trittfrequenz-Option /
DIsplayeindruck TF AKt / Durch / Max
M3.1 WL
Activate the Cadence option /
Display CAD Act / Avr / Max
M3.1 WL
Activation de l‘option “Cadence” / Affichage à l‘écran : Cad. act. / moy. / max. M3.1 WL
Tour Daten auf NULL zurückstellen
Resetting trip data to zero
Mise à zéro des données du tour
NAVIGATOR auf NULL
zurückstellen
Resetting the NAVIGATOR
to zero
Mise à zéro du navigateur
TRIP SECTION Starten/Stoppen
Starting/stopping a TRIP SECTION
Démarrage / Arrêt du compteur partiel
– BIKE-Taste gedrückt halten
– Im Display erscheint der
Hinweis: Tourdaten RESET
– BIKE-Taste weiter gedrückt halten
Hinweis: Strecke und Fahrzeit werden
zu den Gesamtdaten hinzu gerechnet.
– Press and hold the BIKE button
– The text Tour Data RESET appears
on the display.
– Continue to hold down the BIKE button
Note: the distance and ride time are added
to the totals.
– Maintenir la touche BIKE enfoncée.
– Le message “Données RESET” apparaît
à l’écran.
– Continuer à maintenir la touche BIKE
enfoncée.
Attention: La distance et le temps sont
ajoutés aux valeurs totales.
– Navigator-Funktion in die
Anzeige bringen
– RESET: BIKE-Taste gedrückt
halten
– Display the Navigator function
– RESET: Press and hold the
BIKE button
– Afficher la fonction “Navigator”
à l’écran
– MISE A ZERO: maintenir la
touche BIKE enfoncée.
– START: BIKE + SET-Taste gleichzeitig kurz drücken
– STOPP: BIKE + SET-Taste gleichzeitig kurz drücken
– Re-START: Erneut BIKE + SET-Taste gleichzeitig kurz drücken
– RESET: BIKE-Taste gedrückt halten
ACHTUNG: Bei Geschwindigkeit NULL stoppt der Trip-Section-Zähler
automatisch. Wird die Fahrt fortgesetzt, zählt der Trip-Section-Zähler
automatisch weiter.
– START: Simultaneously press the BIKE + SET buttons
– STOPP: Simultaneously press the BIKE + SET buttons
– RE-START: Simultaneously press the BIKE + SET buttons again
– RESET: Press and hold the BIKE button
ATTENTION: if the speed is zero, the trip section counter automatically
stops. If you set off again, the trip section counter automatically continues.
– DEMARRAGE : enfoncer brièvement les touches BIKE et SET
simultanément.
– ARRÊT : enfoncer brièvement les touches BIKE et SET simultanément.
– REDEMARRAGE : enfoncer à nouveau brièvement les touches BIKE
et SET simultanément.
– MISE A ZERO : maintenir la touche BIKE enfoncée.
ATTENTION : Lorsque la vitesse est égale à zéro, le compteur partiel
s’arrête automatiquement. Le compteur partiel redémarre
automatiquement lorsque le trajet reprend.
DEUTSCHENGLISHFRANÇAIS
Aktuelle
Geschwindigkeit
Current speed
Wert der
ausgewählten
Funktion
Value of the
selected function
Ausgewählte
Funktion
Selected
function
Taste BIKE:
kurz drücken:
Abruf der Bike
Funktionen
BIKE button:
Press:
Scroll forward
through the functions
Touche BIKE:
Pression courte :
Consultation des
fonctions “BIKE”
Taste SET:
kurz drücken:
rückwärts durch
die Funktionen
blättern
SET button:
Press:
Scroll backwards
through the functions
Touche SET:
Pression courte :
Retour en arrière
dans les fonctions
NAVIGATOR Einstellen
Setting the NAVIGATOR
Réglage du navigateur
Der Navigator ist ein zweiter, völlig unabhängiger, Tagesstreckenzähler.
Der Navigator kann:
– beliebig oft während einer Tour auf Null zurückgestellt werden
– auf einen Strecken-Wert eingestellt werden
– von dem eingestellten Strecken-Wert vorwärts oder rückwärts zählen.
– Mit der BIKE-Taste die Funktion NAVIGATOR in die Anzeige holen
– SET-Taste gedrückt halten bis sich das Einstellmenü öffnet
– Daten verändern: Mit der BIKE-Taste
– Einstellung bestätigen: Mit der SET-Taste
– Der M3.1 WR kehrt automatisch zum Funktions-Modus zurück
The navigator is a second, completely independent trip distance counter.
The navigator can:
– be reset to zero as often as desired and independently of the trip
distance counter
– be preset to a specific value
– count forwards or backwards from this value
– Press the BIKE button to view the Navigator function on the display
– Press and hold the SET button until the menu opens
– Change the data: Press the BIKE button
– Confi rm the setting: Press the SET button
– The M3.1 WR automatically returns to function mode.
Le navigateur est un SECOND compteur des kilomètres quotidiens,
totalement indépendant. Le navigateur peut :
– être remis à zéro aussi souvent que souhaité, et ce, indépendamment
du compteur des kilomètres quotidiens,
– être prédéfini sur une valeur,
– compter ou décompter au départ de cette valeur.
– Avec la touche BIKE, afficher la fonction NAVIGATOR à l’écran.
– Maintenir la touche SET enfoncée jusqu‘à ce qu‘il ouvre le menu de réglage.
– Modification des données: touche BIKE.
– Confirmation d’un réglage: touche SET.
– Le M3.1 WR revient automatiquement au mode “Fonctions”.
Nach dem der Computer in die Lenkerhalterung eingedreht wurde,
beginnt der Computer mit der Sendersuche. Die Sendersuche
erkennt man an den blinkenden Ziffern für die Geschwindigkeit.
Der VDO M3.1 WL hat eine automatische Raderkennung. Je nach
dem, ob Sie Rad 1 oder Rad 2 verwenden, werden die Daten
entsprechend für Rad 1 oder Rad 2 erfasst.
Für weitere Informationen: www.vdocyclecomputing.com/service
Diese Störquellen können das Pairing stören:
– LED-Beleuchtung
– Mobil-Telefon / GPS-Empfänger
– WLAN
Once the computer has been rotated into place in the bracket,
it starts searching for the transmitter. The transmitter search is
identifi ed by the fl ashing digits for the speed.
The VDO M3.1 WL has an automatic bike recognition function.
Depending on whether you are using bike 1 or bike 2,
the data is recorded for bike 1 or bike 2.
For more information: www.vdocyclecomputing.com/service
Potential source of interference:
– LED lights
– Mobile telephone / GPS recever
– WLAN
Le compteur commence à rechercher l’émetteur dès qu’il a été
tourné dans le support du guidon. La recherche de l’émetteur est
visible au clignotement des valeurs de vitesse. Le VDO M3.1 WL
est doté d’une fonction de détection automatique du vélo. Les
données sont enregistrées pour le vélo 1 ou le vélo 2 selon que
vous utilisez le vélo 1 ou le vélo 2.
Pour plus d‘informations : www.vdocyclecomputing.com/service
Sources de parasites possibles :
– Eclairage LED
– Téléphone mobile / Récepteur GPS
– WLAN
ACHTUNG: Im Sender muss bei der ersten
Inbetriebnahme der Schalter für die Rader-
kennung entweder auf RAD 1 oder RAD 2
eingestellt werden. Nur dann funktioniert auch
die automatische Raderkennung.
Taste LANG gedrückt halten, bis LED Blinkt.
1 mal blinken grün = Rad 1 ist ausgewählt
2 mal blinken rot = Rad 2 ist ausgewählt
ATTENTION: when using the transmitter for the
fi rst time, the bike recognition switch must be
set to either BIKE 1 or BIKE 2. Only then will the
automatic bike recognition work.
Press and HOLD the button until the LED
fl ashes.
Green fl ashes once = bike 1 is selected
Red fl ashes twice = bike 2 is selected
ATTENTION : Dans l’émetteur, l’interrupteur
de détection du vélo doit être réglé sur VELO 1
ou VELO 2 lors de la première mise en service.
C’est la seule façon pour que le système de
détection automatique du vélo fonctionne.
MAINTENIR la touche enfoncée jusqu’à ce
que la LED clignote.
1 clignotement vert = vélo 1 sélectionné
2 clignotements rouges = vélo 2 sélectionné
Pairing (Inbetriebnahme)
des Senders
M3.1 WL
Pairing the transmitter
(initial use)
M3.1 WL
Couplage (mise en service)
de l‘émetteur
M3.1 WL
Radauswahl M3.1 WL
Bike selection M3.1 WL
Choix du vélo M3.1 WL
!
Beim Batteriewechsel gehen
KEINE Daten verloren.
Achtung: Nach der Entnahme
der leeren Batterie bitte
10 Sekunden warten vor dem
Einlegen der neuen Batterie
When battery is replaced
NO data is lost.
Attention: After taking
out of empty battery,
please wait for 10 sec.
before putting in
new battery
!
OPENCLOSE
3 V type 2032
CENTER
LEFT
M3.1 WL
max
90 cm
35"
max
90 cm
35"
LEFT
RIGHT
UNLOCK
LOCK
1. LOCK2. CLICK
2. UNLOCK
Montage / Mounting
IC
This device complies with Industry Canada licence-exempt RSS standard(s). Operation is subject to the following two conditions:
(1) this device may not cause interference, and
2) this device must accept any interference, including interference that may cause undesired operation of the device. CAN ICES-3(B)/NMB-3(B)
Le présent appareil est conforme aux CNR d‘Industrie Canada applicables aux appareils radio exempts de licence. L‘exploitation est autorisée aux
deux conditions suivantes:
(1) il ne doit pas produire de brouillage et
(2) l’ utilisateur du dispositif doit étre prêt à accepter tout brouillage radioélectrique reçu, même si ce brouillage est susceptible de compromettre
le fomctionnement du dispositif. CAN ICES-3(B)/NMB-3(B)
The device meets the exemption from the routine evaluation limits in section 2.5 of RSS 102 and compliance with RSS-102 RF exposure, users
can obtain Canadian information on RF exposure and compliance.
Le dispositif rencontre l‘exemption des limites courantes d‘évaluation dans la section 2.5 de RSS 102 et la conformité à l‘exposition de RSS-102
rf, utilisateurs peut obtenir l‘information canadienne sur l‘exposition et la conformité de rf.
This transmitter must not be co-located or operating in conjunction with any other antenna or transmitter. This equipment should be installed and
operated with a minimum distance of 20 millimeters between the radiator and your body.
Cet émetteur ne doit pas être Co-placé ou ne fonctionnant en même temps qu‘aucune autre antenne ou émetteur. Cet équipement devrait être
installé et actionné avec une distance minimum de 20 milliimètres entre le radiateur et votre corps.
FCC statement
This device complies with part 15 of the FCC Rules. Operation is subject to the following two conditions:
(1) This device may not cause harmful interference, and
(2) this device must accept any interference received, including interference that may cause undesired
operation.
NOTE: This equipment has been tested and found to comply with the limits for a Class B digital device,
pursuant to part 15 of the FCC Rules. These limits are designed to provide reasonable protection against
harmful interference in a residential installation. This equipment generates, uses and can radiate radio
frequency energy and, if not installed and used in accordance with the instructions, may cause harmful
interference to radio communications. However, there is no guarantee that interference will not occur in
a particular installation. If this equipment does cause harmful interference to radio or television reception,
which can be determined by turning the equipment off and on, the user is encouraged to try to correct the
interference by one or more of the following measures:
– Reorient or relocate the receiving antenna.
– Increase the separation between the equipment and receiver.
– Connect the equipment into an outlet on a circuit different from that to which the receiver is connected.
– Consult the dealer or an experienced radio/TV technician for help.
Changes or modifications not expressly approved by the party responsible for compliance could void the
user’s authority to operate the equipment.
EU-Konformitätserklärung
Wir, CYCLE PARTS GmbH, Le Quartier Hornbach 13, D-67433 Neustadt/Weinstr.
erklären, dass der VDO Fahrradcomputer VDO M3.1 WR/WL bei bestimmungs-
gemäßer Verwendung den grundlegenden Anforderungen der CE-Bestim-
mungen entspricht. Die Konformitäts-Erklärung finden Sie unter:
www.vdocyclecomputing.com.
Neustadt, Oktober 2013
EU-Declaration of Conformity
We, CYCLE PARTS GmbH, Le Quartier Hornbach 13, D-67433 Neustadt/
Weinstraße, declare that when used as intended, the VDO cycle computer
VDO M3.1 WR/WL complies with the essential requirements established in
the CE Directives.The declaration of conformity can be found at:
www.vdocyclecomputing.com.
Neustadt, October 2013
Product specificaties
| Merk: | VDO Dayton |
| Categorie: | Fietscomputer |
| Model: | M3.1 WL |
| Kleur van het product: | Black, Red |
| Gewicht: | 25 g |
| Breedte: | 35 mm |
| Diepte: | 16 mm |
| Hoogte: | 45 mm |
| Soort: | Draadloze fietscomputer |
| Meeteenheid temperatuur: | F, °C |
| Levensduur batterij/accu: | 1 jaar |
| Batterij bijna leeg-indicatie: | Ja |
| Backlight: | Ja |
| Batterijen inbegrepen: | Ja |
| Type batterij: | 2032 |
| Schermgrootte (display): | 34 x 24 mm |
| Afstand meeteenheid: | Imperial, Metric |
| Zender: | Ja |
| Snelheidfuncties: | Current speed, Average speed, Comparing speed, Maximum speed |
| Tijdsfuncties: | Clock, Stopwatch |
| Additionele meetparameters: | Temperatuur |
| Inclusief klem: | Ja |
| Afstandsfuncties: | Total, Trip (passed) |
Heb je hulp nodig?
Als je hulp nodig hebt met VDO Dayton M3.1 WL stel dan hieronder een vraag en andere gebruikers zullen je antwoorden
Handleiding Fietscomputer VDO Dayton

9 Juli 2023
Handleiding Fietscomputer
Nieuwste handleidingen voor Fietscomputer
23 Juli 2026
20 Juli 2026
14 Juni 2026
15 Mei 2026
11 Mei 2026
16 Maart 2026
15 Maart 2026
14 Maart 2026
5 December 2025
23 September 2025