Vaxcel Da Vinci PD5027 Handleiding
Vaxcel Verlichting Da Vinci PD5027
Bekijk gratis de handleiding van Vaxcel Da Vinci PD5027 (1 pagina’s), behorend tot de categorie Verlichting. Deze gids werd als nuttig beoordeeld door 11 mensen en kreeg gemiddeld 4.7 sterren uit 7 reviews. Heb je een vraag over Vaxcel Da Vinci PD5027 of wil je andere gebruikers van dit product iets vragen? Stel een vraag
Pagina 1/1
ASSEMBLY AND INSTALLATION
INSTRUCTIONS
WARNING:
TO AVOID RISK OF ELECTRICAL SHOCK, BE SURE TO SHUT
OFF POWER WHILE INSTALLING OR SERVICING THIS FIXTURE.
NOTE: Before installing, consult local electrical codes for wiring and grounding requirements.
PD5027
Installation Steps
1.Unscrew the set screws from the plate, and attach the
canopy and the back plate to the ceiling:
a.If the ceiling material is concrete:
Aim the middle hole of the back plate at the center
of the ceiling box. Mark the 2 setting holes of the back
plate on the ceiling, drill these 2 marks, and then thread
the wall anchors into the 2 holes of the ceiling. Thread
the wires of the power source through the canopy and
the back plate. Attach the canopy and the back plate
to the ceiling by threading the dry wall screws through
the setting holes of the back plate into the wall anchors.
b.If the ceiling material is wooden:
Thread the wires of the power source through the
canopy and the back plate. Attach the canopy and
the back plate to the ceiling by threading the dry wall
screws through the setting holes of the back plate
into the ceiling.
c.If the ceiling material is sheetrock:
Thread the wires of the power source through
the canopy and the back plate. Attach the canopy
and the back plate to the ceiling by threading the
small steel nails (not supplied) through the setting
holes of the back plate into the ceiling.
2.Take the proper numbers of the tubes to install the
height of the xture to be 16-5/8", 26-1/8" or 35-5/8"
as needed. (Three tubes for each lamp holder are
provided.)
Tube connections:
a. Thread the xture wire from the socket through
the down tube(w/o nipple), and secure the down
tube to the cap.
b. Thread the xture wire from the assembled tube
through the middle tube(w/ niple) and secure the
middle tube with the nipple.
c. Thread the xture wire through the upper tube(w/ nipple),
and then secure the upper tube with the nipple.
d. Thread the xture wire through the set nipple of the plate,
and secure the upper tube to the plate.
e. Complete the same steps for the other sockets and tubes.
3.Make wire connections with wire nuts:
---All black wires from tubes to the black wire from
power source.
---All white wires from tubes to the white wire from
power source.
---Attach the grounding wire and house grounding
wire to the back plate with a green grounding screw.
Carefully tuck wires into the ceiling box.
4.Attach the plate to the back plate, and secure with
the set screws.
5.Attach the glass shades to the lamp holders, and
secure with the socket rings.
6.Install bulbs.(Please do not exceed the maximum
capacity, which is recommended on the package.)
7.Turn on the power at fuse or circuit box.
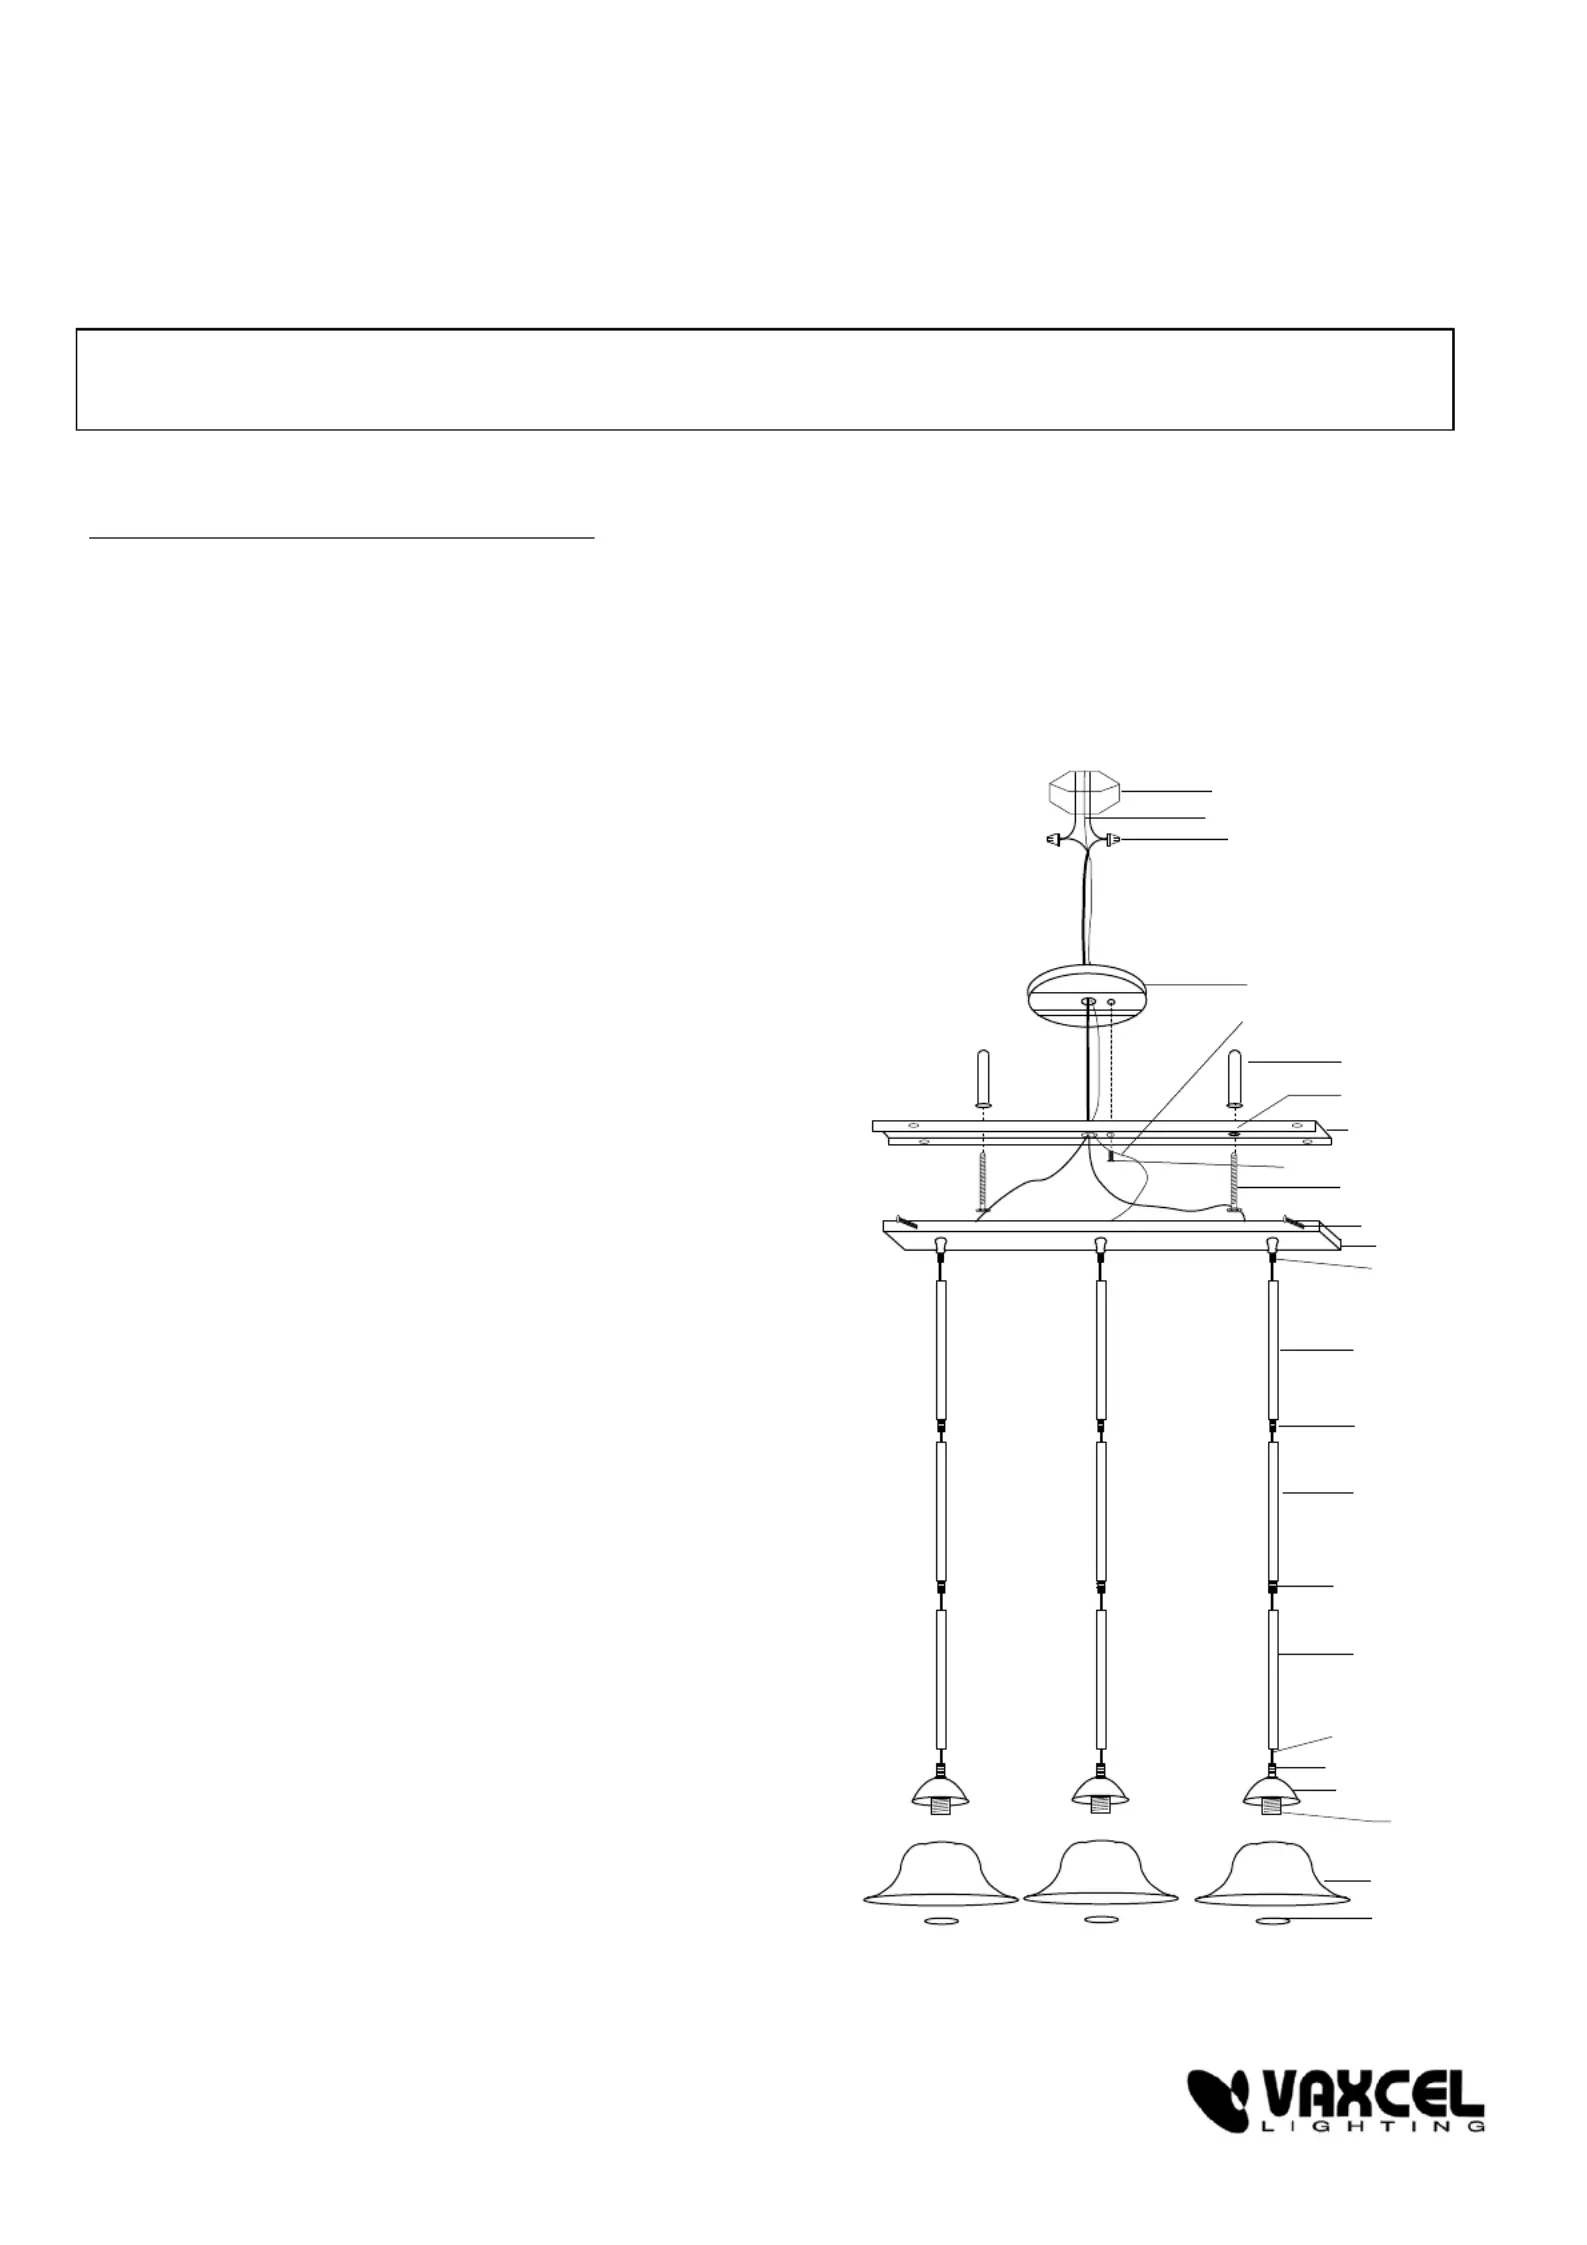
Upper Tube
Nipple
Set Nipple
Nipple
Nipple
Cap
Socket
Glass Shade
Socket Ring
Middle Tube
Down Tube
Fixture Wire
Plate
Canopy
Wire Nut
House Grounding Wire
Grounding Wire
Ceiling Box
Set Screw
Dry Wall Screw
Green Grounding Screw
Back Plate
Wall Anchor
Setting Hole
Product specificaties
| Merk: | Vaxcel |
| Categorie: | Verlichting |
| Model: | Da Vinci PD5027 |
Heb je hulp nodig?
Als je hulp nodig hebt met Vaxcel Da Vinci PD5027 stel dan hieronder een vraag en andere gebruikers zullen je antwoorden
Handleiding Verlichting Vaxcel

14 Maart 2026
13 Maart 2026
25 Februari 2026
23 Februari 2026
23 Februari 2026
23 Februari 2026
16 Januari 2026
16 Januari 2026
16 Januari 2026
16 Januari 2026
Handleiding Verlichting
Nieuwste handleidingen voor Verlichting
2 April 2026
2 April 2026
2 April 2026
2 April 2026
2 April 2026
2 April 2026
2 April 2026
2 April 2026
2 April 2026
1 April 2026