Vaxcel Claremont H0300 Handleiding
Bekijk gratis de handleiding van Vaxcel Claremont H0300 (2 pagina’s), behorend tot de categorie Lamp. Deze gids werd als nuttig beoordeeld door 11 mensen en kreeg gemiddeld 4.4 sterren uit 6 reviews. Heb je een vraag over Vaxcel Claremont H0300 of wil je andere gebruikers van dit product iets vragen? Stel een vraag
Pagina 1/2
ASSEMBLY AND INSTALLATION
INSTRUCTIONS
TO AVOID RISK OF ELECTRICAL SHOCK, BE SURE TO SHUT OFF
POWER BEFORE INSTALLING OR SERVICING THIS FIXTURE.
NOTE: 1. Before installing, consult local electrical codes for wiring and grounding requirements.
2. Read and save this instruction.
H0300
WARNING:
TO AVOID RISK OF ELECTRICAL SHOCK, BE SURE TO SHUT OFF
POWER WHILE INSTALLING OR SERVICING THIS FIXTURE.
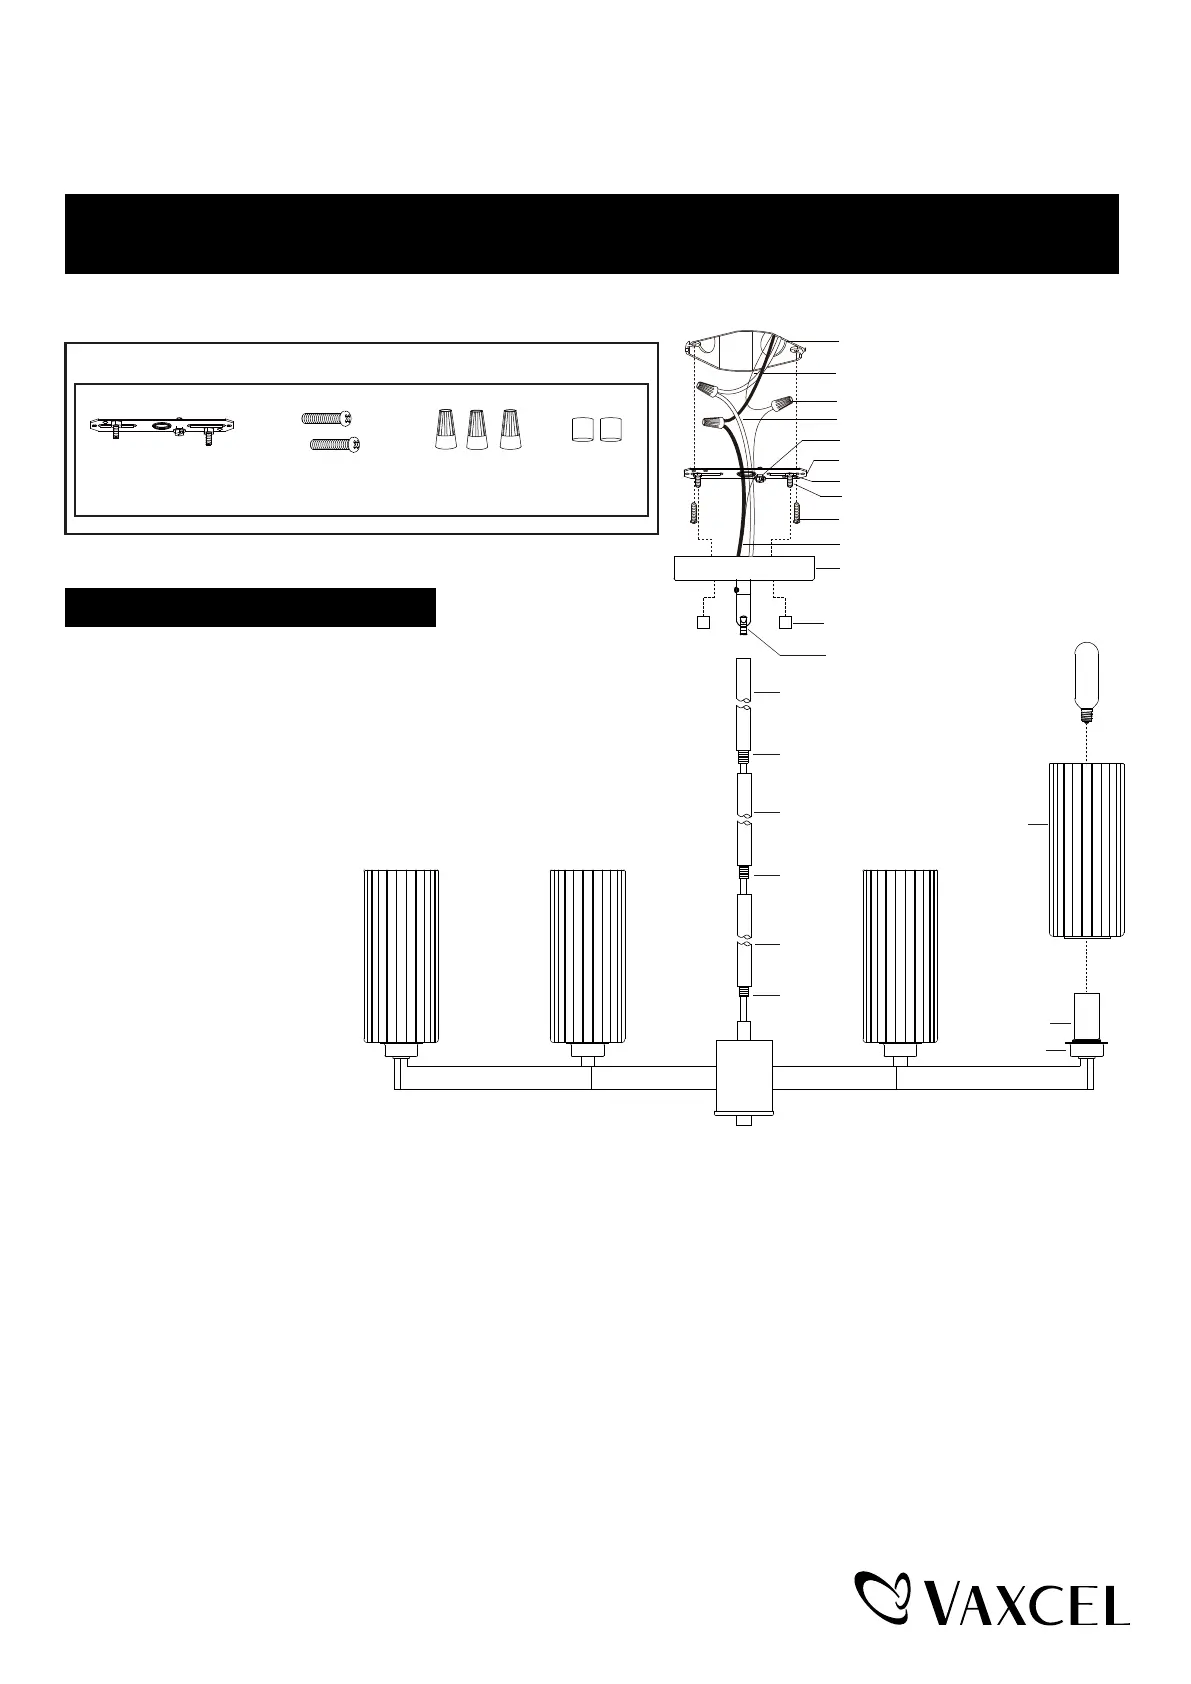
Hardware Package (included):
Turn off the power at fuse or circuit box
Installation Steps
1. Attach the mounting strap unit (A) to the outlet box by
using two mounting screws (B).
2. Rod connections:
a. Thread the fixture wires from the fixture through the lower rod,
then secure the lower rod onto the fixture using the threaded
pipe.
b. Thread the fixture wires through the middle rod,
then secure the middle rod
onto the lower rod using the
threaded pipe.
c. Thread the fixture wires
through the upper rod, then
secure the upper rod onto
the middle rod using the
threaded pipe.
d. Thread the fixture wire
through coupling kit, canopy
kit, then secure the rod
assembly to the coupling kit.
Note: Length adjustable from 10-3/4" to 55". Use fewer rods if shorter length is desired.
3. Pull out the source wires from the outlet box. Make wire connections using wire connectors (C) as follow:
---Connect the hot wire (black insulation) from the fixture to the black wire from the power source.
---Connect the neutral wire (white insulation) from the fixture to the white wire from the power source.
---Attach the fixture ground wire (bare wire) to the mounting strap unit (A) with the green ground screw, and
then connect it to the house ground wire with the wire connector (C).
Carefully put the wires back into the outlet box.
4. Attach the canopy kit to the mounting strap unit (A) by inserting the fixture mounting screws, then secure it with
two bolt nuts (D).
5. Install 6 x 60W Max. candelabra base bulbs (not included). See relamping label at socket area or packaging for
maximum wattage allowed.
6. Rotate the glass shades onto the glass holders until they are locked in place.(Do not over tighten the glass shades).
Page 1 / 2
240222
Bolt Nut (D)
Mounting Screw (B)
Wire Connector (C)Mounting Strap Unit (A)
Canopy Kit
Bolt Nut (D)
Upper Rod
Middle Rod
Glass Shade
Glass Holder
Socket
Lower Rod
Threaded
Pipe
Threaded
Pipe
Threaded Pipe
Coupling Kit
Outlet Box
House Ground Wire
Wire Connector (C)
Lock Nut
Mounting Strap Unit (A)
Green Ground Screw
Mounting Screw (B)
Fixture Wire
Fixture Mounting Screw
Fixture Ground Wire
Max. 60W Candelabra
Base
Bulb
(not included)
Product specificaties
| Merk: | Vaxcel |
| Categorie: | Lamp |
| Model: | Claremont H0300 |
Heb je hulp nodig?
Als je hulp nodig hebt met Vaxcel Claremont H0300 stel dan hieronder een vraag en andere gebruikers zullen je antwoorden
Handleiding Lamp Vaxcel

26 Februari 2026
24 Februari 2026
24 Februari 2026
24 Februari 2026
24 Februari 2026
23 Februari 2026
23 Februari 2026
13 Januari 2026
12 Januari 2026
9 Januari 2026
Handleiding Lamp
Nieuwste handleidingen voor Lamp
2 April 2026
2 April 2026
2 April 2026
2 April 2026
2 April 2026
2 April 2026
2 April 2026
2 April 2026
2 April 2026
1 April 2026