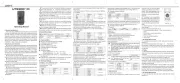
Uni-T UT595 Handleiding
Uni-T
Meetapparatuur
UT595
Bekijk gratis de handleiding van Uni-T UT595 (2 pagina’s), behorend tot de categorie Meetapparatuur. Deze gids werd als nuttig beoordeeld door 72 mensen en kreeg gemiddeld 4.8 sterren uit 36.5 reviews. Heb je een vraag over Uni-T UT595 of wil je andere gebruikers van dit product iets vragen? Stel een vraag
Pagina 1/2

Current
Danger of possible electric shock
Double insulation or reinforced insulation
DC
AC
Grounding
0.05Ω 1.99Ω~
2.0Ω 19.9Ω~
20Ω 2000Ω~
20Hz~100Hz
1Hz
Only for reference
Measuring Range
Resolution
Accuracy
Three-phase AC voltage 100V~440V, frequency: 45Hz~65Hz;
Phase sequence: L1 L2 L3 forward rotation;
L1 L3 L2 reversed rotation
Any open phase among L1, L2, L3 will be displayed on LCD
Operating Voltage
Test Result
Detect Open Phase
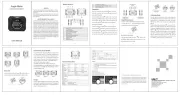
Figure 1 Figure 2
Figure 3
VI. Rotary Switch
VII. Preparations before Measurement
Low Battery Indicator Battery Voltage
≤7V
VIII. Testing for Continuity (See Figure 3)
Understanding F1-F4 Buttons:
F1 F2 F3 F4
Buzzer and backlight Test lock ZERO Invalid
Figure 4
F1 F2 F3 F4
Buzzer and backlight Test lock Invalid Invalid
Figure 5
I. Overview
UT593/UT595 is a multifunction digital safety testing instrument, designed with combin
-ation of large-scale integrated analog & digital circuits and micro-processor chip. It mai
-nly measures RCD, line/loop impedance, continuity, insulation resistance, DC and AC
voltage, phase sequence, featuring versatile functionality, higher accuracy, stable perfor
-mance and ease of use. The instrument is widely used to measure RCD, insulation and
earth connections for various equipments, and an ideal tool for testing, inspection and
maintenance badly needed for various electric devices and RCDs.
II. Safety Information
The Tester is designed, manufactured and tested according to IEC61010 safety standard.
The manual include safety information related to safe use of the Tester. Please strictly
follow the safety items and read the following instructions before use.
Warning
Warning
● Please read and understand the manual before using the Tester.
● Use the Tester as specified in the manual and keep it for future reference.
● Please note that misuse during tests might cause personal injury or damage to the
Tester.
on the Tester alerts users to use the Tester properly, please refer to the manual for
details.
Danger
Warning
Caution
Specifies conditions and actions that may cause severe or
fatal hazards.
Alerts users to avoid electric shock.
Specifies conditions and actions that may damage the Tester
or affect accurate measurement.
Danger
● Do not measure around any inflammables, sparkle may cause potential explosion.
● Do not operate the Tester if its surface is wet or the operator’s hands are wet.
● Do not touch conductive part of test leads during measurement.
● Do not measure with the battery cover opened.
● Do not touch the circuits under test when measuring insulation resistance and RCD.
● Stop using the Tester if any anomaly happens. E.g. the Tester is damaged or shows
exposed metal.
● Take extreme caution when working with voltages higher than 33Vrms, 46.7acrms or
70Vdc, for it may pose electric shock.
● The electric storage present in tested circuits must be released after finishing high-
resistance measurement.
● Do not replace the battery if the Tester is under wet status.
● Make sure all test leads are firmly secured to input terminals of the Tester.
● Turn off the Tester before opening the battery cover.
Caution
● If it is necessary to replace test leads or power adaptor, use only the same model
with same electrical specifications.
● When low battery indicator( ) shows, do not use the Tester. Take the batt
-ery if not used for a long time.
● Do not store or use the Tester around high-temperature, high humidity, flammables,
explosives and electromagnetic environments.
● Clean the Tester’s casing with soft cloth dampened with water or mild detergent. No
abrasives or solvents are allowed.
● Dry the Tester before storing it if it is wet.
III. Electrical Symbols
VI. Technical Specifications
Accuracy: ±(a% of reading + b digits), calibration per year.
1. RCD Test
Test Current
Operational Voltage
Test Current Accuracy
Trip Time
Trip Time Accuracy
Trip Current Range
Trip Current Accuracy
Select Timer Function
Select Timer Function
2.Loop Impedance Measurement
Operating Voltage (L - E)
Test Current& Time
Measuring Scope
Measuring Ranges
Accuracy
Resolution
Prospective Fault Current
3. Line Impedance Measurement
Operating Voltage (L - N)
Test Current& Time
Measuring Scope
Measuring Ranges
Accuracy
Resolution
Prospective Short Current
4. Non-Trip Loop Impedance Measurement
Operating Voltage (L - E)
Test Current
Display Range
Measuring Scope
Measuring Ranges
Accuracy
Resolution
Prospective Fault Current
5. Continuity Test
V
V
V
S
C
Accuracy
0.00~2.00Ω:>200mA
6. Insulation Resistance Measurement
Measuring Ranges
Short-Circuit Current
Accuracy
C
T
Range
Range
Range
<1.8mA
7. Voltage Measurement
Measuring Range
Special Function
Resolution
Accuracy
<10V: for reference only.
8. Frequency Measurement
9. Phase Rotation Test
● Display: LCD, display count: 9999
● Low Battery Indication: displays
● Over-Load Indication: “ over-limited value”(e.g.: 500MΩ)> >
● Auto Ranging
● Unit Display: Simultaneously display function and electrical units symbols
● Release Voltage Automatically
● Working Conditions: 0 /Humidity:≤85%℃ ℃~40
● Storage Conditions: -20 /Humidity:≤90%℃ ℃~60
● Current Consumption: around 50mA (at Max.1000V output voltage)(normally status
at 10mA)
● Safety: CATIII 300V, Pollution Degree 2 as per IEC61010
● Dimensions: 210mm(L)×175mm(W)×90mm(D)
● Weight: 1kg (including battery)
● Power: Alkaline battery 1.5V (AA) ×8pcs
● Accessories: Test leads, alkaline battery 1.5V (AA) ×8pcs, operating manual, carrying
bag
V. Tester Description (See Figure 1&2)
1. LCD Display
2. Function Buttons F1, F2, F3, F4
3. TEST Button
4. Rotary Switch
5. Input Terminal to Test Lead (Black)
6. Input Terminal to Test Lead (Red)
Or to specified test lead
7. Input Terminal to Test Lead (Green)
1. Phase Rotation: Detest Phase sequence
2. Volts: Measure Voltage/Frequency
3. 250V: Measure Insulation Resistance
4. 500V: Measure Insulation Resistance
5. 1000V: Measure Insulation Resistance
6.Ω: Continuity with Test Current up to 200mA;
7. OFF;
8. Loop/PSC/Zs/Ze:Measure Loop/Line Impedance, Prospective Fault current, Prospec
-tive Short Current.
9. Auto: Automatically Test RCD;
10.×1/2: Measure RCD Trip Time at ×1/2 Rated Current
11. ×1: Measure RCD Trip Time at ×1 Rated Current
12. ×2: Measure RCD Trip Time at ×2 Rated Current(for UT595 Only)
13. ×5: Measure RCD Trip Time at ×5 Rated Current
14. Ramp: Measure RCD Trip Current
If low battery indicator shows on the upper left part of LCD after turning on the Tester,
it indicates the battery falls low, please replace the battery time.
To test for continuity:
(1) Discharge totally the tested circuits and keep them completely separated from the
power supply before test.
(2) Insert red lead or specific TEST-marked test lead into red input terminal and black
test lead to black terminal.
(3) Connect red and black alligators or test probes to the circuit under test.
(4) Turn the rotary switch to Ω position, then press TEST button to begin. Refer to
Figure 3 for details.
F1: Long press F1 for about 2 seconds to turn on/off the backlight; short press to turn
on/off 20 Ω compare function and LCD will show buzzer indicator, the buzzer will
alarm if the measured resistance is <20Ω.
F2: Press to turn on/off TEST LOCKED function. When it is necessary to take a long
-time measurement, press F2 to enable the function, lock indicator shows on LCD,
you then just need to press TEST down once, release it and the Tester will take
measurements continuously.
Press TEST again to stop the measurements. To disable the function, press F2 again
or turn the rotary switch to other functions.
F3: Press to zero the test leads. First short-circuit two test leads, and then long press
F3 to reset the display to 0.00Ω, “ZERO” will show on LCD, indicating the operation
completes.
Caution:
● To ensure an accurate test, please perform the zeroing before test
● Do not test on live objects
● Before the test starts, the Tester will automatically display the voltage between two
input terminals if this voltage is 30V, and TEST button will be inhibited.>
IX. Measuring Insulation Resistance (See Figure 4)
To measure insulation resistance:
(1) Discharge totally the tested circuits and keep them completely separated from the
power supply before test.
(2) Insert red lead or specific TEST-marked test lead into red input terminal and black
test lead to black terminal.
(3) Connect red and black alligators or test probes to the circuit under test.
(4) Turn the rotary switch to “Insulation” position and select proper test voltage, then
press TEST button to start.
Caution
● Make sure the test circuits are de-energized before measurement. Do not measure
any live electrical devices or lines.
● Before the test starts, the Tester will automatically display the voltage between two
input terminals if this voltage is 30V, and TEST button will be inhibited. >
● Do not measure with the battery cover opened.
● Do not short-circuit two test leads under high- voltage output status or measure insu
-lation resistance after the high-voltage has already been output.
Understanding F1-F4 Buttons:
F1: Long press F1 for about 2 seconds to turn on/off the backlight; short press to turn
on/off 2 MΩ compare function. The buzzer will alarm if the measured resistance is
<2MΩ.
F2: Press to turn on/off TEST LOCKED function. When it is necessary to take a long-
time measurement, press F2 to enable the function, lock indicator shows on LCD,
you then just need to press TEST down once, release it and the Tester will take
measurements continuously.
Press TEST again to stop the measurements. To disable the function, press F2 again
or turn the rotary switch to other functions.
X. Measuring Voltage/Frequency (See Figure 5)
To measure voltage/frequency:
1) Set the rotary switch to Volts
Connect as shown in Figure 5:

.
F1 F2 F3 F4
Buzzer and backlight
XI. Detecting Phase Sequence(See Figure 6)
Figure 6
Figure 7 Figure 8
L2
L3
Black green
red
Understanding F1-F4 Buttons:
F1 F2 F3 F4
Backlight InvalidInvalidInvalid
XI. Measuring Loop Impedance/Prospective Fault Current
(See Figure 7, 8)
1.Measuring Loop/Line
Impedance/RCD/Socket
Voltage
2.Measuring Loop Impedance/
Line (L-N) Impedance
Understanding F1-F4 Buttons:
F1 F2 F3 F4
Backlight InvalidInvalidInvalid
.
Caution
XIII. Measuring Line Impedance/Prospective Short Current
(See Figure 7, 8)
Understanding F1-F4 Buttons:
F1 F2 F3 F4
Not usedNot usedNot used
Backlight/L-N/L-PE
Caution
XIV. Taking Auto RCD Tests (See Figure 7)
F1 F2 F3 F4
Backlight AC/DC/time RCL I n
XV. Taking Regular RCD Tests (See Figure 7)
Understanding F1-F4 Buttons:
F1 F2 F3 F4
AC/DC/time I nNot used
Backlight/0 /180
1/2*I n
1*I n
2*I n(only for UT595)
5*I n
10mA 30mA 100 mA 300 mA 500Ma
Caution
XVI. Measuring RCD Trip Current (See Figure 7)
F1 F2 F3 F4
AC/DC/time I nNot used
Backlight/0 /180
10mA 30mA 100 mA 300 mA 500Ma
Full wave
Half wave
Caution
XVII. Replacing the Battery
Danger
Danger
XVIII. Maintenance & Repair
Cleaning the Casing:
●Clean the Tester surface with soft cloth or sponge dampened with little water.
●To avoid damage to the Tester, do not submerge it into the water.
●Dry the Tester before storing it if it is wet.
**END**
2) Insert red test lead into “Red” input terminal and black test lead into “Black” terminal.
3) Connect red & black alligator clips or probes firmly to tested circuits. The Tester will
automatically identify AC/DC voltage and show measured voltage and frequency
readings on the LCD.
Or connect as shown in Figure 7:
1) Insert three connectors of specified one-plug test leads to three input terminals of the
Tester (red to red, green to green, black to black).
2) Insert the plug of the test leads into the socket of test circuits, the Tester will automa
-tically identify AC/DC voltage and show measured voltage and frequency readings
on the LCD.
Understanding F1-F4 Buttons:
Invalid Invalid Invalid
F1: Long press F1 for 2 seconds to turn on/off the backlight.
F2, F3,F4: all are invalid. TEST is invalid too.
Caution
Caution
● Do not input voltage higher than 440V or 440Vrms. It may be possible to display the
voltage value, but it may pose hazard to the Tester.
● To avoid electric shock, please take extreme caution when working with high voltage.
● Remove the test leads away from tested circuits and disconnect them from the input
terminals of the Tester after completing the measurements.
● Do not measure with the battery cover opened.
To Detect Phase Sequence:
(1) Turn the rotary switch to Phase Rotation position.
(2) t o to o t o Insert three connec ors f three tes leadst in input terminals f the Tes er(red t red,
green to green, black to black).
(3) Then connect three test leads into three-phase AC system(black to L1, green to L2,
red to L3, refer to Figure 6 for details), after that, the Tester will indicate the phase
sequence and open phase result on LCD.
F1: Long press for 2 seconds to turn on/off the backlight.
F2, F3, F4: all are invalid; TEST button is invalid too.
● Do not input voltage higher than 440V or 440Vrms. It may be possible to display the
voltage value, but it may pose hazard to the Tester.
● To avoid electric shock, please take extreme caution when working with high voltage.
● Remove the test leads away from tested circuits and disconnect them from the input
terminals of the Tester after completing the measurements.
● Do not measure with the battery cover opened.
To measure Loop Impedance/ Prospective Fault Current:
(1) Turn the rotary switch to LOOP.
(2) Insert three connectors of one-plug test leads or three separate test leads into three
input terminals of the Tester (red to red, green to green, black to black).
(3) Plug the plug into domestic 220V socket or connect the test probes to the tested lines.
(4) Press TEST button to start.
F1: Long press F1 for 2 seconds to turn on/off the backlight.
F2, F3, F4: all are invalid.
● Please make sure domestic 220V in the power socket is normally supplied. If the soc
-ket is unable to be powered normally or de-energized, L-PE and L-N icons on lower
left part of LCD will flash simultaneously.
● Ensure the socket is properly grounded. If the socket has bad grounding or isn’t grou
-nded, L-PE and N-PE icons on lower left part of LCD will flash simultaneously.
● Ensure the neutral terminal of the socket is firmly connected. If the neutral terminal is
badly or not connected, L-N and N-PE icons on lower left part of LCD will flash simult
-aneously.
● Ensure live and neutral terminals of the power socket are not reversely connected
when measuring loop impedance/prospective fault current, otherwise L-PE, L-N and
N-PE icons on the lower left part of LCD will flash simultaneously.
● Please take extreme caution when making the measurement, for it is performed under
high-voltage status.
To measure Line Impedance/Prospective Short Current:
(1) Turn the rotary switch to NO-TRIP position;
(2) Insert three connectors of one-plug test leads or three separate test leads into three
input terminals of the Tester (red to red, green to green, black to black).(Refer to
Figure 6, 7, 8)
(3) P lug the plug in dome icto st 220 so ke or connec heV c t t t tes probest t to he es ed lines t t .
(4) Press TEST button to start.
F1: 1Long press F for 2 seconds to turn /o on ff the bac ligh hork t; s t pre wiss to s tch be tween
L-N and L-PE measurements.
F2, F3, F4: all are invalid.
● P se ke lea ma sure domes ic 220t V in he t power socket s i normally supplied he . If t soc t ke
is unable to be powered normally or de-energized, L-PE and L-N icons on lower left
part of LCD will flash simultaneously.
● Ensure the socke t is properly grounded he socke. If t t has bad grounding or isn’ groundedt ,
L-PE and N-PE icons on lower left part of LCD will flash simultaneously.
● Ensure the neutral terminal of the socket is firmly connected. If the neutral terminal is
badly or not connected, L-N and N-PE icons on lower left part of LCD will flash simult
-aneously.
● Ensure live and neu ralt terminals he of t power soc ke aret no re ert v sel onne ed wheny c ct
measuring line impedance/prospective short current, otherwise L-PE, L-N and N-PE
icons on the lower left part of LCD will flash simultaneously.
● Please take extreme caution when making the measurement, for it is performed under
high-voltage status.
To Test Auto i y:RCD mat call
(1) urn he T t ro ar swit y tch to AUTO posi iont ;
(2) nser hree onne or I t t c ct s of one-plug test lead ins to three inpu erminal het t s of t Tes ert
(red to red green, to green, blac blak to ck). f(Re er t Fo igure 7)
(3) lug he P t plug in to dome icst 220 socV ket.
(4) re P ss TEST button to start.
Tips:
Auto RCD Test is designed to measure rip ime t t s in one ime t just by sspre ing one bu ontt
down. The Tester will complete all RCD measurements before proceeding into next test.
All these test data will be saved in the Tester; pressing F3 can review all the data. RCD
measurements are taken in following order:
Understanding F1-F4 Buttons:
UT593: 1. 1/2*I n/0 UT595: 1. 1/2*I n/0 △ △
2. 1/2*I n/180 2. 1/2*I n/180△ △
3. 1*I n/0 3. 1*I n/0△ △
4. 1*I n/180 4. 1*I n/180 △ △
5. 5*I n/0 5. 2*I n/0△ △
6. 5*I n/180 6. 2*I n/0△ △
7. 5*I n/0△
8. 5*I n/180△
F1: Long press for 2 seconds to turn on/off the backlight.
F2: Press to toggle between RCD types and Timer mode.
RCD Types: AC and DC(full-and half-wave)
Timer: under this mode, press down TEST button and the Tester will count down
from 30s to 0s before enabling RCD test;
F3: Press to recall all saved data from the whole test;
F4: Press to select RCD test current.
Caution
● Please make sure domestic 220V in the power socket is normally supplied. If the so
-cket is unable to be powered normally or de-energized, L-PE and L-N icons on lower
left part of LCD will flash simultaneously.
● Ensure the socket is properly grounded. If the socket has bad grounding or isn’t grou
-nded, L-PE and N-PE icons on lower left part of LCD will flash simultaneously.
● Ensure the neutral terminal of the socket is firmly connected. If the neutral terminal is
badly or not connected, L-N and N-PE icons on lower left part of LCD will flash simult
-aneously.
● Ensure live and neutral terminals of the power socket are not reversely connected
when testing RCD, otherwise L-PE, L-N and N-PE icons on the lower left part of LCD
will flash simultaneously.
● Please take extreme caution when taking auto RCD tests, for it is performed under
high-voltage status
To take regular RCD test:
(1) Turn the rotary switch to1/2*I n(for UT595 only) or 5*I△△△n, 1*I n, 2*I △n position;
(2) Insert three connectors of one-plug test leads into three input terminals of the Tester
(red to red, green to green, black to black).(Refer to Figure 7)
(3) Plug the plug into domestic 220V socket.
(4) Press TEST button to start.
F1: Long press for 2 seconds to turn on/off the backlight; short press to toggle between
0 /180
F2: Press to toggle between RCD types and Timer mode.
RCD Types: AC and DC (full-and half-wave)
Timer: under this mode, press down TEST button and the Tester will count down
from 30s to 0s before enabling RCD test;
F3: invalid
F4: Press to select RCD rated test current, refer to rated options in following order:
Tips:
The leakage current will be different depending on the selected current multiplier. Refer
to the following table for detailed relationship.
● Please make sure domestic 220V in the power socket is normally supplied. If the so
-cket is unable to be powered normally or de-energized, L-PE and L-N icons on lower
left part of LCD will flash simultaneously.
● Ensure the socket is properly grounded. If the socket has bad grounding or isn’t grou
-nded, L-PE and N-PE icons on lower left part of LCD will flash simultaneously.
● Ensure the neutral terminal of the socket is firmly connected. If the neutral terminal is
badly or not connected, L-N and N-PE icons on lower left part of LCD will flash simul
-taneously.
● Ensure live and neutral terminals of the power socket are not reversely connected
when testing RCD, otherwise L-PE, L-N and N-PE icons on the lower left part of LCD
will flash simultaneously.
● Please take extreme caution when taking regular RCD tests, for it is performed under
high-voltage status
To measure trip current:
(1) Turn the rotary switch to ▲Ramp position.
(2) Insert three connectors of one-plug test leads into three input terminals of the Tester
(red to red, green to green, black to black).(Refer to Figure 7)
(3) Plug the plug into domestic 220V socket.
(4) Press TEST button to start.
Understanding F1-F4 Buttons:
F1: Long press for 2 seconds to turn on/off the backlight; short press to toggle between
0 /180
F2: Press to toggle between RCD types and Timer mode.
RCD Types: AC and DC (full-and half-wave)
Timer: under this mode, press down TEST button and the Tester will count down
from 30s to 0s before enabling RCD test;
F3: invalid
F4: Press to select RCD rated leakage test current, refer to rated options in following
order.
Tips:
The leakage current will be different depending on the selected waveform. Refer to the
following table for detailed relationship.
● Please make sure domestic 220V in the power socket is normally supplied. If the so
-c iket s unable to be powered normally or de-energized , L- and L-NPE ic r on ons lowe
left part of LCD will flash simultaneously.
● Ensure the socket is properly grounded. If the socket has bad grounding or isn’t gro
-unded, L-PE and N-PE icons on lower left part of LCD will flash simultaneously.
● Ensure the neutral terminal of the socket is firmly connected. If the neutral terminal
is badly or not connected, L-N and N-PE icons on lower left part of LCD will flash
simultaneously.
● Ensure live and neutral terminals of the power socket are not reversely connected
when testing RCD trip current, otherwise L-PE, L-N and N-PE icons on the lower left
part of LCD will flash simultaneously.
● Please take extreme caution when testing RCD trip current, for it is performed under
high-voltage status.
● To avoid electric shock, remove away all test leads from the Tester before replacing
the battery.
● Do not measure with the battery cover opened.
● Do not mix old and new batteries for use.
● When low battery indicator “ ” shows on LCD, please replace the battery timely.
To replace the battery, follow steps as below:
(1) Power off the Tester (set the rotary switch to OFF) and remove away the test leads.
(2) Unscrew the battery cover, remove the battery cover and replace the batteries with
8pcs new batteries.
(3) Screw up the battery and tighten up the screws.
Repair:
When it become necessary to calibrate or repair the Tester, please have it serviced by
qualified professional personnel or designated service center.
P/N: DATE:2018.12.26 REV.6110401108117X
Product specificaties
| Merk: | Uni-T |
| Categorie: | Meetapparatuur |
| Model: | UT595 |
Heb je hulp nodig?
Als je hulp nodig hebt met Uni-T UT595 stel dan hieronder een vraag en andere gebruikers zullen je antwoorden
Handleiding Meetapparatuur Uni-T

9 Juni 2025
1 Mei 2025

12 April 2025
5 April 2025

3 April 2025

3 April 2025

3 April 2025

3 April 2025

3 April 2025

3 April 2025
Handleiding Meetapparatuur
- VirtuFit
- Tektronix
- AREXX
- Autel
- HOZO Design
- Enda
- Beha-Amprobe
- Ermenrich
- Wago
- Laserliner
- DriveTest
- Soler And Palau
- Crowcon
- Delta Ohm
- Silverline
Nieuwste handleidingen voor Meetapparatuur
29 Juli 2025
29 Juli 2025
29 Juli 2025

29 Juli 2025
29 Juli 2025
29 Juli 2025
28 Juli 2025
28 Juli 2025
28 Juli 2025

28 Juli 2025