Turtle Beach Recon 500 Handleiding
Turtle Beach Headset Recon 500
Bekijk gratis de handleiding van Turtle Beach Recon 500 (33 pagina’s), behorend tot de categorie Headset. Deze gids werd als nuttig beoordeeld door 22 mensen en kreeg gemiddeld 4.9 sterren uit 8 reviews. Heb je een vraag over Turtle Beach Recon 500 of wil je andere gebruikers van dit product iets vragen? Stel een vraag
Pagina 1/33
CONTENTS
CONTENU DE
LA BOÎTE
A
Recon 500 Headset
Casque Recon 500
B
Microphone
Microphone
EN
1. Connect your wired headset to the aux port in the DualSense controller.
Once you do this, the microphone function will automatically switch from
the controller’s integrated mic to your headset.
2. Go to Settings >> Sound >> Audio Output >> Output Device.
• Select headset connected to controller for output device.
• Set Output to Headphones to All Audio*.
3. Go to Settings >> Sound >> Volume >> Master volume >> Headphones.
• Set Volume Control (headphones) level to maximum.
4. Adjust your microphone levels by going to Settings >> Sound >>
Microphone >> Adjust Mic Level >> Microphone level.
*As desired, Go to Adjust 3D Audio Profile and enable the 3D Audio function
to enhance the audio through your headset.
FR
1. Connectez votre casque filaire au port auxiliaire de la manette DualSense.
La fonction microphone passera alors automatiquement du microphone
intégré dans la manette à celui de votre casque.
2. Allez dans Options >> Son >> Sortie audio >> Périphérique de sortie.
• Sélectionnez le casque connecté à votre manette en tant que
périphérique de sortie.
• Réglez Sortie vers le casque sur Tout audio*.
3. Allez dans Options >> Son >> Volume >> Volume principal >> Casque
• Mettez le réglage du volume (casque) au maximum
4. Ajustez les niveaux de votre microphone en allant dans Options >> Son >>
Microphone >> Ajuster niveau microphone >> Niveau microphone
*Si vous le souhaitez. Allez dans Ajuster profil audio 3D et activez la fonction
Audio 3D pour améliorer le son de votre casque.
ES
1. Conecta el cable de tus auriculares al puerto auxiliar del mando DualSense.
Al conectarlo, la función del micrófono cambiará automáticamente del
micrófono integrado en el mando a tus auriculares.
2. Ve a Configuración >> Sonido >> Salida de audio >> Dispositivo de salida.
• Selecciona los auriculares conectados al mando como dispositivo de salida.
• Establece los auriculares como salida para todo el sonido*.
3. Ve a Configuración >> Sonido >> Volumen >> Volumen principal >> Auriculares.
• Establece el nivel de control del volumen (auriculares) al máximo.
4. Ajusta los niveles de tu micrófono desde Configuración >> Sonido >>
Micrófono >> Ajustar nivel del micrófono >> Nivel del micrófono.
*Si lo deseas, puedes ir a Ajustar perfil del sonido 3D y activar la función de
sonido 3D para mejorar el audio de los auriculares.
IT
1. Collega il cavo delle cuffie alla porta ausiliaria del controller DualSense.
Dopodiché, la funzione microfono passerà automaticamente dal
microfono integrato del controller a quello delle cuffie.
2. Vai a Impostazioni >> Suono >> Uscita audio >> Dispositivo di uscita.
• Seleziona le cuffie collegate al controller come dispositivo di uscita.
• Imposta le cuffie come dispositivo di uscita su Tutto l'audio*.
3. Vai a Impostazioni >> Suono >> Volume >> Volume principale >> Cuffie.
• Imposta Regolazione volume (cuffie) al livello massimo.
4. Regola i livelli del microfono in Impostazioni >> Suono >> Microfono >>
Regola livello microfono >> Livello microfono.
*Se desideri, vai su Regola profilo audio 3D e attiva la funzione audio 3D per
potenziare l'audio delle tue cuffie.
PT
1. Liga os teus auscultadores com fios à porta aux no comando DualSense.
Em seguida, a função microfone passará automaticamente do microfone
integrado no comando para os auscultadores.
2. Vai a Definições >> Som >> Saída de Áudio >> Dispositivo de Saída
• Seleciona os auscultadores ligados ao comando como dispositivo de saída
• Configura Saída para auscultadores para Todo o áudio*
3. Vai a Definições >> Som >> Volume principal >> Auscultadores
• Define o nível de controlo do volume (auscultadores) para o máximo
4. Ajusta os níveis do microfone em Definições >> Som >> Microfone >>
Ajustar nível do microfone >> Nível do microfone
*Conforme desejado, vai a Ajustar perfil de Áudio 3D e ativa a função de Áudio
3D para melhorar o áudio nos auscultadores.
NL
1. Sluit je bekabelde headset aan op de aux-poort van de DualSense-controller.
De microfoonfunctie schakelt vervolgens automatisch over van de
ingebouwde microfoon van de controller naar de headset.
2. Ga naar Instellingen >> Geluid >> Audio-uitvoer >> Uitvoerapparaat.
• Selecteer als uitvoerapparaat de headset die op de controller is aangesloten.
• Stel Uitvoer naar hoofdtelefoon in op Alle audio*.
3. Ga naar Instellingen >> Geluid >> Volume >> Hoofdvolume >> Hoofdtelefoon.
• Stel Volumebediening (hoofdtelefoon) in op de maximale waarde.
4. Je kunt de microfoonniveaus aanpassen door naar Instellingen >> Geluid >>
Microfoon >> Microfoonniveau aanpassen >> Microfoonniveau te gaan.
*Indien gewenst kun je naar 3D Audio-profiel aanpassen gaan en de 3D
Audio-functie inschakelen om het geluid van je headset te verbeteren.
DE
1. Schließe dein kabelgebundenes Headset am AUX-Eingang des
DualSense-Controllers an.
Danach wird automatisch das Mikrofon deines Headsets verwendet, statt
des integrierten Mikrofons des Controllers.
2. Gehe zu Einstellungen >> Sound >> Audioausgabe >> Ausgabegerät
• Wähle das angeschlossene Headset als Ausgabegerät
• Stelle ein, dass alle Sounds über die Kopfhörer ausgegeben werden*
3. Gehe zu Einstellungen >> Sound >> Lautstärke >> Gesamtlautstärke >> Kopfhörer
• Stelle die Lautstärkenregelung (Kopfhörer) auf die höchste Stufe
4. Passe deinen Mikrofonpegel in Einstellungen >> Sound >> Mikrofon >>
Mikrofonpegel anpassen >> Mikrofonpegel an
*Wenn gewünscht, gehe auf „3D-Audioprofil anpassen“ und aktiviere die
3D-Audiofunktion, um den Sound deines Headsets zu verstärken.
SE
1. Anslut ditt headset till ljudingången på DualSense-handkontrollen.
När du har gjort detta byter konsolen automatiskt mikrofon från
handkontrollens inbyggda till den på headsetet.
2. Gå till Inställningar >> Ljud och bildskärm >> Inställningar för ljudutdata >>
Utgångsenhet.
• Välj det headset som är anslutet till handkontrollen.
• Välj Allt ljud* för Utdata till hörlurar.
3. Gå till Inställningar >> Ljud och bildskärm >> Volym >> Huvudvolym >> Hörlurar.
• Ställ in volymkontroll (hörlurar) till max.
4. Justera mikrofonnivån genom att gå till Inställningar >> Ljud och
bildskärm >> Mikrofon >> Justera mikrofonnivå >> Mikrofonnivå.
*Efter personlig preferens. Gå till Justera profil för 3D-ljud och aktivera
3D-ljud för att förbättra ljudet i ditt headset.
DK
1. Sæt dit headset-kabel til aux-porten i din DualSense-controller.
Nu skifter mikrofonen automatisk fra controllerens indbyggede
mikrofon til headsettets.
2. Gå til Indstillinger >> Lyd og skærm >> Indstillinger for audio-output >>
Outputenhed
• Vælg dit headset forbundet til controlleren som udgangsenhed
• Sæt hovedtelefonudgangen til "Al lyd"*
3. Gå til Indstillinger >> Lyd og skærm >> Lydstyrke >> Overordnet
lydstyrke >> Hovedtelefoner
• Indstil "Lydstyrkekontrol (hovedtelefoner)" til maksimum
4. Du kan justere mikrofonens niveauer i Indstillinger >> Lyd og skærm >>
Mikrofon >> Juster mikrofonniveau >> Mikrofonniveau
*Du kan gå ind under "Juster 3D Audio-profil" og slå 3D Audio til for at gøre
lyden endnu bedre i dit headset.
Note: If your PC uses separate Green/Pink connectors for audio
you will need a PC Splitter Cable. This adapter is available online
at turtlebeach.com
Remarque : Un câble Y est nécessaire pour les PC dotés de
sorties audio rose et verte. Ce câble est également en vente sur
turtlebeach.com
Chat available for games that support in-game chat capability.
Chat en jeu disponible pour les jeux disposant de cette option.
*Nintendo Switch™ compatible in
handheld mode only
*Compatible Nintendo Switch™
uniquement en mode portable
Not/ eRemarque :
Declaration of Conformity
Marking by this symbol:
indicates compliance with the Essential Requirements of the
EMC Directive of the European Union (2014/30/EU). This
equipment meets the following conformance standards:
Safety:
EN 60950-1: 2006 + A11: 2009 + A1: 2010 + A12: 2011 + A2: 2013
(T-Mark License),
IEC 60950-1: 2005 (2nd Ed.) + Am 1: 2009 + Am 2: 2013
(CB Scheme Certificate),
EN 62368-1: 2014 + A11 (T-Mark License),
IEC 62368-1: 2014 (CB Scheme Certificate),
EN 50332-1: 2013, EN 50332-2: 2013, EN 71-3: 2013
Additional licenses issued for specific countries available on request.
Emissions:
EN 55032: 2015, CISPR 32: 2015
Immunity:
EN 55024: 2010, CISPR 24: 2010
EN 61000-4-2: 2009, EN 61000-4-3: 2006 + A1: 2008 + A2: 2010,
EN 61000-4-8: 2010
Environmental:
Low Voltage Directive 2014/35/EU, REACH 2006/1907/EC,
RoHS 2015/863 amending Annex II to Directive 2011/65/EU,
WEEE 2012/19/EU, Packaging 94/62/EC, Toys Safety Directive
2009/48/EC
The products are licensed, as required, for additional country
specific standards for the International Marketplace.
Additional issued licenses available upon request.
Regulatory Compliance Statements for the EAR FORCE RECON 500
Federal Communications Commission (FCC) Compliance Notices
Class B Interference Statement
This equipment has been tested and found to comply with the limits for a Class B digital device, pursuant to Part 15, Subpart B of the
FCC Rules. These limits are designed to provide reasonable protection against harmful interference in a residential installation. This
equipment generates, uses, and can radiate radio frequency energy and, if not installed and used in accordance with the instructions,
may cause harmful interference to radio communications. However, there is no guarantee that interference will not occur in a
particular installation. If this equipment does cause harmful interference to radio or television reception, which can be determined by
turning the equipment off and on, the user is encouraged to try to correct the interference by one or more of the following measures:
• Reorient or relocate the receiving antenna.
• Increase the separation between the equipment and receiver.
• Connect the equipment into an outlet on a circuit different from that to which the receiver is connected.
• Consult the dealer or an experienced radio/TV technician for help.
FCC Caution:
This device complies with Part 15 of the FCC Rules. Operation is subject to the following two conditions: (1) This device may not cause
harmful interference, and (2) this device must accept any interference received, including interference that may cause undesired operation.
This product is compliant with the Consumer Product Safety Improvement Act of 2008, Public Law 110-314 (CPSIA).
Canadian ICES Statements
Canadian Department of Communications Radio Interference Regulations
This digital apparatus does not exceed the Class B limits for radio-noise emissions from a digital apparatus as set out in the Radio
Interference Regulations of the Canadian Department of Communications. This Class B digital apparatus complies with Canadian ICES-003.
Règlement sur le brouillage radioélectrique du ministère des Communications
Cet appareil numérique respecte les limites de bruits radioélectriques visant les appareils numériques de classe B prescrites
dans le Règlement sur le brouillage radioélectrique du ministère des Communications du Canada. Cet appareil numérique de la
Classe B est conforme à la norme NMB-003 du Canada.
European Union and European Fair Trade Association (EFTA) Regulatory Compliance
This equipment may be operated in the countries that comprise the member countries of the European Union and the European
Fair Trade Association. These countries, listed below, are referred to as The European Community throughout this document:
AUSTRIA, BELGIUM, BULGARIA, CYPRUS, CZECH REPUBLIC, DENMARK, ESTONIA, FINLAND, FRANCE, GERMANY, GREECE,
HUNGARY, IRELAND, ITALY, LATVIA, LITHUANIA, LUXEMBOURG, MALTA, NETHERLANDS, POLAND, PORTUGAL, ROMANIA,
SLOVAKIA, SLOVENIA, SPAIN, SWEDEN, UNITED KINGDOM, ICELAND, LICHTENSTEIN, NORWAY, SWITZERLAND
This symbol on the product or its packaging indicates that this product must not be disposed of with your other household
waste. Instead, it is your responsibility to dispose of your waste equipment by handing it over to a designated collection
point for the recycling of waste electrical and electronic equipment. The separate collection and recycling of your waste
equipment at the time of disposal will help conserve natural resources and ensure that it is recycled in a manner that
protects human health and the environment. For more information about where you can drop off your waste for recycling,
please contact your local authority, or where you purchased your product.
Please visit the following URL for a complete copy of the Declaration of Conformity:
http://www.turtlebeach.com/homologation
Turtle Beach Europe Ltd is obligated as a producer with a main activity of selling under The Producer Responsibility Obligations
(Packaging Waste) Regulations 2007. To fulfil our obligation we are registered with Comply Direct and their Recycling Room.
Here you will find advice and information on packaging waste management, recycling symbols and the waste hierarchy principles
of reduce, reuse and recycle.
https://www.complydirect.com/the-recycling-room/
Japan Compliance Statement
This is a Class B product based on the standard of the VCCI Council. If this is used near a radio or television receiver in a domestic
environment, it may cause radio interference. Install and use the equipment according to the instruction manual.
For more information on Xbox Surround Sound visit:
Pour plus d’informations sur l’effet Surround Xbox, rendez-vous sur:
turtlebeach.com/sonic
VOLUME SETUP | CONFIGURATION DU VOLUMESURROUND SOUND SETUP (AVAILABLE ONLY ON XBOX SERIES X|S & XBOX ONE)
CONFIGURATION DU SON SURROUND
(DISPONIBLE UNIQUEMENT SUR XBOX SERIES X|S & XBOX ONE)
FR
1. Appuyez sur le bouton Xbox sur votre manette.
2. Appuyez sur la gâchette droite ou défilez jusqu'aux boutons
en bas de l'onglet Xbox et sélectionnez le bouton écouteur. ( )
3. Réglez le volume du casque sur le maximum.
4. Réglez le chat du casque sur le paramètre central.
5. Réglez le retour du microphone sur le niveau qui vous convient.
Cette option n'est pas toujours visible (avant, l'option audio n'apparaissait
que si vous aviez un casque connecté à votre manette), mais si aucun
casque n'est connecté, les options seront toutes grisées.
DE
1. Drücke die Xbox-Taste auf deinem Controller
2. Drücke den rechten Trigger oder wähle aus den Xbox-Menü
unten die Lautsprecher-Schaltfläche aus. ( )
3. Stelle die Lautstärke des Headsets auf das Maximum.
4. Stelle den Headset-Chat-Mixer auf die mittlere Einstellung.
5. Stelle das Mikrofon-Monitoring auf deine bevorzugte Einstellung.
Diese Einstellung ist nicht immer verfügbar (zuvor erschienen die
Audio-Einstellungen nur, wenn ein Headset am Controller angeschlossen war),
wenn aber kein Headset angeschlossen ist, sind alle Optionen ausgegraut.
PT
1. Prime o Botão Xbox no comando
2. Prime o Acionador direito ou desliza para os botões no fundo do
separador Xbox e seleciona o botão Auscultadores ( )
3. Configura o Volume dos auscultadores para o máximo
4. Coloca a Barra de mistura dos auscultadores no centro
5. Configura a monitorização do microfone no teu nível preferido
Esta opção não está sempre visível (antes a opção de áudio apenas aparecia
se tivesses uns auscultadores ligados ao teu comando), mas se não houver
auscultadores ligados as opções aparecerão em cinzento.
DK
1. Tryk på Xbox-knappen på din controller
2. Tryk på højre udløser, og gå ned til knapperne i bunden af
Xbox-fanen for at vælge højtalerknappen. ( )
3. Indstil dit headsets lydstyrke til maksimum
4. Vælg den midterste indstilling på din chat-mixer til hovedtelefoner
5. Vælg niveau for mikrofonmonitor
Dette er ikke altid synligt (tidligere kunne lydindstillinger kun ses, hvis dit
headset var forbundet til controlleren), men hvis dit headset ikke er
forbundet, er indstillingerne ikke valgbare.
EN
1. Press the Xbox Button on your controller.
2. Press Right Trigger or scroll to the buttons at the bottom
of the Xbox tab and select the Speaker button. ( )
3. Set Headset Volume to maximum.
4. Set Headset Chat Mixer to the middle setting.
5. Set Mic Monitoring to your preferred level.
This option is not always visible (before the Audio option would only appear
if you had a headset connected to your controller), but if no headset
is connected the options will all be grayed out.
ES
1. Pulsa el botón Xbox en tu mando.
2. Pulsa el gatillo derecho o desliza hasta llegar a los botones del
final de la pestaña Xbox y selecciona el botón del altavoz. ( )
3. Ajusta el volumen de los auriculares al máximo.
4. Ajusta el mezclador de chat de los auriculares a la mitad.
5. Ajusta el monitor del micrófono al nivel deseado.
Esta opción no siempre es visible. Antes, la opción Sonido solo aparecía si los
auriculares estaban conectados al mando, pero si los auriculares no están
conectados, las opciones no estarán disponibles.
IT
1. Premi il pulsante Xbox sul controller.
2. Premi il pulsante dorsale destro oppure scorri in basso fino a
trovare i pulsanti nella scheda Xbox e seleziona il pulsante
Altoparlante. ( )
3. Imposta il volume delle cuffie al massimo.
4. Imposta il mixer della chat delle cuffie a metà livello.
5. Imposta il controllo microfono al livello che preferisci.
Questa opzione non è sempre visibile (prima l'opzione Audio appariva solo
se le cuffie erano collegate al controller). Se le cuffie non sono collegate,
le opzioni non saranno selezionabili.
SE
1. Tryck på Xbox-knappen på handkontrollen.
2. Tryck på höger avtryckare eller gå längst ner i Xbox-fliken och
tryck på högtalarknappen. ( )
3. Ställ in headsetvolymen på max.
4. Ställ in chattmixern på mittinställningen.
5. Ställ in den mikrofonnivå du vill ha.
Det här alternativet syns inte alltid (tidigare dök ljudalternativet bara upp om
du hade kopplat ett headset till din handkontroll), men om inget headset är
anslutet är inga alternativ tillgängliga.
NL
1. Druk op de Xbox-knop op je controller.
2. Druk op de rechter-trigger of scrol naar de knoppen aan de
onderkant van het Xbox-tabblad en selecteer de knop
Luidspreker. ( )
3. Stel Headsetvolume in op de maximale waarde.
4. Stel Headsetchatmixer in op de middelste instelling.
5. Stel Microfoonbewaking in op het gewenste niveau.
Deze optie is niet altijd zichtbaar (eerder werd de optie Geluid alleen
weergegeven als er een headset op je controller was aangesloten),
maar als er geen headset is aangesloten, zijn alle opties uitgeschakeld.
Le casque Recon 500 nécessite la manette Xbox One avec 3,5mm casque jack. Pour toute utilisation avec la
manette Xbox One d'origine, l'adaptateur audio pour casque Ear Force est nécessaire. Disponible sur
turtlebeach.com.
The Recon 500 requires the Xbox One Controller with 3.5mm headset jack.Purchase the Ear Force Headset
Audio Controller from for use with the original Xbox One Controller.turtlebeach.com
Note/ Remarque :
FR
1. Appuyez sur le bouton Xbox sur votre manette.
2. Allez dans l'onglet Profil & Sytème. ( )
3. Sélectionnez Options >> Général >> Volume et sortie audio.
4. Réglez le type de casque dans la colonne Son du casque sur
Windows Sonic pour casque.
DE
1. Drücke die Xbox-Taste auf deinem Controller
2. Gehe zum Reiter „Profil & System“ ( )
3. Wähle Einstellungen >> Allgemein >> Lautstärke & Audioausgabe
4. Stelle unter Headset-Audio das Headset-Format auf Windows Sonic
PT
1. Prime o Botão Xbox no comando
2. Vai para o separador Perfil e Sistema ( )
3. Selecionar Definições >> Geral >> Saída de Volume e Áudio
4. Configura o formato dos Auscultadores na coluna de áudio dos
Auscultadores para Windows Sonic para Auscultadores
DK
1. Tryk på Xbox-knappen på din controller
2. Gå ind under fanen "Profil og system" ( )
3. Vælg Indstilinger >> Generelt >> Lydstyrke og lydoutput
4. Indstil headset-formatet under "Lyd i hovedtelefoner" til
Windows Sonic til hovedtelefoner
EN
1. Press the Xbox Button on your controller.
2. Go to the Profile & System Tab. ( )
3. Select Settings >> General >> Volume & Audio Output.
4. Set Headset format under the Headset audio column to
Windows Sonic for Headphones.
ES
1. Pulsa el botón Xbox en tu mando.
2. Ve a Perfil y después a la pestaña Sistema. ( )
3. Selecciona Configuración >> General >> Volumen y Salida de audio.
4. En la columna Sonido de los auriculares, selecciona Windows
Sonic para auriculares como formato de los auriculares.
IT
1. Premi il pulsante Xbox sul controller.
2. Vai alla scheda Profilo e sistema. ( )
3. Seleziona Impostazioni >> Generale >> Volume e uscita audio.
4. Imposta il formato delle cuffie nella colonna Audio cuffie su
Windows Sonic per cuffie.
SE
1. Tryck på Xbox-knappen på handkontrollen.
2. Gå till fliken för profiler och system. ( )
3. Välj Inställningar >> Allmänt >> Volym och ljudutdata
4. Välj Windows Sonic for Headphones under headsetkolumnen.
NL
1. Druk op de Xbox-knop op je controller.
2. Ga naar het tabblad Profiel en systeem. ( )
3. Selecteer Instellingen >> Algemeen >> Volume- en audio-uitvoer.
4. Stel Headsetindeling in de kolom Headsetgeluid in op Windows
Sonic voor hoofdtelefoon.
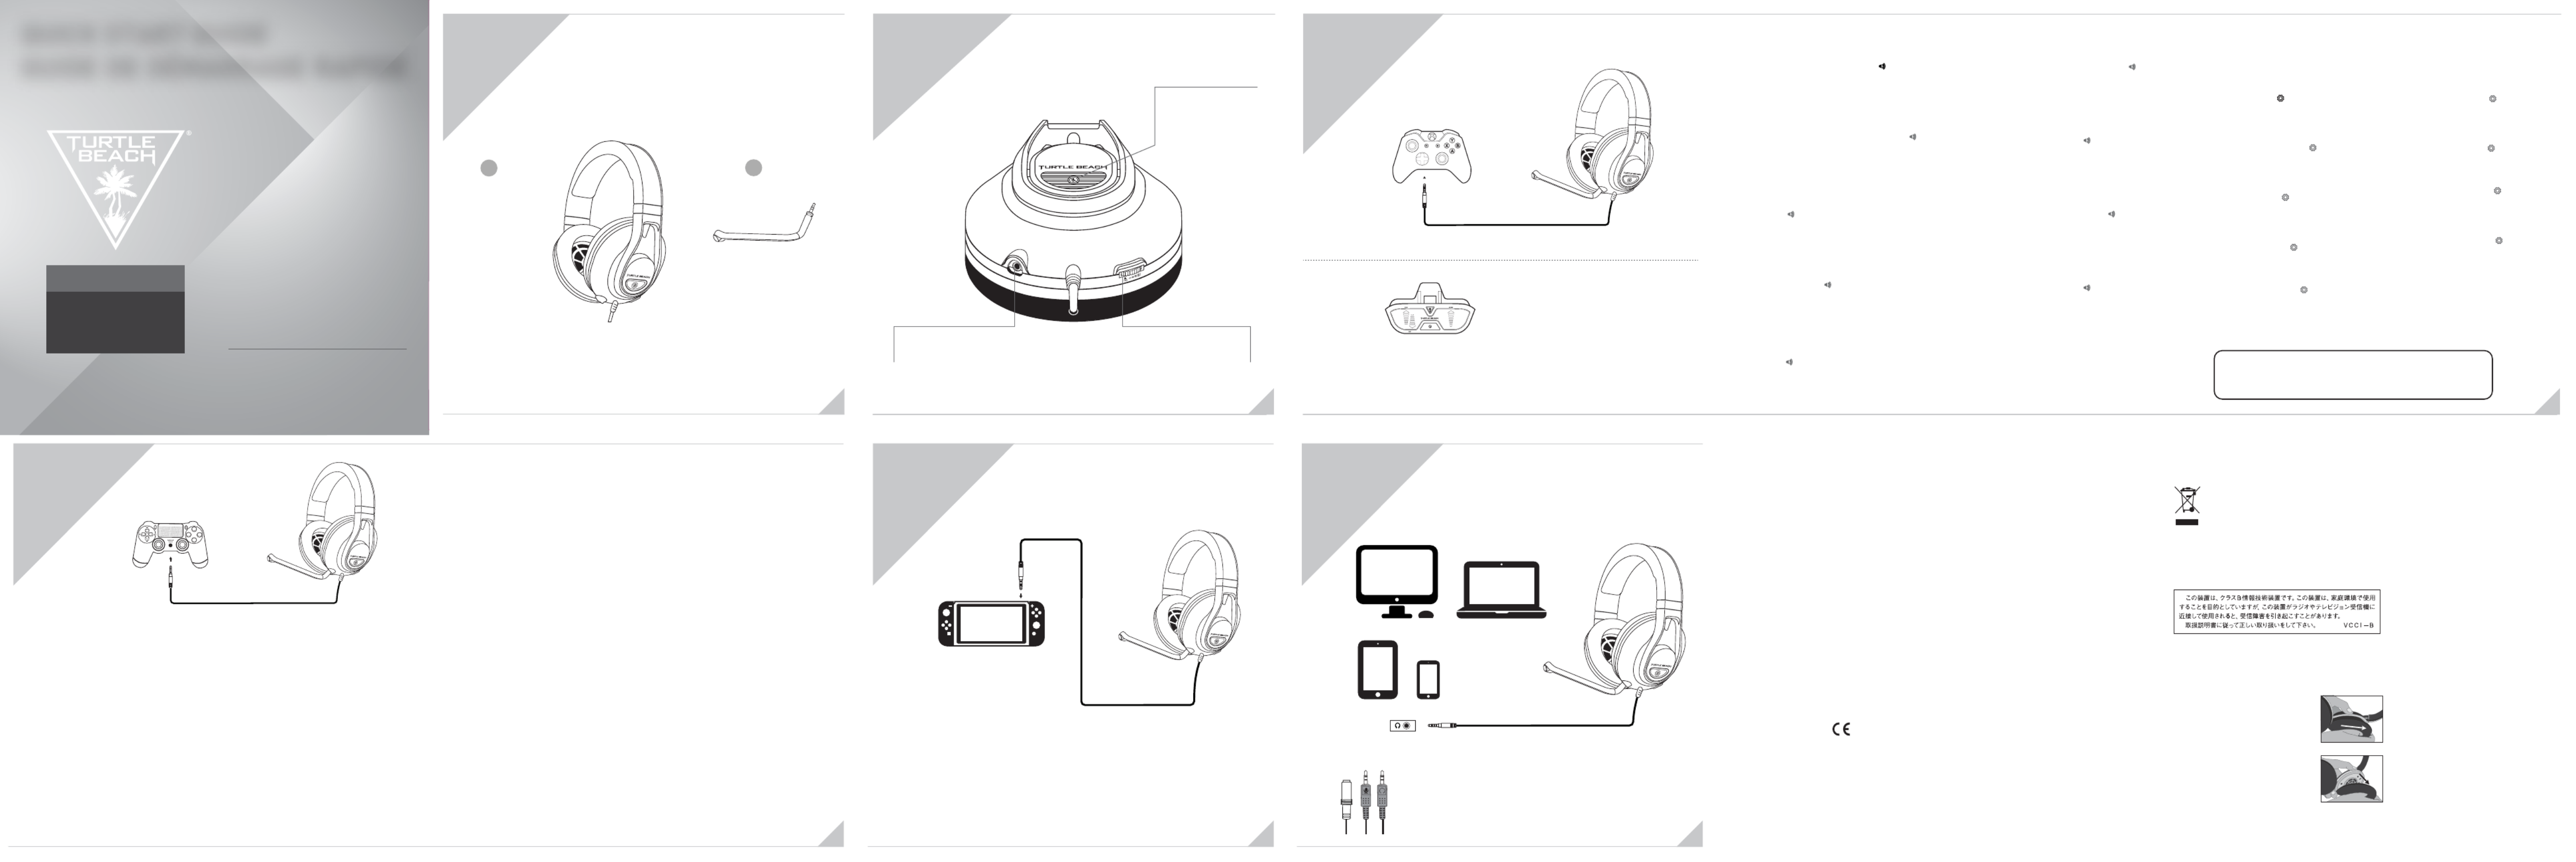
HEADSET CONTROLS
COMMANDES
SUR CASQUE
Microphone Jack
Prise jack microphoneMaster Volume Dial
Molette de volume principal
Microphone Mute Button
Bouton pour désactiver
le microphone
SETUP FOR
XBOX
CONFIGURATION
POUR
XBOX
Not seeing what you're looking for here?
Visit turtlebeach.com/support for the
latest Tech Support information.
Vous n'avez pas trouvé ce que vous cherchiez?
Rendez-vous sur pour turtlebeach.com/support
consulter les dernières informations de
l'assistance technique.
SETUP FOR
PLAYS ONTATI
®
CONFIGURATION
POUR
PLAYS ONTATI
®
SETUP FOR
NINTENDO SWITCH
™
CONFIGURATION
POUR
NINTENDO
SWITCH
™
SETUP FOR
PC/MAC
®
& MOBILE
CONFIGURATION
POUR
PC/MAC
®
&
MOBILE
To access the rating label:
Pour accéder à l'étiquette:
2. Once you’ve released the cloth from the lip on
top, pull the ear pad straight back and it should
slip right off.
2. Une fois le haut du tissu dégagé, tirez le
coussinet vers vous pour le retirer facilement.
1. Remove the left ear pad by pulling the ear pad
straight up using your thumb.
1. Retirez le coussinet gauche en le tirant vers le
haut à l'aide de votre pouce.
To replace the ear pad, follow the same process in reverse.
Pour remettre le coussinet en place, veuillez suivre la
procédure inverse.
QUICK START GUIDE
GUIDE DE E DÉMARRAGRAPIDE
READ BEFORUSINGE
IMPORTANT
À LIRE
LIRAVANUTILISATIONE T
tu tlreh.mbeacco/support
Model: Recon 500
Any questions?Des questions ?
R E C O N™
500
Product specificaties
| Merk: | Turtle Beach |
| Categorie: | Headset |
| Model: | Recon 500 |
| Kleur van het product: | Wit |
| Gewicht: | 640 g |
| Breedte: | 93.3 mm |
| Diepte: | 39.7 mm |
| Hoogte: | 79.5 mm |
| Snoerlengte: | 1.3 m |
| Gewicht verpakking: | 700 g |
| Breedte verpakking: | 172 mm |
| Diepte verpakking: | 102.4 mm |
| Hoogte verpakking: | 86.6 mm |
| Type verpakking: | Doos |
| Connectiviteitstechnologie: | Bedraad |
| Snelstartgids: | Ja |
| Land van herkomst: | China |
| Volumeregeling: | Draaiknop |
| Materiaal: | Traagschuim |
| Aantal: | 1 |
| Draagwijze: | Hoofdband |
| Aanbevolen gebruik: | Gamen |
| Headset type: | Stereofonisch |
| Positie speakers koptelefoon: | Circumaural |
| Frequentiebereik koptelefoon: | 20 - 20000 Hz |
| 3,5mm-connector: | Ja |
| Microfoontype: | Boom |
| Bedieningstoetsen: | Volume +,Volume - |
| Diameter van de luidspreker: | 60 mm |
| Soort magneet: | Neodymium |
| Microphone direction type: | Unidirectioneel |
| Aanbevolen geslacht: | Jongen/meisje |
| Microfoonaansluiting: | 3,5 mm |
| Type product: | Headset |
| Code geharmoniseerd systeem (HS): | 85183000 |
| Commodity Classification Automated Tracking System (CCATS): | 9504500000 |
| Afneembare microfoon: | Ja |
Heb je hulp nodig?
Als je hulp nodig hebt met Turtle Beach Recon 500 stel dan hieronder een vraag en andere gebruikers zullen je antwoorden
Handleiding Headset Turtle Beach

5 Juli 2025
5 Juli 2025
5 Juli 2025
20 Februari 2025
14 Mei 2023
11 Mei 2023
9 Mei 2023
7 Mei 2023
5 Mei 2023
3 Mei 2023
Handleiding Headset
Nieuwste handleidingen voor Headset
22 Juni 2026
16 Juni 2026
16 Juni 2026
3 Juni 2026
31 Mei 2026
29 Mei 2026
28 Mei 2026
28 Mei 2026
27 Mei 2026
27 Mei 2026