Trek Sonic 2.0 Handleiding

Trek Fietscomputer Sonic 2.0

Lees hieronder de đź“– handleiding in het Nederlandse voor Trek Sonic 2.0 (6 pagina's) in de categorie Fietscomputer. Deze handleiding was nuttig voor 18 personen en werd door 2 gebruikers gemiddeld met 4.5 sterren beoordeeld

Pagina 1/6
Trek Sonic 2.0
Cycling Computer Owners Manual
Congratulations and thank you for purchasing your Trek Cycling Computer.
Before operation please read this instruction manual carefully and retain it for
future reference. We recommend setting the speed scale and wheel
circumference before installing the computer.
Precautions
Remember to watch the road or trail while riding. Watching your bicycle
computer makes it difficult to see upcoming obstacles. Awareness of potential
road, trail or traffic problems should be your main concern.
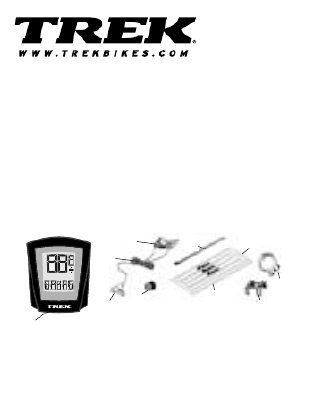
Main Unit/Accessories
Contents:
1. Main Unit
2. Bracket
3. Wire
4. Wheel Sensor
5. Magnet
6. Wire Securing Tape
7. Zip Tie
8. Bracket Rubber Pad
9. Mounting Clamp
10.Rubber Pad for Clamp
Page 1
1
2
3
4
5
6
7
8
9
10
Table 1. Setting values reference table
Preparation - Must be completed before operation
1. Measure the wheel circumference before setup
Refer to fig. 1 (25.4 mm equals 1 inch) or Table 1 to get the wheel
circumference in millimeters. Confirm and note this number in the manual
for later use here:__________
2. Installing/Replacing the battery.
Remove the battery cover by using a narrow flat blade
or similar opener as illustrated in fig. 2. Insert a new
battery (3v) CR2032, position the (+) pole upward as
illustrated. Place the battery properly into the case and
close the cover securely. After the battery is installed
speed scale and wheel size can be set.
3. Setting Speed Scale Choose KM for Kilometers
or MI for Miles.
After installing the battery, all displays will be
illuminated, then “SEL km” will remain on the screen
as in fig 3. Press either the Left (L) or Right (R)
Page 2
Wheel/Tire Size Wheel size Setting Wheel/Tire Size Wheel size Setting
16” 1300 700 X 20C 2074
20” X 1.75” 1600 700 X 23C 2085
24” X 1.95” 1920 700 X 25C 2114
26” X 1” 1950 700 X 28C 2124
650 X 20C 1945 700 X 32C 2155
650 X 23C 1990 700 X 35C 2175
26” X 1.5” 2030 700 X 38C 2180
26” X 1.9” 2055 700 X 40C 2190
26” X 2.0” 2074 700 X 1-1/4” 2160
26” X 2.2” 2114
Measure the distance which
is your circumference
First
Point
Second
Point
button to switch between miles
fig 2
fig 3
either side of the stem. Or use
b. Review wheel-circumference value. Go to (ODO) Odometer function,
press both L & R buttons at same time to review display wheel-
circumference value ( will last for 3 seconds) when needed.
c. Bike 1 or 2 selecting & resetting the wheel-circumference value
When you are in wheel-circumference value review mode, press L or R
button to select bike 1 or 2. For wheel-circumference resetting, press L & R
at the same time again until the last two digits blink. Repeat steps as
above ( point 4) to reset the wheel circumference as your bike. This
convenient design is handy for switching between different size bike tires.
5. Setting clock time
Under any display mode except Stopwatch, press R button for 1 second. Clock
time displayed. Repress either L or R button to return to “Odometer (ODO)”
mode. Follow step 2 to complete setting clock time and 12/24 hour alternate.
a. 12/24 hours alternative.
When clock is displayed, press both L & R buttons at the same time. Clock
will blink then press L or R button to switch between 12 hours and 24
hours. To reset clock, press L & R at the same time ( as following b.); after
3 seconds, clock will stop blinking automatically.
b. Resetting clock time
After choosing 12 or 24 hours, press L & R at the same
time, minutes “MM” will blink (fig. 5). Advance them
rapidly by holding the R button, or one at a time by
pressing the R button (to go backward hold or press
the L button). At the correct number press both L & R
buttons to confirm. Follow the same method to adjust hour “HH” to
complete the whole setting. Press R button to move to other display
modes after clock is set.
Installation
1. Use the attached rubber pad between the bracket and handlebar to
provide a secure fit.
2. Slide the zip tie into bracket, position the bracket to the handlebar on
Page 4
fig 5


Product specificaties

Merk: Trek
Categorie: Fietscomputer
Model: Sonic 2.0

Heb je hulp nodig?

Als je hulp nodig hebt met Trek Sonic 2.0 stel dan hieronder een vraag en andere gebruikers zullen je antwoorden


Handleiding Fietscomputer Trek

Handleiding Fietscomputer

Nieuwste handleidingen voor Fietscomputer